一:实验环境
主nginx负载均衡器:10.192.203.201 (通过keepalived配置了VIP:10.192.203.106供外使用)
副nginx负载均衡器:10.192.203.102(通过keepalived配置了VIP:10.192.203.106供外使用)
后端代理的web服务器:
10.192.203.201:81
10.192.203.102:81
--由于是在自己虚拟机里实验的,所以这里一共使用了两台服务器。Nginx服务器最好能和web服务器分离。
二:实验步骤
2.1 安装web服务器
略
2.2 安装Nginx
在两台服务器上分别安装nginx,实验步骤参考:
http://blog.csdn.net/yabingshi_tech/article/details/47416787
2.3 配置nginx
#代理两台web服务器
修改两台nginx服务器配置文件:
vi /usr/local/nginx/conf/nginx.conf
修改前:
修改后(添加ustream……,修改server里的location /部分):
注意:proxy_pass http://webservers的webservers需要和upstream 后的内容保持一致。
重新加载配置文件(可以不用重启nginx):
/usr/local/nginx/sbin/nginx -s reload
#测试效果
这里以10.192.203.201为例。
先修改两台web服务器默认调用的文件index.html
[root@web1 ~]# echo"
web1.test.com
" > /var/www/html/index.html[root@web2 ~]# echo"
web2.test.com
" > /var/www/html/index.html
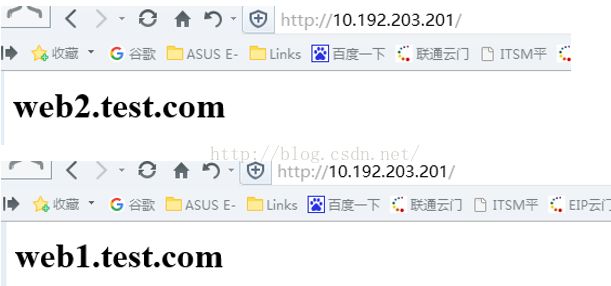
多次刷新,可以看到有时调用的是web1,有时调用的是web2,说明做到了负载均衡。
也可以通过查看apache 访问日志,来查看nginx当时将请求发送到了哪台web服务器。
2.4 ngnix实现动静态分离
动态的由apache处理,静态的由Nginx处理。
vi /usr/local/nginx/conf/nginx.conf
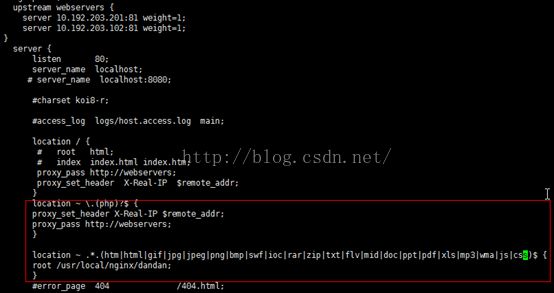
在server{}里添加:
location ~\.(php)?$ {
        proxy_set_header X-Real-IP$remote_addr;
        proxy_pass http://webservers;
        }

        location ~.*.(htm|html|gif|jpg|jpeg|png|bmp|swf|ioc|rar|zip|txt|flv|mid|doc|ppt|pdf|xls|mp3|wma|js|css)${ root /usr/local/nginx/dandan; }
如图:
/*
如果后端代理的是tomcat或者jboss的话,将location ~ \.(php)?$ {
proxy_set_header X-Real-IP$remote_addr;
proxy_pass http://webservers;
}
改为: location ~ \.(jsp|do)$ {
proxy_pass http://webservers;
proxy_set_header X-Real-IP $remote_addr;
}即可。
如图:
*/
在/usr/local/nginx/下新建一个dandan目录,并在该目录下新建一个a.html文件,添加内容:this is from nginx dir
测试静态页面:
测试动态页面
/*
确保web服务器上已经安装PHP
# sudo yum install php
# sudo /etc/init.d/httpd restart
*/
echo"" > /var/www/html/info.php
验证php是否是通过apache处理的:
关闭apache再测试访问php页面,看到访问不到php,但是能访问到静态页面
[root@PChtml]# service httpd stop
Stoppinghttpd: [ OK ]
2.5 nginx结合keepalive
nginx结合keepalive可以实现nginx的高可用。
2.5.1 安装keepalive
yum install -y popt-devel
cd /usr/local/src
tar zxvf keepalived-1.2.2.tar.gz
cd keepalived-1.2.2 ./configure --prefix=/ make make install
2.5.2 新建检查nginx脚本
vi /root/check_nginx.sh
if [ "$(ps -ef | grep "nginx:master process"| grep -v grep )" == "" ]
 then /etc/init.d/keepalived stop else echo "nginx is running" fi
chmod +x /root/check_nginx.sh
加入到作业计划
crontab -e
*/1 * * * * /root/check_nginx.sh >>/root/check_nginx.log
2.5.3 修改配置文件
--修改两台keepalived服务器配置文件
vi /etc/keepalived/keepalived.conf
#ConfigurationFile for keepalived
global_defs {
notification_email {                        ######定义接受邮件的邮箱
 [email protected]
       }
 notification_email_from [email protected]    ######定义发送邮件的邮箱
 smtp_server mail.tuge.com
 smtp_connect_timeout 10
}
vrrp_script check_nginx {                   ######定义监控nginx的脚本 script "/root/check_nginx.sh" interval 2 ######监控时间间隔 weight 2 ######负载参数 } vrrp_instance vrrptest { ######定义vrrptest实例 state BACKUP ######服务器状态 interface eth0 ######使用的接口 virtual_router_id 51 ######虚拟路由的标志,一组lvs的虚拟路由标识必须相同,这样才能切换 priority 150 ######服务启动优先级,值越大,优先级越高,BACKUP 不能大于MASTER advert_int 1 ######服务器之间的存活检查时间 authentication { auth_type PASS ######认证类型 auth_pass ufsoft ######认证密码,一组lvs 服务器的认证密码必须一致 } track_script { ######执行监控nginx进程的脚本 check_nginx } virtual_ipaddress { ######虚拟IP地址 10.192.203.106 } }
#注意,需要修改下从的priority的值 ,改成比主的小。
2.5.4 vi /etc/sysconfig/iptables
#注意,在两台机器上都要修改。添加:
-A INPUT -d 10.192.203.106/32 -j ACCEPT
-A INPUT -d 224.0.0.18 -j ACCEPT
#第二行意思是添加VRRP通讯支持
修改完后,重启防火墙
service iptables restart
2.5.5 启动keepalived
在两台服务器上分别启动:
service keepalived start
分别执行ip addr命令,可以在最先启动的机器上看到虚拟IP.如:
 [root@PCkeepalived]# ip addr
1: lo:  mtu16436 qdisc noqueue state UNKNOWN
   link/loopback 00:00:00:00:00:00 brd 00:00:00:00:00:00 inet 127.0.0.1/8 scope host lo inet6 ::1/128 scope host valid_lft forever preferred_lft forever 2: eth0: mtu 1500 qdisc pfifo_fast state UP qlen1000 link/ether 08:00:27:04:05:16 brd ff:ff:ff:ff:ff:ff inet 10.192.203.201/24 brd 10.192.203.255 scope global eth0 inet 10.192.203.106/32 scope global eth0 inet6 fe80::a00:27ff:fe04:516/64 scope link valid_lft forever preferred_lft forever 3: eth1: mtu 1500 qdisc pfifo_fast state UP qlen1000 link/ether 08:00:27:3a:ec:3c brd ff:ff:ff:ff:ff:ff inet 10.0.0.1/24 brd 10.0.0.255 scope global eth1 inet6 fe80::a00:27ff:fe3a:ec3c/64 scope link valid_lft forever preferred_lft forever
2.5.6 验证
关掉主的nginx,看到vip漂移到了从,且仍然能通过虚拟IP均衡地访问web服务器。
[root@PC keepalived]# ip addr
1: lo:  mtu16436 qdisc noqueue state UNKNOWN
   link/loopback 00:00:00:00:00:00 brd 00:00:00:00:00:00 inet 127.0.0.1/8 scope host lo inet6 ::1/128 scope host valid_lft forever preferred_lft forever 2: eth0: mtu 1500 qdisc pfifo_fast state UP qlen1000 link/ether 08:00:27:04:05:16 brd ff:ff:ff:ff:ff:ff inet 10.192.203.102/24 brd 10.192.203.255 scope global eth0 inet 10.192.203.106/32 scope global eth0 inet6 fe80::a00:27ff:fe04:516/64 scope link valid_lft forever preferred_lft forever
同理nginx也可以代理tomcat,jboss等。


