nio的缓冲区
nio的缓冲区
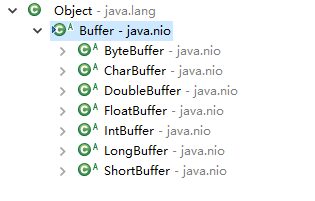
nio定义了7中缓冲区类型,就是八种java基本类型减去一个boolean型的。,包括父类Buffer,这些都是抽象类。缓冲区是包在对象内的基本数据元素数组,相对于一个简单的数组来说,Buffer将数组与对数组的操作包含在一个对象内。
Buffer类解析
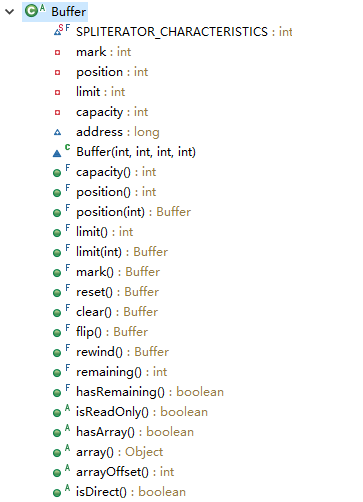
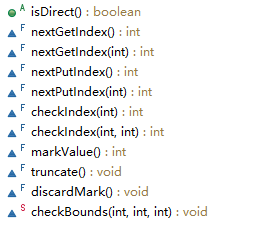
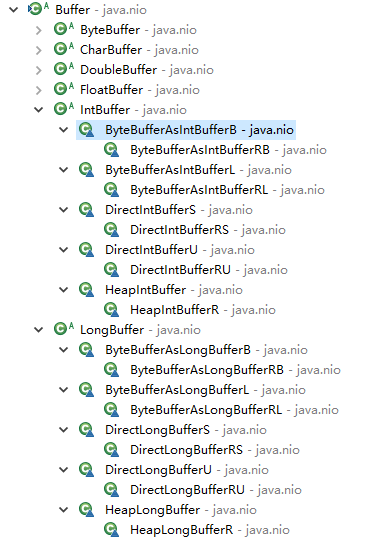
首先来看Buffer的结构:
在源码中一个一个方法查看,可以看出这些方法中大部分是对mark、position、limit、capacity的操作。
- 对于数组来说,需要以下一些重要元素,比如数组大小(
capacity)。 - 此时如果是对数组的读取操作时,需要表明当前读到了哪个位置(
position),总共可以读到哪个位置(limit),也就是当前数组中有几个元素。 - 此时如果是写操作,那么需要知道现在写到了哪个位置(
position),最大可以写到哪个位置(limit)。 - 最后为了实现可重复读,产生一个备忘位置,即标记(
mark)。
对于一个Buffer来说,它用缓冲读就应该一直用于缓冲读,如果用于缓冲写,应该一直用于缓冲写,如果想要写一段后再去读,那么久需要进行一些转换。
Buffer基本成员变量操作
- 有关四个基本成员变量的读取与设置
- 读函数
- 写函数
| 函数名 | 函数作用 |
|---|---|
| public final int capacity() | 返回数组capacity |
| public final int position() | 返回数组当前position |
| public final Buffer position(int newPosition) | 设置position位置 |
| public final int limit() | 返回数组limit |
| public final Buffer limit(int newLimit) | 设置limit |
| public final Buffer mark() | 标记当前位置 |
| public final Buffer reset() | 将position设置为mark值 |
| public final Buffer clear() | 清空数组,目的是为写入做基础 |
| public final Buffer rewind() | 倒回,将位置重设为0,用于重读或重写 |
| public final int remaining() | 返回limit-position,还剩下可读或可写的 |
| public final boolean hasRemaining() | 是否还有可读数据或可写空间 |
| final int nextGetIndex() | 读取的当前位置,然后位置+1 |
| final int nextGetIndex(int nb) | 读取的当前位置,然后位置+nb |
| final int nextPutIndex() | 存放的当前位置,然后位置+1 |
| final int nextPutIndex(int nb) | 存放的当前位置,然后位置+nb |
| final int checkIndex(int i) | 检查Index是否合法 |
| final int checkIndex(int i, int nb) | 检查Index以及Index+nb是否合法 |
| final int markValue() | 返回mark值 |
| final void truncate() | 清空数组 |
| final void discardMark() | 丢弃mark值,即设置为-1 |
| static void checkBounds(int off, int len, int size) | |
Buffer其他函数
| 函数名 | 函数作用 |
|---|---|
| public abstract boolean isReadOnly() | 是否只读 |
| public abstract boolean hasArray() | buffer中数组是否有权限供外部使用 |
| public abstract Object array() | 返回buffer中的内部数组 |
| public abstract int arrayOffset() | 返回可使用的内部数组第一个可用位置 |
| public abstract boolean isDirect() | 当前是否是直接内存缓冲区 |
flip函数
对于一个Buffer来说,它作为通道两端的容器,在输入通道的一端,它明确从position位置到当前最后一个元素位置limit(与数组内元素个数相等)作为可读取的数据。在通道输入到容器的一端,它从position位置输出到数组最大容量的位置limit(与capacity相等)作为可存储数据的空间。
flip函数将一个写数组转变为一个读数组。将当前写入的数据作为源数据,然后可以读出来。具体的步骤就是limit=position; position=0;。
Buffer的子类简介
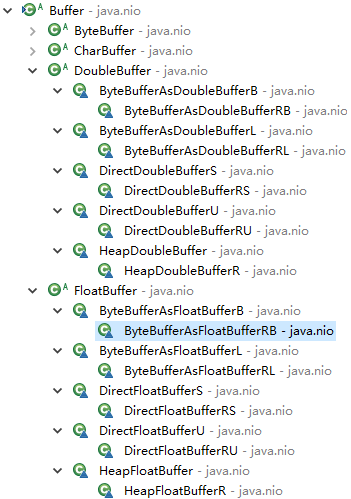
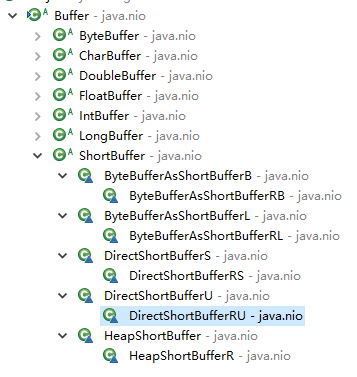
下面是子类的所有:类名最后的标志意思:
R表示只读;B与L是与大头(big Endian)存储与小头(little Endian)存储有关;将byte转化为其他类型时,byte串使用的是big Endian还是little Endian存储的,如果是B,表示是big Endian存储。S与U表示swap(反转字符)与unswap(不反转字符),也是与大头(big Endian)存储与小头(little Endian)存储有关;当使用JVM堆外内存做数组存储时,若使用S,获取或存储数据时,转换传入数据的字节顺序。Heap与Direct表示堆内(JVM管理的java内存)与直接(JVM管控外的内存空间)
这些类的产生规律如下:
java基本类型除了boolean,其他均有对应的Buffer- 读写缓冲区与只读缓冲区,所有的非抽象类均有读写缓冲区与只读缓冲区两种。
- 除去
ByteBuffer以外的Buffer,有以下的特征
- 由于数据存储以字节为单位,所以除
ByteBuffer外,其他都可以由Bytebuffer转化(指的是多个byte组成一个其他类型)而来。 - 由于大端存储于小端存储与硬件操作系统有关,所以在物理内存中到底以哪种方式进行储存并不确定,所以直接内存映射需要使用
Swap与UnSwap区分。 - 在
JVM中的内存空间,规定只使用大端模式进行储存,所以JVM对内存不存在字节顺序(即swap)转换问题 CharBuffer存在一个特殊的子类,即StringCharBuffer
- 由于数据存储以字节为单位,所以除
- MappedByteBuffer,内存映射缓存区,是通过内存映射来存取数据元素的字节缓冲区。只能通过FileChannel类创建。
大头存储与小头存储
计算机中的数据以字节来划分。
简介
但是假如一个字符需要用两个字节来表示,那么这两个字节是什么顺序呢?使用两个16进制字数表示一个字节,假设现在一个字符占用两个字节,表示为”1234“,那么:
- 计算机地址从低到高,分别存放:12 34,此时就是大端存储。
- 计算机地址从低到高,分别存放:34 12,此时就是小端存储。
一个long型数据由8个字节表示,假设这个16进制的串是一个long型的数字,12345678,那么是怎么存储的?
- 计算机地址从低到高,分别存放:12 34 56 78,此时就是大端存储。
- 计算机地址从低到高,分别存放:78 56 34 12,此时就是小端存储。
java编写的程序是以big endian来存储数据的,但是其他程序传递给java程序的数据不一定就是big endian顺序的,但是java却将数据按照big endian来处理,此时就会出现问题,所以有时候需要进行一定的转换。
代码中的体现
L与B区别
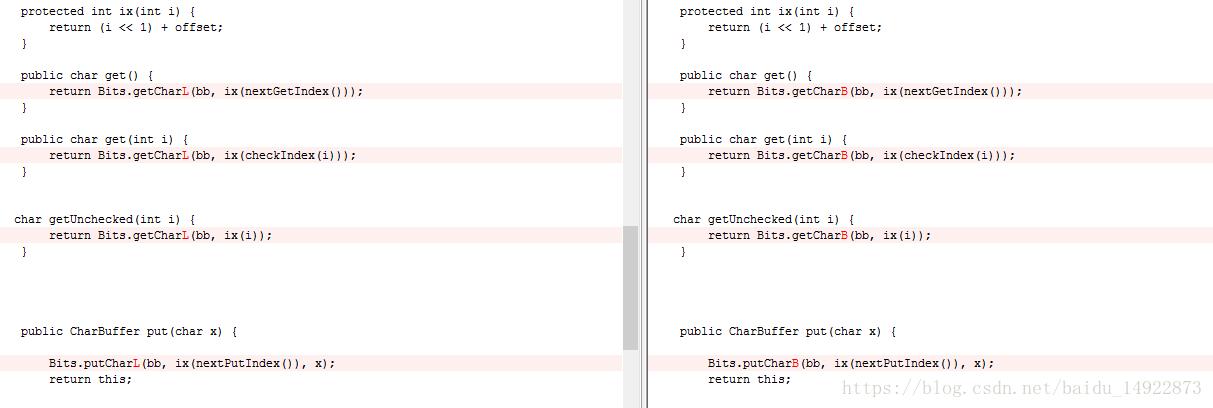
拿ByteBufferAsCharBufferL.java与ByteBufferAsCharBufferB.java做比较,这两个类是从byte数组中获取一个char,其中的主要差别是:
BIts类中如下:
分别取接下来的两个字节去合成字符,但是顺序是不一样的。
S与U区别
以DirectCharBufferS.java与DirectCharBufferU.java作比较,这两个类表示缓存区分是小端存储的数据与大端存储的数据。比较如下:
在Bits中的实现:
在Character中的实现:
Heap与Direct
在网上找了一个有关这两者的关系博客,感觉写的特别好,地址在https://my.oschina.net/happyBKs/blog/1592329。盗用一下
简介
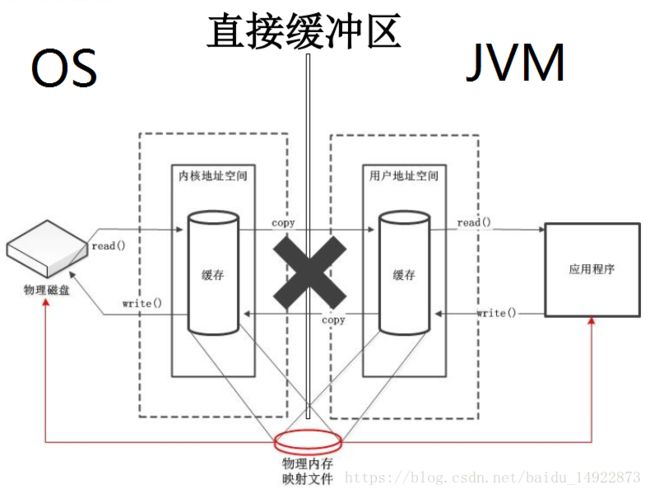
Heap是指在JVM中申请堆内存,但是这种内存是在用户空间中,当与硬件进行交互时,需要与内核空间进行来回拷贝。
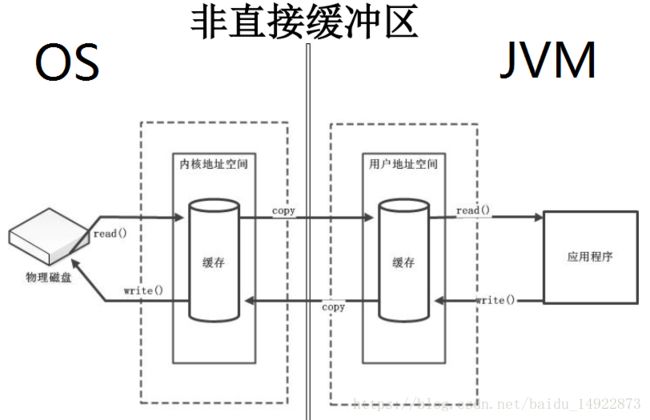
Direct表示直接地址缓冲区,这种缓冲区不通过内核地址空间与用户地址空间复制传递,而是在物理内存中直接申请一块内存,将这块内存映射到内核地址空间与直接地址空间,应用程序与硬件间的数据存取通过这块物理内存进行。
区别
- 如果为直接字节缓冲区,则 Java 虚拟机会尽最大努力直接在此缓冲区上执行本机 I/O 操作。也就是说,在每次调用操作系统基础的一个本机 I/O 操作之前(或之后),虚拟机都会尽量避免将缓冲区的内容复制到中间缓冲区中(或从中间缓冲区中复制内容)。
- 创建直接缓冲区成本高于非直接缓冲区。但是创建这种缓冲区对应用程序的内存需求不会造成什么影响。内存的回收不受JVM垃圾回收影响。直接缓冲区适合与数据长时间存在于内存,或者大数据量的操作时更加适合。
- 字节缓冲区是直接缓冲区还是非直接缓冲区可通过调用其 isDirect() 方法来确定。提供此方法是为了能够在性能关键型代码中执行显式缓冲区管理
直接缓冲区缺点
不安全
消耗更多,因为它不是在JVM中直接开辟空间。这部分内存的回收只能依赖于垃圾回收机制,垃圾什么时候回收不受我们控制。
数据写入物理内存缓冲区中,程序就丧失了对这些数据的管理,即什么时候这些数据被最终写入从磁盘只能由操作系统来决定,应用程序无法再干涉。
关于内核地址空间/用户地址空间/物理内存映射
一个应用程序需要运行,那么就需要内存空间,而操作系统为应用分配的物理内存是有实际地址的,在应用启动之前,应用并不知道自己被分配的地址从哪开始,所以应用只操作相对地址,当向内存中读写数据时,将相对地址转换为实际内存地址,然后进行读写。物理内存映射是指直接申请一段物理内存,然后将该地址映射到内核地址空间与用户地址中相应位置。
Buffer类的使用
主要从对Buffer类的使用主要从创建、复制、其他基本操作来讲解。最后专门使用实例体会字节缓冲区的使用。
创建Buffer
分别拿ByteBuffer、CharBuffer的创建来举例:
创建ByteBuffer
创建ByteBuffer有三种方式:
import java.nio.ByteBuffer;

public class TestByteBufferCreate {
    public static void main(String[] args) {
        ByteBuffer heapByteBuffer = ByteBuffer.allocate(10);
        ByteBuffer directByteBuffer = ByteBuffer.allocateDirect(10);
        byte[] array = new byte[10];
        ByteBuffer wrapByteBuffer = ByteBuffer.wrap(array);
    }
}ByteBuffer.allocate创建的源码如下:
    /**
     * Allocates a new byte buffer.
     *
     *  The new buffer's position will be zero, its limit will be its
     * capacity, its mark will be undefined, and each of its elements will be
     * initialized to zero.  It will have a {@link #array backing array},
     * and its {@link #arrayOffset array offset} will be zero.
     *
     * @param  capacity
     *         The new buffer's capacity, in bytes
     *
     * @return  The new byte buffer
     *
     * @throws  IllegalArgumentException
     *          If the capacity is a negative integer
     */
    public static ByteBuffer allocate(int capacity) {
        if (capacity < 0)
            throw new IllegalArgumentException();
        return new HeapByteBuffer(capacity, capacity);
}其中的HeapByteBuffer代码如下:
    HeapByteBuffer(int cap, int lim) {            // package-private

        super(-1, 0, lim, cap, new byte[cap], 0);
        /*
        hb = new byte[cap];
        offset = 0;
        */


    }
其实就是新建一个数组,然后使用该数组存储字节。
- 使用
ByteBuffer.allocateDirect创建的源码如下:
    /**
     * Allocates a new direct byte buffer.
     *
     *  The new buffer's position will be zero, its limit will be its
     * capacity, its mark will be undefined, and each of its elements will be
     * initialized to zero.  Whether or not it has a
     * {@link #hasArray backing array} is unspecified.
     *
     * @param  capacity
     *         The new buffer's capacity, in bytes
     *
     * @return  The new byte buffer
     *
     * @throws  IllegalArgumentException
     *          If the capacity is a negative integer
     */
    public static ByteBuffer allocateDirect(int capacity) {
        return new DirectByteBuffer(capacity);
}DirectByteBuffer的实现如下:
   DirectByteBuffer(int cap) {                   // package-private

        super(-1, 0, cap, cap);
        boolean pa = VM.isDirectMemoryPageAligned();
        int ps = Bits.pageSize();
        long size = Math.max(1L, (long)cap + (pa ? ps : 0));
        Bits.reserveMemory(size, cap);

        long base = 0;
        try {
            base = unsafe.allocateMemory(size);
        } catch (OutOfMemoryError x) {
            Bits.unreserveMemory(size, cap);
            throw x;
        }
        unsafe.setMemory(base, size, (byte) 0);
        if (pa && (base % ps != 0)) {
            // Round up to page boundary
            address = base + ps - (base & (ps - 1));
        } else {
            address = base;
        }
        cleaner = Cleaner.create(this, new Deallocator(base, size, cap));
        att = null;


}其中使用unsafe.allocateMemory(size)申请物理内存。
- 使用
wrap函数生成Buffer,实现如下:
 /**
     * Wraps a byte array into a buffer.
     *
     *  The new buffer will be backed by the given byte array;
     * that is, modifications to the buffer will cause the array to be modified
     * and vice versa.  The new buffer's capacity and limit will be
     * array.length, its position will be zero, and its mark will be
     * undefined.  Its {@link #array backing array} will be the
     * given array, and its {@link #arrayOffset array offset>} will
     * be zero.
     *
     * @param  array
     *         The array that will back this buffer
     *
     * @return  The new byte buffer
     */
    public static ByteBuffer wrap(byte[] array) {
        return wrap(array, 0, array.length);
    }
    /**
     * Wraps a byte array into a buffer.
     *
     *  The new buffer will be backed by the given byte array;
     * that is, modifications to the buffer will cause the array to be modified
     * and vice versa.  The new buffer's capacity will be
     * array.length, its position will be offset, its limit
     * will be offset + length, and its mark will be undefined.  Its
     * {@link #array backing array} will be the given array, and
     * its {@link #arrayOffset array offset} will be zero.
     *
     * @param  array
     *         The array that will back the new buffer
     *
     * @param  offset
     *         The offset of the subarray to be used; must be non-negative and
     *         no larger than array.length.  The new buffer's position
     *         will be set to this value.
     *
     * @param  length
     *         The length of the subarray to be used;
     *         must be non-negative and no larger than
     *         array.length - offset.
     *         The new buffer's limit will be set to offset + length.
     *
     * @return  The new byte buffer
     *
     * @throws  IndexOutOfBoundsException
     *          If the preconditions on the offset and length
     *          parameters do not hold
     */
    public static ByteBuffer wrap(byte[] array,
                                    int offset, int length)
    {
        try {
            return new HeapByteBuffer(array, offset, length);
        } catch (IllegalArgumentException x) {
            throw new IndexOutOfBoundsException();
        }
}HeapByteBuffer中的实现为:
    HeapByteBuffer(byte[] buf, int off, int len) { // package-private

        super(-1, off, off + len, buf.length, buf, 0);
        /*
        hb = buf;
        offset = 0;
        */


    }
创建CharBuffer
有三种创建方式,创建直接内存缓冲区只能通过byteBuffer.asCharBuffer()这种方式。第一种与第二种方式与ByteBuffer类似,使用allocate与wrap,都是内部维护了一个数组。
需要注意的是,wrap包装的还可以是一个CharSequence接口类型的对象,StringBuffer、StringBuilder、CharBuffer、String都实现了该接口。
import java.nio.ByteBuffer;
import java.nio.CharBuffer;

public class TestCharBufferCreate {

    public static void main(String[] args) {

        CharBuffer heapCharBuffer = CharBuffer.allocate(10);
        char[] array = new char[10];
        CharBuffer wrapCharBuffer = CharBuffer.wrap(array );

        ByteBuffer byteBuffer = ByteBuffer.allocateDirect(20);
        CharBuffer directCharBuffer = byteBuffer.asCharBuffer();
        System.out.println(directCharBuffer.isDirect());  //true
    }
}
复制Buffer
复制缓冲区大致有三种方式:duplicate、asReadOnlyBuffer、slice。
- duplicate,复制buffer的4个基础变量,使用的数组容器与原buffer是同一个
- asReadOnlyBuffer,复制buffer的4个基础变量,使用的数组容器与原buffer是同一个
- slice,使用原buffer剩余的部分作为容量,新建一个数组,存储空间还是使用原来数组的一部分
import java.nio.CharBuffer;

public class TestCharBufferCopy {

    public static void main(String[] args) {
        CharBuffer charBuffer = CharBuffer.allocate(10);
        charBuffer.put("我们都是好孩子");
        charBuffer.flip(); //将写转换为读
        System.out.println(charBuffer.get()); //读取一个字符  我
        System.out.println(charBuffer.position()); //1

        CharBuffer charBuffer1 = charBuffer.duplicate();  //复制
        System.out.println(charBuffer1.get()); //读取一个字符  们
        System.out.println(charBuffer.position()); //1
        System.out.println(charBuffer1.position()); // 2

        charBuffer.rewind();  //重新开始读
        CharBuffer charBuffer2 = charBuffer.asReadOnlyBuffer();
        System.out.println(charBuffer2.get()); //我

        CharBuffer charBuffer3 = charBuffer.slice();//position为0,limit为7,那么此时容量就是搞了 7
        System.out.println(charBuffer3.capacity()); //  7
        charBuffer3.put("12");
        System.out.println(charBuffer.get(1));  // 2
    }
}
使用Buffer
主要从下面四种ByteBuffer、CharBuffer、LongBuffer、MappedByteBuffer来看如何使用Buffer。
ByteBuffer、CharBuffer介绍
由于ByteBuffer、CharBuffer,所以它中的函数主要由以下几部分组成:
- 继承自
Buffer类的函数 - 创建以及复制
Buffer的函数 - 需要由实现类实现的抽象函数
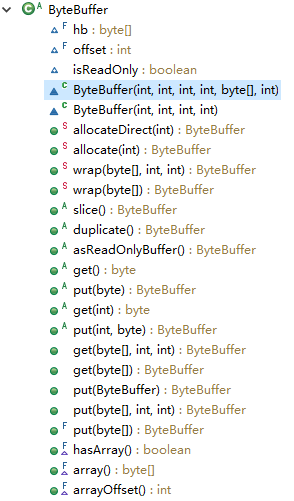
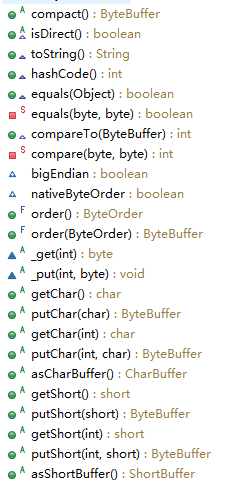
ByteBuffer
类函数:
例子:
import java.nio.ByteBuffer;

public class TestByteBuffer {

    public static void main(String[] args) {
        ByteBuffer byteBuffer = ByteBuffer.allocate(20);
        byteBuffer.put((byte)56);
        byteBuffer.put(0, (byte)57);
        byteBuffer.put(1,(byte)58);//需要注意这么添加后,position的位置不变
        byteBuffer.putChar("我们".charAt(0));
        byteBuffer.putLong(10l);

        byteBuffer.flip();
        System.out.println(byteBuffer.get()); //57
        byteBuffer.compact(); //压缩数组,将当前数组中的position和limit之间数据复制到0位置及以后,并将position置为当前数组中元素的个数。表示当前正在写,可以接着写入。
        byteBuffer.flip();
        System.out.println(byteBuffer.position());//0
        System.out.println(byteBuffer.getChar()); //我
        System.out.println(byteBuffer.getLong());// 10

    }
}
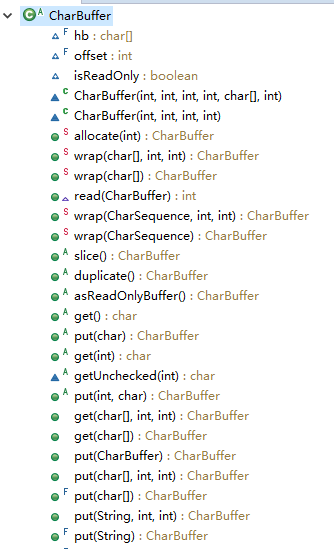
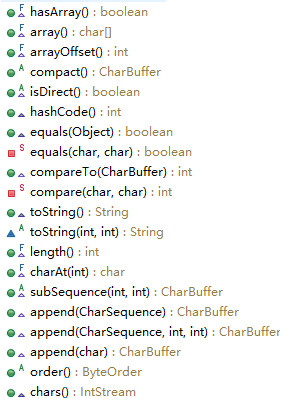
CharBuffer
这其中的比较难理解的函数有:chars(),这事jdk1.8加上的有关Stream的东西,在以后的学习中进行了解。
其他的Buffer与CharBuffer类似。
import java.nio.CharBuffer;

public class TestCharBuffer {

    public static void main(String[] args) {
        CharBuffer charBuffer = CharBuffer.allocate(20);
        charBuffer.put(new String("我23"));
        charBuffer.flip();
        System.out.println(charBuffer.get()); //我

    }
}
MappedByteBuffer
它有两个子类,DirectByteBuffer与DirectByteBufferR,直接内存映射,对直接内存映射的理解见学习nio之前这篇文章。
主要函数:
MappedByteBuffer创建时需要几个参数,model/position/size。
MapModel有三种:READ_ONLY:只读映射READ_WRITE:可读写PRIVATE:copy-on-write,写时复制,就是这种方式创建的Buffer,修改时不是直接修改文件,而是修改内容的拷贝,然后在以后某个时机将再将内容写入实际位置。
position:文件映射的起始位置size:申请的空间大小
通过MappedByteBuffer对文件进行操作
通过FileChannel.map对文件进行操作的过程讲解
获取
MappedByteBuffer我的
windows操作系统在添加openjdk的源码后,可以打开FileChannelImpl中看到map()函数的如下实现:
    public MappedByteBuffer map(MapMode mode, long position, long size)
        throws IOException
    {
        //文件打开判断
        ensureOpen();
        //参数校验
        if (mode == null)
            throw new NullPointerException("Mode is null");
        if (position < 0L)
            throw new IllegalArgumentException("Negative position");
        if (size < 0L)
            throw new IllegalArgumentException("Negative size");
        if (position + size < 0)
            throw new IllegalArgumentException("Position + size overflow");
        if (size > Integer.MAX_VALUE)
            throw new IllegalArgumentException("Size exceeds Integer.MAX_VALUE");

        int imode = -1;
        if (mode == MapMode.READ_ONLY)
            imode = MAP_RO;
        else if (mode == MapMode.READ_WRITE)
            imode = MAP_RW;
        else if (mode == MapMode.PRIVATE)
            imode = MAP_PV;
        assert (imode >= 0);
        if ((mode != MapMode.READ_ONLY) && !writable)
            throw new NonWritableChannelException();
        if (!readable)
            throw new NonReadableChannelException();

        long addr = -1;
        int ti = -1;
        try {
            //设置当前线程的可中断IO标识blocker,当线程的interrupt status被设置后,关闭channel
            begin();
            //**没有理解这个线程添加时为何**
            ti = threads.add();
            if (!isOpen())
                return null;

            long filesize;
            do {
                filesize = nd.size(fd);
            } while ((filesize == IOStatus.INTERRUPTED) && isOpen());
            if (!isOpen())
                return null;
            //当前映射的大小大于改文件position后的大小,则扩展文件
            if (filesize < position + size) { // Extend file size
                if (!writable) {
                    throw new IOException("Channel not open for writing " +
                        "- cannot extend file to required size");
                }
                int rv;
                do {
                    rv = nd.truncate(fd, position + size);
                } while ((rv == IOStatus.INTERRUPTED) && isOpen());
                if (!isOpen())
                    return null;
            }
            //传入的size为0,则特殊处理的MapppedByteBuffer
            if (size == 0) {
                addr = 0;
                // a valid file descriptor is not required
                FileDescriptor dummy = new FileDescriptor();
                if ((!writable) || (imode == MAP_RO))
                    return Util.newMappedByteBufferR(0, 0, dummy, null);
                else
                    return Util.newMappedByteBuffer(0, 0, dummy, null);
            }
            //allocationGranularity 内存分页的页大小
            //将读取的大小,从某一页的开始处进行申请,保证申请的是页大小的整数倍。
            //这么弄返回申请的直接内存的首地址,因为有虚拟内存的保证,一般不用担心内存溢出的问题
            int pagePosition = (int)(position % allocationGranularity);
            long mapPosition = position - pagePosition;
            long mapSize = size + pagePosition;
            try {
                // If no exception was thrown from map0, the address is valid
                addr = map0(imode, mapPosition, mapSize);
            } catch (OutOfMemoryError x) {
                // An OutOfMemoryError may indicate that we've exhausted memory
                // so force gc and re-attempt map
                //如果发生了内存溢出,则进行垃圾回收,休眠后再次申请
                //为什么会假设这里发生了内存溢出,不太清楚
                System.gc();
                try {
                    Thread.sleep(100);
                } catch (InterruptedException y) {
                    Thread.currentThread().interrupt();
                }
                try {
                    addr = map0(imode, mapPosition, mapSize);
                } catch (OutOfMemoryError y) {
                    // After a second OOME, fail
                    throw new IOException("Map failed", y);
                }
            }

            // On Windows, and potentially other platforms, we need an open
            // file descriptor for some mapping operations.
            //对于一个线程来说,操作文件需要文件handle句柄,
            //java中对文件操作需要一个FileDescriptor(文件描述符),文件操作符中含有文件handle句柄
            //所以就需要将JVM中对同一文件的操作句柄拷贝出来
            FileDescriptor mfd;
            try {
                mfd = nd.duplicateForMapping(fd);
            } catch (IOException ioe) {
                unmap0(addr, mapSize);
                throw ioe;
            }
            //校验地址是否是页开始,是否格式合理
            assert (IOStatus.checkAll(addr));
            assert (addr % allocationGranularity == 0);
            int isize = (int)size;
            //将一些数据放在对象中,方便使用
            Unmapper um = new Unmapper(addr, mapSize, isize, mfd);
            if ((!writable) || (imode == MAP_RO)) {
                return Util.newMappedByteBufferR(isize,
                                                 addr + pagePosition,
                                                 mfd,
                                                 um);
            } else {
                return Util.newMappedByteBuffer(isize,
                                                addr + pagePosition,
                                                mfd,
                                                um);
            }
        } finally {
            threads.remove(ti);
            end(IOStatus.checkAll(addr));
        }
}- 初始化
MappedByteBuffer,上面使用的是Util.newMappedByteBuffer()方法:
    static MappedByteBuffer newMappedByteBuffer(int size, long addr,
                                                FileDescriptor fd,
                                                Runnable unmapper)
    {
        MappedByteBuffer dbb;
        if (directByteBufferConstructor == null)
            //获得 java.nio.DirectByteBuffer 的构造器,目的是创建一个 DirectByteBuffer
            initDBBConstructor();
        try {
            //强制转换,为何使用这种方式?
            //因为 DirectByteBuffer 类是 protect的,包可见,Util类所在包与其不在一个包中,所以用这种方式获得实例
            dbb = (MappedByteBuffer)directByteBufferConstructor.newInstance(
              new Object[] { new Integer(size),
                             new Long(addr),
                             fd,
                             unmapper });
        } catch (InstantiationException |
                 IllegalAccessException |
                 InvocationTargetException e) {
            throw new InternalError(e);
        }
        return dbb;
}- 当读取文件内容时,实际调用的是
DirectByteBuffer中的get,该方法使用unsafe.getByte方式去读取数据
    public byte get() {
        return ((unsafe.getByte(ix(nextGetIndex()))));
    }

    public byte get(int i) {
        return ((unsafe.getByte(ix(checkIndex(i)))));
    }
代码示例
- 这段示例来自于https://www.cnblogs.com/bronte/articles/1996915.html这篇文章中,并对其进行简单修改。这个例子主要是要用来区分创建
MappedByteBuffer的种类(私有、只读、读写)。我在原来的基础上添加对MappedByteBuffer的关闭操作。
import java.io.File;
import java.io.IOException;
import java.io.RandomAccessFile;
import java.lang.reflect.Method;
import java.nio.ByteBuffer;
import java.nio.MappedByteBuffer;
import java.nio.channels.FileChannel;

import sun.nio.ch.FileChannelImpl;

public class TestFileChannelMapRO_RW_COW {
    public static void main (String [] argv){
        try {
            // Create a temp file and get a channel connected to it
            File tempFile = File.createTempFile ("mmaptest", null);
            RandomAccessFile file = new RandomAccessFile (tempFile, "rw");
            FileChannel channel = file.getChannel();
            ByteBuffer temp = ByteBuffer.allocate (100);
            // Put something in the file, starting at location 0
            temp.put ("This is the file content".getBytes());
            temp.flip();
            channel.write (temp, 0);
            // Put something else in the file, starting at location 8192.
            // 8192 is 8 KB, almost certainly a different memory/FS page.
            // This may cause a file hole, depending on the
            // filesystem page size.
            temp.clear();
            temp.put ("This is more file content".getBytes());
            temp.flip();
            channel.write (temp, 8192);
            // Create three types of mappings to the same file
            MappedByteBuffer ro = channel.map (
                    FileChannel.MapMode.READ_ONLY, 0, channel.size());
            MappedByteBuffer rw = channel.map (
                    FileChannel.MapMode.READ_WRITE, 0, channel.size());
            MappedByteBuffer cow = channel.map (
                    FileChannel.MapMode.PRIVATE, 0, channel.size());
            // the buffer states before any modifications
            System.out.println ("Begin");
            showBuffers (ro, rw, cow);
            // Modify the copy-on-write buffer
            cow.position (8);
            cow.put ("COW".getBytes());
            System.out.println ("Change to COW buffer");
            showBuffers (ro, rw, cow);

            // Modify the read/write buffer
            rw.position (9);
            rw.put (" R/W ".getBytes());
            rw.position (8194);
            rw.put (" R/W ".getBytes());
            rw.force();
            System.out.println ("Change to R/W buffer");
            showBuffers (ro, rw, cow);
            // Write to the file through the channel; hit both pages
            temp.clear();
            temp.put ("Channel write ".getBytes());
            temp.flip();
            channel.write (temp, 0);
            temp.rewind();
            channel.write (temp, 8202);
            System.out.println ("Write on channel");
            showBuffers (ro, rw, cow);
            // Modify the copy-on-write buffer again
            cow.position (8207);
            cow.put (" COW2 ".getBytes());
            System.out.println ("Second change to COW buffer");
            showBuffers (ro, rw, cow);
            // Modify the read/write buffer
            rw.position (0);
            rw.put (" R/W2 ".getBytes());
            rw.position (8210);
            rw.put (" R/W2 ".getBytes());
            rw.force();
            System.out.println ("Second change to R/W buffer");
            showBuffers (ro, rw, cow);

            //将copy of write强制写入文件中,但是最后这个不会写入文件中,我的理解有问题
            cow.force();
            System.out.println("force copy-on-write: try write to file,but filed");
            showBuffers (ro, rw, cow);

            // cleanup
            channel.close();
            file.close();

            //当我发现无法删除文件的时候,第一想到的是调用System.gc();但是发现并没有效果
            //System.gc();

            //调用下面这段方法后,文件删除成功,但是仍然感觉System.gc();后就应该可以删除文件了。
            Method m = FileChannelImpl.class.getDeclaredMethod("unmap", MappedByteBuffer.class);
            m.setAccessible(true);
            m.invoke(FileChannelImpl.class, ro);
            m.invoke(FileChannelImpl.class, rw);
            m.invoke(FileChannelImpl.class, cow);

            try {
                Thread.sleep(1000);
            } catch (InterruptedException e) {
                e.printStackTrace();
            }

            System.out.println("文件删除是否成功:" + tempFile.delete());
        } catch (Exception e) {
            e.printStackTrace();
        }
    }

    // Show the current content of the three buffers
    public static void showBuffers (ByteBuffer ro, ByteBuffer rw, ByteBuffer cow) throws IOException {
        dumpBuffer ("R/O", ro);
        dumpBuffer ("R/W", rw);
        dumpBuffer ("COW", cow);
        System.out.println (" ");
    }
    // Dump buffer content, counting and skipping nulls
    public static void dumpBuffer (String prefix, ByteBuffer buffer) throws IOException {
        System.out.print (prefix + ": '");
        int nulls = 0;
        int limit = buffer.limit();
        for (int i = 0; i < limit; i++) {
            char c = (char) buffer.get (i);
            if (c == '\u0000') {
                nulls++;
                continue;
            }
            if (nulls != 0) {
                System.out.print ("|[" + nulls
                        + " nulls]|");
                nulls = 0;
            }
            System.out.print (c);
        }
        System.out.println ("'");
    }
}