IDEA搭建SpringBoot+mybatis+thymeleaf增删改查项目(一)
首先创建数据库(一个 user表 里面三个字段 id为主键 自增)

现在开始创建项目了
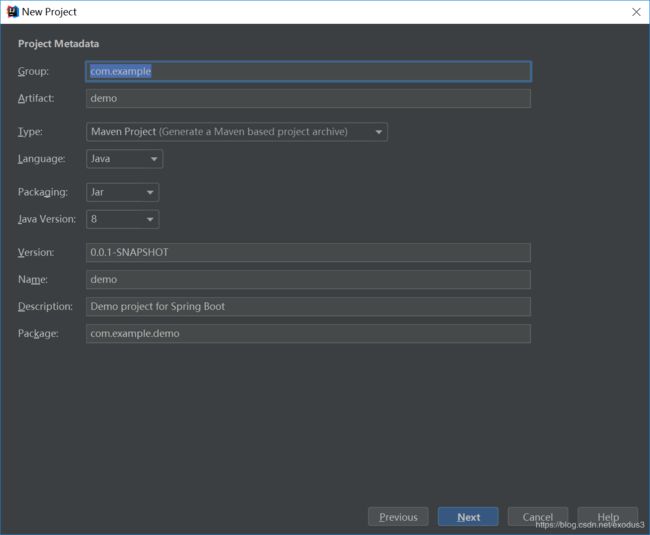
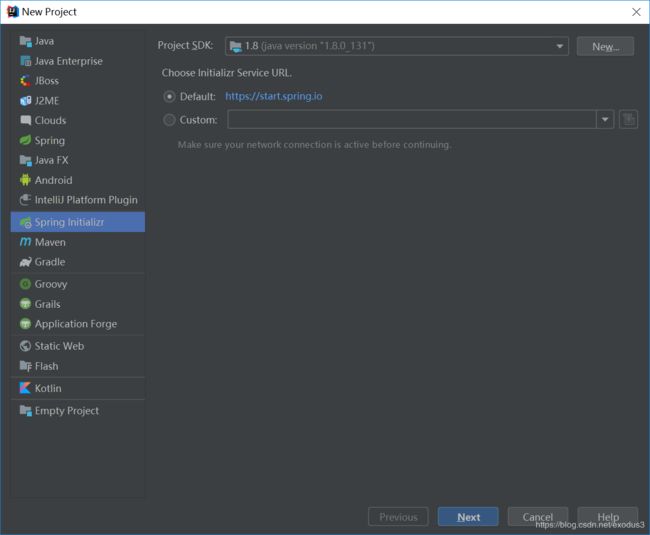
1.打开IDEA 点击Create New Project (我电脑jdk是1.8 所以project SDK 默认就是1.8)
3.下一步,选择依赖 (本项目选择了 Web(web项目嘛),模板引擎 thymeleaf,数据库 mysql,jdbc,mybatis)
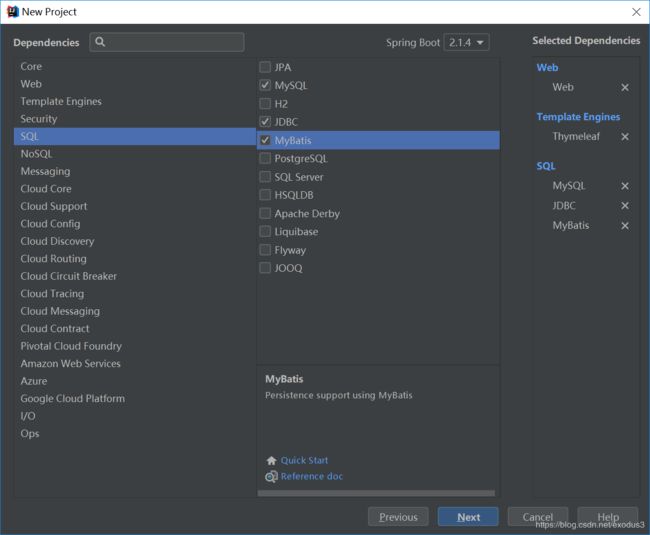
- 点击finish,项目就建好了。
下面开始写user表的增删改查了。
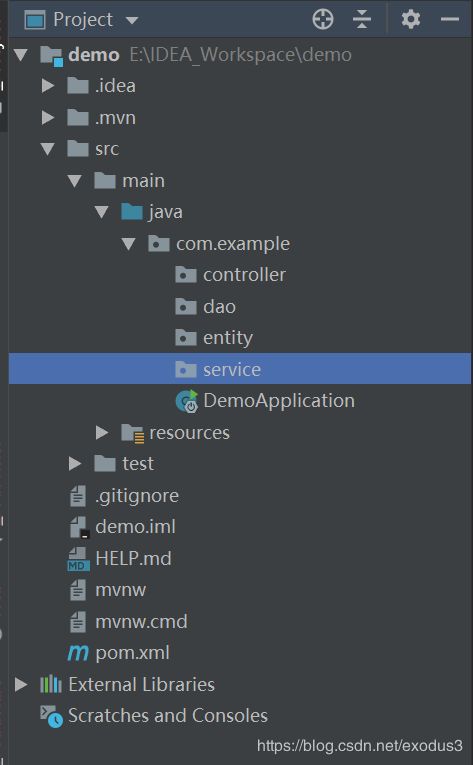
1.下面是项目的目录结构。创建entity,dao, service, controller 包,在service下面创建impl ,在resources下创建 mapper文件夹。另外把DemoApplication类移到example包下,然后把demo文件夹删掉
2.然后在entity下创建User类 ,三个私有属性 实现get set方法
package com.example.entity;

public class User {

    private Integer id;
    private String name;
    private Integer age;

    public Integer getId() {
        return id;
    }

    public void setId(Integer id) {
        this.id = id;
    }

    public String getName() {
        return name;
    }

    public void setName(String name) {
        this.name = name;
    }

    public Integer getAge() {
        return age;
    }

    public void setAge(Integer age) {
        this.age = age;
    }
}
3.在dao下创建UserMapper接口(注意需要mapper注解)
package com.example.dao;

import com.example.entity.User;
import org.apache.ibatis.annotations.Mapper;

import java.util.List;

@Mapper
public interface UserMapper {

    /**
     * 查询所有的user信息
     *
     * @return
     */
    List<User> findByAll();

    /**
     * 根据id查找User信息
     *
     * @param id
     * @return
     */
    User findUserById(Integer id);

    /**
     * 保存user信息
     *
     * @param user
     * @return
     */
    int saveUser(User user);

    /**
     * 根据id删除某个user信息
     *
     * @param id
     * @return
     */
    int deleteUser(Integer id);

    /**
     * 更新user信息
     *
     * @param user
     * @return
     */
    int updateUser(User user);

}
4.在service下创建UserService接口
package com.example.service;

import com.example.entity.User;

import java.util.List;

public interface UserService {

    List<User> findByAll();

    User findUserById(Integer id);

    int saveUser(User user);

    int deleteUser(Integer id);

    int updateUser(User user);
}
5.在impl包下创建UserServiceImpl类 实现UserService接口
package com.example.service.impl;

import com.example.dao.UserMapper;
import com.example.entity.User;
import com.example.service.UserService;
import org.springframework.beans.factory.annotation.Autowired;
import org.springframework.stereotype.Service;

import java.util.List;


@Service
public class UserServiceImpl implements UserService {

    @Autowired
    private UserMapper userMapper;

    @Override
    public List<User> findByAll() {
        return userMapper.findByAll();
    }

    @Override
    public User findUserById(Integer id) {
        return userMapper.findUserById(id);
    }

    @Override
    public int saveUser(User user) {
        return userMapper.saveUser(user);
    }

    @Override
    public int deleteUser(Integer id) {
        return userMapper.deleteUser(id);
    }

    @Override
    public int updateUser(User user) {
        return userMapper.updateUser(user);
    }
}
6.在controller下创建UserController类
package com.example.controller;

import com.example.entity.User;
import com.example.service.UserService;
import org.springframework.beans.factory.annotation.Autowired;
import org.springframework.stereotype.Controller;
import org.springframework.ui.Model;
import org.springframework.web.bind.annotation.RequestMapping;

import java.util.List;

@Controller
public class UserController {

    @Autowired
    private UserService userService;

    //查询所有user数据
    @RequestMapping("/findByAll")
    public String index(Model model) {
        List<User> list = userService.findByAll();
        model.addAttribute("users", list);
        return "user/userList";
    }

    //默认访问list页面
    @RequestMapping("/")
    public String list(Model model) {
        List<User> users = userService.findByAll();
        model.addAttribute("users", users);
        return "user/userList";
    }

    //保存user数据
    @RequestMapping("/toAdd")
    public String toAdd() {
        return "user/userAdd";
    }

    @RequestMapping("/add")
    public String add(User user) {
        userService.saveUser(user);
        return "redirect:/";
    }

    //修改user数据
    @RequestMapping("/toEdit")
    public String toEdit(Model model, Integer id) {
        User user = userService.findUserById(id);
        model.addAttribute("user", user);
        return "user/userEdit";
    }

    @RequestMapping("/edit")
    //@ResponseBody
    public String edit(User user) {
        userService.updateUser(user);
        return "redirect:/";
    }

    //删除user数据
    @RequestMapping("/delete")
    public String delete(Integer id) {
        userService.deleteUser(id);
        return "redirect:/";
    }


}
7.在resources下的mapper文件夹下创建UserMapper.xml配置文件
<mapper namespace="com.example.dao.UserMapper">
    <resultMap id="BaseResultMap" type="com.example.entity.User">
        <id column="id" jdbcType="INTEGER" property="id" />
        <result column="name" jdbcType="VARCHAR" property="name" />
        <result column="age" jdbcType="INTEGER" property="age" />
    resultMap>

    <sql id="Base_Column_List">
        id, name, age
    sql>


    <insert id="saveUser" parameterType="com.example.entity.User">
        insert into USER (id, name, age) values (#{id,jdbcType=INTEGER}, #{name,jdbcType=VARCHAR}, #{age,jdbcType=INTEGER})
    insert>


    <select id="findByAll" resultMap="BaseResultMap">
        SELECT  <include refid="Base_Column_List" /> FROM  user
    select>


    <delete id="deleteUser" parameterType="java.lang.Integer">
        delete from user
        where id = #{id,jdbcType=INTEGER}
    delete>


    <update id="updateUser" parameterType="com.example.entity.User">
        update user
        <set>
            <if test="name != null">
                name = #{name,jdbcType=VARCHAR},
            if>

            <if test="age != null">
                age = #{age,jdbcType=INTEGER},
            if>

        set>
        where id = #{id,jdbcType=INTEGER}
    update>


    <select id="findUserById" parameterType="java.lang.Integer" resultMap="BaseResultMap">
        select
        <include refid="Base_Column_List"/>
        from user
        where id = #{Id,jdbcType=INTEGER}
    select>


mapper>
8.在templates文件夹下user文件夹,创建userList.html文件
<html lang="en" xmlns:th="http://www.thymeleaf.org">
<head>
    <meta charset="UTF-8"/>
    <title>userListtitle>
head>
<body class="container">
<br/>
<h1>用户列表h1>
<br/><br/>
<div class="with:80%">


    <table class="table table-hover">
        <thead>
        <tr>
            <th>IDth>
            <th>User Nameth>
            <th>Ageth>
            <th>Editth>
            <th>Deleteth>
        tr>
        thead>
        <tbody>
        <tr th:each="user : ${users}">
            <th scope="row" th:text="${user.id}">th>
            <td th:text="${user.name}">td>
            <td th:text="${user.age}">td>
            <td><a th:href="@{/toEdit(id=${user.id})}">edita>td>
            <td><a th:href="@{/delete(id=${user.id})}">deletea>td>
        tr>

        tbody>
    table>
div>
<div class="form-group">
    <div class="col-sm-2 control-label">
        <a href="/toAdd" th:href="@{/toAdd}" class="btn btn-info">adda>
    div>
div>


body>
html>
9.修改配置文件application.properties
#扫描实体类
mybatis.type-aliases-package=com.example.entity
#扫描映射文件
mybatis.mapper-locations: classpath:mapper/*.xml

#配置数据库
spring.datasource.driver-class-name=com.mysql.jdbc.Driver
spring.datasource.url=jdbc:mysql://localhost:3306/test?characterEncoding=utf8&useSSL=false&autoReconnect=true&failOverReadOnly=false&autoReconnectForPools=true
spring.datasource.username=root
spring.datasource.password=root

#过滤静态资源
spring.mvc.static-path-pattern=/**

#指定系统直接访问路径
spring.resources.static-locations = classpath:/templates/,classpath:/META-INF/resources/,classpath:/resources/
#热部署:修改后台文件保存后自动重启
#spring.devtools.restart.enabled=true

#Messages资源信息
#spring.messages.basename=messages

#关闭thymeleaf缓存 开发时使用 否则没有实时画面
spring.thymeleaf.cache=false
注意:我这里用的MySQL是5.0的版本,更高版本的话,比如,8.0,application.properties里面的配置会不一样,这里,就需要自己上网去查一下了。
好了,现在直接运行DemoApplication类
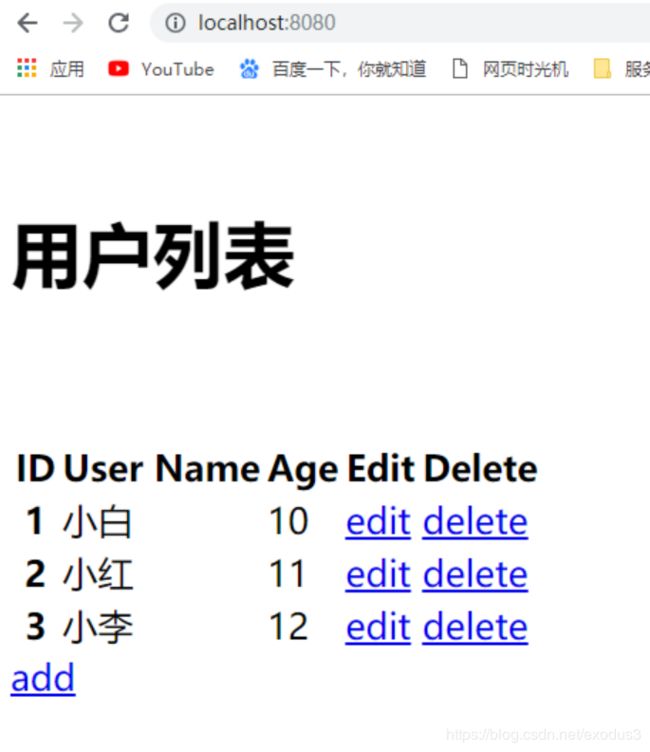
浏览器输入http://localhost:8080/,效果就出来了,界面有点丑陋,毕竟不是做前端的,将就着
项目的目录结构

下一篇会完善页面的功能
如果觉得我的文章对您有用,请随意打赏。您的支持将鼓励我继续创作!
谢谢大家
