Centos7.2下nginx+uwsgi+python/Django搭建生产环境
【查了很多资料并尝试,刚配置好的生产环境,记录下,免得忘了。】
python/Django在开发时使用命令如下来运行测试:
python manage.py runserver 0.0.0.0:8000但在真正部署运行时不能这么用,得配合nginx+uwsgi来部署(这两个做什么用网络上资料很多)。
为了省去中间繁琐的不必要的配置步骤,采用如下集成包:
Anaconda3-4.4.0 for
Linux,Python的运行环境,包含了很多常用的库,下载地址:https://repo.continuum.io/archive/Anaconda3-4.4.0-Linux-x86_64.shPHPStudy for Linux,支持Apache/Nginx/Tengine/Lighttpd,
支持php5.2/5.3/5.4/5.5切换 ,同时包含了MySql数据库,下载地址:http://lamp.phpstudy.net/,这里已经包含了安装教程
将以上安装程序上传到服务器的指定目录(或使用wget下载)
一、安装Python
所申请的阿里云服务器Centos7.2默认安装了python2.7的版本,但我们开发用的是python 3.6的,所以需要再安装。
直接运行安装包:
./Anaconda3-4.4.0-Linux-x86_64.shPS:如果出现权限不足的提示,则使用chmod +x 添加可执行权限
等待安装结束即可。
按自己开发所需的模块执行安装:
pip install django
pip install pymysql
......
二、安装nginx
wget -c http://lamp.phpstudy.net/phpstudy-all.bin
chmod +x phpstudy.bin    #添加可执行权限的设置
./phpstudy.bin     #运行安装
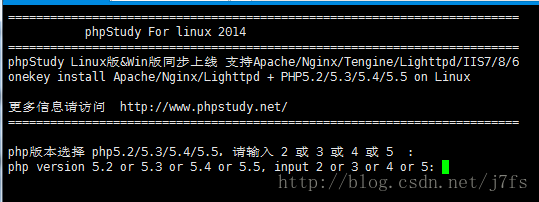
按提示选择所需的版本(我用的是nginx+php5.5),执行安装、编译过程,等。。。用时23分钟:

可通过以下命令管理:
服务进程管理:phpstudy (start|stop|restart|uninstall) #默认做为系统服务随开机启动
站点主机管理:phpstudy (add|del|list)
ftpd用户管理:phpstudy ftp (add|del|list)
这个步骤就完成了nginx+php+mysql的安装
三、配置uwsgi模块
前提:确保运行python manage.py runserver 0.0.0.0:8000能正常访问,即表示站点程序没有问题
本步骤重点参考并感谢如下博文:
http://blog.csdn.net/oushaoabc/article/details/51942355
http://www.linuxidc.com/Linux/2017-03/141806.htm
主要时间都是花在这边的配置,它主要是监听python/django的运行端口并与nginx交互。
配置过程整理如下:
1、安装uwsgi
执行命令:
pip install uwsgi2、在站点程序的根目录下(即与manage.py文件同级目录)
- 创建runapp.py的uwsgi运行文件,代码如下:
#coding:utf-8
import os
from django.core.wsgi import get_wsgi_application
os.environ.setdefault("DJANGO_SETTINGS_MODULE", "sitename.settings")  # 这里是你自己的项目名
application = get_wsgi_application()
主要作用是通过uwsgi来加载django程序
创建runapp.ini的uwsgi配置文件,内容如下:
[uwsgi]
http = 127.0.0.1:7070 #监听IP和端口
chdir = /www/sitename #项目根目录
module = runapp #uwsgi文件,注意不用把后缀.py加上去
processes = 4 #开启4个进程(按需更改)
threads = 2 #每个进程开启4个线程
enable-threads = True #支持线程启动
daemonize = /var/log/uwsgi.log #后台启动,并把日志记录到指定文件
buffer-size = 21573在/etc下建uwsgi7070.ini
[uwsgi]
socket = 127.0.0.1:7070
master = true         #主进程
vhost = true          #多站模式
no-stie = true        #多站模式时不设置入口模块和文件
workers = 2           #子进程数
reload-mercy = 10
vacuum = true         #退出、重启时清理文件
max-requests = 1000
limit-as = 512
buffer-sizi = 30000
#pid文件,用于下面的脚本启动、停止该进程
pidfile = /var/run/uwsgi7070.pid
daemonize = /var/log/uwsgi/uwsgi7070.log
运行命令
uwsgi /etc/uwsgi7070.ini 会出现如下提示:
[uWSGI] getting INI configuration from /etc/uwsgi7070.iniTips:这个步骤之前不懂,认为是要在浏览器中访问7070端口,但却浏览不到,以为是配错了,搞得配了好多次,多花了时间。
再用命令查看指定端口是否有线程启动:
lsof -i:7070Tips:
可以查看/var/log/uwsgi/uwsgi7070.log日志文件中的内容判断配置及运行是否正常;
如果提示找不到lsof命令,则运行安装命令:yum install lsof -y
- 将uwsgi配置为开机启动
这个步骤建议做。其目的,是免得服务启重时都要手动执行 uwsgi /etc/uwsgi7070.ini 这个过程
在/ect/init.d/目录下新建uwsgi7070文件,内容如下(可以参考init.d目录下其他启动文件的写法):
#! /bin/sh
# chkconfig: 2345 55 25
# Description: Startup script for uwsgi webserver on Debian. Place in /etc/init.d and
# run 'update-rc.d -f uwsgi defaults', or use the appropriate command on your
# distro. For CentOS/Redhat run: 'chkconfig --add uwsgi'

### BEGIN INIT INFO
# Provides:          uwsgi
# Required-Start:    $all
# Required-Stop:     $all
# Default-Start:     2 3 4 5
# Default-Stop:      0 1 6
# Short-Description: starts the uwsgi web server
# Description:       starts uwsgi using start-stop-daemon
### END INIT INFO


PATH=/usr/local/sbin:/usr/local/bin:/sbin:/bin:/usr/sbin:/usr/bin:/root/anaconda3/bin
DESC="uwsgi deamo"
NAME=uwsgi7070
DAEMON=/root/anaconda3/bin/uwsgi
CONFIGFILE=/etc/$NAME.ini

PIDFILE=/var/run/$NAME.pid
SCRIPTNAME=/etc/init.d/$NAME

set -e
[ -x "$DAEMON" ] || exit 0

do_start() {
    $DAEMON $CONFIGFILE || echo -n "uwsgi already running"
}

do_stop() {
    $DAEMON --stop $PIDFILE || echo -n "uwsgi not running"
    rm -f $PIDFILE
    echo "$DAEMON STOPED."
}

do_reload() {
    $DAEMON --reload $PIDFILE || echo -n "uwsgi can't reload"
}

do_status() {
    ps aux|grep $DAEMON
}

case "$1" in
 status)
    echo -en "Status $NAME: \n"
    do_status
 ;;
 start)
    echo -en "Starting $NAME: \n"
    do_start
 ;;
 stop)
    echo -en "Stopping $NAME: \n"
    do_stop
 ;;
 reload|graceful)
    echo -en "Reloading $NAME: \n"
    do_reload
 ;;
 *)
    echo "Usage: $SCRIPTNAME {start|stop|reload}" >&2
    exit 3
 ;;
esac
exit 0
uwsgi7070
然后执行命令:
chkconfig --add uwsgi7070  #添加服务
chkconfig uwsgi7070 on  #设置开机启动
Tips:
运行如下命令测试脚本是否可行:
./etc/init.d/uwsgi7070 start这个地方碰到个错误,提示:
-bash: ./uwsgi7070: /bin/sh^M: bad interpreter: No such file or directory查下了资料,是因为:sh脚本在windows系统下写的,不同系统的编码格式引起的。
解决方法:
vi test.sh
#在vi的命令状态下执行下列指令:
  :set ff
#看到如下信息
 fileformat=dos
#修改文件格式命令
 :set ff=unix
 :wq (存盘退出)
四、配置nginx的站点服务
最后一步配置项:
打开 /phpstudy/server/nginx/conf/vhosts/phpstudy.conf 文件,添加自己的站点配置:
server {
        listen       80;
        server_name  test.com; #你自己的域名或IP
        #配置资源文件,指定静态文件的位置,不然项目中css、js文件找不到,网站就没样式,也执行不了js脚本等
        location /static/ {
            alias  /web/sitesname/static/;
            allow   all;
        }
        #重定向到uwsgi的配置
        location / {
            include  uwsgi_params;  #使用uwsgi模式
            uwsgi_pass  127.0.0.1:7070;  #映射到前面定义的7070端口
            uwsgi_param UWSGI_SCRIPT runapp;  #前面定义的py模块名
            uwsgi_param UWSGI_CHDIR /web/sitesname/; #站点目录
            index  index.html index.htm;
        }
    }
最后执行 phpstudy restart或是reboot下看站点能否正常访问。