springboot 2.1 实践教程(十六)-整合Redis
Redis介绍
Redis是当前比较热门的NOSQL系统之一,它是一个开源的key-value存储系统(区别于MySQL的二维表格的形式存储。)。和Memcache类似,但很大程度补偿了Memcache的不足。和Memcache一样,Redis数据都是缓存在计算机内存中,不同的是,Memcache只能将数据缓存到内存中,无法自动定期写入硬盘,这就表示,一断电或重启,内存清空,数据丢失。所以Memcache的应用场景适用于缓存无需持久化的数据。而Redis不同的是它会周期性的把更新的数据写入磁盘或者把修改操作写入追加的记录文件,实现数据的持久化
Spring Boot如何整合Redis?
网上目前有很多整合Redis的文章,但是大部分都是复制粘贴根本没有验证能不能用,本着能够让大家直接通过实践代码就能使用的目的,本章通过实际的案例来整合Redis步骤如下:
1.首先要安装Redis,如果已经安装完成Redis则跳过本步骤,如果没安装,具体如何安装可参考
Redis在Window服务下的安装,或者自行百度如何安装。
2.pom.xml文件增加Redis的相关依赖包
    4.0.0

    org.learn
    learn15
    1.0-SNAPSHOT


        org.springframework.boot
        spring-boot-starter-parent
        2.1.4.RELEASE


            org.springframework.boot
            spring-boot-starter-web


            org.springframework.boot
            spring-boot-configuration-processor
            true


            org.springframework
            spring-context-support


            org.springframework.boot
            spring-boot-starter-aop


            org.springframework.boot
            spring-boot-starter-test
            test


            org.springframework.boot
            spring-boot-starter-thymeleaf


            mysql
            mysql-connector-java


            org.mybatis.spring.boot
            mybatis-spring-boot-starter
            1.3.2


            com.alibaba
            druid-spring-boot-starter
            1.1.10


            org.springframework.boot
            spring-boot-starter-data-redis


            redis.clients
            jedis
            2.9.0


            com.alibaba
            fastjson
            1.2.47
3.application.yml增加redis的相关配置,注意不要忘记增加springbootlearn.redis.open=true #是否开启redis缓存true开启 false关闭,完整配置文件如下:
server:
  servlet:
    context-path: /
  tomcat:
    uri-encoding: UTF-8
spring:
  # 模板引擎
  thymeleaf:
    mode: HTML
    encoding: utf-8
    # 禁用缓存
    cache: false
    # 资源信息
  #messages:
    # 国际化资源文件路径
   # basename: i18n/messages  #系统会在i118n目录下查找messages开头的文件
    #encoding: UTF-8
  http:
    encoding:
      charset: UTF-8
  redis:
    database: 0
    host: localhost
    port: 6379
    password: 123456      # 密码(默认为空)
    timeout: 6000ms  # 连接超时时长(毫秒)
    jedis:
      pool:
        max-active: 1000  # 连接池最大连接数(使用负值表示没有限制)
        max-wait: -1ms      # 连接池最大阻塞等待时间(使用负值表示没有限制)
        max-idle: 10      # 连接池中的最大空闲连接
        min-idle: 5       # 连接池中的最小空闲连接
  profiles:
    active: dev
#Redis开关
springbootlearn:
  redis:
    open: true #是否开启redis缓存  true开启   false关闭
# MyBatis
mybatis:
  # 搜索指定包别名
  typeAliasesPackage: org.learn
  # 配置mapper的扫描,找到所有的mapper.xml映射文件
  mapperLocations: classpath*:mapper/*Mapper.xml
  # 加载全局的配置文件
  configLocation: classpath:mapper/mybatis-config.xml
4.增加RedisConfig注入RedisTemplate
package org.learn.config;

import com.fasterxml.jackson.annotation.JsonAutoDetect;
import com.fasterxml.jackson.annotation.PropertyAccessor;
import com.fasterxml.jackson.databind.ObjectMapper;
import org.springframework.context.annotation.Bean;
import org.springframework.context.annotation.Configuration;
import org.springframework.data.redis.connection.RedisConnectionFactory;
import org.springframework.data.redis.core.RedisTemplate;
import org.springframework.data.redis.serializer.Jackson2JsonRedisSerializer;
import org.springframework.data.redis.serializer.StringRedisSerializer;


/**
 * Redis配置
 *
 * @author yuewei
 */
@Configuration
public class RedisConfig {

    @Bean
    public RedisTemplate redisTemplate(RedisConnectionFactory factory) {
        RedisTemplate template = new RedisTemplate();
        template.setConnectionFactory(factory);
        Jackson2JsonRedisSerializer jackson2JsonRedisSerializer = new Jackson2JsonRedisSerializer(Object.class);
        ObjectMapper om = new ObjectMapper();
        om.setVisibility(PropertyAccessor.ALL, JsonAutoDetect.Visibility.ANY);
        om.enableDefaultTyping(ObjectMapper.DefaultTyping.NON_FINAL);
        jackson2JsonRedisSerializer.setObjectMapper(om);
        StringRedisSerializer stringRedisSerializer = new StringRedisSerializer();
        // key采用String的序列化方式
        template.setKeySerializer(stringRedisSerializer);
        // hash的key也采用String的序列化方式
        template.setHashKeySerializer(stringRedisSerializer);
        // value序列化方式采用jackson
        template.setValueSerializer(jackson2JsonRedisSerializer);
        // hash的value序列化方式采用jackson
        template.setHashValueSerializer(jackson2JsonRedisSerializer);
        template.afterPropertiesSet();
        return template;
    }
}
5.创建一个RedisUtils工具类用于方面读写数据
package org.learn.utils;

import com.alibaba.fastjson.JSON;
import org.springframework.beans.factory.annotation.Autowired;
import org.springframework.data.redis.core.RedisTemplate;
import org.springframework.data.redis.core.ValueOperations;
import org.springframework.stereotype.Component;

import javax.annotation.Resource;
import java.util.concurrent.TimeUnit;

/**
 * Redis工具类
 */
@Component
public class RedisUtils {
    @Autowired
    private RedisTemplate redisTemplate;

    @Resource(name="redisTemplate")
    private ValueOperations valueOperations;

    /**  默认过期时长,单位:秒 */
    public final static long DEFAULT_EXPIRE = 60 * 60 * 24;
    /**  不设置过期时长 */
    public final static long NOT_EXPIRE = -1;

    public void set(String key, Object value, long expire){
        valueOperations.set(key, toJson(value));
        if(expire != NOT_EXPIRE){
            redisTemplate.expire(key, expire, TimeUnit.SECONDS);
        }
    }

    public void set(String key, Object value){
        set(key, value, DEFAULT_EXPIRE);
    }

    public  T get(String key, Class clazz, long expire) {
        String value = valueOperations.get(key);
        if(expire != NOT_EXPIRE){
            redisTemplate.expire(key, expire, TimeUnit.SECONDS);
        }
        return value == null ? null : fromJson(value, clazz);
    }

    public  T get(String key, Class clazz) {
        return get(key, clazz, NOT_EXPIRE);
    }

    public String get(String key, long expire) {
        String value = valueOperations.get(key);
        if(expire != NOT_EXPIRE){
            redisTemplate.expire(key, expire, TimeUnit.SECONDS);
        }
        return value;
    }

    public String get(String key) {
        return get(key, NOT_EXPIRE);
    }

    public void delete(String key) {
        redisTemplate.delete(key);
    }

    /**
     * Object转成JSON数据
     */
    private String toJson(Object object){
        if(object instanceof Integer || object instanceof Long || object instanceof Float ||
                object instanceof Double || object instanceof Boolean || object instanceof String){
            return String.valueOf(object);
        }
        return JSON.toJSONString(object);
    }

    /**
     * JSON数据,转成Object
     */
    private  T fromJson(String json, Class clazz){
        return JSON.parseObject(json, clazz);
    }
}
6.创建Redis的切面类RedisAspect 用于处理Redis启动的开关
package org.learn.aspectj;

import org.aspectj.lang.ProceedingJoinPoint;
import org.aspectj.lang.annotation.Around;
import org.aspectj.lang.annotation.Aspect;
import org.learn.exception.RRException;
import org.slf4j.Logger;
import org.slf4j.LoggerFactory;
import org.springframework.beans.factory.annotation.Value;
import org.springframework.stereotype.Component;

/**
 * Redis切面处理类
 *
 * @author  yuewei
 */
@Aspect
@Component
public class RedisAspect {
    private Logger logger = LoggerFactory.getLogger(getClass());
    /**
     * 是否开启redis缓存  true开启   false关闭
     */
    @Value("${springbootlearn.redis.open: false}")
    private boolean open;

    @Around("execution(* org.learn.utils.RedisUtils.*(..))")
    public Object around(ProceedingJoinPoint point) throws Throwable {
        Object result = null;
        if(open){
            try{
                result = point.proceed();
            }catch (Exception e){
                logger.error("redis error", e);
                throw new RRException("Redis服务异常");
            }
        }
        return result;
    }
}
7.创一个异常类RRException用于处理Redis异常
package org.learn.exception;

/**
 * 自定义异常
 *
 * @author yuewei
 */
public class RRException extends RuntimeException {
   private static final long serialVersionUID = 1L;

    private String msg;
    private int code = 500;

    public RRException(String msg) {
      super(msg);
      this.msg = msg;
   }

   public RRException(String msg, Throwable e) {
      super(msg, e);
      this.msg = msg;
   }

   public RRException(String msg, int code) {
      super(msg);
      this.msg = msg;
      this.code = code;
   }

   public RRException(String msg, int code, Throwable e) {
      super(msg, e);
      this.msg = msg;
      this.code = code;
   }

   public String getMsg() {
      return msg;
   }

   public void setMsg(String msg) {
      this.msg = msg;
   }

   public int getCode() {
      return code;
   }

   public void setCode(int code) {
      this.code = code;
   }


}
8编写一个测试类测试Redis是否整合成功,记住测试类要放在test目录下
package org.learn;

import org.junit.Test;
import org.junit.runner.RunWith;
import org.learn.utils.RedisUtils;
import org.springframework.beans.factory.annotation.Autowired;
import org.springframework.boot.test.context.SpringBootTest;
import org.springframework.test.context.junit4.SpringRunner;

@RunWith(SpringRunner.class)
@SpringBootTest
public class RedisTest {

    @Autowired
    private RedisUtils redisUtils;

    @Test
    public void contextLoads() {

        redisUtils.set("user", "testuser");

        System.out.println(redisUtils.get("user"));
    }

}
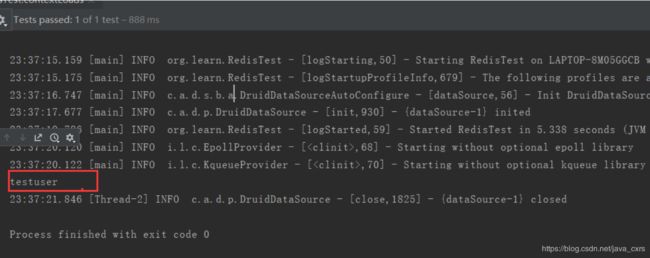
执行测试类,结果输出入下:
标红的打印输出了我们在测试类添加到Redis缓存中的数据, 说明我们通过Redis成功的完成了数据读写,整合成功!
