springmvc-没有web.xml和springmvc.xml你还可以运行起来springmvc吗
前面也写了几篇有关springboot的简单使用的文章,也写了几篇有关springcloud的文章,不过springcloud是基于springboot的。所以就来纠结一下springboot的吧。
springboot之所以可以不用使用任何的xml配置文件就可以实现web的配置和发布,在前期的spring中已经加入了很多的元素,用于实现这些功能。
本篇主要介绍两个内容:1)不使用web.xml发布一个web项目;2)不使用springmvc.xml配置文件,实现messageconverter的更换。
1.不使用web.xml配置文件发布一个web项目。
1.1先引入jar包
因为近期在研究spring的源码,所以干脆直接把项目建到spring的模块下面,作为spring的子项目,方便debug和注释。这里也就使用gradle构建,为了运行不出现问题,没有使用源码引入的还是jar包。这里跟maven相差不大,也就是把maven中坐标版本信息groupId,artifactId,version抠出来放到gradle中的group,name,version中。这里可以先拷贝模板,然后配置一下即可,不再多言。
group 'org.springframework'
version '5.0.3.BUILD-SNAPSHOT'

apply plugin: 'java'
apply plugin: 'war'

sourceCompatibility = 1.8

/*repositories {
    mavenCentral()
}*/
//将仓库更换为阿里云仓库
allprojects {
    repositories {
        maven{ url 'http://maven.aliyun.com/nexus/content/groups/public/'}
    }
}

dependencies {

    compile group: 'org.springframework',name: 'spring-core',version: '5.0.3.BUILD-SNAPSHOT'
    compile group: 'org.springframework',name: 'spring-beans',version: '5.0.3.BUILD-SNAPSHOT'
    compile group: 'org.springframework',name: 'spring-expression',version: '5.0.3.BUILD-SNAPSHOT'
    compile group: 'org.springframework',name: 'spring-context',version: '5.0.3.BUILD-SNAPSHOT'
    compile group: 'org.springframework',name: 'spring-web',version: '5.0.3.BUILD-SNAPSHOT'
    compile group: 'org.springframework',name: 'spring-webmvc',version: '5.0.3.BUILD-SNAPSHOT'

    compile group: 'commons-logging', name: 'commons-logging', version: '1.2'
    compile group: 'commons-collections', name: 'commons-collections', version: '3.2.1'
    compile group: 'commons-io', name: 'commons-io', version: '2.4'
    compile group: 'commons-fileupload', name: 'commons-fileupload', version: '1.3.1'
    compile group: 'commons-codec', name: 'commons-codec', version: '1.10'

    compile group: 'jstl', name: 'jstl', version: '1.2'
    compile group: 'javax', name: 'javaee-api', version: '7.0'
    compile group: 'log4j', name: 'log4j', version: '1.2.17'
    compile group: 'org.slf4j', name: 'slf4j-api', version: '1.7.24'
    compile group: 'org.slf4j', name: 'slf4j-log4j12', version: '1.7.24'


    /*springmvc默认使用的jackson*/
    compile group: 'com.fasterxml.jackson.core', name: 'jackson-annotations', version: '2.9.5'
    compile group: 'com.fasterxml.jackson.core', name: 'jackson-core', version: '2.9.5'
    compile group: 'com.fasterxml.jackson.core', name: 'jackson-databind', version: '2.9.5'

    /*将jackson跟换为fastjson,需要修改messageconverter*/
    /*compile group: 'com.alibaba', name: 'fastjson', version: '1.2.33'*/


    testCompile group: 'junit', name: 'junit', version: '4.12'
}
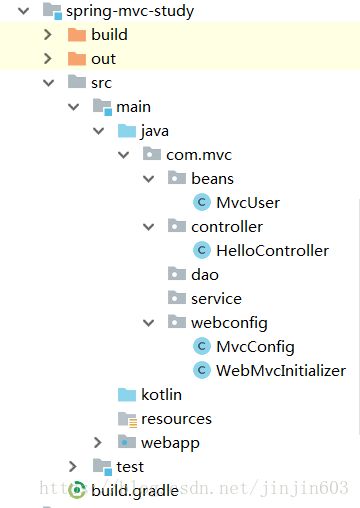
1.2工程目录

MvcUser-实例对象
HelloController-controller类
MvcConfig-@configuration 容器类
WebMvcInitializer-web配置类
1.3看代码
MvcUser
public class MvcUser implements Serializable{
	private String id;
	private String name;
	private Integer age;
	private String email;

	public MvcUser(String id, String name, Integer age, String email) {
		this.id = id;
		this.name = name;
		this.age = age;
		this.email = email;
	}

	public String getId() {
		return id;
	}

	public void setId(String id) {
		this.id = id;
	}

	public String getName() {
		return name;
	}

	public void setName(String name) {
		this.name = name;
	}

	public Integer getAge() {
		return age;
	}

	public void setAge(Integer age) {
		this.age = age;
	}

	public String getEmail() {
		return email;
	}

	public void setEmail(String email) {
		this.email = email;
	}
}
HelloController
@RestController
public class HelloController {

	@GetMapping("/get/{id}")
	public MvcUser getMvcUser(@PathVariable("id") String id){
		System.out.println("查询id:"+id);
		MvcUser mu = new MvcUser("1","zhangsan",19,"[email protected]");
		return mu;
	}
}
这里的@RestController是组合注解@Controller+@ResponseBody
@GetMapping是简化版的Get请求,类似于@RequestMapping+Get方法
其他配置都是一样的。
由于前面相当于已经配置了@ResponseBody,所以在方法上面就不在配置,直接返回对象类型。
1.4@Bean配置
@Configuration
@ComponentScan("com.mvc")
@EnableWebMvc
public class MvcConfig{
	/**
	 * 配置视图解析器
	 * @return
	 */
	@Bean
	public InternalResourceViewResolver viewResolver(){
		InternalResourceViewResolver viewResolver = new InternalResourceViewResolver();
		viewResolver.setPrefix("/WEB-INF/classes/views/");
		viewResolver.setSuffix(".jsp");
		viewResolver.setViewClass(JstlView.class);
		return viewResolver;
	}
}
这里配置视图解析器。@Configuration+@Bean就相当于一个IOC容器。添加@Bean的方法就类似于一个bean。所以在这里添加跟在xml配置文件中添加一个
所以在这里添加viewResolver()方法,实际上就是相当于配置了视图解析器。
1.5web配置
/**
 * 取代web.xml配置文件
 */
public class WebMvcInitializer implements WebApplicationInitializer{

	@Override
	public void onStartup(ServletContext servletContext) throws ServletException {

		AnnotationConfigWebApplicationContext ctx = new AnnotationConfigWebApplicationContext();
		ctx.register(MvcConfig.class);
		ctx.setServletContext(servletContext);

		Dynamic dispatcher = servletContext.addServlet("dispatcher", new DispatcherServlet(ctx));
		dispatcher.addMapping("/");
		dispatcher.setLoadOnStartup(1);

	}
}
实现WebApplicationInitializer。实现中间的onStartup()方法,并在方法中配置servlet,filter,listener就等价于配置了web.xml配置文件,并在配置文件中实现一样。
比如这里配置了DispatcherServlet,并设置Mapping为/,启动时机。
做好这些配置之后是不是就可以启动了呢?试一下
run on server
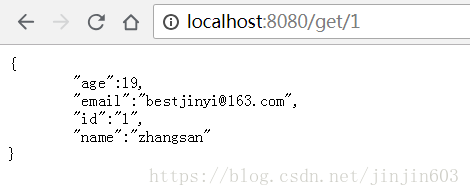
启动完成之后访问 http://localhost:8080/get/1

不需要web.xml配置文件,不需要springmvc.xml配置文件的web项目成功的发布且正常对外提供了服务。
2.messageconverter更换
springmvc能够直接返回json是因为springmvc底层依赖了jackson。那么我现在遇到了问题,我想使用alibaba的fastjson该怎么办呢,我的数据转换出现了乱码该怎么办呢?
使用xml配置文件的时候,我们可以通过下面的形式进行配置。
<mvc:annotation-driven>
        <mvc:message-converters>
            <ref bean="stringHttpMessageConverter">ref>
			<ref bean="mappingJackson2HttpMessageConverter">ref>
        mvc:message-converters>
    mvc:annotation-driven>

	<bean id="stringHttpMessageConverter" class="org.springframework.http.converter.StringHttpMessageConverter">

		<property name="supportedMediaTypes">
			<list>
				<value>application/json;charset=UTF-8value>
				<value>text/html;charset=UTF-8value>
				<value>text/plain;charset=UTF-8value>
			list>
		property>
	bean>

	<bean id="mappingJackson2HttpMessageConverter" class="org.springframework.http.converter.json.MappingJackson2HttpMessageConverter"/>
这样就可以解决问题了。那么没有配置文件我们该怎么办呢?
可以这样弄
2.1先引入fastjson
compile group: 'com.alibaba', name: 'fastjson', version: '1.2.33'
2.2使用WebMvcConfigurerAdapter
@Configuration
@ComponentScan("com.mvc")
@EnableWebMvc
public class MvcConfig extends WebMvcConfigurerAdapter {

	/**
	 * 配置视图解析器
	 * @return
	 */
	@Bean
	public InternalResourceViewResolver viewResolver(){
		InternalResourceViewResolver viewResolver = new InternalResourceViewResolver();
		viewResolver.setPrefix("/WEB-INF/classes/views/");
		viewResolver.setSuffix(".jsp");
		viewResolver.setViewClass(JstlView.class);
		return viewResolver;
	}

	@Bean
	public FastJsonHttpMessageConverter fastJsonHttpMessageConverter(){
		//1.需要定义一个convert转换消息的对象;
		FastJsonHttpMessageConverter fastJsonHttpMessageConverter = new FastJsonHttpMessageConverter();
		//2.添加fastJson的配置信息,比如:是否要格式化返回的json数据;
		FastJsonConfig fastJsonConfig = new FastJsonConfig();
		fastJsonConfig.setSerializerFeatures(SerializerFeature.PrettyFormat);
		//3处理中文乱码问题
		List<MediaType> fastMediaTypes = new ArrayList<>();
		fastMediaTypes.add(MediaType.APPLICATION_JSON_UTF8);
		//4.在convert中添加配置信息.
		fastJsonHttpMessageConverter.setSupportedMediaTypes(fastMediaTypes);
		fastJsonHttpMessageConverter.setFastJsonConfig(fastJsonConfig);

		return fastJsonHttpMessageConverter;
	}

	/**
	 * springmvc原生的message使用的是jackson,现在想更换为fastjson的,需要经过两步处理
	 * 	1.将fastjson messageconverter加入到ioc容器中
	 * 	2.将fastjson messageconverter加入到converters组中
	 * 		继承WebMvcConfigurerAdapter类并重写extendMessageConverters()方法
	 *
	 * 		注意:现在的WebMvcConfigurerAdapter 类已经过时,但是还可以使用。
	 * 				如果担心以后不再支持,可以继承新的类WebMvcConfigurationSupport,但是通过配置,发现没法执行,
	 * 实现了WebMvcConfigurer接口是可行的。所以可以选择继续使用WebMvcConfigurerAdapter
	 * 或者使用WebMvcConfigurer
	 *
	 * 	讲过上面的两步操作,就完成了fastjson的集成
	 * @param converters
	 */
	@Override
	public void extendMessageConverters(List<HttpMessageConverter<?>> converters) {
		converters.add(fastJsonHttpMessageConverter());
	}

}
继承WebMvcConfigurerAdapter 类,然后重写extendMessageConverters()。然后将fastjson的实现加入到converters组中。然后再启动服务,就好了(前提是先把jackson注释掉)。
通过上面的步骤我们就完成了MessageConverter的更换。
但遗憾的是WebMvcConfigurerAdapter 类已经过期了。
替代WebMvcConfigurerAdapter类的是WebMvcConfigurationSupport和WebMvcConfigurer。但是实现了WebMvcConfigurationSupport接口,配置的MessageConverter却不起作用。实现WebMvcConfigurer可以使用。
好了,就写到这里。
我去瞅瞅为啥实现WebMvcConfigurationSupport接口MessageConverter不起作用。