第一阶段-入门详细图文讲解tensorflow1.4 -(三)TensorFlow 编程基础知识
开始之前先把准备工作做好。
打开Anaconda。
没有安装移步 第一阶段-入门详细图文讲解tensorflow1.4 -安装(二)Windows CPU or GPU

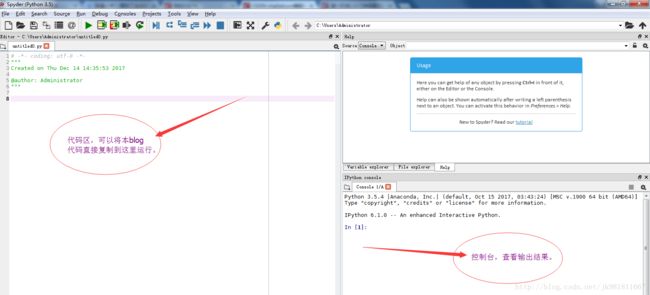
当然有很多python IED。看你熟悉哪个IDE。新手如果没有经验先按我的步骤走,可以避免入坑。打开spyder
——–>开始我们的tensorflow征程<——
对于小白直接开始tensorflow基础知识是有困难的。
需要:线性代数与矩阵,概率论,多重积分,级数变换,信息论等工科基础。默认需要有前馈神经网络(BP),标准卷积神经网络(CNN),标准循环神经网络(RNN)基础知识。tensorflow会让你如虎添翼。
但是不想因为这些困难让大家望而止步。这不是paper,而是blog。初级以通俗简单例子通透基本原理。中级以实战项目为例细细品味tensorflow。
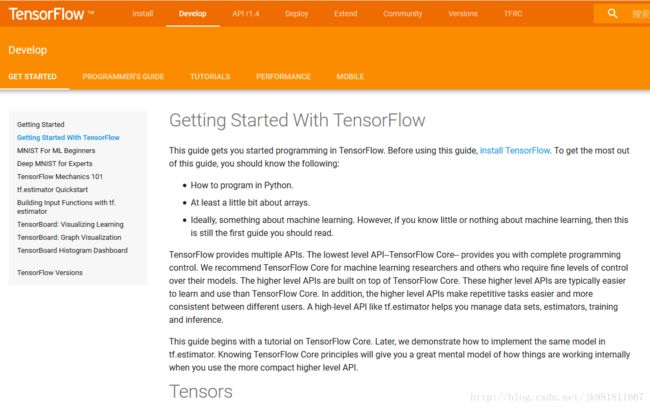
get started这页文档,是面向基础的,全流程体验tensorflow。非常适合入门。
follow me.
TensorFlow provides multiple APIs. The lowest level API–TensorFlow Core– provides you with complete programming control. We recommend TensorFlow Core for machine learning researchers and others who require fine levels of control over their models. The higher level APIs are built on top of TensorFlow Core. These higher level APIs are typically easier to learn and use than TensorFlow Core. In addition, the higher level APIs make repetitive tasks easier and more consistent between different users. A high-level API like tf.estimator helps you manage data sets, estimators, training and inference.
This guide begins with a tutorial on TensorFlow Core. Later, we demonstrate how to implement the same model in tf.estimator. Knowing TensorFlow Core principles will give you a great mental model of how things are working internally when you use the more compact higher level API.
最底层的API,tensorflow Core是面向机器学习研究者的,和一些想完全控制自己模型的人。
另外一些封装比较好的高层的API是非常容易上手和使用的。像tf.estimator。
先看几个核心概念。
一,Tensor(张量)
张量是tensorflow核心的基本数据单元。
张量由一组基本值组成,这些值构成任意数量的数组。
张量的秩是它的维数。
下面是张量的一些例子:
3 # a rank 0 tensor; a scalar with shape []
[1., 2., 3.] # a rank 1 tensor; a vector with shape [3]
[[1., 2., 3.], [4., 5., 6.]] # a rank 2 tensor; a matrix with shape [2, 3]
[[[1., 2., 3.]], [[7., 8., 9.]]] # a rank 3 tensor with shape [2, 1, 3]
rank:张量的秩。
shape:描述tensor的形状。
理解:做到给出一个shape数组,能够写出tensor的形状。技巧:去掉中括号,逗号+1就是数组的值。数组的的长度是rank。
其实张量是物理学上的量,严格意义上张量在线性不变的情况下才和,scalar ,vector,matrix ,n-dimension量等价。先知道这些对tensorflow程序来说已经够用。深入理解张量请移步《张量分析》。
二,The Computational Graph(计算图)
站在计算图的角度,你可以认为tensorflow程序是有相对独立的两部分组成。
1,构建计算图。
2,运行计算图。
计算图是由一系列的tensorflow的操作组成,并且这些操作编配成计算图的节点。
我们先构建一个简单的图。
node1 = tf.constant(3.0, dtype=tf.float32)
node2 = tf.constant(4.0) # also tf.float32 implicitly
print(node1, node2)
打印结果:
Tensor("Const:0", shape=(), dtype=float32) Tensor("Const_1:0", shape=(), dtype=float32)注意:很惊讶结果并没有输出3.0和4.0。
实际中我们运行计算图必须在Session中。
三,Session(会话)
Session:囊括tensorflow运行时候的状态,运行控制。
修改一下:
sess = tf.Session()
print(sess.run([node1, node2]))
结果:[3.0, 4.0]
我们当然可以写出更复杂的计算图。
from __future__ import print_function
node3 = tf.add(node1, node2)
print("node3:", node3)
print("sess.run(node3):", sess.run(node3))
打印出两行:
node3: Tensor("Add:0", shape=(), dtype=float32)
sess.run(node3): 7.0
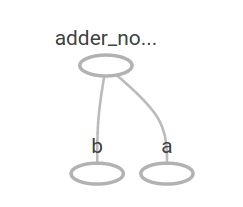
四,TensorBoard
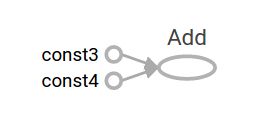
TensorBoard :tensorflow提供展示计算图的工具。上面的TensorBoard 表示为:
五,placeholders(占位符)
placeholders:在计算图中,能够接受额外输入,通常情况下,提供的值晚于定义。
a = tf.placeholder(tf.float32)
b = tf.placeholder(tf.float32)
adder_node = a + b  # + provides a shortcut for tf.add(a, b)
以上三行代码,很像一个函数,或者是lambda表达式。我们可以通过feed_dict参数
去填充一些具体的值。
print(sess.run(adder_node, {a: 3, b: 4.5}))
print(sess.run(adder_node, {a: [1, 3], b: [2, 4]}))
输出结果:
7.5
[ 3.  7.]
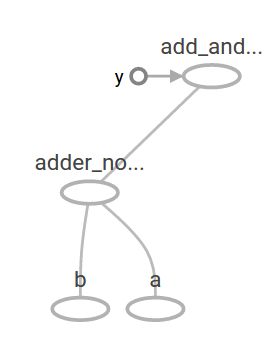
再加添加一步操作乘法操作。
add_and_triple = adder_node * 3.
print(sess.run(add_and_triple, {a: 3, b: 4.5}))
produces the output
22.5六,Variables (变量)
Variables :是在模型训练中,允许修改的量。相同的输入,通过修改变量得到不同输出值。在线性模型中用来描述权重和偏移量。
W = tf.Variable([.3], dtype=tf.float32)
b = tf.Variable([-.3], dtype=tf.float32)
x = tf.placeholder(tf.float32)
linear_model = W*x + b
变量必须显示申明,使用:
init = tf.global_variables_initializer()//初始化全局变量
sess.run(init)print(sess.run(linear_model, {x: [1, 2, 3, 4]}))to produce the output
[ 0. 0.30000001 0.60000002 0.90000004]当我们创建一个模型,当时我们不知道它是不是好的模型。因此我们需要提供一个y占位符。用来构建一个损失函数loss function。根据以上代码,我们将linear_model-y得到的差值,在进行平方,将平方结果进行相加。
y = tf.placeholder(tf.float32)
squared_deltas = tf.square(linear_model - y)
loss = tf.reduce_sum(squared_deltas)
print(sess.run(loss, {x: [1, 2, 3, 4], y: [0, -1, -2, -3]}))
平方差的和:
23.66可以看出这个结果描述,W,b变量是不合适的。如果我们将W=-1,b=1替换。
fixW = tf.assign(W, [-1.])
fixb = tf.assign(b, [1.])
sess.run([fixW, fixb])
print(sess.run(loss, {x: [1, 2, 3, 4], y: [0, -1, -2, -3]}))
结果是
0.0这是个完美的结果。
但是机器学习的目的就是自动找到合适的参数。就是我们接下来要讲的内容。
———————————核心概念讲解完———————————————
介绍两个最基础的API,接下来是飞行模式,没有python基础的移步 python入门。
一,tf.train
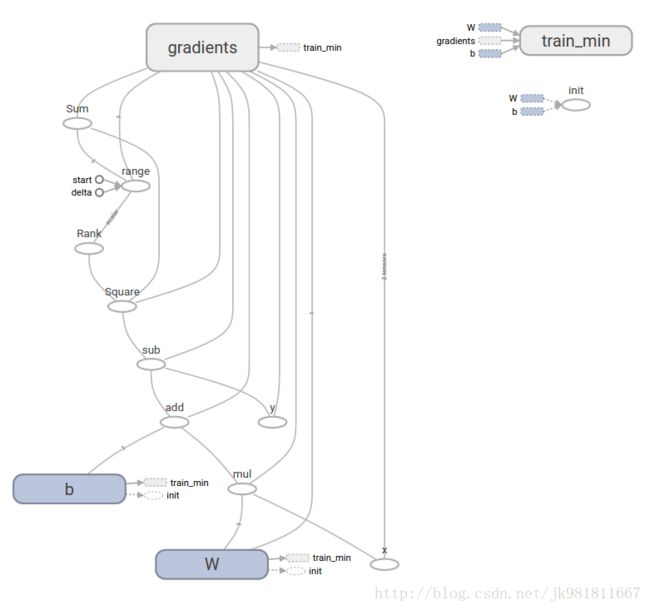
直接讨论完整的机器学习,超出本教程的范围。但是tensorflow通过改变变量达到最小化损失函数的过程太慢。最简单的优化方式,梯度下降。就是求损失函数的导数,每一步都会逼近损失函数最小值。当然tensorflow提供tf.gradients自动求导,自动优化损失函数。看一个例子。
optimizer = tf.train.GradientDescentOptimizer(0.01)
train = optimizer.minimize(loss)

sess.run(init) # reset values to incorrect defaults.
for i in range(1000):
  sess.run(train, {x: [1, 2, 3, 4], y: [0, -1, -2, -3]})

print(sess.run([W, b]))
最终得到参数:
[array([-0.9999969], dtype=float32), array([ 0.99999082], dtype=float32)]完整程序
import tensorflow as tf
# Model parameters
W = tf.Variable([.3], dtype=tf.float32)
b = tf.Variable([-.3], dtype=tf.float32)
# Model input and output
x = tf.placeholder(tf.float32)
linear_model = W*x + b
y = tf.placeholder(tf.float32)

# loss
loss = tf.reduce_sum(tf.square(linear_model - y)) # sum of the squares
# optimizer
optimizer = tf.train.GradientDescentOptimizer(0.01)
train = optimizer.minimize(loss)

# training data
x_train = [1, 2, 3, 4]
y_train = [0, -1, -2, -3]
# training loop
init = tf.global_variables_initializer()
sess = tf.Session()
sess.run(init) # reset values to wrong
for i in range(1000):
  sess.run(train, {x: x_train, y: y_train})

# evaluate training accuracy
curr_W, curr_b, curr_loss = sess.run([W, b, loss], {x: x_train, y: y_train})
print("W: %s b: %s loss: %s"%(curr_W, curr_b, curr_loss))
输出
W: [-0.9999969] b: [ 0.99999082] loss: 5.69997e-11tf.estimator是一个高层次的API,包括以下内容:
1,运行训练循环
2,运行评估循环
3,管理数据集
tf.estimator定义了许多通用型模型。
同样是线性回归,使用tf.estimator实现。代码如下:
# NumPy用来预处理数据
import numpy as np
import tensorflow as tf

# Declare list of features. We only have one numeric feature. There are many
# other types of columns that are more complicated and useful.
feature_columns = [tf.feature_column.numeric_column("x", shape=[1])]

# An estimator is the front end to invoke training (fitting) and evaluation
# (inference). There are many predefined types like linear regression,
# linear classification, and many neural network classifiers and regressors.
# The following code provides an estimator that does linear regression.
estimator = tf.estimator.LinearRegressor(feature_columns=feature_columns)

# TensorFlow provides many helper methods to read and set up data sets.
# Here we use two data sets: one for training and one for evaluation
# We have to tell the function how many batches
# of data (num_epochs) we want and how big each batch should be.
x_train = np.array([1., 2., 3., 4.])
y_train = np.array([0., -1., -2., -3.])
x_eval = np.array([2., 5., 8., 1.])
y_eval = np.array([-1.01, -4.1, -7, 0.])
input_fn = tf.estimator.inputs.numpy_input_fn(
    {"x": x_train}, y_train, batch_size=4, num_epochs=None, shuffle=True)
train_input_fn = tf.estimator.inputs.numpy_input_fn(
    {"x": x_train}, y_train, batch_size=4, num_epochs=1000, shuffle=False)
eval_input_fn = tf.estimator.inputs.numpy_input_fn(
    {"x": x_eval}, y_eval, batch_size=4, num_epochs=1000, shuffle=False)

# We can invoke 1000 training steps by invoking the  method and passing the
# training data set.
estimator.train(input_fn=input_fn, steps=1000)

# Here we evaluate how well our model did.
train_metrics = estimator.evaluate(input_fn=train_input_fn)
eval_metrics = estimator.evaluate(input_fn=eval_input_fn)
print("train metrics: %r"% train_metrics)
print("eval metrics: %r"% eval_metrics)
结果如下:
train metrics: {'average_loss': 1.4833182e-08, 'global_step': 1000, 'loss': 5.9332727e-08}
eval metrics: {'average_loss': 0.0025353201, 'global_step': 1000, 'loss': 0.01014128}
自定义模型
设想通过tensorflow底层次API实现LinearRegressor.
我们需要使用到tf.estimator.Estimator. tf.estimator.LinearRegressor
import numpy as np
import tensorflow as tf

# Declare list of features, we only have one real-valued feature
def model_fn(features, labels, mode):
  # Build a linear model and predict values
  W = tf.get_variable("W", [1], dtype=tf.float64)
  b = tf.get_variable("b", [1], dtype=tf.float64)
  y = W*features['x'] + b
  # Loss sub-graph
  loss = tf.reduce_sum(tf.square(y - labels))
  # Training sub-graph
  global_step = tf.train.get_global_step()
  optimizer = tf.train.GradientDescentOptimizer(0.01)
  train = tf.group(optimizer.minimize(loss),
                   tf.assign_add(global_step, 1))
  # EstimatorSpec connects subgraphs we built to the
  # appropriate functionality.
  return tf.estimator.EstimatorSpec(
      mode=mode,
      predictions=y,
      loss=loss,
      train_op=train)

estimator = tf.estimator.Estimator(model_fn=model_fn)
# define our data sets
x_train = np.array([1., 2., 3., 4.])
y_train = np.array([0., -1., -2., -3.])
x_eval = np.array([2., 5., 8., 1.])
y_eval = np.array([-1.01, -4.1, -7., 0.])
input_fn = tf.estimator.inputs.numpy_input_fn(
    {"x": x_train}, y_train, batch_size=4, num_epochs=None, shuffle=True)
train_input_fn = tf.estimator.inputs.numpy_input_fn(
    {"x": x_train}, y_train, batch_size=4, num_epochs=1000, shuffle=False)
eval_input_fn = tf.estimator.inputs.numpy_input_fn(
    {"x": x_eval}, y_eval, batch_size=4, num_epochs=1000, shuffle=False)

# train
estimator.train(input_fn=input_fn, steps=1000)
# Here we evaluate how well our model did.
train_metrics = estimator.evaluate(input_fn=train_input_fn)
eval_metrics = estimator.evaluate(input_fn=eval_input_fn)
print("train metrics: %r"% train_metrics)
print("eval metrics: %r"% eval_metrics)
结果:
train metrics: {'loss': 1.227995e-11, 'global_step': 1000}
eval metrics: {'loss': 0.01010036, 'global_step': 1000}
注意:model_fn()是如何通过底层API实现训练循环的。
以上都是tensorflow的基础知识。下一节我们将使用面向新手的MNIST。
