CAS单点登录开源框架解读(六)--CAS单点登录服务端认证之用户认证跳转
用户认证之后如何执行后续跳转
在上一章节中,我们知道了默认CAS服务端是如何通过配置文件实现用户登录名和密码的认证,下面我们将继续对认证之后的动作处理进行分析。
1. 发送TGT之行为状态sendTicketGrantingTicket
身份验证成功后进入sendTicketGrantingTicket行为状态。
*login-webflow.xml:*
<action-state id="sendTicketGrantingTicket">
        <evaluate expression="sendTicketGrantingTicketAction"/>
        <transition to="serviceCheck"/>
action-state>
配置文件中可以知道要执行表达式sendTicketGrantingTicket。
2. 发送TGT之执行表达式sendTicketGrantingTicket(context)
SendTicketGrantingTicketAction此类主要用于创建TGC,并响应到客户端。在cas-server-webapp-actions模块下的org.jasig.cas.web.flow包中。
*SendTicketGrantingTicketAction.java*

@Component("sendTicketGrantingTicketAction")
public final class SendTicketGrantingTicketAction extends AbstractAction {
    private static final Logger LOGGER = LoggerFactory.getLogger(SendTicketGrantingTicketAction.class);

    @Value("${create.sso.renewed.authn:true}")
    private boolean createSsoSessionCookieOnRenewAuthentications = true;

…………
    @Override
protected Event doExecute(final RequestContext context) {
    //获取TGT
        final String ticketGrantingTicketId = WebUtils.getTicketGrantingTicketId(context);
        //从cookie中获取TGT
        final String ticketGrantingTicketValueFromCookie = (String) context.getFlowScope().get("ticketGrantingTicketId");

        if (ticketGrantingTicketId == null) {
            return success();
        }

        if (isAuthenticatingAtPublicWorkstation(context))  {
            //如果是通过公共工作台去认证的,那么将不产生cookie
            LOGGER.info("Authentication is at a public workstation. "
                    + "SSO cookie will not be generated. Subsequent requests will be challenged for authentication.");
        } else if (!this.createSsoSessionCookieOnRenewAuthentications && isAuthenticationRenewed(context)) {
            LOGGER.info("Authentication session is renewed but CAS is not configured to create the SSO session. "
                    + "SSO cookie will not be generated. Subsequent requests will be challenged for authentication.");
        } else {
            LOGGER.debug("Setting TGC for current session.");
//把TGC设置到cookie中并响应客户端
this.ticketGrantingTicketCookieGenerator.addCookie(WebUtils.getHttpServletRequest(context), WebUtils
                .getHttpServletResponse(context), ticketGrantingTicketId);
        }

        if (ticketGrantingTicketValueFromCookie != null && !ticketGrantingTicketId.equals(ticketGrantingTicketValueFromCookie)) {
//如果从cookie中获取的tgt和后端请求中的tgt不一致那么在服务端中销毁cookie中对应的tgt
this.centralAuthenticationService.destroyTicketGrantingTicket(ticketGrantingTicketValueFromCookie);
        }
        return success();
    }
此类主要功能是将TGT写到cookie,如果写之前从cookie里获取的TGT与上下文里的TGT不一致,就销毁该TGT,并登出,正常情况是一致的。执行完成后,返回success,可以看到后续的《transition to=“serviceCheck”/》。
3. 检查服务serviceCheck
*login-webflow.xml:*
<decision-state id="serviceCheck">
        <if test="flowScope.service != null" then="generateServiceTicket" else="viewGenericLoginSuccess"/>
decision-state>
由于本文只通过服务端登录进行用户的验证,因此service参数为空,因此此时会进入viewGenericLoginSuccess。如果service不为空, 例如请求的是类似http://localhost:8080/cas/login?service=XXX ,service的值为XXX,所以进入generateServiceTicket。
我们接下来会先分析服务端不带service参数的情况,然后再继续分析有service情况下是如何把ST回传给客户端。
4. 无service时到结束状态viewGenericLoginSuccess
从注释中我们可以知道这个结束状态主要是用于服务端登录不带有service参数的情况下而存在的。最终会跳转到casGenericSuccessView.jsp页面上,展示认证的用户名(注意不同国际化的展示不一致,有些不展示用户名)。
需要执行的表达式为genericSuccessViewAction.getAuthenticationPrincipal。
*login-webflow.xml:*


    <end-state id="viewGenericLoginSuccess" view="casGenericSuccessView">
        <on-entry>
            <evaluate expression="genericSuccessViewAction.getAuthenticationPrincipal(flowScope.ticketGrantingTicketId)"
                      result="requestScope.principal"
                      result-type="org.jasig.cas.authentication.principal.Principal"/>
        on-entry>
    end-state>
5. 执行表达式genericSuccessViewAction.getAuthenticationPrincipal(ticketGrantingTicketId)
此类在cas-server-webapp-actions模块下的org.jasig.cas.web.flow包中。主要功能为获取认证用户信息,并把登录用户名返回到登录成功的页面。
*GenericSuccessViewAction.java*
@Component("genericSuccessViewAction")
public final class GenericSuccessViewAction {
    private final CentralAuthenticationService centralAuthenticationService;

    /**
     * Gets authentication principal.
     *
     * @param ticketGrantingTicketId the ticket granting ticket id
     * @return the authentication principal, or {@link org.jasig.cas.authentication.principal.NullPrincipal}
     * if none was available.
     */
    public Principal getAuthenticationPrincipal(final String ticketGrantingTicketId) {
        try {
            //通过认证服务获取到TGT对象
            final TicketGrantingTicket ticketGrantingTicket =
                    this.centralAuthenticationService.getTicket(ticketGrantingTicketId, TicketGrantingTicket.class);
            //通过TGT对象获取到认证用户登录名并返回
            return ticketGrantingTicket.getAuthentication().getPrincipal();
        } catch (final InvalidTicketException e){
            logger.warn(e.getMessage());
        }
        logger.debug("In the absence of valid TGT, the authentication principal cannot be determined. Returning {}",
                NullPrincipal.class.getSimpleName());
        return NullPrincipal.getInstance();
    }
}
通过上面的获取到的用户信息,并跳转到显示用户登录认证成功页面casGenericSuccessView.jsp。
6. 有service时到行为状态generateServiceTicket
当我们是通过http://localhost:8088/cas-client/客户端进行访问登录CAS单点登录服务端时,这个时候service参数就有值,那么会进入generateServiceTicket。
*login-webflow.xml:*
<action-state id="generateServiceTicket">
        <evaluate expression="generateServiceTicketAction"/>
        <transition on="success" to="warn"/>
        <transition on="authenticationFailure" to="handleAuthenticationFailure"/>
        <transition on="error" to="initializeLogin"/>
        <transition on="gateway" to="gatewayServicesManagementCheck"/>
action-state>
执行创建ST的表达式generateServiceTicketAction。
7. 执行表达式generateServiceTicketAction产生ST
表达式generateServiceTicketAction对应的GenerateServiceTicketAction.java类在cas-server-webapp-actions模块的org.jasig.cas.web.flow包中。中心认证服务器(centralAuthenticationService)根据TGT(ticketGrantingTicket),产生ST(serviceTicketId),并放入上下文。
*GenerateServiceTicketAction.java*
@Component("generateServiceTicketAction")
public final class GenerateServiceTicketAction extends AbstractAction {
	…………
    @Override
protected Event doExecute(final RequestContext context) {
    //对于通过cas单点登录客户端请求进入的,获取到对应的service
        final Service service = WebUtils.getService(context);
        //获取到tgt
        final String ticketGrantingTicket = WebUtils.getTicketGrantingTicketId(context);

        try {
            //通过tgt获取到当前的登录认证信息
            final Authentication authentication = ticketRegistrySupport.getAuthenticationFrom(ticketGrantingTicket);
            if (authentication == null) {
                throw new InvalidTicketException(new AuthenticationException(), ticketGrantingTicket);
            }

            final AuthenticationContextBuilder builder = new DefaultAuthenticationContextBuilder(
                    this.authenticationSystemSupport.getPrincipalElectionStrategy());
            //通过认证信息和service形成认证结果集
            final AuthenticationContext authenticationContext = builder.collect(authentication).build(service);
            //通过tgt,service和认证结果集获取st
            final ServiceTicket serviceTicketId = this.centralAuthenticationService
                    .grantServiceTicket(ticketGrantingTicket, service, authenticationContext);
            //将st放入上下文中,并跳转到成功的事件上
            WebUtils.putServiceTicketInRequestScope(context, serviceTicketId);
            return success();

        } catch (final AuthenticationException e) {
            logger.error("Could not verify credentials to grant service ticket", e);
        } catch (final AbstractTicketException e) {
            //如果是无效的tgt,就销毁对应的tgt,跳转到错误的事件上
            if (e instanceof InvalidTicketException) {
                this.centralAuthenticationService.destroyTicketGrantingTicket(ticketGrantingTicket);
            }
            //判断是否有gateway参数,有就跳转到对应的行为状态
            if (isGatewayPresent(context)) {
                return result("gateway");
            }

            return newEvent(AbstractCasWebflowConfigurer.TRANSITION_ID_ERROR, e);
        }

        return error();
    }
如果成功生成ServiceTicket,那么进入下一步《transition on=“success” to=“warn”/》。
8. 显示警告信息:warn
*login-webflow.xml:*

    <decision-state id="warn">
        <if test="flowScope.warnCookieValue" then="showWarningView" else="redirect"/>
    decision-state>
需要注意的是:warnCookieValue是在InitialFlowSetupAction.java类中放入的,如果cookie里有警告,就在showWarningView里展示。本例没有警告,则进入redirect。
9. 重定向:redirect
*login-webflow.xml:*

    <action-state id="redirect">
        <evaluate expression="flowScope.service.getResponse(requestScope.serviceTicketId)"                result-type="org.jasig.cas.authentication.principal.Response" result="requestScope.response"/>
        <transition to="postRedirectDecision"/>
    action-state>
先判断表达式是否是要求的返回格式和对应的结果,本例为true,进行下一步:《transition to=“postRedirectDecision”/》
10. 判断响应类型:postRedirectDecision
*login-webflow.xml:*

  <decision-state id="postRedirectDecision">
        <if test="requestScope.response.responseType.name() == 'POST'" then="postView" else="redirectView"/>
    decision-state>
判断响应类型,在带有service参数的本例中responseType 为redirect方式,进入redirectView。
11. 重定向视图:redirectView
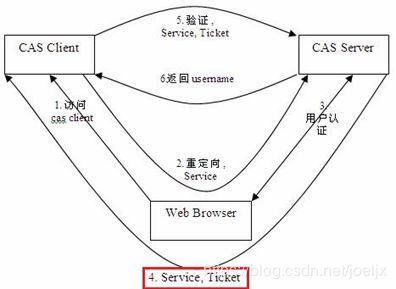
最后获取到重定向的地址,这个地址就是我们最开始的入参service所带的地址。重定向到CAS单点登录客户端。
*login-webflow.xml*

    <end-state id="redirectView" view="externalRedirect:#{requestScope.response.url}"/>
直接重定向到客户端地址:http://localhost:8088/cas-client/ 。
至此,完成了我们流程图的第4步,结束了在有service的情况下的流程。页面直接展示了客户端的页面。

12. postView(本例不进入)
*login-webflow.xml:*

<end-state id="postView" view="postResponseView">
        <on-entry>
            <set name="requestScope.parameters" value="requestScope.response.attributes"/>
            <set name="requestScope.originalUrl" value="flowScope.service.id"/>
        on-entry>
end-state>
postView直接展示视图postResponseView,下面我们看一下这个视图所对应的jsp页面。
*\WEB-INF\spring-configuration\protocolViewsConfiguration.xml:*


    <bean id="postResponseView" class="org.springframework.web.servlet.view.JstlView"
          c:url="/WEB-INF/view/jsp/protocol/casPostResponseView.jsp" />
postResponseView对应视图文件为casPostResponseView.jsp。webflow结束,进入视图postResponseView.jsp
*postResponseView.jsp*
<%@ page language="java" session="false"%>
<%@ taglib prefix="c" uri="http://java.sun.com/jsp/jstl/core" %>
<html>
<body onload="document.acsForm.submit();">
注意此form表单中的action为客户端地址。《body “document.acsForm.submit();”》用户浏览器加载后自动提交到客户端。