分布式任务调度平台XXL-JOB安装部署
分布式任务调度平台XXL-JOB相关教程:
使用教程
分布式任务调度平台XXL-JOB使用教程_foxofwind的博客-CSDN博客分布式任务调度平台XXL-JOB使用教程https://blog.csdn.net/foxofwind/article/details/120783695
集成CAS单点登录
调度平台XXL-JOB集成CAS单点登录_foxofwind的博客-CSDN博客本文用最简单的方法来集成,不引入第三方权限框架,用最小改动,换取以后升级的便利。需要集成的是xxl-job-admin项目,如果有小伙伴还没有部署XXL-JOB,可以官网教程来搞一个分布式任务调度平台XXL-JOBXXL-JOB的权限设置比较简单,用的是拦截器,所以我们就在这个基础上来集成CAS:1.pom.xml引用cas快速配置包:
啥是XXL_JOB?
XXL-JOB是一个分布式任务调度平台,其核心设计目标是开发迅速、学习简单、轻量级、易扩展。现已开放源代码并接入多家公司(目前官网主动上报的446家)线上产品线,开箱即用。
不多介绍了,直接上部署教程:
一.下载
文档地址
- 中文文档
- English Documentation
源码仓库地址
| 源码仓库地址 | Release Download |
|---|---|
| GitHub - xuxueli/xxl-job: A distributed task scheduling framework.(分布式任务调度平台XXL-JOB) | Download |
| xxl-job: 一个分布式任务调度平台,其核心设计目标是开发迅速、学习简单、轻量级、易扩展。现已开放源代码并接入多家公司线上产品线,开箱即用。 | Download |
中央仓库地址
com.xuxueli
xxl-job-core
${最新稳定版本}
二.环境部署
- Maven3+
- Jdk1.8+
- Mysql5.7+
这些教程,大家可以网上搜,一找一大把。
三.项目部署
1.初始化调度配置库
1.1.下载项目源码并解压。
1.2.获取 “调度数据库初始化SQL脚本” 并执行
1.3.“调度数据库初始化SQL脚本” 位置为:
/xxl-job/doc/db/tables_xxl_job.sql调度中心支持集群部署,集群情况下各节点务必连接同一个mysql实例;
如果mysql做主从,调度中心集群节点务必强制走主库;
2.编译源码
2.1.解压源码,按照maven格式将源码导入IDE, 使用maven进行编译即可,源码结构如下:
xxl-job-admin:调度中心
xxl-job-core:公共依赖
xxl-job-executor-samples:执行器Sample示例(选择合适的版本执行器,可直接使用,也可以参考其并将现有项目改造成执行器)
    :xxl-job-executor-sample-springboot:Springboot版本,通过Springboot管理执行器,推荐这种方式;
    :xxl-job-executor-sample-frameless:无框架版本;
3.配置部署“调度中心”
调度中心项目:xxl-job-admin
作用:统一管理任务调度平台上调度任务,负责触发调度执行,并且提供任务管理平台。
3.1.调度中心配置:
/xxl-job/xxl-job-admin/src/main/resources/application.properties一般的项目做法是生产、测试分开,我们会复制application.properties,建3个文件:
application.properties
application-dev.properties
application-prod.properties
application.properties中配置,这个文件里可以配置用dev或prod,如下:
spring.profiles.active: devapplication-dev.properties中是开发环境的配置,我这里只贴出dev配置,prod可仿照这个来改:
### web
server.port=8080
server.servlet.context-path=/xxl-job-admin

# cas.这些参数是 cas-client-autoconfig-support 包里用的。
cas.server-url-prefix=https://casserver.com/casserver/
cas.server-login-url=https://casserver.com/casserver/login
cas.client-host-url=http://localhost:8080/xxl-job-admin
cas.validation-type=CAS
cas.use-session=true
cas.redirect-after-validation=true

# cas-这些参数是 做cas集成时 自定义的,目的是代码里不写死,方便统一配置。
cas-ignore-pattern=(/api/*)|(/file/*)|(/js/*)|(/img/*)|(/view/*)|(/css/*)|(/static/*)
cas-login-url=https://casserver.com/casserver/login?service=http://localhost:8080/xxl-job-admin/toLoginCas
cas-logout-url=https://casserver.com/casserver/logout?service=http://localhost:8080/xxl-job-admin

### actuator
management.server.servlet.context-path=/actuator
management.health.mail.enabled=false

### resources
spring.mvc.servlet.load-on-startup=0
spring.mvc.static-path-pattern=/static/**
spring.resources.static-locations=classpath:/static/

### freemarker
spring.freemarker.templateLoaderPath=classpath:/templates/
spring.freemarker.suffix=.ftl
spring.freemarker.charset=UTF-8
spring.freemarker.request-context-attribute=request
spring.freemarker.settings.number_format=0.##########

### mybatis
mybatis.mapper-locations=classpath:/mybatis-mapper/*Mapper.xml
#mybatis.type-aliases-package=com.xxl.job.admin.core.model

### xxl-job, datasource 调度中心JDBC链接:链接地址请保持和 所创建的调度数据库的地址一致
spring.datasource.url=jdbc:mysql://192.168.145.128:3306/xxl_job?useUnicode=true&characterEncoding=UTF-8&autoReconnect=true&serverTimezone=Asia/Shanghai
spring.datasource.username=root
spring.datasource.password=xxxxxx
spring.datasource.driver-class-name=com.mysql.cj.jdbc.Driver

### datasource-pool
spring.datasource.type=com.zaxxer.hikari.HikariDataSource
spring.datasource.hikari.minimum-idle=10
spring.datasource.hikari.maximum-pool-size=30
spring.datasource.hikari.auto-commit=true
spring.datasource.hikari.idle-timeout=30000
spring.datasource.hikari.pool-name=HikariCP
spring.datasource.hikari.max-lifetime=900000
spring.datasource.hikari.connection-timeout=10000
spring.datasource.hikari.connection-test-query=SELECT 1
spring.datasource.hikari.validation-timeout=1000

### xxl-job, email 报警邮箱
spring.mail.host=10.0.8.46
spring.mail.port=25
[email protected]
[email protected]
spring.mail.password=xxxxxx
spring.mail.properties.mail.smtp.auth=true
# 下面这2个要注意下,如果没有证书、smtp不需要SSL验证,一定要false,不然后会报错
spring.mail.properties.mail.smtp.starttls.enable=false
spring.mail.properties.mail.smtp.starttls.required=false
spring.mail.properties.mail.smtp.socketFactory.class=com.sun.mail.util.MailSSLSocketFactory
#spring.mail.properties.mail.smtp.socketFactory.class=javax.net.ssl.SSLSocketFactory

### xxl-job, access token 调度中心通讯TOKEN [选填]:非空时启用;
xxl.job.accessToken=

### 调度中心国际化配置 [必填]: 默认为 "zh_CN"/中文简体, 可选范围为 "zh_CN"/中文简体, "zh_TC"/中文繁体 and "en"/英文;
xxl.job.i18n=zh_CN

## xxl-job, triggerpool max size 调度线程池最大线程配置【必填】
xxl.job.triggerpool.fast.max=200
xxl.job.triggerpool.slow.max=100

### xxl-job, log retention days
### 调度中心日志表数据保存天数 [必填]:过期日志自动清理;限制大于等于7时生效,否则, 如-1,关闭自动清理功能;
xxl.job.logretentiondays=30
3.2.指定日志配置logback.xml
这个主要是设置日志的地址,如果要生产和测试分开要设置成变量方式,我这里xxl-job-admin项目是写死的,xxl-job-executor执行器的项目是做的变量,怎么做一会再讲。
3.3.部署项目:
如果已经正确进行上述配置,可将项目编译打包部署。
开发环境直接用idea启动就可以了。
调度中心访问地址:http://localhost:8080/xxl-job-admin (该地址执行器将会使用到,作为回调地址)
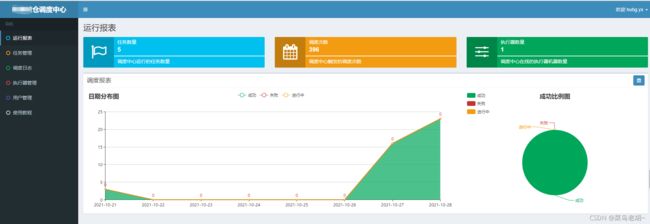
默认登录账号 “admin/123456”, 登录后运行界面如下图所示。
3.4.调度中心集群(可选):
调度中心支持集群部署,提升调度系统容灾和可用性。
调度中心集群部署时,几点要求和建议:
- DB配置保持一致;
- 集群机器时钟保持一致(单机集群忽视);
- 建议:推荐通过nginx为调度中心集群做负载均衡,分配域名。调度中心访问、执行器回调配置、调用API服务等操作均通过该域名进行。
我部署了2台,配置都不需要改,直接上就行,最好做个nginx,配域名,可以一个域名访问。
3.5.其他:Docker 镜像方式搭建调度中心:
这个我没操作过,大家看官方文档吧。
4.配置部署“执行器项目”
“执行器”项目:xxl-job-executor-sample-springboot (提供多种版本执行器供选择,现以 springboot 版本为例,可直接使用,也可以参考其并将现有项目改造成执行器)
作用:负责接收“调度中心”的调度并执行;可直接部署执行器,也可以将执行器集成到现有业务项目中。
4.1 maven依赖
确认pom文件中引入了 “xxl-job-core” 的maven依赖;
这个官方写需要配置,但我下载的项目里,是已经配置过的,确认下就可以了。
4.2 执行器配置
/xxl-job/xxl-job-executor-samples/xxl-job-executor-sample-springboot/src/main/resources/application.properties和上面的admin项目一样,复制成3个配置文件:
application.properties
application-dev.properties
application-prod.properties
application.properties中配置,这个文件里可以配置用dev或prod,如下:
spring.profiles.active: devapplication-dev.properties中的配置:
# web port
server.port=8081
# no web
#spring.main.web-environment=false

# log config
logging.config=classpath:logback.xml


### xxl-job admin address list, such as "http://address" or "http://address01,http://address02"
### 调度中心部署跟地址 [选填]:如调度中心集群部署存在多个地址则用逗号分隔。执行器将会使用该地址进行"执行器心跳注册"和"任务结果回调";为空则关闭自动注册;
xxl.job.admin.addresses=http://localhost:8080/xxl-job-admin

### xxl-job, access token 执行器通讯TOKEN [选填]:非空时启用;
xxl.job.accessToken=

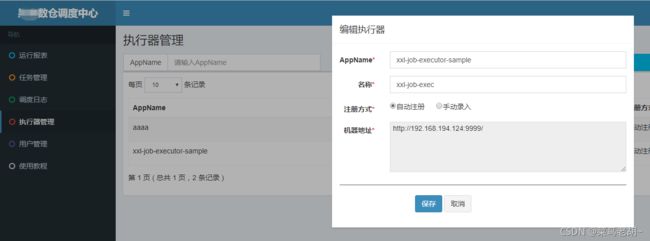
### xxl-job executor appname 执行器AppName [选填]:执行器心跳注册分组依据;为空则关闭自动注册
xxl.job.executor.appname=xxl-job-executor-sample
### xxl-job executor registry-address: default use address to registry , otherwise use
ip:port if address is null
xxl.job.executor.address=
### xxl-job executor server-info
xxl.job.executor.ip=
xxl.job.executor.port=9999
### 这个app.home是为了把日志路径做成变量,这个具体路径,可以在启动spring boot时传进来。
app.home=/data1/ETL/xxl-job
### xxl-job executor log-path
xxl.job.executor.logpath=${app.home}/applogs/jobhandler
#xxl.job.executor.logpath=/data/applogs/xxl-job/jobhandler
### xxl-job executor log-retention-days
xxl.job.executor.logretentiondays=30
4.3 指定日志配置logback.xml
主要改日志路径,这个做了变量化,因为不同的执行机环境,路径可能不一样,所以变量取的是属性文件里的${app.home},这个app.home的值在启动程序时,可以传进来。
我的启动脚本,传递变量的方法:
4.4 执行器组件配置
这个官方写需要配置,但我下载的项目里,是已经配置过的,确认下就可以了。
执行器组件,配置文件地址:
/xxl-job/xxl-job-executor-samples/xxl-job-executor-sample-springboot/src/main/java/com/xxl/job/executor/core/config/XxlJobConfig.java执行器组件,配置内容说明:
@Bean
public XxlJobSpringExecutor xxlJobExecutor() {
logger.info(">>>>>>>>>>> xxl-job config init.");
XxlJobSpringExecutor xxlJobSpringExecutor = new XxlJobSpringExecutor();
xxlJobSpringExecutor.setAdminAddresses(adminAddresses);
xxlJobSpringExecutor.setAppname(appname);
xxlJobSpringExecutor.setIp(ip);
xxlJobSpringExecutor.setPort(port);
xxlJobSpringExecutor.setAccessToken(accessToken);
xxlJobSpringExecutor.setLogPath(logPath);
xxlJobSpringExecutor.setLogRetentionDays(logRetentionDays);

return xxlJobSpringExecutor;
}
4.5 部署执行器项目
如果已经正确进行上述配置,可将执行器项目编译打部署,系统提供多种执行器Sample示例项目,选择其中一个即可,各自的部署方式如下
xxl-job-executor-sample-springboot:项目编译打包成springboot类型的可执行JAR包,命令启动即可;
xxl-job-executor-sample-frameless:项目编译打包成JAR包,命令启动即可;
我用的是xxl-job-executor-sample-springboot的,开发环境直接用idea启动就可以了。
4.6 执行器集群(可选)
执行器支持集群部署,提升调度系统可用性,同时提升任务处理能力。
执行器集群部署时,几点要求和建议:
- 执行器回调地址(xxl.job.admin.addresses)需要保持一致;执行器根据该配置进行执行器自动注册等操作。
- 同一个执行器集群内AppName(xxl.job.executor.appname)需要保持一致;调度中心根据该配置动态发现不同集群的在线执行器列表。
5.其他的个性化配置
到这里基本的配置就完成了,但你还可以改一些其他配置:
5.1 修改系统名字,登陆页的标题,和其他一些文字显示:
在本地化语言文件中改:
src/main/resources/i18n/message_zh_CN.properties
src/main/resources/i18n/message_en.properties
src/main/resources/i18n/message_zh_TC.properties
5.2 做CAS单点登陆集成
可以看这里,我的另一篇文章:
调度平台XXL-JOB集成CAS单点登录_foxofwind的博客-CSDN博客


