【tensorflow入门教程二】数据集制作:使用TFRecords制作数据集并使用inceptionv3进行训练
这篇文章中,我们将探讨深度学习中最基本的问题,图像分类中的数据集以及标签的制作;以及使用Inceptionv3网络对其进行训练。
Inception v3结构请戳:Inception v3
PS:文末附博文配套代码以及数据集原图的下载。
先上一张最后的训练结果图:
17flowers数据集
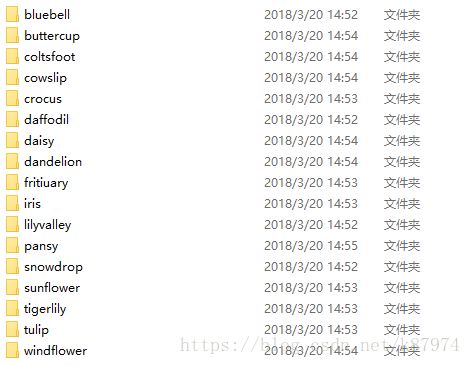
17flowers数据集包含有17种不同的花的图片,每个种类的花都含有80张图片,图片的尺寸不唯一,但是都在500x500左右,所有这些一共组成了1360张图片。该篇博文要做的就是使用tensorflow将其做成tfrecords格式的数据集文件。
制作TFRecords数据集
首先定位到我们的原图片的目录,并使用数组保存所有类别。
cwd = 'D:\py project/tensorflow-tfrecord\jpg\\'
classes = {'daffodil', 'snowdrop', 'lilyvalley', 'bluebell', 'crocus', 'iris', 'tigerlily', 'tulip', 'fritiuary',
           'sunflower', 'daisy', 'coltsfoot', 'dandelion', 'cowslip', 'buttercup', 'windflower', 'pansy'}  # 花为 设定 17 类
这里使用tf.python_io.TFRecordWriter的方式将所有图片数据写入到tfrecords文件。
def createdata():
    filename="flower_train.tfrecords"      #要生成的文件名以及地址,不指定绝对地址的话就是在建立在工程目录下
    writer = tf.python_io.TFRecordWriter(filename)  # 使用该函数创建一个tfrecord文件
    height = 299    #将图片保存成为299x299的尺寸,方便进行之后的训练
    width = 299
    for index, name in enumerate(classes):    #index即为花的类别的索引,若当前值index=0, name= 'corslip',则在标签y=0时即表示这张图属于corslip
        class_path = cwd + name + '\\'    #定位到每一个花的类别目录
        for img_name in os.listdir(class_path): # 以list的方式显示目录下的各个文件夹
            img_path = class_path + img_name  # 每一个图片的地址
            img = Image.open(img_path)    # 导入Image 包,打开图片
            img = img.resize((height, width))
            img_raw = img.tobytes()  # 将图片转化为二进制格式
            example = tf.train.Example(features=tf.train.Features(feature={    #写的时候标签类的数据形式为int64,图片类的数据形式为Bytes
                "label": tf.train.Feature(int64_list=tf.train.Int64List(value=[index])),
                'img_raw': tf.train.Feature(bytes_list=tf.train.BytesList(value=[img_raw]))
            }))  # example对象对label和image数据进行封装
            writer.write(example.SerializeToString())  # 序列化为字符串
    writer.close()
执行上述代码之后我们将在当前工程的目录下得到一个flower_train.tfrecords文件。
接下来对我们的Tfrecords文件进行读取并解析成能使用的数据。
要对tfrecords文件进行读取,首先需要使用tf.train.string_input_producer建立一个队列,并使用tf.TFRecordReader()读取tfrecords文件;之后使用 pasr_single_example对序列化的数据解析。
def read_and_decode(filename, batch_size):  # 读取tfrecords
    filename_queue = tf.train.string_input_producer([filename])  # 生成一个queue队列
    reader = tf.TFRecordReader()
    _, serialized_example = reader.read(filename_queue)  # 返回文件名和文件
    features = tf.parse_single_example(serialized_example,  #对序列化数据进行解析
                                       features={
                                           'label': tf.FixedLenFeature([], tf.int64),
                                           'img_raw': tf.FixedLenFeature([], tf.string),
                                       })  # 将image数据和label取出来

    img = tf.decode_raw(features['img_raw'], tf.uint8) #将图片解析成uint8格式的数据
    img = tf.reshape(img, [299, 299, 3])  # 解码后需要reshape为299*299的3通道图片
    img = tf.cast(img, tf.float32) * (1. / 255)  # 将tensor数据转化为float32格式,后面的*(1./255)是必须的,不然生成的图片会反相。
    label = tf.cast(features['label'], tf.int64)  # 将label标签转化为int64格式
    label = tf.one_hot(label, 17)   #对标签做one hot处理:假如共有4个类,若标签为3,做one hot之后则为[0 0 0 1],若标签为0,则[1 0 0 0]
    # img_batch, label_batch = tf.train.batch([img,label],batch_size,1,50)    #按序输出
    img_batch, label_batch = tf.train.shuffle_batch([img,label],batch_size,500,100)     #打乱排序输出batch
    return img_batch, label_batch
要读取每个record是固定字节数的二进制文件,需要tf.FixedLengthRecordReader与tf.decode_raw操作一起使用。该decode_raw操作从string类型转换为uint8 tensor。其中的tf.train.shuffle_batch定义如下:
def shuffle_batch(tensors, batch_size, capacity, min_after_dequeue,
                  num_threads=1, seed=None, enqueue_many=False, shapes=None,
                  allow_smaller_final_batch=False, shared_name=None, name=None):
batch_size为队列一次输出的数据大小,capactiy为队列中保存的最大数据数量,min_after_dequeue为出队后队列中的元素最小数量。其中capacity的值须大于min_after_dequeue。num_threads为该函数执行的线程数,即使用几个线程从队列中取数据。
测试一下以上代码能不能再次读取我们的图片:
if __name__ == "__main__":
    createdata()
    init_op = tf.global_variables_initializer()
    image, label = read_and_decode("flower_train.tfrecords", 32)    #该处得到的为tensor,需要sess.run才能得到实际的数据
    with tf.Session() as sess:
        sess.run(init_op)
        coord = tf.train.Coordinator()        #从队列中取数据需要先建立一个Coordinator()
        threads = tf.train.start_queue_runners(sess=sess, coord=coord)    #并建立线程开始从队列中读取数据
        for i in range(32):
            example, l = sess.run([image, label])  # 取出image和label
            plt.imshow(example[i, :, :, :])
            plt.show()
            print(l[i])
            print(example.shape)
        coord.request_stop()    #结束队列
        coord.join(threads)
在print处打个断点,可以看到如下结果:
![]()
至此,数据集的制作及解析便处理完毕。
接下来使用inceptionv3网络对其进行训练。inception v3的网络结构及构建方法请查看我之前的博客(即开头给的链接),这里给出主体函数部分的代码(loss的定义以及optimizer的定义):
其得到的最终训练结果如下所示:
本篇文章的配套代码请点击下面的链接进行下载:
【tensorflow入门教程二】数据集制作:使用TFRecords制作数据集并使用inceptionv3进行训练
本篇博文大致如此,下篇文章见
如果你觉得有用,帮忙扫个红包支持一下吧:


