2.SpringCloud简单搭建--服务提供方和消费方(rest+ribbon)(Finchley版本)
创建一个服务提供者 (eureka client)
1. 创建一个订单服务作为服务提供者
新建一个模块order-service
pom.xml如下
        SpringCloud
        com.tp.demo
        1.0-SNAPSHOT

    4.0.0

    order-service
    1.0-SNAPSHOT
    jar

    order-service
    Demo project for Spring Boot


            org.springframework.cloud
            spring-cloud-starter-netflix-eureka-client


            org.springframework.boot
            spring-boot-starter-web
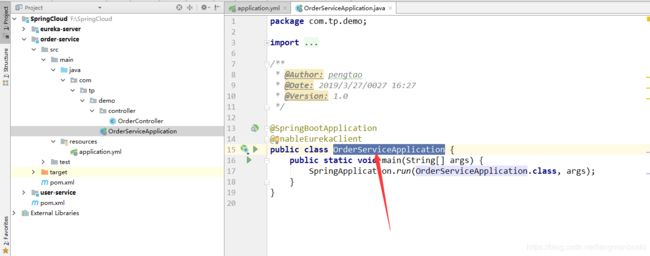
2.创建启动类OrderServiceApplication加注解@EnableEurekaClient表明这是一个eureka的客户端
package com.tp.demo;

import org.springframework.boot.SpringApplication;
import org.springframework.boot.autoconfigure.SpringBootApplication;
import org.springframework.cloud.netflix.eureka.EnableEurekaClient;

/**
 * @Author: pengtao
 * @Date: 2019/3/27/0027 16:27
 * @Version: 1.0
 */

@SpringBootApplication
@EnableEurekaClient
public class OrderServiceApplication {
	public static void main(String[] args) {
		SpringApplication.run(OrderServiceApplication.class, args);
	}
}
3.新建一个包controller, 建一个controller类OrderController
package com.tp.demo.controller;

import org.springframework.beans.factory.annotation.Value;
import org.springframework.web.bind.annotation.RequestMapping;
import org.springframework.web.bind.annotation.RestController;

/**
 * @Author: pengtao
 * @Date: 2019/3/27/0027 16:40
 * @Version: 1.0
 */

@RestController
public class OrderController {

	@Value("${server.port}")
	private String port;

	@RequestMapping("/order")
	public String query() {
		return "i'm order service, port=[" + port + "]";
	}

}
4.创建application.yml
server:
  port: 8762

spring:
  application:
    name: order-service

eureka:
  client:
    serviceUrl:
      defaultZone: http://localhost:8761/eureka/
5.启动启动类
6.访问order服务
7. 修改application.yml的端口为8763, 把idea的单例启动勾去掉
这里去掉后可以启动多个,端口修改为8763后再次启动,看到又一个order服务端口为8763
访问以下没问题
8. 我们新建一个模块,用户服务来作为服务消费方,来调用服务提供方订单服务
新建一个模块名user-service
        SpringCloud
        com.tp.demo
        1.0-SNAPSHOT

    4.0.0

    user-service


            org.springframework.cloud
            spring-cloud-starter-netflix-eureka-client


            org.springframework.boot
            spring-boot-starter-web


            org.springframework.cloud
            spring-cloud-starter-netflix-ribbon
9.新建启动类UserServiceApplication
package com.tp.demo;

import org.springframework.boot.SpringApplication;
import org.springframework.boot.autoconfigure.SpringBootApplication;
import org.springframework.cloud.client.loadbalancer.LoadBalanced;
import org.springframework.cloud.netflix.eureka.EnableEurekaClient;
import org.springframework.context.annotation.Bean;
import org.springframework.web.client.RestTemplate;

/**
 * @Author: pengtao
 * @Date: 2019/3/27/0027 16:27
 * @Version: 1.0
 */

@SpringBootApplication
@EnableEurekaClient
public class UserServiceApplication {
	public static void main(String[] args) {
		SpringApplication.run(UserServiceApplication.class, args);
	}

	@Bean
	@LoadBalanced
	RestTemplate getRestTemplate() {
		return new RestTemplate();
	}
}
新建一个servie
package com.tp.demo.service;

/**
 * @Author: pengtao
 * @Date: 2019/3/27/0027 17:27
 * @Version: 1.0
 */
public interface UserService {

	/**
	 * fetch data by rule id
	 *
	 * @param
	 * @return Result
	 */
	String callOrder();
}
实现这个接口
package com.tp.demo.service.impl;

import com.tp.demo.service.UserService;
import org.springframework.beans.factory.annotation.Autowired;
import org.springframework.stereotype.Service;
import org.springframework.web.client.RestTemplate;

/**
 * @Author: pengtao
 * @Date: 2019/3/27/0027 17:28
 * @Version: 1.0
 */
@SuppressWarnings("All")
@Service
public class UserServiceImpl implements UserService {

	private final String ORDER_URL = "http://ORDER-SERVICE/order";

	@Autowired
	private RestTemplate restTemplate;

	@Override
	public String callOrder() {
		return restTemplate.getForObject(ORDER_URL, String.class);
	}
}
提供一个controller
package com.tp.demo.controller;

import com.tp.demo.service.UserService;
import org.springframework.beans.factory.annotation.Autowired;
import org.springframework.beans.factory.annotation.Value;
import org.springframework.cloud.client.loadbalancer.LoadBalanced;
import org.springframework.context.annotation.Bean;
import org.springframework.web.bind.annotation.RequestMapping;
import org.springframework.web.bind.annotation.RestController;
import org.springframework.web.client.RestTemplate;

/**
 * @Author: pengtao
 * @Date: 2019/3/27/0027 16:40
 * @Version: 1.0
 */

@RestController
public class UserController {

	@Value("${server.port}")
	private String port;

	@RequestMapping("/user")
	public String query() {
		return "i'm user service, port=[" + port + "]";
	}

	@Autowired
	private UserService userService;

	@RequestMapping("/callUserService")
	public String callUser() {
		return userService.callOrder();
	}

}
10.配置application.yml
eureka:
  client:
    serviceUrl:
      defaultZone: http://localhost:8761/eureka/
server:
  port: 8764
spring:
  application:
    name: user-service
11.启动用户服务
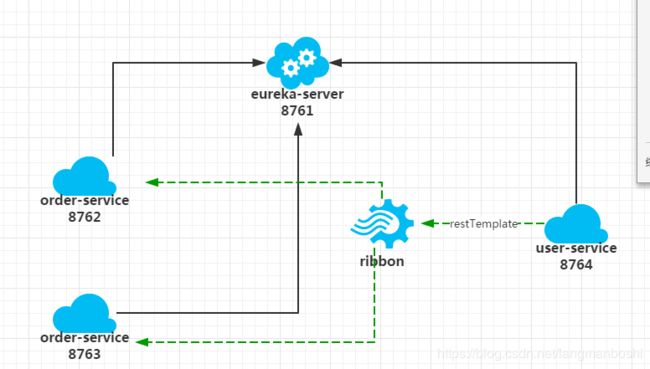
此时的结构如下


