android MVP + dagger2 + Retrofit + Rxjava+okhttp android基础项目框架搭建(1)--之Dagger2引入
1. 概述
最近由于公司项目的需要, 需要使用android MVP dagger2 retrofit rxjava okhttp来搭建android的基础开发框架;一百度发现网上大把的类似的搭建开发框架的文章, 按照文章的操作介绍搭建下来,中间总是有一些地方打不通,所以被逼的没有办法只有自己去 github上寻找demo自己摸索;通过自己的一番努力,终于将此框架搭建一起了。于是决定写一个博客做一个记录,希望对别人能有一个帮助。
2. MVP 简介
什么是MVP?
MVP是Model, View和Presenter的简称。是非常有名的MVC模式的演化版。MVP模式把显示逻辑和从业务逻辑层中分离出来,理想状况下,MVP模式中,在替换不同的视图(View)的情况下,可以实现完全相同的业务逻辑。
Presenter代替了MVC中Controller,它比Controller担当更多的任务,也更加复杂。Presenter处理事件,执行相应的逻辑,这些逻辑映射到Model的Command以操作Model。那些处理UI如何工作的代码基本上都位于Presenter。Presenter如同一个乐队的指挥家,表现和协调整个Application,它负责创建和协调其它对象。
MVP与MVC有着一个重大的区别:在MVP中View并不直接使用Model,它们之间的通信是通过Presenter (MVC中的Controller)来进行的,所有的交互都发生在Presenter内部,而在MVC中View会从直接Model中读取数据而不是通过 Controller。
表示器(Presenter)
表示器也可以称为指挥器,它处在View和Model之间,负责从Model中获取数据,然后返回给View。同时决定视图上的交互的处理。
视图(View)
Presenter代替了MVC中Controller,它比Controller担当更多的任务,也更加复杂。Presenter处理事件,执行相应的逻辑,这些逻辑映射到Model的Command以操作Model。那些处理UI如何工作的代码基本上都位于Presenter。Presenter如同一个乐队的指挥家,表现和协调整个Application,它负责创建和协调其它对象。
MVP与MVC有着一个重大的区别:在MVP中View并不直接使用Model,它们之间的通信是通过Presenter (MVC中的Controller)来进行的,所有的交互都发生在Presenter内部,而在MVC中View会从直接Model中读取数据而不是通过 Controller。
为什么使用MVP模式
因为在android中,Activity严重耦合了界面和数据获取层。这样不仅导致了Activity的类越来越庞大,而且,如果修改数据获取层,可能也导致整个View都要重写。也非常不利于模块和自动化测试。MVP使View独立于数据,把大量的逻辑从Activity中提取出来。把应用分层,每层都可以独立测试和变动。MVP模式是如何工作的
MVP模式中的角色划分并没有标准的划分方法。大致的定义如下:表示器(Presenter)
表示器也可以称为指挥器,它处在View和Model之间,负责从Model中获取数据,然后返回给View。同时决定视图上的交互的处理。
视图(View)
视图比较好理解,在Android中一般对应的是Activity,Fragment或者View。因为视图上的交互需要通知表示器,让它决定做什么事情。所以View中一般包含一个Presenter的引用。理想状况下,Presenter一般使用依赖注入的方式实现。
模型(Model)
模型是应用程序中的数据处理和业务逻辑部分。
模型是应用程序中的数据处理和业务逻辑部分。
MVP处理流程如下图所示:
3. Dagger2简介
依赖注入(Dependency Injection),简称DI,又叫控制反转(Inversion of Control),简称IOC。熟悉spring的开发者对这个概念应该不陌生, spring 中当一个类中应用到另外一个类的对象时, 该对象不是直接被new 出来的, 而是通过spring框架注入的。dagger2也一样, 当一个类的实例需要另另一个类的实例进行协助时,在传统的设计中,通常由调用者来创建被调用者的实例,然而依赖注入的方式,创建被调用者不再由调用者创建实例,创建被调用者的实例的工作由IOC容器来完成,然后注入到调用者。因此也被称为依赖注入。
其他框架这里就不一一介绍, 感兴趣的同学可以百度。也可以加我微信进行交流, 微信号 lg878398509
4. 基础框架代码实现
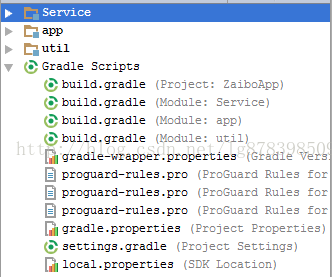
使用android studio 建立一个android项目, 另外分别建立两个library如图:
4.1 gradle 文件如下:
项目gradle文件类容如下:
buildscript {
    repositories {
        jcenter()
    }
    dependencies {
        classpath 'com.android.tools.build:gradle:2.3.2'
        classpath 'com.neenbedankt.gradle.plugins:android-apt:1.8'
        // NOTE: Do not place your application dependencies here; they belong
        // in the individual module build.gradle files
    }
}

allprojects {
    repositories {
        jcenter()
        maven { url "https://jitpack.io" }
    }
}

task clean(type: Delete) {
    delete rootProject.buildDir
}


ext {
    // Sdk and tools
    minSdkVersion = 15
    targetSdkVersion = 25
    compileSdkVersion = 25
    buildToolsVersion = '25.0.0'

    supportLibraryVersion = '25.3.1'
    junitVersion = '4.12'
    daggerVersion = '2.5'
}apply plugin: 'com.android.application'
apply plugin: 'com.neenbedankt.android-apt'
android {
compileSdkVersion rootProject.ext.compileSdkVersion
buildToolsVersion rootProject.ext.buildToolsVersion
defaultConfig {
applicationId "com.longer.zaibo"
minSdkVersion rootProject.ext.minSdkVersion
targetSdkVersion rootProject.ext.targetSdkVersion
versionCode 1
versionName "1.0"
multiDexEnabled true
testInstrumentationRunner "android.support.test.runner.AndroidJUnitRunner"
}
buildTypes {
release {
minifyEnabled false
proguardFiles getDefaultProguardFile('proguard-android.txt'), 'proguard-rules.pro'
}
}
packagingOptions {
exclude 'META-INF/DEPENDENCIES'
exclude 'META-INF/NOTICE'
exclude 'META-INF/LICENSE'
exclude 'META-INF/LICENSE.txt'
exclude 'META-INF/NOTICE.txt'
exclude 'META-INF/rxjava.properties'
}
}
dependencies {
//单元测试
compile fileTree(dir: 'libs', include: ['*.jar'])
androidTestCompile('com.android.support.test.espresso:espresso-core:2.2.2', {
exclude group: 'com.android.support', module: 'support-annotations'
})
testCompile 'org.robolectric:robolectric:3.3.2'
testCompile "org.mockito:mockito-core:2.+"
testCompile "junit:junit:$rootProject.ext.junitVersion"
testCompile "org.robolectric:shadows-multidex:3.0"
compile project(':Service')
//V7
compile "com.android.support:appcompat-v7:$rootProject.ext.supportLibraryVersion"
//65536
compile 'com.android.support:multidex:1.0.1'
//view
compile "com.android.support:recyclerview-v7:$rootProject.ext.supportLibraryVersion"
compile "com.android.support:cardview-v7:$rootProject.ext.supportLibraryVersion"
compile "com.android.support:design:$rootProject.ext.supportLibraryVersion"
// Rx Life Cycle
compile 'com.trello:rxlifecycle:0.6.1'
compile 'com.trello:rxlifecycle-components:0.6.1'
// RxBinding
compile 'com.jakewharton.rxbinding:rxbinding:0.4.0'
compile 'com.jakewharton.rxbinding:rxbinding-support-v4:0.4.0'
compile 'com.jakewharton.rxbinding:rxbinding-recyclerview-v7:0.4.0'
// ButterKnife
compile 'com.jakewharton:butterknife:8.2.1'
apt 'com.jakewharton:butterknife-compiler:8.2.1'
// BottomBar
compile 'com.roughike:bottom-bar:1.4.0.1'
// spots-dialog
compile 'com.github.d-max:spots-dialog:0.4@aar'
// material view
compile 'com.github.rey5137:material:1.2.4'
compile 'com.miguelcatalan:materialsearchview:1.4.0'
// RxAndroid 和 RxJava
compile 'io.reactivex.rxjava2:rxandroid:2.0.1'
compile 'io.reactivex.rxjava2:rxjava:2.0.3'
// Dagger2
compile "com.google.dagger:dagger:$rootProject.ext.daggerVersion"
apt "com.google.dagger:dagger-compiler:$rootProject.ext.daggerVersion"
provided 'org.glassfish:javax.annotation:10.0-b28'
}
apply plugin: 'com.android.library'
apply plugin: 'com.neenbedankt.android-apt'
apply plugin: 'android-apt'
android {
    compileSdkVersion rootProject.ext.compileSdkVersion
    buildToolsVersion rootProject.ext.buildToolsVersion

    defaultConfig {
        minSdkVersion rootProject.ext.minSdkVersion
        targetSdkVersion rootProject.ext.targetSdkVersion
        versionCode 1
        versionName "1.0"

        testInstrumentationRunner "android.support.test.runner.AndroidJUnitRunner"

    }
    buildTypes {
        release {
            minifyEnabled false
            proguardFiles getDefaultProguardFile('proguard-android.txt'), 'proguard-rules.pro'
        }
    }

    defaultPublishConfig "debug"
}
dependencies {
    compile fileTree(dir: 'libs', include: ['*.jar'])
    androidTestCompile('com.android.support.test.espresso:espresso-core:2.2.2', {
        exclude group: 'com.android.support', module: 'support-annotations'
    })
    testCompile 'org.robolectric:robolectric:3.3.2'
    testCompile "org.mockito:mockito-core:2.+"
    testCompile "junit:junit:$rootProject.ext.junitVersion"
    testCompile "org.robolectric:shadows-multidex:3.0"

    compile 'com.android.support:appcompat-v7:25.3.1'

    //工具包
    compile project(':util')

    // Retrofit 网络请求
    compile 'com.squareup.retrofit2:retrofit:2.1.0'
    compile 'com.squareup.retrofit2:converter-gson:2.1.0'
    compile 'com.squareup.retrofit2:adapter-rxjava:2.1.0'

    // OkHttp 日志拦截
    compile 'com.squareup.okhttp3:logging-interceptor:3.3.1'

    // RxAndroid 和 RxJava
    compile 'io.reactivex.rxjava2:rxandroid:2.0.1'
    compile 'io.reactivex.rxjava2:rxjava:2.0.3'

    // Dagger2
    compile "com.google.dagger:dagger:$rootProject.ext.daggerVersion"
    apt "com.google.dagger:dagger-compiler:$rootProject.ext.daggerVersion"
    provided 'org.glassfish:javax.annotation:10.0-b28'
}
apply plugin: 'com.android.library'
apply plugin: 'com.neenbedankt.android-apt'
apply plugin: 'android-apt'
android {
    compileSdkVersion rootProject.ext.compileSdkVersion
    buildToolsVersion rootProject.ext.buildToolsVersion

    defaultConfig {
        minSdkVersion rootProject.ext.minSdkVersion
        targetSdkVersion rootProject.ext.targetSdkVersion
        versionCode 1
        versionName "1.0"

        testInstrumentationRunner "android.support.test.runner.AndroidJUnitRunner"

    }
    buildTypes {
        release {
            minifyEnabled false
            proguardFiles getDefaultProguardFile('proguard-android.txt'), 'proguard-rules.pro'
        }
    }

    defaultPublishConfig "debug"
}

dependencies {
    compile fileTree(dir: 'libs', include: ['*.jar'])
    androidTestCompile('com.android.support.test.espresso:espresso-core:2.2.2', {
        exclude group: 'com.android.support', module: 'support-annotations'
    })
    compile "com.android.support:appcompat-v7:$rootProject.supportLibraryVersion"
    testCompile "junit:junit:$rootProject.junitVersion"

    //日志
    compile 'com.orhanobut:logger:1.14'

    // crash采集
    compile 'com.tencent.bugly:crashreport:2.2.0'

    // Glide 图片加载
    compile 'com.github.bumptech.glide:glide:3.7.0'
    compile 'jp.wasabeef:glide-transformations:2.0.1'
    compile 'com.google.code.gson:gson:2.7'
}
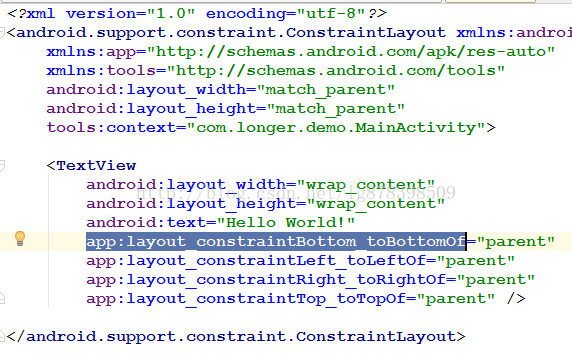
说明:按照以上步骤建立工程时, 编译的时候有可能报如下错误,报错信息如下:
解决办法, 此错误是由 自动生成的布局文件的TextView的app:layout_constraint属性引起的。 去掉这些属性同时将ConstraintLayout换成LinearLayout即可。
4.2 java 代码实现[说明; 程序中的主包名已经省略, 比如你的主包名是: com.xxx.xx]
Application.javapublic class Application extends MultiDexApplication{
@Override
public void onCreate() {
super.onCreate();
// init logger.
AppLog.init();
// InitializeService.start(this);
}
public static Application get(Context context) {
return (Application) context.getApplicationContext();
}
ApplicationComponent mApplicationComponent;
public ApplicationComponent getComponent() {
if (mApplicationComponent == null) {
mApplicationComponent = DaggerApplicationComponent.builder()
.applicationModule(new ApplicationModule(this))
.build();
}
return mApplicationComponent;
}
// Needed to replace the component with a test specific one
public void setComponent(ApplicationComponent applicationComponent) {
mApplicationComponent = applicationComponent;
}
}
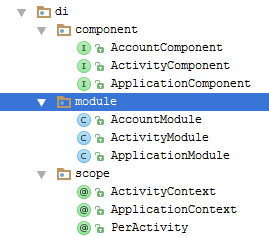
Dagger2相关目录如下:
ActivityContext.java
@Qualifier
@Retention(RetentionPolicy.RUNTIME)
public @interface ActivityContext {
}@Qualifier
@Retention(RetentionPolicy.RUNTIME)
public @interface ApplicationContext {
}@Scope
@Retention(RetentionPolicy.RUNTIME)
public @interface PerActivity {
}@Module
public class AccountModule {
// @Provides
// public AccountService provideAccountService(AccountDataSource dataSource) {
// return dataSource;
// }
}ActivityModule.java
@Module
public class ApplicationModule {

    protected final Application mApplication;

    public ApplicationModule(Application application) {
        mApplication = application;
    }

    @Provides
    public Application provideApplication() {
        return mApplication;
    }

    @Provides
    @ApplicationContext
    public Context provideContext() {
        return mApplication;
    }

//    @Provides
//    @Singleton
//    public AccountApi provideRepoService(ZaiboRetrofit retrofit) {
//        return retrofit.get().create(AccountApi.class);
//    }
//
//    @Provides
//    @Singleton
//    public IScheduler provideScheduler(Scheduler scheduler) {
//        return scheduler;
//    }
}
ApplicationModule.java
@Module
public class ApplicationModule {

    protected final Application mApplication;

    public ApplicationModule(Application application) {
        mApplication = application;
    }

    @Provides
    public Application provideApplication() {
        return mApplication;
    }

    @Provides
    @ApplicationContext
    public Context provideContext() {
        return mApplication;
    }

    @Provides
    @Singleton
    public AccountApi provideRepoService(ZaiboRetrofit retrofit) {
        return retrofit.get().create(AccountApi.class);
    }

    @Provides
    @Singleton
    public IScheduler provideScheduler(Scheduler scheduler) {
        return scheduler;
    }
}@PerActivity
@Component(
dependencies = ApplicationComponent.class,
modules = {ActivityModule.class, AccountModule.class})
public interface AccountComponent extends ActivityComponent {
void inject(MainActivity loginActivity);
}@PerActivity
@Component(dependencies = ApplicationComponent.class, modules = ActivityModule.class)
public interface ActivityComponent {
Activity activity();
}
/**
 * Created by longer on 2017/7/30.
 */
@Singleton
@Component(modules = ApplicationModule.class)
public interface ApplicationComponent {
    @ApplicationContext
    Context context();

    Application application();

//    AccountApi accountAccountApi();
//
//    IScheduler scheduler();
}
4.3运行项目
等项目编译完成,在Application类中引入Dagger2生成的DaggerApplicationComponent类, 再次运行出现如下界面, 那么恭喜你,dagger2已经成功引入。下一篇将介绍如何引入Retrofit 、Rxjava、okhttp及MVP模式。
项目下载地址


