python3爬虫(8)爬虫框架scrapy安装和使用
一:scrapy的windows下安装
① 安装Python3.6,浏览器打开官网,找到适合自己操作系统的版本下载即可,注意Customize installation 为自定义安装路径,不要忘记勾选pip 进行安装。
②安装pywin32.网址:https://sourceforge.net/projects/pywin32/files/pywin32/
下载相应版本的.exe 文件,下载完成后安装即可。
③安装lxml,命令pip3 install lxml
④安装pyOpenSSL,命令pip3 install pyOpenSSL
⑤安装Twisted,网址:https://www.lfd.uci.edu/~gohlke/pythonlibs/
找到操作系统对应的版本下载
之后进入DOS窗口,进入Twisted所在的目录执行命令pip3 install Twisted-17.9.0-cp36-cp36m-win_amd64.whl 这里17.9.0为版本号,36为对应的python版本号
⑥安装scrapy,进入Python所在目录,命令pip3 install scrapy
成功安装后,重启DOS,输入scrapy显示如下即为安装成功!
二:为什么要使用scrapy
1.scrapy 底层是异步框架 twisted ,高并发和性能是最大优势
2.scrapy方便扩展,提供了很多内置的功能
3.scrapy内置的css和xpath非常方便,效率比beautifulsoup好很多
4.URL去重采用布隆过滤器方案,避免同个网页多次趴取
当然也有缺点
1.不支持分布式部署
2.原生不支持爬去JavaScript的页面,需要手动分JS请求
三:scrapy简单的使用
创建项目:scrapy startproject quote
创建spider文件:scrapy genspider quotes quotes.toscrape.com
运行爬虫:scrapy crawl quotes
也可以用pycharm打开运行和调试scrapy项目,需要个调用文件,如main.py,想在pycharm中运行或调试整个项目运行或调试main.py就可以了
from scrapy.cmdline import execute
import os
import sys

#添加当前项目的绝对地址
sys.path.append(os.path.dirname(os.path.abspath(__file__)))
#执行 scrapy 内置的函数方法execute,  使用 crawl 爬取并调试,最后一个参数jobbole 是我的爬虫文件名
execute(['scrapy', 'crawl', 'zhihu', '--nolog'])
(上面的代码里的zhihu就是创建的爬虫,也就是scrapy genspider quotes quotes.toscrtapy.com中红色标注的地方,偷个懒,不做更改了,知道就好)
可以把爬去到的内容存储JSON,XML文件,命令为:
scrapy crawl quotes -o quotes.json一个简单的爬虫示例(爬去的网站是quotes.toscrape.com):
https://pan.baidu.com/s/1N3b5NXRJWZZuVV7mMD2j7A
提取码:bhhf
代码就不贴出来了,有点多
四:scrapy抓取知乎用户信息
大家都知道知名网站“知乎”,这个站究竟有多少用户呢,又有多少活跃用户能,能不能爬去到所有用户信息?用scrapy可以试一下。首先如何下手爬去用户,我真知道知乎有个粉丝机制,部分用户有自己的粉丝,也有自己关注的用户,如下图:
越活跃的用户粉丝越多,我们随便找个比较活跃的用户,爬去他的所有粉丝,假设有2000个,这2000个用户每个人都自己的粉丝,假设每个人有20个粉丝,这样不就爬去到4W用户吗,这样无限递归下去,理论上可以爬去所有用户。这个时候聪明的你可能会跟我抬杠,如果两个人互粉,或者A粉B,B粉C,C粉D,D粉A,这样不就出现死循环了吗,不用担心,scrapy有个参数可以设置去重,避免相同网页第二次爬去。这个时候你脑子一转,又提出了一种情况,A是B和C的粉丝,我们搜集B和C的粉丝的时候都会有A,这个时候是不同页面,还是会出现同一个用户采集多次情况,没关系,存数据库的时候我们去除重复就好了。
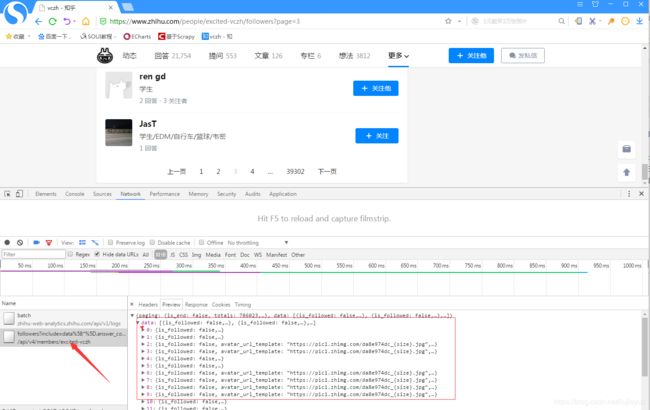
看下粉丝列表是如何获取的:
F12打开开发者工具,点击粉丝列表第二页,可以看到获取粉丝列表是一个XHR请求,亦即AJAX加载的,是一个get请求,地址是:
https://www.zhihu.com/api/v4/members/excited-vczh/followers?include=data%5B*%5D.answer_count%2Carticles_count%2Cgender%2Cfollower_count%2Cis_followed%2Cis_following%2Cbadge%5B%3F(type%3Dbest_answerer)%5D.topics&offset=60&limit=20
经过简单分析,我们只需关注
excited-vczh 当前用户
offset=60&limit=20 开始位置和获取个数
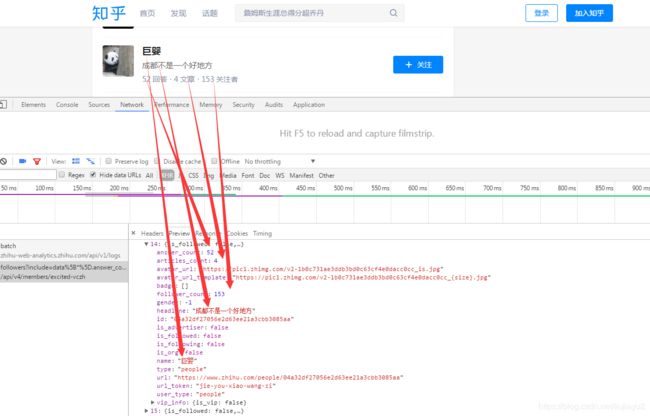
爬去到的数据大概是这样:
代码如下:
zhihu.py
# -*- coding: utf-8 -*-
import json

from scrapy import Spider,Request

from zhihuuser.items import UserItem


class ZhihuSpider(Spider):
    name = 'zhihu'
    allowed_domains = ['www.zhihu.com']
    start_urls = ['http://www.zhihu.com/']

    start_user = 'excited-vczh'

    user_url = ''
    user_query = ''

    followers_url = 'https://www.zhihu.com/api/v4/members/{user}/followers?{include}&offset={offset}&limit={limit}'
    followers_query = 'include=data[*].answer_count,articles_count,gender,follower_count,is_followed,is_following,badge[?(type=best_answerer)].topics'

    followings_url = ''
    followings_query = ''

    def start_requests(self):
        yield Request(self.followers_url.format(user=self.start_user,include=self.followers_query,offset=0,limit=20), callback=self.parse_followers, dont_filter=False)

    #关注他的人
    def parse_followers(self, response):
        results = json.loads(response.text)

        if 'data' in results.keys():
            for data in results.get('data'):
                item = UserItem()
                for field in item.fields:
                    if field in data.keys():
                        item[field] = data.get(field)
                yield item
                print('爬去到用户:',item['name'])
                yield Request(self.followers_url.format(user=data.get('url_token'),include=self.followers_query,offset=0,limit=20),callback=self.parse_followers, dont_filter=False)

        if 'paging' in results.keys()  and results.get('paging').get('is_end') == False:
            next_page = results.get('paging').get('next')
            pos = next_page.find('www.zhihu.com/') + len('www.zhihu.com/')
            next_page = next_page[:pos] + 'api/v4/' + next_page[pos:]
            yield Request(next_page, self.parse_followers, dont_filter=False)
items.py
# -*- coding: utf-8 -*-

# Define here the models for your scraped items
#
# See documentation in:
# https://doc.scrapy.org/en/latest/topics/items.html

from scrapy import Item,Field


class UserItem(Item):
    # define the fields for your item here like:
    # name = scrapy.Field()
    id = Field()
    name = Field()
    avatar_url = Field()
    url_token = Field()
    headline = Field()
    is_vip = Field()

    answer_count = Field()
    articles_count = Field()
    follower_count = Field()
pipeline.py
# -*- coding: utf-8 -*-

# Define your item pipelines here
#
# Don't forget to add your pipeline to the ITEM_PIPELINES setting
# See: https://doc.scrapy.org/en/latest/topics/item-pipeline.html


import pymongo

class MongoPipeline(object):

    def __init__(self, mongo_uri, mongo_db):
        self.mongo_uri = mongo_uri
        self.mongo_db = mongo_db

    @classmethod
    def from_crawler(cls, crawler):
        return cls(
            mongo_uri=crawler.settings.get('MONGO_URI'),
            mongo_db=crawler.settings.get('MONGO_DATABASE')
        )

    def open_spider(self, spider):
        self.client = pymongo.MongoClient(self.mongo_uri)
        self.db = self.client[self.mongo_db]

    def close_spider(self, spider):
        self.client.close()

    def process_item(self, item, spider):
        # self.db['user3'].insert_one(dict(item))
        self.db['user'].update({'url_token':item['url_token']},{'$set':item}, True)
        return item
项目整个下载:
https://pan.baidu.com/s/1dWaIJhdK-nSooxdKpj1-NQ
提取码:ns5d
我运行了5个小时左右,抓取到了16W个用户,
放进了mongodb里面,这16W数据加载用了56秒,占用内存1.6G。毫无疑问,知乎用户至少是千万级别,本次只是个简单测试和学习,后面考虑分布式爬去,


