Python结合Excel进行接口自动化
前言
自己通过摸索,和借鉴、综合大神些的意见,捣鼓了一套接口自动化的脚本。比较简略,还有一些有局限的地方,欢迎大家斧正留言~~~
工具
requests   -- Python的requests库
xlrd           -- 操作Excel
moco(moco-runner-0.10.0-standalone.jar)   -- moco-server模拟接口
logging     -- 日志
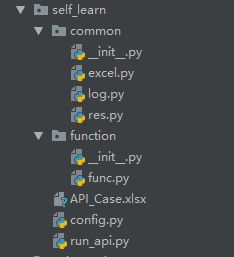
下图是我的目录结构:
common:存放一些通用/公用的文件
function:存放的接口的业务文件
工作流程
接口的测试用例在Excel文件中进行维护,使用第三方库 xlrd 对 Excel 操作,遍历读取测试用例。接下来封装requests库,符合自己的接口业务测试流程,使用封装好的类完成接口请求,创建run_api.py文件,运行测试用例。
一、配置文件config
我本次使用的Python文件来作为配置文件,因为个人觉得这种方式读取配置项的时候:简单、易懂、直观,在使用的时候,直接导入配置文件即可使用。
config.py:
# -*- coding:utf-8 -*-
""" 接口相关配置 """
host = 'http://127.0.0.1:5025'

"""Excel"""
# FILE_PATH = "F:\PyCharmProject\LYKION\new\API_Case.xlsx"      # 因为文件夹的名字中有'n',而在Python中'n'表示空格,所以要在前面加'\'进行转义
FILE_PATH = "F:\PyCharmProject\LYKION\self_learn\API_Case.xlsx"

"""Excel中单元格列的配置"""
CASE_URL = 3
CASE_METHOD = 4
CASE_HEADER = 5
CASE_DATA = 7

"""其他(测试类会用到)"""
url = 'http://127.0.0.1:5025/do/extra'
method = 'post'
data = {
    'OrderCode': '1002',
    'ShipperCode': 'SF',
    'LogisticCode': '118652124588863'
        }

headers = {
    'Content-Type': 'application/json'
}
data_type = 'Json'
is_header = 'yes'
二、logging封装
个人觉得用 print 打印,不好看(哈哈^_^),就用logging自己封装了一个,log输出格式自己定义,在控制台打印的 log 开起来就舒服多了,本文的 log 格式比较简单
# -*- coding:utf-8 -*-
import logging


class logger:
    def __init__(self):
        self.logger = logging.getLogger()
        self.logger.setLevel(logging.INFO)
        # 设置log输出格式
        self.formatter = logging.Formatter('[%(asctime)s] -- %(levelname)s: %(message)s', '%Y-%m-%d %H:%M:%S')

        self.consle = logging.StreamHandler()   # StreamHandler将log输出到控制台
        self.consle.setFormatter(self.formatter)
        self.consle.setLevel(logging.INFO)
        self.logger.addHandler(self.consle)

    def info(self, msg):
        self.logger.info(msg)
        self.logger.removeHandler(self.consle)

    def debug(self, msg):
        self.logger.debug(msg)
        self.logger.removeHandler(self.consle)

    def error(self, msg):
        self.logger.error(msg)
        self.logger.removeHandler(self.consle)

    def critical(self, msg):
        self.logger.critical(msg)
        self.logger.removeHandler(self.consle)

    def warning(self, msg):
        self.logger.warning(msg)
        self.logger.removeHandler(self.consle)


if __name__ == '__main__':
    logger().info('dfd14575')
三、封装Excel
Excel的格式都是自定义的,其格式都是按照各自的接口需求来定。
我自己写的格式不复杂,很简单。
封装Excel:
# -*- coding:utf-8 -*-
import xlrd
import LYKION.self_learn.config as conf

workbook = None


def open_excel(path):
    """
    打开Excel
    :param path: Excel路径
    :return:
    """
    global workbook
    if workbook == None:
        workbook = xlrd.open_workbook(path)
    return workbook


def get_sheet(sheetName):
    """
    通过sheet打开工作簿
    :param sheetName:
    :return:
    """
    global workbook
    return workbook.sheet_by_name(sheetName)


def get_row(sheet):
    """
    获取行数
    :param sheet:
    :return:
    """
    return sheet.nrows


def get_col(sheet):
    """
    获取列数
    :param sheet:
    :return:
    """
    return sheet.ncols


def get_cell_content(sheet, row, col):
    """
    获取单元格内容
    :param sheet: sheet名
    :param row: 行
    :param col: 列
    :return:
    """
    return sheet.cell_value(row, col)


"""测试类"""
if __name__ == '__main__':
    wb = open_excel(conf.FILE_PATH)
    ws = get_sheet('Test_Case')
    row = get_row(ws)
    col = get_col(ws)
    cell_content = get_cell_content(ws, 1, 3)
    print(ws.name, row, col, cell_content)
四、MOCO_Server来模拟接口
我没有使用项目上面的接口,而是用的moco工具来模拟接口请求。moco是一款简便,易上手且好用的接口模拟工具。使用方法非常简单,提前下载好 moco-runner-0.10.0-standalone.jar 包,然后在CMD使用命令:java -jar moco-runner-0.10.0-standalone.jar start -p xxxx -c dddd(xxxx:端口号, dddd:配置文件)启动成功即可。
一个接口配置文件,可以只有一个请求,也可以有多个请求。我就是把示例中的接口放在同一个配置文件中。
express.json -- 接口配置文件
[
  {
    "description":"模拟快递查询",
    "request":{
      "method":"post",
      "uri":"/do/extra",
      "json":{
        "OrderCode":"1002",
        "ShipperCode":"SF",
        "LogisticCode":"118652124588863"
      }
    },
    "response":{
      "json":{
        "code":"200",
        "msg":"ok",
        "result":"操作成功",
        "EBusinessId":"11092531",
        "OrderCode":"1002",
        "ShipperCode":"SF",
        "LogisticCode":"118652124588863",
        "Success":true,
        "State":3,
        "Reason":null,
        "data":{
          "msg":"你的快递信息查询成功",
          "expr":"SF"
        },
        "Traces":[
          {
            "AcceptTime":"",
            "AcceptStation":"",
            "Remark":null
          },
          {
            "AcceptTime":"2018/06/25 08:05:37",
            "AcceptStation":"正在派件..(派件人:邓裕富,电话:18718866310)[深圳 市]",
            "Remark":null
          },
          {
            "AcceptTime":"2018/06/25 10:01:28",
            "AcceptStation":"快件在 深圳集散中心 ,准备送往下一站 深圳 [深圳市]",
            "Remark":null
          },
          {
            "AcceptTime":"2018/06/25 17:41:06",
            "AcceptStation":"快件在 深圳集散中心 [深圳市]",
            "Remark":null
          },
          {
            "AcceptTime":"2018/06/26 09:41:06",
            "AcceptStation":"已收件[深圳市]",
            "Remark":null
          },
          {
            "AcceptTime":"2018/06/26 10:05:06",
            "AcceptStation":"拣货完成",
            "Remark":null
          },
          {
            "AcceptTime":"2018/06/26 09:41:07",
            "AcceptStation":"扫描完成",
            "Remark":null
          },
          {
            "AcceptTime":"2018/06/26 09:43:06",
            "AcceptStation":"打包完成",
            "Remark":null
          },
          {
            "AcceptTime":"2018/06/26 09:43:50",
            "AcceptStation":"您的订单在[深圳市]集散中心分拣完成",
            "Remark":null
          },
          {
            "AcceptTime":"2018/06/26 10:43:06",
            "AcceptStation":"您的订单在[深圳市]送往[四川省成都市青白江集散中心]",
            "Remark":null
          },
          {
            "AcceptTime":"2018/06/29 10:43:06",
            "AcceptStation":"您的订单已到达[四川省成都市青白江集散中心]",
            "Remark":null
          },
          {
            "AcceptTime":"2018/06/29 15:43:06",
            "AcceptStation":"您的订单在[四川省成都市青白江集散中心]送往[成都市应龙路分拣中心]",
            "Remark":null
          },
          {
            "AcceptTime":"2018/06/29 23:43:06",
            "AcceptStation":"您的订单已到达[成都市应龙路分拣中心]",
            "Remark":null
          },
          {
            "AcceptTime":"2018/06/30 09:13:06",
            "AcceptStation":"您的订单在正在配送中(派件人:黄日华,电话:18918866310,请您准备签收)",
            "Remark":null
          },
          {
            "AcceptTime":"2018/06/30 11:41:21",
            "AcceptStation":"您的订单已完成配送",
            "Remark":null
          }
        ]
      }
    }
  },
  {
    "request":{
      "method":"get",
      "uri":"/do/something"
    },
    "response":{
      "json":{
        "code":"200",
        "msg":"ok",
        "result":"操作成功",
        "text":"顺丰快递",
        "EBusinessId":"11092531",
        "OrderCode":"1002",
        "ShipperCode":"SF",
        "LogisticCode":"118652124588863",
        "Success":true,
        "State":3,
        "Reason":null,
        "Traces":{
            "AcceptTime":"",
            "AcceptStation":"",
            "Remark":null
          }
      }
    }
  },
  {
    "request":{
      "method":"get",
      "uri":"/do/getInfo"
    },
    "response":{
      "text":"中国人民解放军",
      "json":{
        "code":"200",
        "msg":"ok",
        "result":"操作成功",
        "text":"中国人民解放军"
      }
    }
  },
  {
    "request":{
      "method":"get",
      "uri":"/do/eg",
      "queries":{
        "id":"5"
      }
    },
    "response":{
      "json":{
        "code":"200",
        "msg":"ok",
        "result":"操作成功",
        "name":"Jack",
        "age":18,
        "sex":"Female",
        "address":"成都"
      }
    }
  },
  {
    "request":{
      "method":"post",
      "uri":"/do/location",
      "forms":{
        "lat":"30.544353",
        "lon":"104.074007"
      }
    },
    "response":{
      "json":{
        "code":"200",
        "msg":"ok",
        "result":"操作成功",
        "location":{
          "province":"四川",
          "city":"成都",
          "area":"高新区",
          "address":"成都市武侯区世纪城南路156号附近"
        }
      }
    }
  }
]
五、Requests的封装
我在示例中使用的时post和get,如有有其他的需求,可以直接把请求方式添加在此文件中就可以了。绝大多数我们都是使用的post和get。
# -*- coding:utf-8 -*-
import requests
import json
import LYKION.self_learn.config as conf
from LYKION.self_learn.common.log import logger


def test_api(method, url, data, headers, is_header):
    """
    自定义的接口测试方法
    :param method: 请求方法
    :param url: 接口地址
    :param data: 请求参数
    :param headers: headers
    :param is_header: 是否有header
    :return: result -- 接口返回的结果
    """
    """
    1、判断接口请求方式、选择对应的请求
    2、判断是否有header,选择对应请求
    """
    try:
        if method == 'POST' or method == 'post':    # post请求
            if is_header == 'YES' or is_header == 'yes':    # 有header
                res = requests.post(url, data, headers=headers)
            else:       # 无header
                res = requests.post(url, json.loads(data))
            result = res.json()
        else:       # get请求
            res = requests.get(url, data)
            result = res.json()
        return result
    except Exception as e:
        logger().error('请求时失败:{}'.format(e))


def get_response_content(method, url, data, headers, is_header):
    """
    自定义检查接口的返回结果
    :param method: 请求方法
    :param url: 接口地址
    :param data: 请求参数
    :param headers: headers
    :param is_header: 是否有header
    :return: content -- 自定义检查的返回结果
    """
    content = []
    try:
        if method == 'POST' or method == 'post':
            if is_header == 'YES' or is_header == 'yes':
                res = requests.post(url, data, headers=headers)
            else:
                res = requests.post(url, json.loads(data))
            code = res.json().get('code')   # 获取code值
            msg = res.json().get('msg')     # 获取msg值
            result = res.json().get('result')   # 获取result值
            content.append(code)
            content.append(msg)
            content.append(result)
        else:
            res = requests.get(url, data)
            code = res.json().get('code')
            msg = res.json().get('msg')
            result = res.json().get('result')
            content.append(code)
            content.append(msg)
            content.append(result)
        return content
    except Exception as e:
        logger().error('请求失败:{}'.format(e))


"""测试类"""
if __name__ == '__main__':
    url = conf.url
    method = conf.method
    data = conf.data
    headers = conf.headers
    is_header = conf.is_header
    res = test_api(method, url, json.dumps(data), headers, is_header)
    content = get_response_content(method, url, json.dumps(data), headers, is_header)
    # logger().info(res)
    logger().info(content)
六、function模块
该文件是requests的第二次封装,主要是从Excel中读取接口请求必要的参数,在进行状态,然后发送请求
# -*- coding:utf-8 -*-
import LYKION.self_learn.common.excel as excel
import LYKION.self_learn.config as conf
import LYKION.self_learn.common.res as res
from LYKION.self_learn.common.log import logger


class ApiTest:
    """ """

    def __init__(self):
        pass

    def run_case(self, sheet):
        """
        读取Excel中的测试用例,并执行测
        :param sheet: sheet
        :return: result -- 接口返回的结果
        """
        row = excel.get_row(sheet)      # 获取Excel测试用例的列
        for i in range(1, row):         # 通过for循环的方式,遍历取出Excel所有的用例
            host = conf.host
            url = excel.get_cell_content(sheet, i, conf.CASE_URL)
            data = excel.get_cell_content(sheet, i, conf.CASE_DATA)
            method = excel.get_cell_content(sheet, i, conf.CASE_METHOD)
            header = conf.headers
            is_header = excel.get_cell_content(sheet, i, conf.CASE_HEADER)
            result = res.test_api(method, host + url, data, header, is_header)  # 执行请求
            logger().info(result)
            logger().info('--------------------------------------------------------------------------'
                          '-----------------------------------------')


"""测试类"""
if __name__ == '__main__':
    wb = excel.open_excel(conf.FILE_PATH)
    sheet = excel.get_sheet('Case')
    ApiTest().run_case(sheet)
七、Run文件
另外来写一个文件,主要就是用来执行测试用例,就是为了方便,让业务和代码分离开。
# -*- coding:utf-8 -*-
from LYKION.self_learn.common.log import logger
from LYKION.self_learn.function.func import ApiTest
import LYKION.self_learn.common.excel as excel
import LYKION.self_learn.config as conf


logger().info('♣♣☆☆☆☆☆☆♣♣♣☆☆☆☆☆☆☆☆☆♣ 开始测试 ♣☆☆☆☆☆☆☆☆♣♣♣☆☆☆☆☆☆☆☆☆')
"""打开Excel"""
workbook = excel.open_excel(conf.FILE_PATH)
sheet = excel.get_sheet('Test_Case')

"""执行测试用例"""
res = ApiTest().run_case(sheet)
logger().info(res)
logger().info('♣♣☆☆☆☆☆☆♣♣♣☆☆☆☆☆☆☆☆☆♣ 测试结束 ♣☆☆☆☆☆☆☆☆♣♣♣☆☆☆☆☆☆☆☆☆')
自此,一个接口自动化测试的框架脚本就完成了((* ̄︶ ̄))。这个脚本的框架设计的功能比较简单,欢迎大家多多提修改意见。

