javascript原生移动云编程9 - 如何使用云数据库读取和保存数据
用javascript在码实云平台上,可以在云里编写原生的移动应用。移动应用必然要和数据库打交道。码实平台提供了全面的云服务,也包括了数据库的部分。云编程可以方便地用javascript对数据进行操作。码实平台里,数据库数据统称为BO(Business Object)。今后的教程里,BO就是云数据库里的数据。
应用中使用数据库之前,我们需要在web开发工具的“数据”栏目里创建新的数据模型。数据模型即用户数据的定义,里面有若干字段。点击“编辑字段”按钮,就可以对数据字段任意定制。详细使用请参阅码实平台数据定制方面的教程。
本实例使用的数据非常简单,只有一个文本字段叫“描述”,保存任意长度的一段文字。程序实现了两个功能:读取并显示数据库里的数据BO,产生一个新的数据记录,分别用两个页面实现。
页面1:数据列表
这个页面的功能是读取数据并且按一个纵向列表的方式展现各个数据记录。移动应用的数据展示,鉴于屏幕较小且竖屏为主,最常见的方式就是这样的纵向列表。
Class.create(Mash5.Widget, {
	initialize : function () {
		var view = Ti.UI.createView({
			backgroundColor : '#fff',
			width : Ti.UI.FILL,
			height : Ti.UI.FILL,
		});
		this.setContentView(view);

		var context = this.getContext();
		var _this = this; // JS的闭包里this总是指向自己所在的函数。跨越函数引用this,需要指向外部函数的this副本。

		// 准备数据库参数
		var params = {
			'method.name' : 'mash5.task.queryFeeds',
			'method.version' : 'Titanium',
			'method.optimize' : 'fetchOne',
			'method.optimize.includeField.fieldName' : '$format$' + JSON.stringify(['_id', 'name', 'Positions']),
			'page.nextTime' : '9999999999999',
			'page.perPageSize' : 50, // 每次只读取50条数据记录
			'query.bo.nameSpace' : 'dev.bo.basic.BOjiaocheng_1409725566665', // 云数据库里本应用数据的命名空间
		};

		var tableView;
		var queryFeeds = function () {
			if (tableView) {
			    // 准备重建 tableView
				view.remove(tableView);
				tableView = null;
			}

			// 访问云数据库,通过参数params调用API读取数据
			Mash5.Network.executeHTTPClientForAllResult(context, params, function (result) {
				var feeds = result.object && result.object.nextData;
				if (feeds.length > 0) {
				    // 有数据就创建一个TableView以显示列表
					tableView = Ti.UI.createTableView({
						width : Ti.UI.FILL,
						height : Ti.UI.FILL,
						backgroundColor : '#fff',
						separatorColor : '#fff',
						top : 0
					});
					view.add(tableView);
					var rows = [];

					for (var i = 0, len = feeds.length; i < len; i++) {
					    // 为每一项数据创建显示
						var row = _this.createRow(feeds[i]);
						rows.push(row);
					}
					tableView.setData(rows);
				} else {
					alert('没有查到数据');
				}
			});
		};

        // 把页面的右上角设定为刷新按钮
		this.getCurrentPage().setRightNavButton({
			style : Mash5.UI.NavigationButtonStyle.REFRESH,
			listener : function () {
				queryFeeds(); // 这个按钮的功能是调用数据并且显示数据列表
			},
		});
		queryFeeds();

        // 发布新数据的按钮
		var post_btn = Ti.UI.createButton({
			color : '#fff',
			width : '200dip',
			height : '40dip',
			borderRadius : dipToPx(10),
			backgroundColor : '#000',
			font : {
				fontSize : '16dip'
			},
			verticalAlign : Ti.UI.TEXT_VERTICAL_ALIGNMENT_CENTER,
			bottom : '10dip',
			title : '发布新数据',
			zIndex:100,
			opacity: 0.6
		});
		view.add(post_btn);

        // 发布新数据的按钮功能是跳转到数据发布页面
		post_btn.addEventListener('click', function () {
			context.startPage({
				nameSpace : 'dev.views.BasicView_1409727629303', // 页面的命名空间
				callback : function (feed) {
				    // 发布新数据页面的回调
					if (feed) {
						if (tableView) {
						    // 添加新数据项到已经存在的数据列表
							var row = _this.createRow(feed);
							tableView.insertRowBefore(0,row,true);
						} else {
						    // 原先还没有数据列表,创建新的数据列表
							queryFeeds();
						}
					}
				}
			});
		});
	},


	createRow : function (feed) {
		var row = Ti.UI.createTableViewRow({
				width : '100%',
				height : '100dip',
				selectionStyle : 0,
			});

		var box = Ti.UI.createView({
				width : Ti.UI.FILL,
				height : Ti.UI.SIZE,
				top : '8dip',
				left : '10dip',
				right : '10dip',
				backgroundColor : '#629138',
				borderRadius : dipToPx(10)
			});
		row.add(box);

		box.add(Ti.UI.createLabel({
				top : '20dip',
				bottom : '20dip',
				color : '#fff',
				text : feed.bo.Fields[0].Value, // 数据项的第一个字段
				left : '10dip',
				font : {fontSize : '16dip'},
			}));
		return row;
	}
})
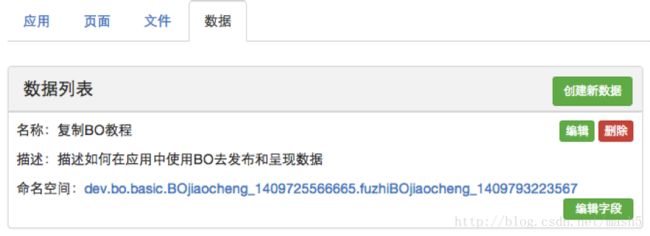
页面1数据列表的代码中,params是调用云数据库API的参数,以后详细介绍。现在你只要关心query.bo.nameSpace,测试时可以使用案例里的BO,也就是这个开源应用的数据。然后要把数据的命名空间改成你自己应用里数据的命名空间,否则你总是在使用我的数据。你自己数据的命名空间在web开发工具的数据栏可以找到,如图:
在queryFeeds函数里,Mash5.Network.executeHTTPClientForAllResult是数据操作的接口函数,按照前面定义的API参数去读取这个BO的最新50条记录。内嵌的匿名函数处理读取数据的结果。如果结果数据不空,就把数据记录逐条显示出来。而每条记录的显示则在createRow函数里确定。在createRow函数里,全是UI的代码,其中,feed.bo.Fields[0].Value是数据记录的第一个字段。关于数据库里BO的全部格式,另有教程详细介绍。
这个页面还设置了右上角的按钮为页面刷新,利用了码实平台提供的按钮图标,由Mash5.UI.NavigationButtonStyle.REFRESH来设定。按钮的动作则是简单地调用数据列表显示。
这个页面还有发布新数据项的入口页面按钮。注意要把跳转页面context.startPage的命名空间改成你自己的数据发布页面,否则你总是在使用教程里我写的页面(现在你应该体会到码实平台如何通过命名空间来复用代码)。按钮的UI参数里,zIndex:100可以让按钮始终悬浮在上面,zIndex可以控制View的前后层级,默认为0,数字大的就显示在上面。
页面2:数据发布
本应用案例有两个页面,第二个页面负责发布新数据。UI部分,可以看到一个用Ti.UI.createTextArea实现的文本输入框。这个页面里的“发布”按钮按下时,要通过数据BO的命名空间和一个回调来完成向云数据库添加保存新数据。注意要把数据的命名空间改成你自己的数据命名空间,否则你的数据永远发布到我的数据里。
数据发布的云数据库操作在addBOFeed函数里。这个函数设定API参数,然后调用云数据库的接口函数,方式和过程和前面读取数据的页面相似,只是在确认保存数据成功后,会把这条数据项用page.setResult通知页面,在页面关闭是会自动回调页面开启是预设的回调函数显示新添加的数据(在前一个页面的代码里)。全部代码如下:
Class.create(Mash5.Widget, {
	initialize : function (config, params) {
		var container = Ti.UI.createView({
				width : Ti.UI.FILL,
				height : Ti.UI.FILL,
				backgroundColor : '#eee',
				layout : 'vertical'
			});
		this.setContentView(container);

		container.add(Ti.UI.createLabel({
				width : Ti.UI.SIZE,
				height : Ti.UI.SIZE,
				text : '说明',
				left:'10dip',
				top: '10dip',
				color : '#000',
				font : {
					fontSize : '16dip'
				}
			}));
		//页面表达字段输入项
		var description_area = Ti.UI.createTextArea({
				borderRadius : dipToPx(5),
				color : '#888',
				font : {
					fontSize : '16dip',
					fontWeight : 'bold'
				},
				textAlign : 'left',
				top : '5dip',
				width : '96%',
				height : '80dip'
			});
		container.add(description_area);
		//发布按钮
		var save_btn = Ti.UI.createButton({
				color : '#fff',
				width : '200dip',
				height : '40dip',
				borderRadius : dipToPx(10),
				backgroundColor : '#03cec2',
				font : {
					fontSize : '16dip'
				},
				verticalAlign : Ti.UI.TEXT_VERTICAL_ALIGNMENT_CENTER,
				backgroundImage : '',
				borderWidth : 0,
				top : '20dip',
				title : '发布'
			});
		container.add(save_btn);

		var context = this.getContext();
		save_btn.addEventListener('click', function () {
			//通过命名空间获取BO定义的结构
			context.getBO({
				nameSpace : 'dev.bo.basic.BOjiaocheng_1409725566665',
				callback : function (bo) {
				    //从页面输入字段项中取值,赋予BO相对应的数据字段值
					bo.Fields[0].Value = description_area.value;
					addBOFeed(bo);
				}
			});
		})
		var page = this.getCurrentPage();
		//将赋值后的BO作为动态保存到数据库
		var addBOFeed = function (bo) {
			bo.belongToCircle = '0';//设置BO数据为所有人可见
			//拼装参数
			var params = {
				'method.name' : 'mash5.task.addFeed',
				'method.version' : 'Titanium"',
				'method.optimize' : 'fetchOne',
				'method.optimize.includeField.fieldName' : '$format$' + JSON.stringify(['_id', 'name', 'Positions']),
				'insert.appId' : context.getCurrentAppId(),
				'insert.bo' : JSON.stringify(bo)
			};
			//码实平台调用WebService向数据库存放数据,并异步执行回调
			Mash5.Network.executeHTTPClientForAllResult(context, params, function (result) {
				if (!result.success || !result.object) {
					alert('调用接口失败');
					return;
				}
				var feed = result.object;
				page.setResult(feed);
				page.close();
			});
		};
	}
})
码农比较关心数据模型的表结构如何体现。这里告诉大家,码实云平台的云数据库用了非常流行的MongoDB,是个NoSQL的数据库。因此数据结构可以随意扩展和修改,BO的数据存储包含了数据定义部分,有自定义的能力。你现在如果修改了BO,增加几个字段,老数据照常可以读取显示。

