Keras中的模型可视化
“微信公众号”
Keras提供了模型可视化的函数,但是要依赖一些工具包,安装起来稍微麻烦了一点,还可能有坑,本篇文章记录我在安装使用过程中的步骤。
环境:win10、Anconda3-5.1.0、Python3.6、Keras2.1.5
(1)安装附加依赖项
1. pydot
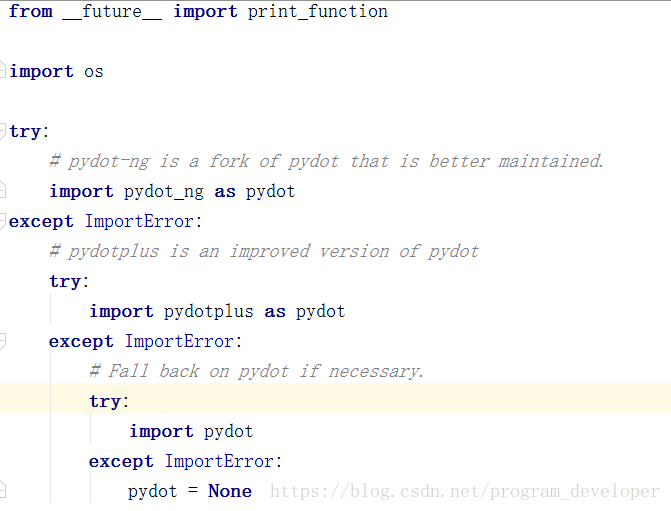
pip install pydot_ng官方文档中说直接安装pydot,但是由于Keras中使用了pydot.find_graphviz()函数,而这个函数在1.2.*之后的版本中被剥离了,所以不能直接安装pydot,而是安装pydot_ng。
在Keras的 keras.utils.vis_utils 中,import pydot或者pydot_ng的源码如下:
2. graphviz
2.1 pip install graphviz
2.2 到https://graphviz.gitlab.io/_pages/Download/Download_windows.html 下载graphviz-2.38.msi文件,并安装。我的安装目录是“E:\graphviz\2.38”。
2.3 找到你安装pydot_ng的目录,E:\***\Anaconda3\envs\python36\Lib\site-packages\pydot_ng,在pydot_ng文件夹下存在__init__.py文件,修改__init__.py文件代码,使得pydot找到graphviz。
修改步骤如下:
i. 找到def find_graphviz(): 函数。
ii. 注释掉 #Method 1(Windows only) 下面的if中部分。
iii. #Method 3(Windows only) 添加 path=r"E:\graphviz\2.38\bin",该路径指向刚才下载的graphviz-2.38.msi的安装路径中的bin。
(2)可视化模型
from keras.utils.vis_utils import plot_model
from keras.models import Sequential
from keras.layers.core import Dense, Dropout, Activation
from keras.layers.embeddings import Embedding
from keras.layers.recurrent import LSTM

model = Sequential()
model.add(Embedding(input_dim=1024, output_dim=256, input_length=50))
model.add(LSTM(128))  # try using a GRU instead, for fun
model.add(Dropout(0.5))
model.add(Dense(1))
model.add(Activation('sigmoid'))

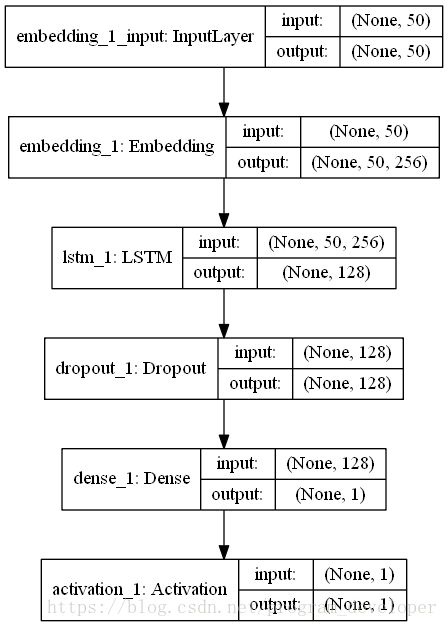
plot_model(model, to_file='model1.png', show_shapes=True)
参数show_shapes为false时是不带输出的形状。
在该文件的同目录下产生模型的可视化图像如下:
(3)可能出现的错误:
graphviz 要按上面的步骤进行安装,该修改源码地方要认真细致的修改。我在安装的时候就在graphviz这里花费了好多时间。
Reference:
(1)http://www.cnblogs.com/combfish/p/6559741.html
(2)https://blog.csdn.net/shashoudouhenleng/article/details/75174912
(3)https://blog.csdn.net/lk7688535/article/details/52882408
(4)https://blog.csdn.net/chenghtao/article/details/78356797
------------------2018年6月29号补充-----------------------------
另一种可视化模型的方法:
# coding:utf-8
from keras.layers.embeddings import Embedding
from keras.models import Sequential
from keras.layers.core import Flatten
from keras.layers.core import Dense
from keras.layers.recurrent import LSTM
from keras.utils.vis_utils import plot_model
from keras.preprocessing.text import one_hot
from keras.preprocessing.sequence import pad_sequences
import numpy as np

# define documents定义文档
docs = ["well done!","Good work","nice work","Excellent!","Weak",
        "Poor effort!","not good","poor work","Could have done better."]

# define class labels 定义分类标签
labels = [1,1,1,1,1,0,0,0,0,0]

# integer encode the documents
vocab_size = 50
encoded_docs = [one_hot(d,vocab_size) for d in docs]
# print(encoded_docs)

# pad documents to a max length of 4 words 将不足长度的用0填充长度为4
max_length =4
padded_docs = pad_sequences(encoded_docs,maxlen=max_length,padding="post")
# print(padded_docs)

# define the model 定义模型
model = Sequential()
model.add(Embedding(vocab_size,8,input_length=max_length))
model.add(Flatten())
model.add(Dense(1,activation="sigmoid"))
# compile the model 编译
model.compile(optimizer="adam",loss="binary_crossentropy",metrics=["acc"])
# summarize the model 打印模型信息
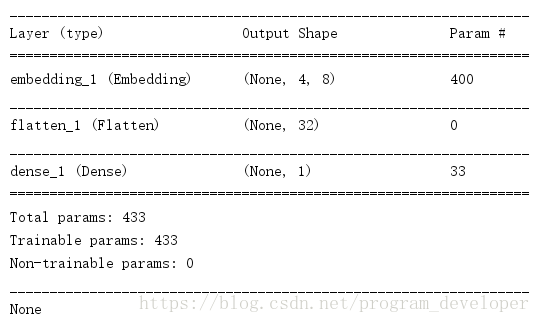
print(model.summary())
通过print(model.summary())函数打印模型信息,如下图所示:
Reference:
(1)https://juejin.im/entry/5acc23f26fb9a028d1416bb3


