Flume笔记
1.日志采集框架Flume概述
在一个完整的大数据处理系统中,除了hdfs+mapreduce+hive组成分析系统的核心之外,还需要数据采集、结果数据导出、任务调度等不可或缺的辅助系统,而这些辅助工具在hadoop生态体系中都有便捷的开源框架,如图所示:

设想一下,当你的系统引入了hadoop以后,基于Hadoop已经做了一些任务,比如一连串的Map Reduce任务,但是他们之间彼此右前后依赖的顺序,因此你必须要等一个任务执行成功后,再手动执行第二个任务。是不是很烦! 这个时候Oozie(驯象人)就派上用场了,它可以把多个任务组成一个工作流,自动完成任务的调用。
- Flume是Cloudera[ Clou-de-ra ]提供的一个分布式、可靠、和高可用的海量日志采集、聚合和传输的系统。
- Flume可以采集文件,socket数据包、文件夹等各种形式源数据,又可以将采集到的数据输出到HDFS、hbase、hive、kafka等众多外部存储系统中
- 一般的采集需求,通过对flume的简单配置即可实现
- Flume针对特殊场景也具备良好的自定义扩展能力,因此,flume可以适用于大部分的日常数据采集场景
当前Flume有两个版本:Flume 0.9X版本的统称Flume-og,Flume1.X版本的统称Flume-ng。由于Flume-ng经过重大重构,与Flume-og有很大不同,使用时请注意区分。
原理图:
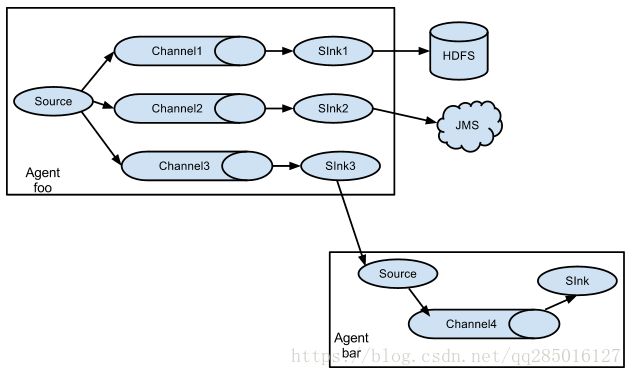
Flume分布式系统中最核心的角色是agent,flume采集系统就是由一个个agent所连接起来形成。1、 每一个agent相当于一个数据传递员**,内部有三个组件:
1. Source:采集源,用于跟数据源对接,以获取数据
2. Sink:下沉地,采集数据的传送目的,用于往下一级agent传递数据或者往最终存储系统传递数据
3. Channel:angent内部的数据传输通道,用于从source将数据传递到sink。

2. Flume快速入门
启动hadoop服务器。
解压安装包对应的文件夹下 tar -zxvf apache-flume-1.6.0-bin.tar.gz
然后进入flume的目录,修改conf下的flume-env.sh,配置JAVA_HOME环境变量
需求如下,现在想实现一个接收网络数据并采集数据的功能,示意图如下

根据数据采集的需求配置采集方案,描述在配置文件中(文件名可任意自定义),文件名为netcat-logger.conf
##agent1是我们定义的agent的名字


##定义agent1中各个组件的名字

agent1.sources=r1
agent1.sinks=k1
agent1.channels=c1


##定义source组件

agent1.sources.r1.type=netcat
agent1.sources.r1.bind=mini1
agent1.sources.r1.port=44444


##定义sinks组件

agent1.sinks.k1.type=logger


##定义channels组件

agent1.channels.c1.type=memory
agent1.channels.c1.capacity=1000
agent1.channels.c1.transactionCapacity=100


##定义agent内部组件之间的关系

agent1.sources.r1.channels=c1
agent1.sinks.k1.channel=c1
启动命令
flume-ng agent -c /root/apps/flume-1.6.0/conf -f /root/netcat-logger.conf -n agent1 -Dflume.root.logger=INFO,console-c conf 指定flume自身的配置文件所在目录
-f conf/netcat-logger.con 指定我们所描述的采集方案
-n a1 指定我们这个agent的名字
新启一个命令行窗口,测试连接
[root@mini2 ~]# telnet mini1 44444
Trying 192.168.254.100...
Connected to mini1.
Escape character is '^]'.
hello flume
OK
hello java
OK

## 发送网络数据后,可以看到目标机接收到数据

2018-06-13 20:10:09,117 (SinkRunner-PollingRunner-DefaultSinkProcessor) [INFO - org.apache.flume.sink.LoggerSink.process(LoggerSink.java:94)] Event: { headers:{} body: 68 65 6C 6C 6F 20 66 6C 75 6D 65 0D             hello flume. }
2018-06-13 20:10:09,117 (SinkRunner-PollingRunner-DefaultSinkProcessor) [INFO - org.apache.flume.sink.LoggerSink.process(LoggerSink.java:94)] Event: { headers:{} body: 68 65 6C 6C 6F 20 6A 61 76 61 0D                hello java. }
3. Flume的复杂结构和参数配置
Flume除了支持单个agent节点的功能,还支持多个agent节点共同工作,下面介绍几种常见的协作结构:

2个agent串联

多个agent的采集的数据进行汇总
采集的数据可以下沉到不同的系统中
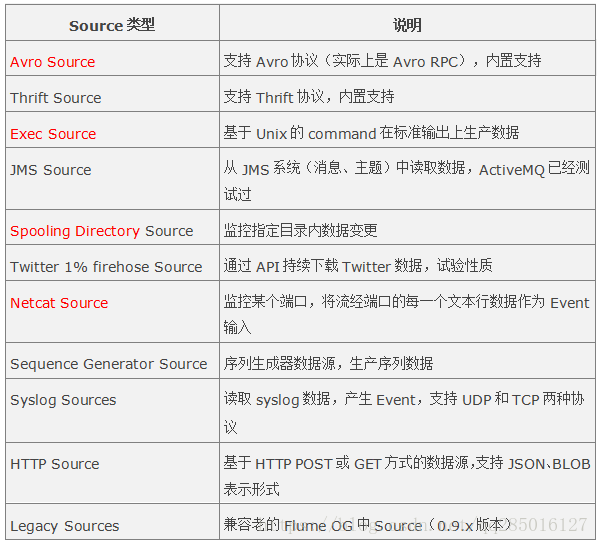
对于source的类型,它支持如下几种:
对于sink的类型,它支持如下几种:

对于channel的类型,它支持如下几种:

4. 采集目录到HDFS
采集需求:某服务器的某特定目录下,会不断产生新的文件,每当有新文件出现,就需要把文件采集到HDFS中去,根据需求,首先定义以下3大要素
- 采集源,即source——监控文件目录 : spooldir
- 下沉目标,即sink——HDFS文件系统 : hdfs sink1
- source和sink之间的传递通道——channel,可用file channel 也可以用内存memory channel
定义配置文件:
#定义三大组件的名称
agent1.sources = source1
agent1.sinks = sink1
agent1.channels = channel1

# 配置source组件
agent1.sources.source1.type = spooldir
agent1.sources.source1.spoolDir = /root/data/
agent1.sources.source1.fileHeader = false

#配置拦截器
agent1.sources.source1.interceptors = i1
agent1.sources.source1.interceptors.i1.type = timestamp
# 配置sink组件
agent1.sinks.sink1.type = hdfs
##指定HDFS存储文件的路径
agent1.sinks.sink1.hdfs.path =/weblog/flume-collection/%y-%m-%d/%H-%M
##指定文件名前缀
agent1.sinks.sink1.hdfs.filePrefix = access_log
agent1.sinks.sink1.hdfs.maxOpenFiles = 5000
##批次处理 当达到多少条的时候,再提交到hdfs上。
agent1.sinks.sink1.hdfs.batchSize= 100
##当前数据存储的文件类型
agent1.sinks.sink1.hdfs.fileType = DataStream
agent1.sinks.sink1.hdfs.writeFormat =Text

##滚动生成的文件按大小生成,当内存中的数据达到多少的时候 才生成对应的文件
agent1.sinks.sink1.hdfs.rollSize = 10240
##滚动生成的文件按行数生成  当文件中的数据达到多少行的时候 才生成对应的文件
agent1.sinks.sink1.hdfs.rollCount = 10000
##滚动生成的文件按时间生成  当达到60秒之后,才生成对应的文件
agent1.sinks.sink1.hdfs.rollInterval = 60
##上面三个条件只要满足一个,就会触发写文件的操作

#开启滚动生成目录的机制
agent1.sinks.sink1.hdfs.round = true
#以10分钟为一梯度滚动生成目录,假设文件每时每刻都会创建,那么每10分钟创建一个目录,并将该时间段内创建的文件存放到该目录下
agent1.sinks.sink1.hdfs.roundValue = 10
agent1.sinks.sink1.hdfs.roundUnit = minute

# Use a channel which buffers events in memory
agent1.channels.channel1.type = memory
agent1.channels.channel1.capacity = 500000
agent1.channels.channel1.transactionCapacity = 600
agent1.channels.channel1.keep-alive = 120
##capacity:默认该通道中最大的可以存储的event数量
##trasactionCapacity:每次最大可以从source中拿到的event数量或者送到sink中的event数量
##keep-alive:event添加到通道中或者移出的允许时间

# Bind the source and sink to the channel
agent1.sources.source1.channels = channel1
agent1.sinks.sink1.channel = channel1在本地路径下创建目录/root/data/,并在hdfs文件系统中创建目录/weblog/flume-collection
启动配置文件:
flume-ng agent -c /root/apps/flume-1.6.0/conf -f /root/weblog -n agent1 -Dflume.root.logger=INFO,console往/root/data/添加文件,此刻会在hdfs上出现相同内容的文件。如下图:

注意:flume的source采用spoodir时,目录下面不运行存放同名的文件,否则会导致系统挂掉
5. 采集文件到HDFS

根据需求,首先定义以下3大要素:
- 采集源,即source——监控文件内容更新 : exec ‘tail -F file’
- 下沉目标,即sink——HDFS文件系统 : hdfs sink
- Source和sink之间的传递通道——channel,可用file channel 也可以用 内存channel
定义配置文件log.conf:
agent1.sources = source1
agent1.sinks = sink1
agent1.channels = channel1

# Describe/configure tail -F source1
agent1.sources.source1.type = exec
agent1.sources.source1.command = tail -F /root/logs/access_log
agent1.sources.source1.channels = channel1

#configure host for source
agent1.sources.source1.interceptors = i1 i2
agent1.sources.source1.interceptors.i1.type = host
agent1.sources.source1.interceptors.i1.hostHeader = hostname
agent1.sources.source1.interceptors.i2.type = timestamp

# Describe sink1
agent1.sinks.sink1.type = hdfs
#a1.sinks.k1.channel = c1
agent1.sinks.sink1.hdfs.path=/file/%{hostname}/%y-%m-%d/%H-%M
agent1.sinks.sink1.hdfs.filePrefix = access_log
agent1.sinks.sink1.hdfs.batchSize= 100
agent1.sinks.sink1.hdfs.fileType = DataStream
agent1.sinks.sink1.hdfs.writeFormat =Text
agent1.sinks.sink1.hdfs.rollSize = 10240
agent1.sinks.sink1.hdfs.rollCount = 1000
agent1.sinks.sink1.hdfs.rollInterval = 10
agent1.sinks.sink1.hdfs.round = true
agent1.sinks.sink1.hdfs.roundValue = 5
agent1.sinks.sink1.hdfs.roundUnit = minute

# Use a channel which buffers events in memory
agent1.channels.channel1.type = memory
agent1.channels.channel1.keep-alive = 120
agent1.channels.channel1.capacity = 50000
agent1.channels.channel1.transactionCapacity = 600

# Bind the source and sink to the channel
agent1.sources.source1.channels = channel1
agent1.sinks.sink1.channel = channel1
创建源目录,并模拟不断往文件内打印日志:
while true; do date >> /root/logs/access_log; sleep 0.5s;done测试日志是否成功:
tail -F /root/logs/access_log启动配置文件:
flume-ng agent -c /root/apps/flume-1.6.0/conf -f /root/log.conf -n agent1 -Dflume.root.logger=INFO,console6. Flume 拦截器(interceptor)
Flume拦截器介绍
拦截器是简单的插件式组件,设置在source和channel之间。source接收到的事件event,在写入channel之前,拦截器都可以进行转换或者删除这些事件。每个拦截器只处理同一个source接收到的事件。可以自定义拦截器。flume内置的拦截器的有三种:
时间戳拦截器
flume中一个最经常使用的拦截器 ,该拦截器的作用是将时间戳插入到flume的事件报头中。时间戳拦截器的配置:

source连接到时间戳拦截器的配置:
a1.sources.r1.interceptors=i1
a1.sources.r1.interceptors.i1.type=timestamp a1.sources.r1.interceptors.i1.preserveExisting=false
主机拦截器
主机拦截器插入服务器的ip地址或者主机名,agent将这些内容插入到事件的报头中。事件报头中的key使用hostHeader配置,默认是host。主机拦截器的配置:

source连接到主机拦截器的配置:
a1.sources.r1.interceptors=i2
a1.sources.r1.interceptors.i2.type=host
a1.sources.r1.interceptors.i2.useIP=false
a1.sources.r1.interceptors.i2.preserveExisting=false
静态拦截器
静态拦截器的作用是将k/v插入到事件的报头中,一般是用户自定义的参数。配置如下:
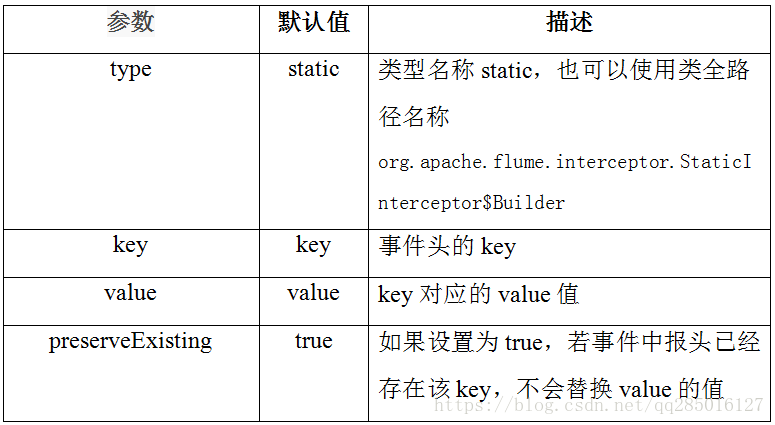
source连接到静态拦截器的配置:
a1.sources.r1.interceptors= i3
a1.sources.r1.interceptors.static.type=static a1.sources.r1.interceptors.static.key=logs a1.sources.r1.interceptors.static.value=logFlume a1.sources.r1.interceptors.static.preserveExisting=false
正则过滤拦截器
在日志采集的时候,可能有一些数据是我们不需要的,这样添加过滤拦截器,可以过滤掉不需要的日志,也可以根据需要收集满足正则条件的日志。配置如下 :

source连接到正则过滤拦截器的配置:
a1.sources.r1.interceptors=i4
a1.sources.r1.interceptors.i4.type=REGEX_FILTER a1.sources.r1.interceptors.i4.regex=(rm)|(kill) a1.sources.r1.interceptors.i4.excludeEvents=false
正则过滤拦截器案例
如下案例收集了客户端发送过来的信息,拦截带有hadoop spark的字符串,代码如下。
定义配置文件test_regex.txt:
# 定义这个agent中各组件的名字
a1.sources = r1
a1.sinks = k1
a1.channels = c1

# 描述和配置source组件:r1
a1.sources.r1.type = netcat
a1.sources.r1.bind = mini1
a1.sources.r1.port = 44444

a1.sources.r1.interceptors=i1
a1.sources.r1.interceptors.i1.type=REGEX_FILTER
#保留内容中出现hadoop或者是spark的字符串的记录
a1.sources.r1.interceptors.i1.regex=(hadoop)|(spark)
a1.sources.r1.interceptors.i1.excludeEvents=false

# 描述和配置sink组件:k1
a1.sinks.k1.type = logger

# 描述和配置channel组件,此处使用是内存缓存的方式
a1.channels.c1.type = memory
a1.channels.c1.capacity = 1000
a1.channels.c1.transactionCapacity = 100

# 描述和配置source  channel   sink之间的连接关系
a1.sources.r1.channels = c1
a1.sinks.k1.channel = c1
启动配置文件:
flume-ng agent -c /root/apps/flume-1.6.0/conf -f /root/test_regex.txt -n a1 -Dflume.root.logger=INFO,console7.多个agent串联的案例
采集需求:比如业务系统使用log4j生成的日志,日志内容不断增加,需要把追加到日志文件中的数据实时采集到hdfs,使用agent串联。

第一台flume agent
- 采集源,即source——监控文件内容更新 : exec ‘tail -F file’
- 下沉目标,即sink——数据的发送者,实现序列化 : avro sink
- Source和sink之间的传递通道——channel,可用file channel 也可以用 内存channel
#tailsource-avrosink.conf
# Name the components on this agent
a1.sources = r1
a1.sinks = k1
a1.channels = c1

# Describe/configure the source
# 这里要先创建/root/logs文件夹
a1.sources.r1.type = exec
a1.sources.r1.command = tail -F /root/logs/test.log

# Describe the sink
##sink端的avro是一个数据发送者
a1.sinks.k1.type = avro
a1.sinks.k1.hostname = mini2
a1.sinks.k1.port = 41414
a1.sinks.k1.batch-size = 10

# Use a channel which buffers events in memory
a1.channels.c1.type = memory
a1.channels.c1.capacity = 1000
a1.channels.c1.transactionCapacity = 100

# Bind the source and sink to the channel
a1.sources.r1.channels = c1
a1.sinks.k1.channel = c1
第二台flume agent
采集源,即source——接受数据。并实现反序列化 : avro source
下沉目标,即sink——HDFS文件系统 : HDFS sink
Source和sink之间的传递通道——channel,可用file channel 也可以用 内存channel
#avrosource-hdfssink.conf
a1.sources = r1
a1.sinks =s1
a1.channels = c1

##source中的avro组件是一个接收者服务
a1.sources.r1.type = avro
##0.0.0.0 表示接受任何目标机请求的数据
a1.sources.r1.bind = 0.0.0.0
a1.sources.r1.port = 41414

a1.sinks.s1.type=hdfs
a1.sinks.s1.hdfs.path=/flumedata
a1.sinks.s1.hdfs.filePrefix = access_log
a1.sinks.s1.hdfs.batchSize= 100
a1.sinks.s1.hdfs.fileType = DataStream
a1.sinks.s1.hdfs.writeFormat =Text
a1.sinks.s1.hdfs.rollSize = 10240
a1.sinks.s1.hdfs.rollCount = 100
a1.sinks.s1.hdfs.rollInterval = 10
a1.sinks.s1.hdfs.round = true
a1.sinks.s1.hdfs.roundValue = 10
a1.sinks.s1.hdfs.roundUnit = minute

a1.channels.c1.type = memory
a1.channels.c1.capacity = 1000
a1.channels.c1.transactionCapacity = 100

a1.sources.r1.channels = c1
a1.sinks.s1.channel = c1 根据上面的配置文件,接着需要启动agent。首先要启动的是第二台服务器的agent,因为第一台服务器agent启动需要依赖于第二台服务器。代码如下:
flume-ng agent -c /root/apps/flume-1.6.0 -f /root/avrosource-hdfssink.conf -n a1 -Dflume.root.logger=INFO,console

flume-ng agent -c /root/apps/flume-1.6.0 -f /root/tailsource-avrosink.conf -n a1 -Dflume.root.logger=INFO,console
测试:在第一台flume agent上往/root/logs/test.log写数据:
while true; do date >> /root/logs/test.log;sleep 1s; done8.高可用故障转移failover
在完成多点的Flume Agent搭建后,下面我们搭建一个高可用的Flume Agent集群,架构图如下所示,灰色部分Agent主要用来收集日志信息。而绿色和蓝色部分的Agent主要用来进行日志汇总,作为汇总的Agent责任重大,需要保证其运行可靠性,这里绿色Agent为汇总主Agent,而蓝色Agent为汇总备份Agent:

节点分配:
| 名称 | Host Name | 角色 |
|---|---|---|
| Agent1 | mini1 | Web Server |
| Collector1 | mini2 | Agent Master |
| Collector2 | mini3 | Agent Master |
Agent1配置文件web-log.conf
#agent1 name
agent1.channels = c1
agent1.sources = r1
#这个节点的输出可以输出给汇总节点1 也可能输出给汇总节点2
agent1.sinks = k1 k2

#设置下沉目标组
agent1.sinkgroups = g1
agent1.sinkgroups.g1.sinks = k1 k2

#set channel
agent1.channels.c1.type = memory
agent1.channels.c1.capacity = 1000
agent1.channels.c1.transactionCapacity = 100

agent1.sources.r1.channels = c1
agent1.sources.r1.type = exec
agent1.sources.r1.command = tail -F /root/logs/failover_test.log

# set sink1
agent1.sinks.k1.channel = c1
agent1.sinks.k1.type = avro
agent1.sinks.k1.hostname = mini2
agent1.sinks.k1.port = 52020

# set sink2
agent1.sinks.k2.channel = c1
agent1.sinks.k2.type = avro
agent1.sinks.k2.hostname = mini3
agent1.sinks.k2.port = 52020

#set failover
agent1.sinkgroups.g1.processor.type = failover
#这里首先要申明一个sinkgroups,然后再设置2个sink ,k1与k2,其中2个优先级是10和5
agent1.sinkgroups.g1.processor.priority.k1 = 10
agent1.sinkgroups.g1.processor.priority.k2 = 5
#假设mini2挂了,需要等待10秒才会发送mini3,默认是30秒。
agent1.sinkgroups.g1.processor.maxpenalty = 10000
Collector1,Collector2 配置文件web-sum-log.conf
#set Agent name
a1.sources = r1
a1.channels = c1
a1.sinks = k1

#set channel
a1.channels.c1.type = memory
a1.channels.c1.capacity = 1000
a1.channels.c1.transactionCapacity = 100

# other node,nna to nns
a1.sources.r1.type = avro
a1.sources.r1.bind = 0.0.0.0
a1.sources.r1.port = 52020
a1.sources.r1.interceptors = i1 i2
a1.sources.r1.interceptors.i1.type = timestamp
a1.sources.r1.interceptors.i2.type = host
a1.sources.r1.interceptors.i2.hostHeader=hostname
a1.sources.r1.interceptors.i2.useIP=false

#set sink to hdfs
a1.sinks.k1.type=hdfs
a1.sinks.k1.hdfs.path=/failover/%{hostname}
a1.sinks.k1.hdfs.filePrefix=%Y-%m-%d
a1.sinks.k1.hdfs.fileType=DataStream
a1.sinks.k1.hdfs.writeFormat=TEXT
a1.sinks.k1.hdfs.rollInterval=10

a1.sources.r1.channels = c1
a1.sinks.k1.channel=c1
为Agent1创建文件夹,并启动集群配置
##Collector1,Collector2
flume-ng agent -c /root/apps/flume-1.6.0 -f web-sum-log.conf -n a1 -Dflume.root.logger=INFO,console

##Agent1
mkdir -p /root/logs
flume-ng agent -c /root/apps/flume-1.6.0 -f web-log.conf -n agent1 -Dflume.root.logger=INFO,console

while true; do date >> /root/logs/failover_test.log;sleep 1s; done
总结:
经测试,默认汇总日志的是Collector1,假设Collector1宕机了,会延迟一段时候后连接Collector2,并将延迟的数据发送给Collector2处理;
当再次启动Collector1后,Collector1会重新处理汇总数据。
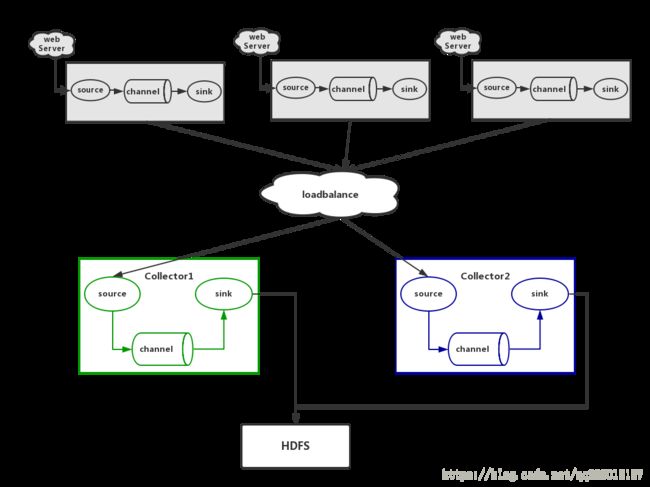
9. 高可用配置loadbalance
为了减轻汇总Agent的压力,这里提供了2台汇总的Agent,用来平衡负载;这里采取了2种策略,一是将汇总功能随机划分给某一台Agent,另一种是通过轮询的机制。其通过agent1.sinkgroups.g1.processor.selector属性来配置。
节点分配:
| 名称 | Host Name | 角色 |
|---|---|---|
| Agent1 | mini1 | Web Server |
| Collector1 | mini2 | Agent Master |
| Collector2 | mini3 | Agent Master |
Agent1配置文件web-loadbalance-log.conf
#agent1 name
agent1.channels = c1
agent1.sources = r1
agent1.sinks = k1 k2

#set gruop
agent1.sinkgroups = g1
agent1.sinkgroups.g1.sinks = k1 k2

#set channel
agent1.channels.c1.type = memory
agent1.channels.c1.capacity = 1000
agent1.channels.c1.transactionCapacity = 100

#set source
agent1.sources.r1.channels = c1
agent1.sources.r1.type = exec
agent1.sources.r1.command = tail -F /root/logs/loadbalance_test.log

# set sink1
agent1.sinks.k1.channel = c1
agent1.sinks.k1.type = avro
agent1.sinks.k1.hostname = mini2
agent1.sinks.k1.port = 52020

# set sink2
agent1.sinks.k2.channel = c1
agent1.sinks.k2.type = avro
agent1.sinks.k2.hostname = mini3
agent1.sinks.k2.port = 52020

#set load-balance
agent1.sinkgroups.g1.processor.type = load_balance
# 默认是round_robin,还可以选择random
agent1.sinkgroups.g1.processor.selector = round_robin
#如果backoff被开启,则 sink processor会屏蔽故障的sink
agent1.sinkgroups.g1.processor.backoff = true
Collector1,Collector2 配置文件web-loadbalance-sum-log.conf
#set Agent name
a1.sources = r1
a1.channels = c1
a1.sinks = k1

#set channel
a1.channels.c1.type = memory
a1.channels.c1.capacity = 1000
a1.channels.c1.transactionCapacity = 100

# other node,nna to nns
a1.sources.r1.type = avro
a1.sources.r1.bind = 0.0.0.0
a1.sources.r1.port = 52020
a1.sources.r1.channels = c1
a1.sources.r1.interceptors = i1 i2
a1.sources.r1.interceptors.i1.type = timestamp
a1.sources.r1.interceptors.i2.type = host
a1.sources.r1.interceptors.i2.hostHeader=hostname
a1.sources.r1.interceptors.i2.useIP=false

#set sink to hdfs
a1.sinks.k1.type=hdfs
a1.sinks.k1.hdfs.path=/data/flume/loadbalance/%{hostname}
a1.sinks.k1.hdfs.fileType=DataStream
a1.sinks.k1.hdfs.writeFormat=TEXT
a1.sinks.k1.hdfs.rollInterval=10
a1.sinks.k1.channel=c1
a1.sinks.k1.hdfs.filePrefix=%Y-%m-%d
为Agent1创建文件夹,并启动集群配置
##Collector1,Collector2
flume-ng agent -c /root/apps/flume-1.6.0 -f web-loadbalance-sum-log.conf -n a1 -Dflume.root.logger=INFO,console

##Agent1
mkdir -p /root/logs
flume-ng agent -c /root/apps/flume-1.6.0 -f web-loadbalance-log.conf -n agent1 -Dflume.root.logger=INFO,console

while true; do date >> /root/logs/loadbalance_test.log;sleep 1s; done
总结:
经测试,默认情况下两者根据策略决定哪个Agent来接收数据,假设其中一个Agent宕机了,剩下运行的Agent还能接收数据,假设宕机的Agent重启了,那么系统还是根据策略来决定哪个Agent来接收数据;
10.日志分类采集汇总
A、B两台日志服务机器实时生产日志主要类型为access.log、nginx.log、web.log
现在要求把A、B 机器中的access.log、nginx.log、web.log 采集汇总到C机器上然后统一收集到hdfs中。
但是在hdfs中要求的目录为:
/source/logs/access/20160101/**
/source/logs/nginx/20160101/**
/source/logs/web/20160101/**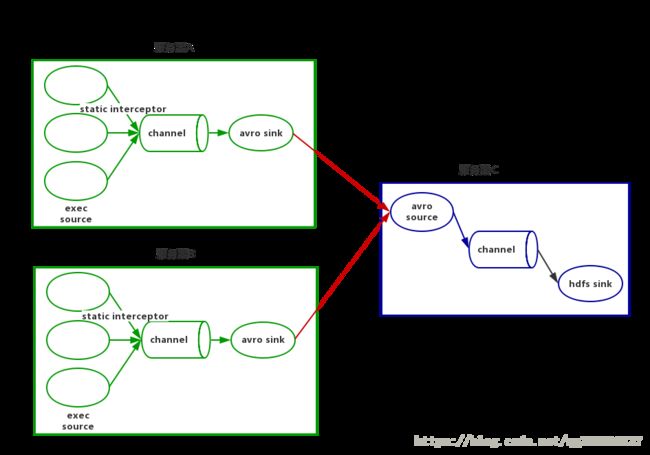
- 服务器A对应的IP为 mini2
- 服务器B对应的IP为 mini3
- 服务器C对应的IP为 mini1
在mini2和mini3上 创建配置文件execsource_avrosink.conf 文件内容为:
# Name the components on this agent
a1.sources = r1 r2 r3
a1.sinks = k1
a1.channels = c1

# Describe/configure the source
a1.sources.r1.type = exec
a1.sources.r1.command = tail -F /root/data/access.log
a1.sources.r1.interceptors = i1
a1.sources.r1.interceptors.i1.type = static
##  static拦截器的功能就是往采集到的数据的header中插入自己定义的key-value对
a1.sources.r1.interceptors.i1.key = type
a1.sources.r1.interceptors.i1.value = access

a1.sources.r2.type = exec
a1.sources.r2.command = tail -F /root/data/nginx.log
a1.sources.r2.interceptors = i2
a1.sources.r2.interceptors.i2.type = static
a1.sources.r2.interceptors.i2.key = type
a1.sources.r2.interceptors.i2.value = nginx

a1.sources.r3.type = exec
a1.sources.r3.command = tail -F /root/data/web.log
a1.sources.r3.interceptors = i3
a1.sources.r3.interceptors.i3.type = static
a1.sources.r3.interceptors.i3.key = type
a1.sources.r3.interceptors.i3.value = web

# Describe the sink
a1.sinks.k1.type = avro
a1.sinks.k1.hostname = mini1
a1.sinks.k1.port = 41414

# Use a channel which buffers events in memory
a1.channels.c1.type = memory
a1.channels.c1.capacity = 20000
a1.channels.c1.transactionCapacity = 10000

# Bind the source and sink to the channel
a1.sources.r1.channels = c1
a1.sources.r2.channels = c1
a1.sources.r3.channels = c1
a1.sinks.k1.channel = c1
在mini1上创建配置文件avrosource_hdfssink.conf 文件内容为
#定义agent名, source、channel、sink的名称
a1.sources = r1
a1.sinks = k1
a1.channels = c1

#定义source
a1.sources.r1.type = avro
a1.sources.r1.bind = 0.0.0.0
a1.sources.r1.port =41414

#添加时间拦截器
a1.sources.r1.interceptors = i1
a1.sources.r1.interceptors.i1.type = org.apache.flume.interceptor.TimestampInterceptor$Builder

#定义channels
a1.channels.c1.type = memory
a1.channels.c1.capacity = 20000
a1.channels.c1.transactionCapacity = 10000

#定义sink
a1.sinks.k1.type = hdfs
a1.sinks.k1.hdfs.path=/logs/%{type}/%Y%m%d
a1.sinks.k1.hdfs.filePrefix =events
a1.sinks.k1.hdfs.fileType = DataStream
a1.sinks.k1.hdfs.writeFormat = Text
#时间类型
a1.sinks.k1.hdfs.useLocalTimeStamp = true
#生成的文件不按条数生成
a1.sinks.k1.hdfs.rollCount = 0
#生成的文件按时间生成
a1.sinks.k1.hdfs.rollInterval = 200
#生成的文件按大小生成
a1.sinks.k1.hdfs.rollSize  = 10485760
#批量写入hdfs的个数
a1.sinks.k1.hdfs.batchSize = 1000
flume操作hdfs的线程数(包括新建,写入等)
a1.sinks.k1.hdfs.threadsPoolSize=10
#操作hdfs超时时间
a1.sinks.k1.hdfs.callTimeout=30000

#组装source、channel、sink
a1.sources.r1.channels = c1
a1.sinks.k1.channel = c1
在mini2 mini3两台服务器上创建/root/data文件目录。
运行mini1配置脚本(因为mini2 mini3 脚本依赖C脚本)。
flume-ng agent -c /root/apps/flume-1.6.0/conf -f avrosource_hdfssink.conf -name a1 -Dflume.root.logger=INFO,console运行mini2 mini3配置脚本。
flume-ng agent -c /root/apps/flume-1.6.0/conf -f execsource_avrosink.conf -name a1 -Dflume.root.logger=INFO,console测试,往access.log , nginx.log , web.log 文件中写入部分数据:
while true; do echo "web" >> /root/data/web.log ; sleep 1s; done
11.自定义拦截器实现过滤和加密
Flume支持在日志系统中定制各类数据发送方,用于收集数据;同时,Flume提供对数据进行简单处理,并写到各种数据接受方(可定制)的能力。
Flume有各种自带的拦截器,比如:TimestampInterceptor、HostInterceptor、RegexExtractorInterceptor等,通过使用不同的拦截器,实现不同的功能。但是以上的这些拦截器,不能改变原有日志数据的内容或者对日志信息添加一定的处理逻辑 。
通过自定义Flume拦截器,过滤掉不需要的字段,并对指定字段加密处理,将源数据进行预处理。减少了数据的传输量,降低了存储的开销。如下是一份日志数据信息,需要对电话号码进行加密,并对列进行筛选。
#数据清洗前
13601249301 100 200 300 400 500 600 700
13601249302 100 200 300 400 500 600 700
13601249303 100 200 300 400 500 600 700
13601249304 100 200 300 400 500 600 700
13601249305 100 200 300 400 500 600 700
13601249306 100 200 300 400 500 600 700
13601249307 100 200 300 400 500 600 700
13601249308 100 200 300 400 500 600 700
13601249309 100 200 300 400 500 600 700
13601249310 100 200 300 400 500 600 700
13601249311 100 200 300 400 500 600 700
13601249312 100 200 300 400 500 600 700

#数据清洗后
b261bde7454af9f7873b40b6f029b066        100     300     500     600
da45efaff4d0a9014b695dfcb2587f00        100     300     500     600
e7ef10782ddbd1d7c1e23dafaaa5cee7        100     300     500     600
bbe82adebcd7e1db9945a4f83d5b9fdb        100     300     500     600
53954f3e0ba4a96a4f619ac1c4e964e2        100     300     500     600
d47280e6e260000c7c23666b3be3b543        100     300     500     600
7e4ee93e8d23be2e8823442c29d2446d        100     300     500     600
7ef681128d253e9f763c6480b7237d3c        100     300     500     600
53b3b8dab7de7c3f4f81abe3c1ec900f        100     300     500     600
5e57e5ecde99f8c120860be18a1b6732        100     300     500     600
5d2d99c87faa75b9e05bb7f938de2e82        100     300     500     600
afcf5b5f42caaece99e0d207c83bd293        100     300     500     600
- 定义配置文件spool-interceptor-hdfs.conf:
a1.channels = c1
a1.sources = r1
a1.sinks = s1

#channel
a1.channels.c1.type = memory
a1.channels.c1.capacity=1000
a1.channels.c1.transactionCapacity=500

#source
a1.sources.r1.channels = c1
a1.sources.r1.type = spooldir
a1.sources.r1.spoolDir = /root/data/
a1.sources.r1.batchSize= 50
a1.sources.r1.inputCharset = UTF-8

a1.sources.r1.interceptors =i1 i2
##自定义拦截器的类名
a1.sources.r1.interceptors.i1.type =cn.wolfcode.intercept.CustomParameterInterceptor$Builder
##定义字段与字段之间的间隔分隔符,这里使用的是unicode编码
a1.sources.r1.interceptors.i1.fields_separator=\\u0009
##定义需要保留的列索引
a1.sources.r1.interceptors.i1.indexs =0,1,3,5,6
##定义上面index字符串的分隔符
a1.sources.r1.interceptors.i1.indexs_separator =\\u002c
##定义加密列的索引
a1.sources.r1.interceptors.i1.encrypted_field_index =0
##上面的定义属性都是在拦截器类中声明的。

a1.sources.r1.interceptors.i2.type = timestamp

#sink
a1.sinks.s1.channel = c1
a1.sinks.s1.type = hdfs
a1.sinks.s1.hdfs.path =/interceptor/%Y%m%d
a1.sinks.s1.hdfs.filePrefix = event
a1.sinks.s1.hdfs.fileSuffix = .log
a1.sinks.s1.hdfs.rollSize = 10485760
a1.sinks.s1.hdfs.rollInterval =20
a1.sinks.s1.hdfs.rollCount = 0
a1.sinks.s1.hdfs.batchSize = 1500
a1.sinks.s1.hdfs.round = true
a1.sinks.s1.hdfs.roundUnit = minute
a1.sinks.s1.hdfs.threadsPoolSize = 25
a1.sinks.s1.hdfs.useLocalTimeStamp = true
a1.sinks.s1.hdfs.minBlockReplicas = 1
a1.sinks.s1.hdfs.fileType =DataStream
a1.sinks.s1.hdfs.writeFormat = Text
a1.sinks.s1.hdfs.callTimeout = 60000
a1.sinks.s1.hdfs.idleTimeout =60
2.创建对应的Java类,代码如下:
package cn.wolfcode.intercept;
...

public class CustomParameterInterceptor implements Interceptor {

    /** The field_separator.指明每一行字段的分隔符 */
    private final String fields_separator;

    /** The indexs.通过分隔符分割后,指明需要那列的字段 下标 */
    private final String indexs;

    /** The indexs_separator. 多个下标的分隔符 */
    private final String indexs_separator;

    /** The encrypted_field_index. 需要加密的字段下标 */
    private final String encrypted_field_index;

    /**
     *
     * @param regex
     * @param field_separator
     * @param indexs
     * @param indexs_separator
     */
    public CustomParameterInterceptor(String fields_separator, String indexs, String indexs_separator,String encrypted_field_index) {
        String f = fields_separator.trim();
        String i = indexs_separator.trim();
        this.indexs = indexs;
        this.encrypted_field_index = encrypted_field_index.trim();
        if (!f.equals("")) {
            f = UnicodeToString(f);
        }
        this.fields_separator = f;
        if (!i.equals("")) {
            i = UnicodeToString(i);
        }
        this.indexs_separator = i;
    }

    /*
     *
     * \t 制表符 ('\u0009') \n 新行(换行)符 (' ') \r 回车符 (' ') \f 换页符 ('\u000C') \a 报警
     * (bell) 符 ('\u0007') \e 转义符 ('\u001B') \cx 空格(\u0020)对应于 x 的控制符
     */
    public static String UnicodeToString(String str) {
        Pattern pattern = Pattern.compile("(\\\\u(\\p{XDigit}{4}))");
        Matcher matcher = pattern.matcher(str);
        char ch;
        while (matcher.find()) {
            ch = (char) Integer.parseInt(matcher.group(2), 16);
            str = str.replace(matcher.group(1), ch + "");
        }
        return str;
    }

    /*
     * @see org.apache.flume.interceptor.Interceptor#intercept(org.apache.flume.
     * Event)
     */
    public Event intercept(Event event) {
        if (event == null) {
            return null;
        }
        try {
            String line = new String(event.getBody(), Charsets.UTF_8);
            String[] fields_spilts = line.split(fields_separator);
            String[] indexs_split = indexs.split(indexs_separator);
            String newLine = "";
            for (int i = 0; i < indexs_split.length; i++) {
                int parseInt = Integer.parseInt(indexs_split[i]);
                // 对加密字段进行加密
                if (!"".equals(encrypted_field_index) && encrypted_field_index.equals(indexs_split[i])) {
                    newLine += StringUtils.GetMD5Code(fields_spilts[parseInt]);
                } else {
                    newLine += fields_spilts[parseInt];
                }

                if (i != indexs_split.length - 1) {
                    newLine += fields_separator;
                }
            }
            event.setBody(newLine.getBytes(Charsets.UTF_8));
            return event;
        } catch (Exception e) {
            return event;
        }
    }

    /*
     * @see org.apache.flume.interceptor.Interceptor#intercept(java.util.List)
     */
    public List intercept(List events) {
        List out = new ArrayList();
        for (Event event : events) {
            Event outEvent = intercept(event);
            if (outEvent != null) {
                out.add(outEvent);
            }
        }
        return out;
    }

    /*
     * @see org.apache.flume.interceptor.Interceptor#initialize()
     */
    public void initialize() {// TODO Auto-generated method stub}

    /*
     * @see org.apache.flume.interceptor.Interceptor#close()
     */
    public void close() {// TODO Auto-generated method stub}

    public static class Builder implements Interceptor.Builder {

        /** The fields_separator.指明每一行字段的分隔符 */
        private String fields_separator;

        /** The indexs.通过分隔符分割后,指明需要那列的字段 下标 */
        private String indexs;

        /** The indexs_separator. 多个下标下标的分隔符 */
        private String indexs_separator;

        /** The encrypted_field. 需要加密的字段下标 */
        private String encrypted_field_index;

        /*
         * @see org.apache.flume.conf.Configurable#configure(org.apache.flume.
         * Context)
         */
        public void configure(Context context) {
            fields_separator = context.getString(Constants.FIELD_SEPARATOR, Constants.DEFAULT_FIELD_SEPARATOR);
            indexs = context.getString(Constants.INDEXS, Constants.DEFAULT_INDEXS);
            indexs_separator = context.getString(Constants.INDEXS_SEPARATOR, Constants.DEFAULT_INDEXS_SEPARATOR);
            encrypted_field_index = context.getString(Constants.ENCRYPTED_FIELD_INDEX,
                    Constants.DEFAULT_ENCRYPTED_FIELD_INDEX);
        }

        /*
         * @see org.apache.flume.interceptor.Interceptor.Builder#build()
         */
        public Interceptor build() {
            return new CustomParameterInterceptor(fields_separator,
                            indexs, indexs_separator, encrypted_field_index);
        }
    }

    public static class Constants {
        /** The Constant FIELD_SEPARATOR. */
        public static final String FIELD_SEPARATOR = "fields_separator";

        /** The Constant DEFAULT_FIELD_SEPARATOR. */
        public static final String DEFAULT_FIELD_SEPARATOR = " ";

        /** The Constant INDEXS. */
        public static final String INDEXS = "indexs";

        /** The Constant DEFAULT_INDEXS. */
        public static final String DEFAULT_INDEXS = "0";

        /** The Constant INDEXS_SEPARATOR. */
        public static final String INDEXS_SEPARATOR = "indexs_separator";

        /** The Constant DEFAULT_INDEXS_SEPARATOR. */
        public static final String DEFAULT_INDEXS_SEPARATOR = ",";

        /** The Constant ENCRYPTED_FIELD_INDEX. */
        public static final String ENCRYPTED_FIELD_INDEX = "encrypted_field_index";

        /** The Constant DEFAUL_TENCRYPTED_FIELD_INDEX. */
        public static final String DEFAULT_ENCRYPTED_FIELD_INDEX = "";

        /** The Constant PROCESSTIME. */
        public static final String PROCESSTIME = "processTime";
        /** The Constant PROCESSTIME. */
        public static final String DEFAULT_PROCESSTIME = "a";

    }

    /**
     * 字符串md5加密
     */
    public static class StringUtils {
        // 全局数组
        private final static String[] strDigits = { "0", "1", "2", "3", "4", "5", "6", "7", "8", "9", "a", "b", "c","d", "e", "f" };

        // 返回形式为数字跟字符串
        private static String byteToArrayString(byte bByte) {
            int iRet = bByte;
            // System.out.println("iRet="+iRet);
            if (iRet < 0) {
                iRet += 256;
            }
            int iD1 = iRet / 16;
            int iD2 = iRet % 16;
            return strDigits[iD1] + strDigits[iD2];
        }

        // 返回形式只为数字
        private static String byteToNum(byte bByte) {
            int iRet = bByte;
            System.out.println("iRet1=" + iRet);
            if (iRet < 0) {
                iRet += 256;
            }
            return String.valueOf(iRet);
        }

        // 转换字节数组为16进制字串
        private static String byteToString(byte[] bByte) {
            StringBuffer sBuffer = new StringBuffer();
            for (int i = 0; i < bByte.length; i++) {
                sBuffer.append(byteToArrayString(bByte[i]));
            }
            return sBuffer.toString();
        }

        public static String GetMD5Code(String strObj) {
            String resultString = null;
            try {
                resultString = new String(strObj);
                MessageDigest md = MessageDigest.getInstance("MD5");
                // md.digest() 该函数返回值为存放哈希值结果的byte数组
                resultString = byteToString(md.digest(strObj.getBytes()));
            } catch (NoSuchAlgorithmException ex) {
                ex.printStackTrace();
            }
            return resultString;
        }
    }

}
定义一个类CustomParameterInterceptor实现Interceptor接口。
在CustomParameterInterceptor类中定义变量,这些变量是需要到 Flume的配置文件中进行配置使用的。每一行字段间的分隔符(fields_separator)、通过分隔符分隔后,所需要列字段的下标(indexs)、多个下标使用的分隔符(indexs_separator)、多个下标使用的分隔符(indexs_separator)。
添加CustomParameterInterceptor的有参构造方法。并对相应的变量进行处理。将配置文件中传过来的unicode编码进行转换为字符串。
写具体的要处理的逻辑intercept()方法,一个是单个处理的,一个是批量处理。
接口中定义了一个内部接口Builder,在configure方法中,进行一些参数配置。并给出,在flume的conf中没配置一些参数时,给出其默认值。通过其builder方法,返回一个CustomParameterInterceptor对象。
定义一个静态类,类中封装MD5加密方法。
启动配置,并在/root/data/ 添加测试文件。
flume-ng agent -c /root/apps/flume-1.6.0/conf -f spool-interceptor-hdfs.conf -name a1 -Dflume.root.logger=DEBUG,console 12.Flume注意事项
注意启动脚本命令的书写. agent 的名称别写错了,后台执行加上nohup … &
channel参数
capacity:默认该通道中最大的可以存储的event数量
trasactionCapacity:每次最大可以从source中拿到或者送到sink中的event数量
keep-alive:event添加到通道中或者移出的允许时间
注意:capacity > trasactionCapacity
日志采集到HDFS配置说明
- round: 默认值:false 是否启用时间上的”舍弃”,这里的”舍弃”,类似于”四舍五入”
- roundValue:默认值:1 时间上进行“舍弃”的值;
- roundUnit: 默认值:seconds时间上进行”舍弃”的单位,包含:second,minute,hour
案例(1):
a1.sinks.k1.hdfs.path = /flume/events/%y-%m-%d/%H:%M/%S
a1.sinks.k1.hdfs.round = true
a1.sinks.k1.hdfs.roundValue = 10
a1.sinks.k1.hdfs.roundUnit = minute
当时间为2015-10-16 17:38:59时候,hdfs.path依然会被解析为:

/flume/events/2015-10-16/17:30/00
/flume/events/2015-10-16/17:40/00
/flume/events/2015-10-16/17:50/00
因为设置的是舍弃10分钟内的时间,因此,该目录每10分钟新生成一个。
案例(2):
a1.sinks.k1.hdfs.path = /flume/events/%y-%m-%d/%H:%M/%S
a1.sinks.k1.hdfs.round = true
a1.sinks.k1.hdfs.roundValue = 10
a1.sinks.k1.hdfs.roundUnit = second
现象:10秒为时间梯度生成对应的目录,目录下面包括很多小文件!!!

HDFS产生的数据目录格式如下:
/flume/events/2016-07-28/18:45/10
/flume/events/2016-07-28/18:45/20
/flume/events/2016-07-28/18:45/30
/flume/events/2016-07-28/18:45/40
/flume/events/2016-07-28/18:45/50
/flume/events/2016-07-28/18:46/10
日志采集使用tail -F 监控一个文件新增的内容(断点续传)
a1.sources.r2.type = exec
a1.sources.r2.command = tail -F /root/data/nginx.log
a1.sources.r2.interceptors = i2
a1.sources.r2.interceptors.i2.type = static
a1.sources.r2.interceptors.i2.key = type
a1.sources.r2.interceptors.i2.value = nginx
这里会出现这样一个情况,当你的这个flume agent程序挂了或者是服务器宕机了,那么随着文件内容的增加,下次重启时,会消费到重复的数据, 怎么办呢?
解决方案:使用改进版的配置信息,修改信息
a1.sources.r2.command= tail -n +$(tail -n1 /root/log) -F /root/data/nginx.log | awk 'ARGIND==1{i=$0;next}{i++;if($0~/^tail/){i=0};print $0;print i >> "/root/log";fflush("")}' /root/log- ##意思就是说:Source每次读取一条信息,就往/root/log文件记住当前消息的行数。这样的话当你的程序挂了之后,重启时先获取上次读取所在的行数,依次从下读,这样避免了数据重复。而在flume1.7已经集成了该功能:
#监控一个目录下的多个文件新增的内容

a1.sources.s1.type = taildir

#通过 json 格式存下每个文件消费的偏移量,避免从头消费

a1.sources.s1.positionFile = /var/local/apache-flume-1.7.0-bin/taildir_position.json

a1.sources.s1.filegroups = f1 f2
a1.sources.s1.filegroups.f1 = /root/data/access.log
a1.sources.s1.filegroups.f2 = /root/data/nginx.log
flume的header参数配置讲解
#配置信息test-header.conf

a1.channels = c1
a1.sources = r1
a1.sinks = k1

#channel

a1.channels.c1.type = memory
a1.channels.c1.capacity=100000
a1.channels.c1.transactionCapacity=50000

#source

a1.sources.r1.channels = c1
a1.sources.r1.type = spooldir
a1.sources.r1.spoolDir = /var/tmp
a1.sources.r1.batchSize= 100
a1.sources.r1.inputCharset = UTF-8

##===========================================

a1.sources.r1.fileHeader = true
a1.sources.r1.fileHeaderKey = mmm
a1.sources.r1.basenameHeader = true
a1.sources.r1.basenameHeaderKey = nnn

##===========================================


#sink

a1.sinks.k1.type = logger
a1.sinks.k1.channel = c1
看到内容控制台打印的信息(其中aaa bbb 为目录/var/tmp 下面的2个文件名称):
Event: { headers:{mmm=/var/tmp/bbb, nnn=bbb} body: 30 30 30 000 }
Event: { headers:{mmm=/var/tmp/aaa, nnn=aaa} body: 31 31 31 111 }