android的hashmap 原理以及源码探究
android的hashmap 原理以及源码探究
- 前言
- 源码阅读
- 基本知识
- put方法
- 重点难点一
- 重点难点二
- 重点难点三
- 总结
- Get方法
- 总结
前言
HashMap, 是我们在android 程序中最常用的map。HashMap和arrayList 承担了我们在程序中临时存储大量数据的需求。
尤其是hashmap,不但能存储大量的数据,而且其查找某个值的性能另我们记忆深刻.并且hashmap不像数组一样需要大量的连续空间来实现数据的快速写入和读取。可以这样说,hashmap拥有了数组的性能和链表的低内存要求。但是hashmap究竟是怎么实现的呢?我们就来看看其中的原理吧。
源码阅读
基本知识
这里我们在阅读核心源代码之前,先贴一些必要的背景代码。
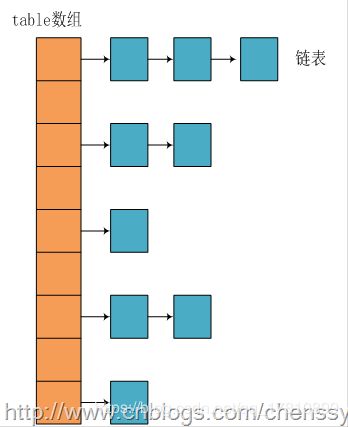
首先是Hashmap的结构是数组+链表(jdk1.8以后已经修改为数组+红黑树,但是android并没有修改,所以此处不讨论)的结构。借用其他博客的一幅图就是这样的。图片出处。
 private static final int MINIMUM_CAPACITY = 4; //数组最小值

 private static final int MAXIMUM_CAPACITY = 1 << 30; //数组最大值

 private static final Entry[] EMPTY_TABLE
            = new HashMapEntry[MINIMUM_CAPACITY >>> 1]; //默认初始数组

 static final float DEFAULT_LOAD_FACTOR = .75F;	//默认加载因子

 transient int size;	//hashmap 数据量存储数据的多少

 //HashMap的阈值,用于判断是否需要调整HashMap的容量(threshold = 容量*加载因子)
 private transient int threshold;
put方法
基础知识介绍完了。首先,我们从put方法开始查看。
    @Override public V put(K key, V value) {
        if (key == null) { //如果key 为null,则调用专用的null存储函数
            return putValueForNullKey(value);
        }

        int hash = Collections.secondaryHash(key); //计算key的hash值
        HashMapEntry[] tab = table; //获取当前hashmap的数组
        int index = hash & (tab.length - 1);	//这里等价于 int index = hash%tab.length 。
        									   //只不过运算速度相比于取余,速度更快。不过必须确保tab.length为2的n次方
        for (HashMapEntry e = tab[index]; e != null; e = e.next) { //遍历对应数组位置的链表
            if (e.hash == hash && key.equals(e.key)) {
            	//如果key 相等的情况下,存入新值,并将老值返回
                preModify(e);
                V oldValue = e.value;
                e.value = value;
                return oldValue;
            }
        }

        // No entry for (non-null) key is present; create one
        modCount++; //将hashmap的改变次数加一
        //判断hashmap存储的数据量是否达到阈值,如果达到阈值,则将数组扩容
        if (size++ > threshold) {
            tab = doubleCapacity(); //将数组扩容
            index = hash & (tab.length - 1); //根据新的数组长度,计算新的index值
        }
        addNewEntry(key, value, hash, index); //将数据保存
        return null;
    }
上面代码的总体逻辑还是比较清晰的。重点难点,在我看来一共有三处
重点难点一
 int index = hash & (tab.length - 1);	//这里等价于 int index = hash%tab.length 。
        									   //只不过运算速度相比于取余,速度更快。不过必须确保tab.length为2的n次方
这句话,我第一次看到的时候,也愣了半天。后面看到网上有人说,等价于 取余操作,我也不知道为什么。后面想了半天才想明白。
例如 hash为(这里全部用二进制表示) 1001 0111 ,tab.length(必须为2的n次方) 为0001 0000。如果要取hash相对于tab.length的余数,那么我们可以把hash已tab.length的大小为标准分解为两个部分,就是大于等于tab.length和小于tab.length的两部分。即 hash=1001 0000 + 0000 0111 。 而前面那部分,肯定可以被0001 0000 ,后面小于tab.length 则肯定不能被0001 0000整除(数字0除外),也就是后面那部分就是hash相对于tab.length的余数。
那我们现在就要用程序把后面那部分取出来,那我们套用源码中的公式 hash & (tab.length - 1),代入我们的参数也就是
10010111&00001111=0111。是不是这样就成功把余数取出来了。现在不由的感叹,写这段代码的人,实在太聪明了。
重点难点二
  	tab = doubleCapacity(); //将数组扩容

    private HashMapEntry[] doubleCapacity() {
        HashMapEntry[] oldTable = table;
        int oldCapacity = oldTable.length;
        if (oldCapacity == MAXIMUM_CAPACITY) {
        	//如果数组的大小,已经达到上限,则不再扩容
            return oldTable;
        }
        int newCapacity = oldCapacity * 2; //将数组大小扩容为原来的两倍
        HashMapEntry[] newTable = makeTable(newCapacity);
        if (size == 0) {
            return newTable;
        }
		//遍历原来的数据,将其添加到到新的数组
        for (int j = 0; j < oldCapacity; j++) {
            /*
             * Rehash the bucket using the minimum number of field writes.
             * This is the most subtle and delicate code in the class.
             */
            HashMapEntry e = oldTable[j]; //取出数组中的hashMapEntry,也就是链表的第一个
            if (e == null) {	//如果数组这个位置的链表为空,则跳过
                continue;
            }
            int highBit = e.hash & oldCapacity;
            HashMapEntry broken = null;
            newTable[j | highBit] = e; //将旧的index,转换为新的index
            for (HashMapEntry n = e.next; n != null; e = n, n = n.next) {
            	//遍历链表,依次赋值
                int nextHighBit = n.hash & oldCapacity;
                //链表中的数值,可能在新的扩容后的数组中,不再属于此链表。
                //不过在此链表中的数值,只可能属于两个数组,一个就是原来的位置,即 e.hash&(oldCapacity-1)
                //或者新的位置e.hash&(oldCapacity-1)+2^(oldCapacity)。
                //所以这里的操作就是把原来的链表一分为二,分别归属上面两个数组
                //这里的highBit是不断变化的,也就是在数组的两个位置不断的转换
                if (nextHighBit != highBit) {
                    if (broken == null)
                        newTable[j | nextHighBit] = n;
                    else
                        broken.next = n;
                    broken = e;
                    highBit = nextHighBit;
                }
            }
            if (broken != null)
                broken.next = null;
        }
        return newTable;
    }

	//创建指定大小的数组
    private HashMapEntry[] makeTable(int newCapacity) {
        @SuppressWarnings("unchecked") HashMapEntry[] newTable
                = (HashMapEntry[]) new HashMapEntry[newCapacity];
        table = newTable;	//保存新的table
        threshold = (newCapacity >> 1) + (newCapacity >> 2); // 3/4 capacity  计算新的阈值,此处也为优化速度的写法
        return newTable;
    }
重点难点三
  addNewEntry(key, value, hash, index); //将数据保存

    void addNewEntry(K key, V value, int hash, int index) {
        table[index] = new HashMapEntry(key, value, hash, table[index]);
    }

    static class HashMapEntry implements Entry {
        final K key;
        V value;
        final int hash;
        HashMapEntry next;
		//....
    }
总结
其实hashmap的精华基本上都在重难点一和二中了,一个是取余的简化操作另外一个就是把旧的数据搬运到新扩容的数组中的操作。
Get方法
    public V get(Object key) {
        if (key == null) {
            HashMapEntry e = entryForNullKey;
            return e == null ? null : e.value;
        }

        int hash = Collections.secondaryHash(key);
        HashMapEntry[] tab = table;
        for (HashMapEntry e = tab[hash & (tab.length - 1)];
                e != null; e = e.next) {
            K eKey = e.key;
            if (eKey == key || (e.hash == hash && key.equals(eKey))) {
                return e.value;
            }
        }
        return null;
    }
这里仅贴出方法,不再解释。为什么呢?你仔细看看代码,是不是都似曾相识?没错,之前在put的时候,由于需要对相同key的值,进行更新,所以我们已经看过这段代码了。所以,这里就不在解释了!
总结
好了,以上就是hashmap最重要的put 和get 方法的主要原理。从这里我们就能感受到自己有多菜了,例如对一个数的取余方法,就算给我一万次机会我恐怕也会用%方法。虽然那样也能实现功能,但是效率不知道要下降了多少。
那么我们从这里能知道什么呢?其实hashmap最耗时间的操作,莫过于对map进行扩容。所以如果我们一开始就能知道我们要存的数据的大致范围,就可以给hashmap初始化一个合适的大小,这样就避免了hashmap的多次扩容。
