Django学习11-ImageField添加头像、Markdown富文本
Django
- 用户信息
- 添加用户头像
- 使用Markdown支持富文本文章
- markdown
- 在项目中使用markdown
- 添加Markdown文本预览
用户信息
添加用户头像
在用户信息UserProfile中添加ImageField字段,用于头像上传和显示,而要使用ImageField(或是FileField)必须先进行一些设置:
- 先安装pillow, 迁移时会报错,
PIL可以可以对图片进行编辑合成等。 - 在setting.py中设置一个
MEDIA_ROOT作为Django保存文件的完整路径(这些文件并不会保存在数据库中),定义MEDIA_URL为该目录的基本公共URL。 确保Web服务器的用户帐户可以写入此目录;
# Build paths inside the project like this: os.path.join(BASE_DIR, ...)
BASE_DIR = os.path.dirname(os.path.dirname(os.path.abspath(__file__)))

# 指定file或image上传目录
MEDIA_URL = '/media/'
MEDIA_ROOT = os.path.join(BASE_DIR, 'media').replace("\\", "/")
- 将
ImageField添加到UserProfile模型中,upload_to选项用以指定用于上传文件的目录(是MEDIA_ROOT的一个子目录);
class UserProfile(models.Model):
    """为已经使用了内置User模型的项目来拓展用户模型 """
    # ...
    avatar = models.ImageField(upload_to='avatar/', blank=True, null=True)
- 修改dajngo_ulysses/urls.py,加载图片静态路径
urlpatterns = [
    path('admin/', admin.site.urls),
    path('', include('learning_logs.urls', namespace='learning_logs')),
    path('users/', include('users.urls', namespace='users')),
]+ static(settings.MEDIA_URL, document_root=settings.MEDIA_ROOT)
- 存储在数据库中的都是文件保存的路径(相对于MEDIA_ROOT)。可以使用
{{object.在模板中获取文件的绝对路径。.url}}
修改之前的个人信息显示模板,添加头像的显示:
  <div>
  {% if user.is_authenticated %}

    <img src="{{ user.profile.avatar.url }}" style="width:250px; height: 250px; position: absolute;"/>
    <div style="margin-left: 280px;">
     {# ... #}
    div>

  {% endif %}
  div>
将显示的头像大小设置为250X250,同时设置文字信息左边的间距。现在先使用admin site管理网页,上传图片。

之后进入个人信息界面:
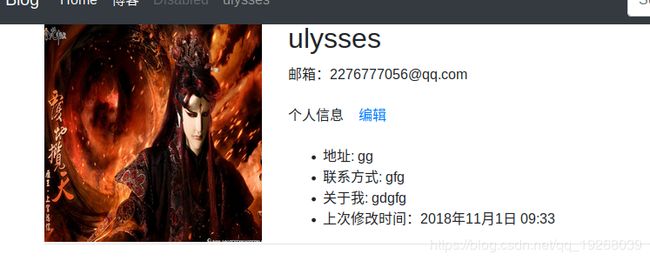
头像能正确显示。
再次修改ImageField字段,为用户添加默认的头像
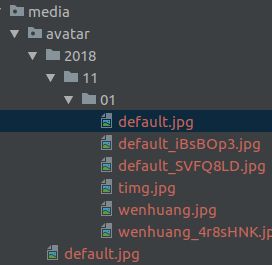
avatar = models.ImageField('用户头像', upload_to='avatar/%Y/%m/%d', default='avatar/wenhuang.jpg',blank=True, null=True)
这样新注册的用户在点击个人信息时,会显示一个默认头像:

接下来添加图片上传功能。
在原先的edit_profile 模板的form表单添加对文件上传的支持
或者在input标签添加formenctype="multipart/form-data",它会覆盖 form 元素的 enctype属性,参考HTML5的input标签属性
修改视图函数:
form = UserProfileForm(request.POST, request.FILES, instance=profile)
request.FILES保存着文件数据。
点击编辑个人信息,可以看到使用Browse上传头像,
 提交后,头像也进行了修改
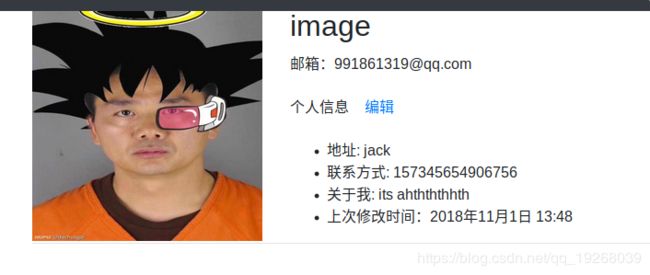
在上传图片时,若是图片的名字重复了,则会自动生成一段后缀。
可以对导航栏进行修改,使用用户的头像取代用户名作为下拉菜单的按钮:
            <a class="nav-link dropdown-toggle" href="#" id="navbarDropdown" role="button" data-toggle="dropdown" aria-haspopup="true" aria-expanded="false">
              <img src="{{ user.profile.avatar.url }} " style="width: 30px; height: 30px"/>
            a>
使用Markdown支持富文本文章
markdown
Markdown是一个用于Web编写者的文本到HTML转换工具。 Markdown允许使用易于阅读,易于编写的纯文本格式进行编写,然后将其转换为结构有效的XHTML(或HTML)。Markdown的2个重要属性:(1)它纯文本格式化语法; (2)用Perl编写的软件工具,它将纯文本格式转换为HTML。 有关Markdown格式语法的详细信息,请参见语法,可以使用在线Dingus进行试用。
将markdown引入项目,使用python-markdown模块:
pip install markdown
它的基本使用方法:
>>> from markdown import markdown
>>> md = "# header1"
>>> html = markdown(md)
>>> html
'header1
'
具体使用可以查看python-markdown
在项目中使用markdown
将Markdown文本转为HTML格式的文本的工作可以放在显示模板中做(添加markdown相关的标签),但每次渲染页面后都会重新转换一次,会降低效率。可以在输入markdown文本,点击提交后,一次性生成html文本,将这段html文本缓存到数据库中。显示时,在模板中调用模型的html文本字段。
class Post(models.Model):
    """同一Topic下的多篇文章"""
    # many to one relationship
    # ...
    text = models.TextField('post content')
    html_content = models.TextField('html content', blank=True)
模型中添加html_content字段
            new_post = form.save(commit=False)
            new_post.topic = topic
            new_post.html_content = markdown(request.POST.get('text'))
            new_post.owner = request.user
            new_post.save()
在保存新post时,就将Markdown文本转为html文本。
        {% if post.html_content %}
          <p class="card-text">{{ post.html_content|safe }}p>
        {% else %}
          <p class="card-text">{{ post.text|linebreaks }}p>
        {% endif %}
要显示html文本需要添加safe过滤器,默认会将变量都转义。
效果:

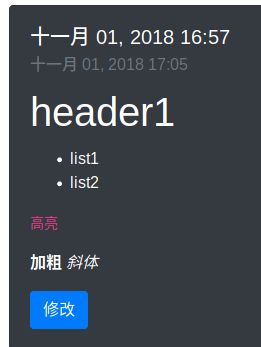
查看数据库中的原文和被转换的html文本。
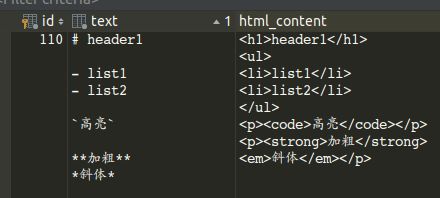
除了在视图函数中对post传送的文本进行格式转换外,还可以用信号接收的方式进行处理
# 只提交Markdown源文本,在服务器上进行转换
# instance 正要被保存的Post对象实例
# update_fields 要更新的字段
@receiver(pre_save, sender=Post)
def md_trans(sender, update_fields=None, instance=None, **kwargs):
    """在post文本提交时,进行markdown转html"""
    instance.html_content = instance.html_content = markdown(instance.text, extensions=['markdown.extensions.extra',])
    update_fields = ['html_content', ]
在每次Post对象实例被保存之前,对文本进行Markdown格式转换。
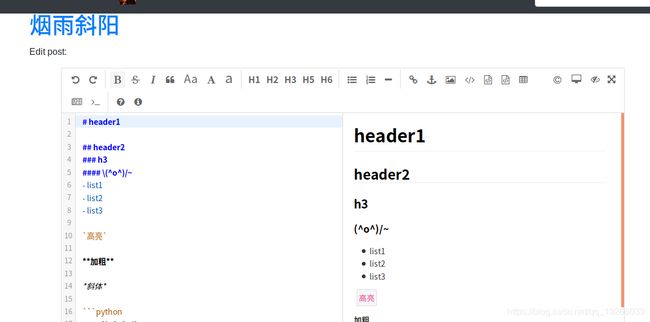
添加Markdown文本预览
在之前的设计中,需要在提交后的显示界面才能看到Markdown转换后的文本。现在添加插件django-mdeditor
,使得在编辑过程中,就能进行文本预览。
- 安装:
pip install django-mdeditor; - 在
INSTALLED_APP添加mdeditor; - 在
setting中配置媒体文件路径MEDIA_ROOT和MEDIA_URL,之前已经设置过; - 在model 中使用 Markdown 编辑字段,将
TextField替换成MDTextField;
from mdeditor.fields import MDTextField
class Post(models.Model):
    # ...
    # text = models.TextField('post content')
    text = MDTextField()
- 在 Form 中使用 markdown 编辑字段:使用
MDEditorWidget部件;
        widgets = {
            'text': MDEditorWidget(),
        }
- 在前段template显示预览框;
<form action="{% url 'learning_logs:new_post' topic.id %}" method="post">
  {% csrf_token %}
  {{form.media}}
  {% bootstrap_form form %}
  <input type="submit" value="添加"/>
form>
-在setting中添加配置项:
MDEDITOR_CONFIGS = {
    'default': {
        'width': '90% ',  # Custom edit box width
        'heigth': 500,  # Custom edit box height
        'toolbar': ["undo", "redo", "|",
                    "bold", "del", "italic", "quote", "ucwords", "uppercase", "lowercase", "|",
                    "h1", "h2", "h3", "h5", "h6", "|",
                    "list-ul", "list-ol", "hr", "|",
                    "link", "reference-link", "image", "code", "preformatted-text", "code-block", "table", "datetime"
                                                                                                           "emoji",
                    "html-entities", "pagebreak", "goto-line", "|",
                    "help", "info",
                    "||", "preview", "watch", "fullscreen"],  # custom edit box toolbar
        'upload_image_formats': ["jpg", "jpeg", "gif", "png", "bmp", "webp"],  # image upload format type
        'image_floder': 'editor',  # image save the folder name
        'theme': 'default',  # edit box theme, dark / default
        'preview_theme': 'default',  # Preview area theme, dark / default
        'editor_theme': 'default',  # edit area theme, pastel-on-dark / default
        'toolbar_autofixed': True,  # Whether the toolbar capitals
        'search_replace': True,  # Whether to open the search for replacement
        'emoji': True,  # whether to open the expression function
        'tex': True,  # whether to open the tex chart function
        'flow_chart': True,  # whether to open the flow chart function
        'sequence': True  # Whether to open the sequence diagram function
    }

}
