Android tips(十四)-->解决AppBarLayout滑动不畅的问题
转载请标明出处:一片枫叶的专栏
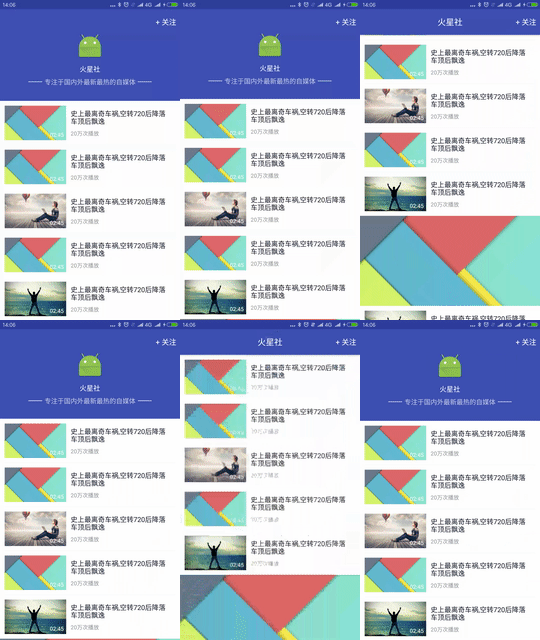
最近在开发的App中需要实现Toolbar与顶部内容区域级联滚动的效果,一开始就想到了Android 5.0 中新添加的AppBarLayout控件,其正好是实现这个效果的,所以马上就使用这个组件实现了一个类似的效果,具体的效果图如下所示:

好吧,使用Android 5.0中新添加的AppBarLayout可以比较方便的实现类似的效果,下面就是如何使用AppBarLayout实现类似的效果:
(一)添加Compile引用
compile 'com.android.support:design:22.2.1'(二)添加Layout布局文件
"1.0" encoding="utf-8"?>
.support.design.widget.CoordinatorLayout
    android:id="@+id/main_content"
    xmlns:android="http://schemas.android.com/apk/res/android"
    xmlns:app="http://schemas.android.com/apk/res-auto"
    android:layout_width="match_parent"
    android:layout_height="match_parent"
    >

    .support.design.widget.AppBarLayout
        android:id="@+id/appbarLayout"
        android:layout_width="match_parent"
        android:layout_height="200dp"
        android:fitsSystemWindows="true"
        android:theme="@style/ThemeOverlay.AppCompat.Dark.ActionBar">

        .support.design.widget.CollapsingToolbarLayout
            android:id="@+id/collapsingToolbar"
            android:layout_width="match_parent"
            android:layout_height="match_parent"
            android:fitsSystemWindows="true"
            app:contentScrim="?attr/colorPrimary"
            app:expandedTitleMarginEnd="64dp"
            app:expandedTitleMarginStart="48dp"
            app:layout_scrollFlags="scroll|snap|exitUntilCollapsed|enterAlwaysCollapsed">

            "match_parent"
                android:layout_height="match_parent"
                android:orientation="vertical"
                app:layout_collapseMode="parallax"
                >

                "60dp"
                    android:layout_height="60dp"
                    android:layout_marginTop="50dp"
                    android:layout_gravity="center_horizontal"
                    android:background="@mipmap/ic_launcher"
                    />

                "wrap_content"
                    android:layout_height="wrap_content"
                    android:text="火星社"
                    android:textSize="15dp"
                    android:textColor="@android:color/white"
                    android:layout_gravity="center_horizontal"
                    android:layout_marginTop="10dp"
                    />

                "wrap_content"
                    android:layout_height="wrap_content"
                    android:layout_gravity="center_horizontal"
                    android:layout_marginTop="8dp"
                    >

                    "30dp"
                        android:layout_height="1dp"
                        android:background="@android:color/white"
                        android:layout_gravity="center_vertical"
                        />

                    "wrap_content"
                        android:layout_height="wrap_content"
                        android:text="专注于国内外最新最热的自媒体"
                        android:layout_gravity="center_horizontal"
                        android:layout_marginLeft="5dp"
                        />

                    "30dp"
                        android:layout_height="1dp"
                        android:background="@android:color/white"
                        android:layout_gravity="center_vertical"
                        android:layout_marginLeft="5dp"
                        />


            .support.v7.widget.Toolbar
                android:id="@+id/toolbar"
                android:layout_width="match_parent"
                android:layout_height="?attr/actionBarSize"
                app:layout_collapseMode="pin"
                app:popupTheme="@style/ThemeOverlay.AppCompat.Light"
                >

                "@+id/titleView"
                    android:layout_width="match_parent"
                    android:layout_height="match_parent"
                    android:visibility="visible"
                    >

                    "@+id/titleText"
                        android:layout_width="wrap_content"
                        android:layout_height="wrap_content"
                        android:text="火星社"
                        android:textSize="18dp"
                        android:textColor="@android:color/white"
                        android:layout_centerInParent="true"
                        android:alpha="0"
                        />

                    "@+id/communityConnect"
                        android:layout_width="wrap_content"
                        android:layout_height="wrap_content"
                        android:textColor="#ffffff"
                        android:text="+ 关注"
                        android:textSize="16dp"
                        android:layout_gravity="right"
                        android:layout_alignParentRight="true"
                        android:layout_centerVertical="true"
                        android:layout_marginRight="8dp"
                        />

            .support.v7.widget.Toolbar>

        .support.design.widget.CollapsingToolbarLayout>

    .support.design.widget.AppBarLayout>

    .support.v7.widget.RecyclerView
        android:id="@+id/videoCommunityRecyclerview"
        android:layout_width="match_parent"
        android:layout_height="match_parent"
        android:background="@android:color/white"
        android:clipToPadding="false"
        android:overScrollMode="never"
        app:layout_behavior="@string/appbar_scrolling_view_behavior"
        />

.support.design.widget.CoordinatorLayout>
在布局文件的定义中:
1) 首先需要用CoordinatorLayout包住AppBarLayout;
CoordinatorLayout也是Android 5.0新出的控件,新的思路通过协调调度子布局的形式实现触摸影响布局的形式产生动画效果。CoordinatorLayout通过设置子View的 Behaviors来调度子View。系统(Support V7)提供了AppBarLayout.Behavior, AppBarLayout.ScrollingViewBehavior, FloatingActionButton.Behavior, SwipeDismissBehavior 等。
2) 然后是添加AppBarLayout,顶部区域的View都放在AppBarLayout里面;
AppBarLayout也是Android 5.0新出的控件,AppBarLayout继承自LinearLayout,布局方向为垂直方向。它可以让你定制当某个可滚动View的滚动手势发生变化时,其内部的子View实现何种动作。
3) AppBarLayout外面,CoordinatorLayout里面,放一个带有可滚动的View。比如:RecyclerView。
4) 在AppBarLayout里面的View,通过app:layout_scrollFlags属性来控制,滚动时候的表现.其中有4种Flag的类型.
scroll:值设为scroll的View会跟随滚动事件一起发生移动
enterAlways:值设为enterAlways的View,当ScrollView往下滚动时,该View会直接往下滚动。而不用考虑ScrollView是否在滚动
exitUntilCollapsed:值设为exitUntilCollapsed的View,当这个View要往上逐渐“消逝”时,会一直往上滑动,直到剩下的的高度达到它的最小高度后,再响应ScrollView的内部滑动事件
enterAlwaysCollapsed:是enterAlways的附加选项,一般跟enterAlways一起使用,它是指,View在往下“出现”的时候,首先是enterAlways效果,当View的高度达到最小高度时,View就暂时不去往下滚动,直到ScrollView滑动到顶部不再滑动时,View再继续往下滑动,直到滑到View的顶部结束
snap:设置滚动View不可停留在半截,也就是滚动View要不是展开状态就是收缩状态
5) 在可以滚动的View上设置属性 app:layout_behavior,比如我们的例子中:app:layout_behavior=”@string/appbar_scrolling_view_behavior”是Android Support Library 定义后的值,可以被直接使用。这个Behavior的class是真正控制滚动时候View的滚动行为。当然了有的时候我们也可以手动的实现一个自定义的Behavior去实现特有的滚动行为。
这样就实现了一个简单的RecyclerView与AppBarLayou的级联滚动效果了,但是实现完成之后有一个问题就是,当我的RecyclerView向下滚动的时候,滚动到头了,就直接停止了,而不可以继续将AppBarLayout向下滚动,好吧,看来这也是一个bug。
既然这样就需要自己实现RecyclerView滚动到头级联AppBarLayout的效果,后来想到可以通过检测RecyclerView滚动到头然后手动执行AppBarLayout的展开动作。具体代码部分,只需要实现RecylerView的逻辑就可以了.
/**
 * 自定义RecyclerView实现对AppBarLayout的滚动效果
 */
recyclerView.addOnScrollListener(object : RecyclerView.OnScrollListener() {
            override fun onScrolled(recyclerView: RecyclerView?, dx: Int, dy: Int) {
            }

            override fun onScrollStateChanged(recyclerView: RecyclerView?, newState: Int) {
                if (newState == RecyclerView.SCROLL_STATE_IDLE) {
                    var visiblePosition = linearLayoutManager.findFirstCompletelyVisibleItemPosition()
                    if (visiblePosition == 0) {
                        barLayout.setExpanded(true, true)
                    }
                }
            }
        })
这样经过重写之后我们在滑动RecyclerView的时候,当RecyclerView滑动到顶部时其就会滑动AppBarLayout:
好吧,可以发现当RecyclerView向下滚动到头的时候,若还有向下滑动的速度则AppBarLayout会被展开,看效果还是不错的,^_^
在实现过程中还有一个问题就是布局文件中:
.support.v7.widget.Toolbar
                android:id="@+id/toolbar"
                android:layout_width="match_parent"
                android:layout_height="?attr/actionBarSize"
                app:layout_collapseMode="pin"
                app:popupTheme="@style/ThemeOverlay.AppCompat.Light"
                >

                "@+id/titleView"
                    android:layout_width="match_parent"
                    android:layout_height="match_parent"
                    android:visibility="visible"
                    >

                    "@+id/titleText"
                        android:layout_width="wrap_content"
                        android:layout_height="wrap_content"
                        android:text="火星社"
                        android:textSize="18dp"
                        android:textColor="@android:color/white"
                        android:layout_centerInParent="true"
                        android:alpha="0"
                        />

                    "@+id/communityConnect"
                        android:layout_width="wrap_content"
                        android:layout_height="wrap_content"
                        android:textColor="#ffffff"
                        android:text="+ 关注"
                        android:textSize="16dp"
                        android:layout_gravity="right"
                        android:layout_alignParentRight="true"
                        android:layout_centerVertical="true"
                        android:layout_marginRight="8dp"
                        />

            .support.v7.widget.Toolbar>
其中Toolbar下的RelativeLayout始终无法居中Toolbar,在Toolbar的左侧有一个Padding长度无法占满,最终造成RelativeLayout中的Title无法居中显示,最后想到了一个变通的方法:
/**
         * 更新title位置
         */
        titleText.post {
            titleText.offsetLeftAndRight(- titleView.left / 2)
        }
在代码中通过RelativeLayout的left长度移动titleText的位置,进而使title居中显示。