tensorflow使用多个gpu训练
1. 模型并行
概念: 模型并行指模型的不同部分在不同GPU上运行。单个模型过大无法在单个GPU上运行,这时候就需要model-parallelism.
https://blog.csdn.net/tigertai98/article/details/81125307
How to Use Distributed TensorFlow to Split Your TensorFlow Graph Between Multiple Machines
Having access to powerful GPUs is becoming increasingly important for implementing deep learning models. If you’re like me and don’t have access to a Tesla GPU with ten trillion GB of memory, but also too broke to be able to consistently use cloud GPU computing services such as FloydHub or AWS, one alternative is to split your TensorFlow (TF) graph between multiple machines in order to handle large models.
Luckily for us, the TF framework makes this type of distributed computing very simple. It’s only a matter of a few additional lines of code.
When I first attempted to use TF in a distributed setting, I had difficulties figuring out the workflow for the specific type of distributed computing that I was interested in.
The documentation for distributed TF focuses on data parallelism much more than it does on model parallelism. Data parallelism focuses on passing copies of a graph to multiple workers who can perform variable updates in parallel. In model parallelism, we simply wish to divide our graph between multiple nodes because our graph is too large to be stored on a single GPU.
As a result, I put together a basic example that demonstrates the workflow for splitting your TF graph between multiple machines. The attached repo uses a classic simple convolutional neural network (CNN) for classifying MNIST digits as an example. We divide the graph between multiple devices on different machines. The architecture was inspired by the TF tutorial here.
In model parallelism, we define each machine that we want to utilize and group each one into something called a cluster. We can define a cluster of servers as follows:
This line basically defines our cluster of servers (2 of them here) according to the job that they are responsible for. In this case, there is only one job called “worker”. Each machine is responsible for a specific task in the job. We define the machine of interest using a combination of its IP address and a port number in the form of a string.
As a concrete example, if we want to define two different tasks on our local machine (but different port numbers), we could do:
Next, we define the server for each machine. The server is defined by the job and the task. In this case, the job is “worker” and the task is basically an index that refers to the position of our machine‘s name in the cluster definition. Referring back to the picture above: localhost:2222 is defined by task 0 and localhost:2223 is defined by task 1.
These steps need to be performed on all machines involved in your cluster. In other words, on each machine, open up the command line/terminal/ notebook and run these lines, paying close attention to the task index.
From there, an important distinction needs to be made. Either a machine is the “chief” of your cluster, or it’s not. If it isn’t, you can simply start the server using an additional line:
If a machine is the chief, then it is responsible for building the graph and running the session.
We can place variables and ops on specific machines using the tf.device() command. For instance, we can create a weight matrix and place it on our first machine as follows:
In the example code, we assign the first half of the graph to the first machine (task 0) and the second half of the graph to the second machine (task 1). The other thing to remember is that when you start your session using the chief, you need to pass the server as an argument. This is really important because otherwise your session will only be able to find local devices.
And that’s it! You can always view your graph’s device placement using TensorBoard to make sure it is doing what you want it to.
The example code can be found here. The workflow is as follows:
- Figure out IP addresses and port numbers for all machines you want to use.
- Define your cluster based on this information in both the Helper_Server.ipynb and Chief Worker.ipynb notebooks.
- Run the Helper_Server.ipynb notebook in separate processes on each machine you intend to use EXCEPT for the chief (Make sure to use the correct task_index for each machine according to how you defined your cluster).
- After adding all other servers to the cluster with Helper_Server.ipynb, you can run the Chief_Worker.ipynb notebook to build the graph, start the session, and train the model!
Full disclosure this is my first shot at a blog post so feel free to let me know if I got something fundamentally wrong or if something is unclear. Hopefully someone finds this useful and is able to save some time figuring this out!
Resources:
Repo can be found here: https://github.com/burtonw0814/TF_Distributed_Training_Example___Model_Parallelism
Additional resource focusing on data parallelism: https://github.com/tmulc18/Distributed-TensorFlow-Guide
Shout out to this repo for the original CNN: https://github.com/aymericdamien/TensorFlow-Examples
2. 数据并行
2.1 概念:
数据并行指不同GPU上训练数据不同,但模型是同一个(相当于是同一个模型的副本)
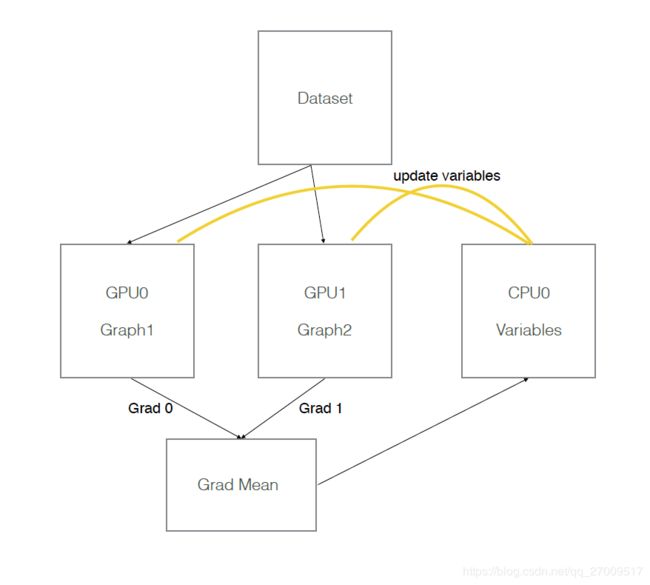
模型参数保存在一个指定gpu/cpu上,模型参数的副本在不同gpu上,每次训练,提供batch_size*gpu_num数据,并等量拆分成多个batch,分别送入不同GPU。前向在不同gpu上进行,模型参数更新时,将多个GPU后向计算得到的梯度数据进行平均,并在指定GPU/CPU上利用梯度数据更新模型参数。
假设有两个GPU(gpu0,gpu1),模型参数实际存放在cpu0上,实际一次训练过程如下图所示:
2.2 例子
# 得到image和对应label
next_img, next_label = iterator.get_next()
# 根据使用的gpu数量做平均拆分
image_splits = tf.split(next_img, num_gpus)
label_splits = tf.split(next_label, num_gpus)
# 保存来自不同GPU计算出的梯度、loss列表
tower_grads = []
tower_loss = []
counter = 0
for d in self.gpu_id:
    with tf.device('/gpu:%s' % d):
        with tf.name_scope('%s_%s' % ('tower', d)):
            cross_entropy = build_train_model(image_splits[counter], label_splits[counter], for_training=True)
            counter += 1
            with tf.variable_scope("loss"):
                grads = opt.compute_gradients(cross_entropy)
# 把当前GPU计算出的梯度、loss值append到列表后,以便后续计算平均值
                tower_grads.append(grads)
                tower_loss.append(cross_entropy)
# 同名变量将会复用,假设现在gpu0上创建了两个变量var0,var1,那么在gpu1上创建计算图的时候,如果还有var0和var1,则默认复用之前gpu0上的创建的那两个值。
                tf.get_variable_scope().reuse_variables()
# 计算不同GPU获取的grad、loss的平均值
mean_loss = tf.stack(axis=0, values=tower_loss)
mean_loss = tf.reduce_mean(mean_loss, 0)
mean_grads = util.average_gradients(tower_grads)
update_ops = tf.get_collection(tf.GraphKeys.UPDATE_OPS)
with tf.control_dependencies(update_ops):
# 梯度平均值更新参数。
    train_op = opt.apply_gradients(mean_grads, global_step=global_step)
注意:上述代码中,所有变量(vars)都放在了第一个GPU上,运行时会发现第一个GPU占用的显存比其他GPU多一些。如果想把变量放在CPU上,则需要在创建计算图时,针对每层使用到的变量进行设备指定,很麻烦,所以建议把变量放在GPU上。
还有EMLo的实现(经过修改):
https://github.com/shelleyHLX/bilm_EMLo
reference:
https://www.cnblogs.com/hrlnw/p/7779058.html
https://blog.csdn.net/tigertai98/article/details/81125307