Caffe学习笔记(一)Caffe训练常用文件
笔记(一):Caffe 训练中用到的一些关键文件,以及这些文件的内容和作用。
文章目录
- 1. train.prototxt 文件
- 1.1 数据层
- 1.2 卷积层
- 1.3 池化层
- 1.4 激活层
- 1.5 全连接层
- 1.6 损失函数层
- 1.7 BN层
- 1.8 Dropout层
- 1.9 准确率层
- 2. solver.prototxt 文件
Caffe 训练模型时,需要两个文件:train.prototxt 和 solver.prototxt,其中:
- train.prototxt 定义了训练时模型的网络结构
- solver.prototxt 定义了训练模型时的一些参数配置
另外,还有 deploy.prototxt 定义了发布时使用的网络结构,使用这个网络来计算结果,与 train.prototxt 差不多,只是修改了输入输出层。
xxx.caffemodel 文件是训练的输出结果,保存了各个网络层的参数,搭配 deploy.prototxt 服用,可以用于最终的预测(TEST)。
Caffe 已经实现了很多 layer,可以直接拿来用,但是如果想要自定义 layer,就需要了解一下 Caffe 每个 layer 都需要包含什么东西。
Caffe 每个 Layer 包含三个基本操作:
- Setup:模型初始化时重置 layer 及 layer 间的连接
- Forward:从 bottom 接收数据,经过计算后送到 top
- Backward:给定 top 输出的梯度,计算其相对于输入的梯度并送到 bottom
1. train.prototxt 文件
1.1 数据层
层类型(type):一般都是 Data
【这个类型说明数据来自于数据库,如 LMDB 和 LEVELDB】
Caffe 有 7 种数据层(即支持输出的数据类型:Data、MemoryData、HDF5Data、HDF5Output、ImageData、WindowData、DummyData),除此之外还可以自定义数据层(自定义数据层就需要自己写代码了)。

数据层必须设置的参数:
- source:数据库的路径,比如 examples/mnist_train_lmdb
- batch_size:每次处理的数据个数,比如 64
其他参数含义说明:
- name:就是这一层的名字,随便取,不过还是符合该层的功能比较好
- type:层类型,数据层的层类型一般就取值为 Data,如果取值为 Python 的话,就需要在编译 caffe 时开启 python layer 的支持,在 Makefile.config 中需要将 WITH_PYTHON_LAYER=1的注释去掉
- top:该层的输出(可以有多个输出),一般数据层的输出包括了 data 和 label,因为 data 和 label 要流向下一层,以便后面计算 loss
- bottom:该层的输入,一般数据层没有输入,而其他层可以有多个输入bottom和输出top
- transform_param:对数据进行预处理,其中 mirror: true 表示将数据进行镜像变化,得到双倍的数据;crop_size 表示将数据裁剪到一个固定的大小;mean_file 是均值文件,用于标准化
- data_param:对数据源的配置,其中 source 是数据源路径,batch_size 是每次训练的图片数量,backend 是数据源的格式
- hdf5_data_param:如果使用的是hdf5格式数据,可用于多标签数据
- image_data_param:如果直接使用图像数据,在该参数里要包括一个 source: “list.txt”,txt文件的内容是图片的路径+空格+图片标签
- python_param{}:包括 module,layer,param_str。
- module:表示自定义的layer的python代码(也就是py文件名,但不要加后缀py),这个文件需要和网络模型定义文件prototxt在同一目录下,在这里不要加后缀py
- layer:是python代码中的类名
- param_str:用于传递自定义的变量,字符串类型
- include{}:表示这一层所用的阶段,一般是 TRAIN 或 TEST,也就是有TRAIN标识的层只在训练时用,TEST也一样
定义数据层:
在 train.prototxt 文件中定义数据层(VGG16模型的部分代码)
name: "VGG16"
layer {
  name: "data"
  type: "Data"  #输入的数据类型
  top: "data"
  top: "label"
  include {
    phase: TRAIN
  }
  #数据预处理,来增强数据
  transform_param {
    mirror: true
    crop_size: 224
    mean_value: 103.939
    mean_value: 116.779
    mean_value: 123.68
  }
  data_param {
    source: "data/ilsvrc12_shrt_256/ilsvrc12_train_leveldb"  #数据库文件路径
    batch_size: 64  #网络单次输入数据数量
    backend: LEVELDB  #选择使用LevelDB还是LMDB
  }
}
自定义数据层:
layer{
    name: "data"   #层的名字,可以随便取
    type: "Python" #类型为python时需要caffe开启python layer的支持,即在caffe的Makefile.config中去掉WITH_PYTHON_LAYER=1
    top: "data"    #该层的输出,在数据层中,至少要有一个名为data的top
    top: "label"   #该层的输出,且可以有多个
    python_param{
        module: "my_data_layer"
        layer: "ImageDataLayer"
        param_str:"{\'source\':\'../data/preproc/data/112/landmark_aug.txt\', \'batch_size\':384, \'shuffle\':True, \'size\':(112,112)}"
    }
    include: {phase: TRAIN}
}

layer{
    name: "data"
    type: "Python"
    top: "data"
    top: "label"
    python_param{
        module: "my_data_layer"
        layer: "ImageDataLayer"
        param_str:"{\'source\':\'../data/preproc/data/112/landmark_aug.txt\', \'batch_size\':384, \'shuffle\':False, \'size\':(112,112)}"
    }
    include: {phase: TEST}
}
Q1:为什么要使用均值文件?
可以减少图像波动
Q2:用均值文件生成的均值和自己计算的均值有什么不一样?
使用 imageNet 数据集的均值文件,由于 imageNet 的数据量非常大,所以它的均值具有一定代表性,可以使用它来表示我们数据集的均值
Q3:各个数据源格式有什么不同?
- lmdb格式用于处理单标签的数据集,如图片分类任务,每个图片只有一个分类,所以标签只有一个
- hdf5格式用于处理多标签的数据集,如人脸关键点,人脸的关键点有很多个,所以必须有多个标签来表示
- 直接调用图片:由于系统做IO计算是一件非常慢的事,所以直接用图片,会严重拖慢训练速度,所以训练时一般不使用直接调用图片的方式
Q4:batch 有什么用?
批次表示每次训练时,一次性调用多少张图像。调用的图像越多,训练的结果越具有代表性,但是同时对显存(如果使用的是GPU)的要求越大,如果批次的数量过大,超过系统的最大显存,可能会导致运行报错。
1.2 卷积层
层类型(type):Convolution
layer {
  bottom: "data"
  top: "conv1_1"
  name: "conv1_1"
  type: "Convolution"
  param {
    lr_mult: 1
    decay_mult: 1
  }
  param {
    lr_mult: 2
    decay_mult: 0
  }
  convolution_param {
    num_output: 64
    pad: 1
    kernel_size: 3
    weight_filler {
      type: "gaussian"
      std: 0.01
    }
    bias_filler {
      type: "constant"
      value: 0
    }
  }
}
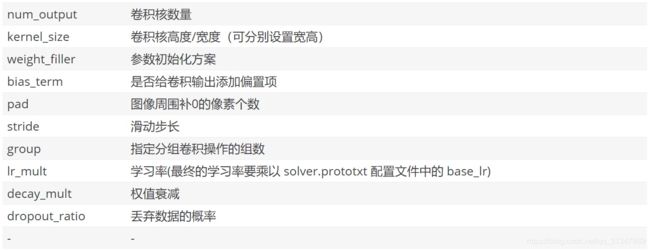
- dropout_ratio 和 decay_mult 用于防止数据过拟合
卷积层必须设置的参数:
- num_output:卷积核个数
- kernel_size:卷积核的大小,如果卷积核的长和宽不等,需要用 kernel_h 和 kernel_w 分别设定
其他参数含义说明:
- param{lr_mult}:第一个 lr_mult 表示参数(权重)的学习率,学习率其实还要乘 solver.prototxt 中的 base_lr,第二个 lr_mult 表示偏置的学习率,也要乘 base_lr。一般偏置的学习率设置为参数学习率的两倍,能够加速收敛。另外 decay_mult 为衰减系数
- convolution_param{}:用于定义卷积层的参数
- num_output:输出通道数,即卷积核的个数
- kernel_size:卷积核大小,只定义kernel_size时它的宽高相同,如果不同就要分别设置kernel_h,kernel_w
- stride:步长,默认为1,也可以用stride_h和stride_w来设置
- weight_filler{type}:权重初始化方式,type可以取gaussian(高斯初始化),也可以用xavier、constant;std高斯分布的标准差
- bias_filler{type}:偏置初始化方式,设置为constant时表示为常量初始化,默认为0,可以通过value来指定常量初始化的值
- pad:填充值,默认为0
1.3 池化层
为了减少运算量和数据维度而设置的一种层。
层类型(type):Pooling
layer {
  bottom: "conv1_2"
  top: "pool1"
  name: "pool1"
  type: "Pooling"
  pooling_param {
    pool: MAX
    kernel_size: 2
    stride: 2
  }
}
- 池化方式:Max-最大池化,AVE-均值池化,STOCHASTIC-随机池化
池化层必须设置的参数:
- kernel_size:池化的核大小,也可以用kernel_h和kernel_w分别设定
其他参数含义说明:
- pooling_param{}:容纳池化层的各项参数
- pool:池化方式,比如 MAX 为最大池化
- kernel_size:池化核的大小
- stride:池化步长
- pad:填充值,默认为0
1.4 激活层
在激活层中,对输入数据进行激活操作(实际上就是一种函数变换),是逐元素进行运算的。从bottom得到一个blob数据输入,运算后,从top输入一个blob数据。在运算过程中,没有改变数据的大小,即输入和输出的数据大小是相等的。
常用的激活函数有sigmoid,tanh,relu 等。
layer {
  bottom: "conv2_2"
  top: "conv2_2"
  name: "relu2_2"
  type: "ReLU"  #常用激活函数,除此之外还有Sigmoid
}
1.5 全连接层
layer{
    name: "landmark_pred"
    type: "InnerProduct"
    bottom: "prelu5"
    top: "landmark_pred"
    param{
        lr_mult: 1
    }
    param{
        lr_mult: 2
    }
    inner_product_param{
        num_output: 254
        weight_filler:{
            type: "xavier"
        }
        bias_filler{
            type: "constant"
        }
    }
}
参数含义信息:
- inner_product_param{}:容纳全连接层的参数
1.6 损失函数层
# Softmax loss
# 多分类问题
layer {
  bottom: "fc8"
  bottom: "label"
  top: "loss"
  name: "loss"
  type: "SoftmaxWithLoss"
}
# SigmoidCrossEntropyLoss
# S形交叉熵损失,用于目标概率分布和多标签多分类任务,各概率相互独立
layer {
	name:"loss"
	type:" SigmoidCrossEntropyLoss"
	bottom:"loss3/classifier"
	bottom:"label"
	top:"loss"
}
# EuclideanLoss
# 欧式距离损失,适用于实数值回归问题
layer {
	name:"loss"
	type:" EuclideanLoss "
	bottom:"loss3/classifiersigmoid"
	bottom:"label"
	top:"loss"
}
layer{
    name: "landmark_loss"
    type: "Python"
    top: "landmark_loss"
    bottom: "landmark_pred"
    bottom: "label"
    python_param{
        module: "wing_loss_layer"
        layer: "WingLossLayer"
        param_str : "{\'w\':1.0, \'eplison\':0.2}"
    }
    # set loss weight so Caffe knows this is a loss layer.
    # since PythonLayer inherits directly from Layer, this isn't automatically
    # known to Caffe
    loss_weight: 1
}
- 最后加上了 loss_weight 参数,否则会不收敛
自定义 Loss 代码:
import caffe
import numpy as np

class WingLossLayer(caffe.Layer):
    def setup(self, bottom, top):
        if len(bottom) != 2:
            raise Exception("Need two bottom for WingLossLayer")
        params = eval(self.param_str)
        self.w = params['w']
        self.eplison = params['eplison']

    def reshape(self, bottom, top):
        if bottom[0].count != bottom[1].count:
            raise Exception("Inputs must have the save dimension")
        self.diff = np.zeros_like(bottom[0].data, dtype=np.float32)
        top[0].reshape(1)

    def forward(self, bottom, top):
        #tag,need reshape bottom[0] and bottom[1],maybe lmdb don't need

        self.diff = bottom[0].data - bottom[1].data

        idx = np.abs(self.diff) < self.w
        idx1 = np.abs(self.diff) >= self.w

        top[0].data[...] = (\
            np.sum(self.w * np.log(1.0/self.eplison * np.abs(self.diff[idx]) + 1.)) +\
             np.sum(np.abs(self.diff[idx1]) - (self.w - self.w * np.log(1.0 + self.w/self.eplison)))\
             ) / bottom[0].num

    def backward(self, top, propagate_down, bottom):
        idx0 = (0. < self.diff) & (self.diff < self.w)
        idx1 = (-self.w < self.diff) & (self.diff < 0.)
        idx2 = self.diff >= self.w
        idx3 = self.diff <= -self.w
        #print "idx2"

        for i in range(0,2):
            if not propagate_down[i]:
                continue
            if i == 0:
                sign = 1
            else:
                sign = -1

            bottom[i].diff[idx0] = sign * 1.0 * (self.w / (1. + 1.0/self.eplison * np.abs(self.diff[idx0]))) / bottom[i].num
            bottom[i].diff[idx1] = sign * (-1.0) * (self.w / (1. + 1.0/self.eplison * np.abs(self.diff[idx1]))) / bottom[i].num
            bottom[i].diff[idx2] = sign * 1.0 / bottom[i].num
            bottom[i].diff[idx3] = sign * (-1.0) / bottom[i].num
1.7 BN层
Caffe的BN层由 BatchNorm 层和 Scale 层组成。BatchNorm 减均值,Scale 层除方差。示例如下:
layer{
    name: "conv1/bn"
    type: "BatchNorm"
    bottom: "conv1"
    top: "conv1/bn"
    batch_norm_param{
        moving_average_fraction: 0.997
        eps: 1e-3
    }
}
layer{
    name: "conv1/scale"
    type: "Scale"
    bottom: "conv1/bn"
    top: "conv1/scale"
    scale_param{
        bias_term: true
    }
}
1.8 Dropout层
防止模型过拟合;训练模型时,随机让网络某些隐含层节点的权重不工作。
layer{
    name:"drop7"
    bottom:""
    top:""
    dropout_param{
        dropout_ratio:0.5 # 杀死50%的神经元
    }
}
1.9 准确率层
layer{
	name:"pro"
	type:"Softmax"
	bottom:"ip"
	top:"pro"
}
2. solver.prototxt 文件
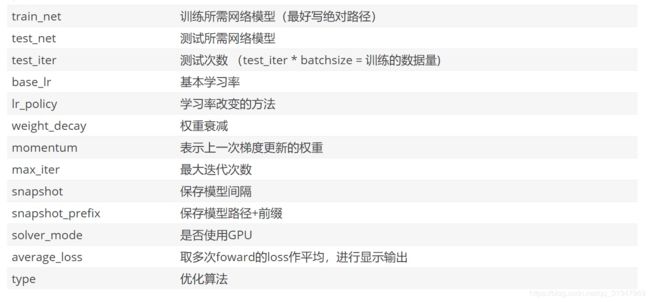
Caffe 模型的训练参数在 solver.prototxt 文件中,该文件是 caffe 的核心,它交替调用前向算法和反向传播算法来更新参数,使 loss 的值达到最小。
net: "landmark.prototxt"
test_iter: 100
test_interval: 500
base_lr: 0.0001
momentum: 0.9
momentum2: 0.999
type: "Adam"
lr_policy: "fixed"
display: 100
max_iter: 30000
snapshot: 5000
snapshot_prefix: "../../checkpoint/caffe"
solver_mode: GPU
执行训练:caffe.bin train --solver=solver.prototxt -gpu
net: "train_val.prototxt"
test_iter: 833
# make test net, but don't invoke it from the solver itself
test_interval: 1000
display: 200
average_loss: 100
base_lr: 1e-5
lr_policy: "step"
gamma: 0.1
stepsize: 5000
# lr for unnormalized softmax -- see train_val definition
# high momentum
momentum: 0.9
# no gradient accumulation
clip_gradients: 10000
iter_size: 1
max_iter: 80000
weight_decay: 0.02
snapshot: 4000
snapshot_prefix: "weight/VGG_item"
test_initialization: false
- “fixed”:固定学习速率,始终等于base_lr
- “step”:步进衰减,base_lr*gamma^(floor(iter/stepsize))
- “exp”:指数衰减,base_lr*gamma^(iter)
- “inv”:倒数衰减,base_lr*(1+gamma*iter)^(-power)
- “multistep”:多步衰减,与步进衰减类似,允许非均匀步进值(stepvalue)
- “ploy”:多项式衰减,在max_iter时达到0,base_lr*(1-iter/max_iter)^(power)
- “sigmoid”:S形衰减,base_lr*(1/(1+exp^(-gamma*(iter-stepsize))))
参考:
Caffe学习系列(2):数据层及参数
caffe网络模型各层详解
Caffe学习系列(10):命令行解析
Caffe 网络在线可视化工具:http://ethereon.github.io/netscope/#/editor


