distributed tensorflow - tensorflow dev summit 2017
整理自tensorflow dev summit 2017- distributed tensorflow-YouTube视频,文字来自于英文字幕。
如何利用低级别API实现使用分布式tensorflow。
目标
1)模型的replica
2)如何把变量放在不同device上
3)session和server
4)fault tolerance容错
单机和多机简单对比
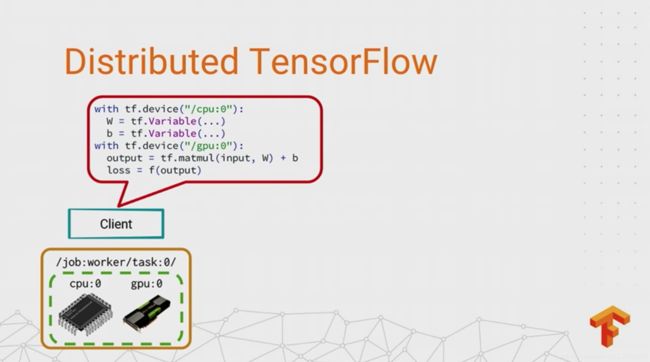
展示tensorflow如何从单机到分布式。
在单机时,通过tf.device把graph拆分到不同的device上,机器自动完成子图的训练。
I’m going to show you how the core concepts you might be used to in single-process TensorFlow translate to the distributed world. I’ll give you some ideas for how to deal with the complexity that ensues. So I just claimed that distributed TensorFlow has a minimalist core. What did I mean by that? Well, let’s say I’ve got just one computer, and it’s got a GCPU device and a GPU device in it. And if I want to write a TensorFlow program to use these devices, I can put these little with_tf.device annotations in my code, so that for this example, the variables go on the CPU, and the math goes on the GPU, where it’s going to run faster. Then, when I come to run this program, TensorFlow splits up the graph between the devices and it puts in the necessary DNA between the devices to run it for me.
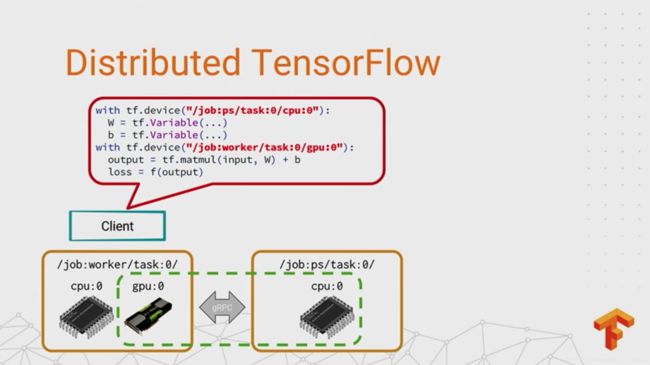
对于多机情况,把graph拆分到不同机器上对于开发者来说是透明的,只是在声明tf.dervice的时候名字稍微不同,不同机器之间通过gRPC通信交换tensor。
So what happens if you have multiple machines? Let’s say, for reasons that will become apparent later, that we want to take those variables and put them on the CPU device of a different process. Well, TensorFlow treats the remote devices exactly the same as the local ones. All I have to do is add just a little bit of information to these device names, and the runtime will put the variables in a different process, splitting up the graph between the devices in the different processes and adding the necessary communication. In this case, it will be using GRPC to transfer tensors between the processes instead of DNA from the GPU device. So there you have it. Using distributed TensorFlow is just a simple matter of getting all of your device placements exactly right. And yeah, I heard a wry chuckle. Yeah, I’m sure you know exactly how easy that can be, if you’ve ever written a TensorFlow program.
graph replication
in-graph replication和between-graph replication是tensorflow中两个关于分布式的重要概念,是接近数据并行data parallel分布式训练的两种模型执行方式,其中对于实践来说,between-graph replication又是面对大规模机器训练更有扩展性的方式。
in-graph replication
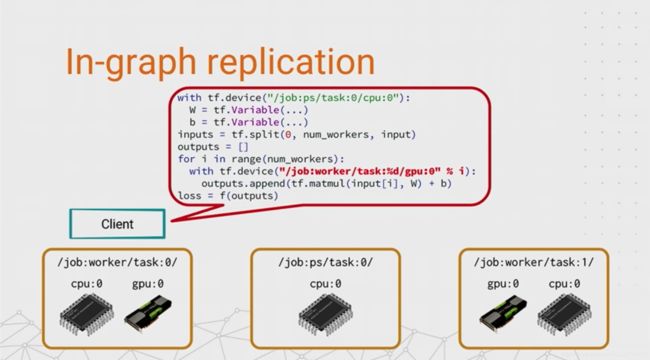
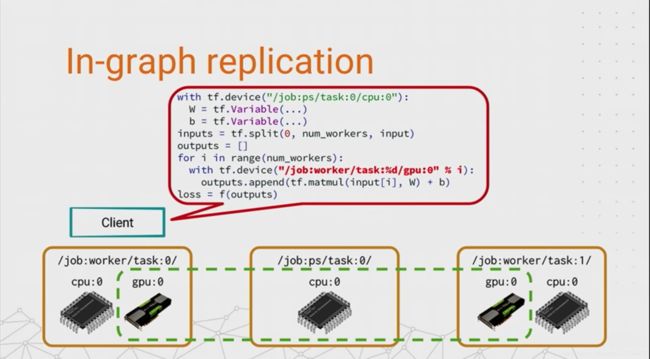
So the first idea that works pretty well for distributed training, particularly when a single model will fit in a single machine, is replication. So just like in DisBelief, we take the compute-intensive part of the model training, the forwards and the backprop, and we make a copy of it in multiple worker tasks, so that each task works on a different subset of the data. This is data parallel training, like we were doing for that Inception example back at the start.
And the simplest thing, simplest way we can achieve this is by doing something I’m going to call in-graph replication. The reason for this name will hopefully become self-explanatory when I-- or maybe just explanatory when I tell you what the code does.
- We start by putting the variables on a PS task, like the earlier example. And this is just so that they’re in a central location that they can be accessed by all of the workers.
- And then the easiest way to do the in-graph replication is just to split up a batch of input data into equal-sized chunks, loop over the worker tasks, and use this tf.device string here to put a subgraph on each worker to compute a partial result.
- And then finally, we combine together all of the partial results into a single loss value that we optimize by using a standard TensorFlow optimizer. And sure enough, when you tell it to compute the loss, TensorFlow will split up the graph across the workers, and it will run across these worker tasks and the PS all in parallel.
So in-graph replication is pretty easy to achieve. It’s not a big modification to your existing programs. And it works pretty well up to a small number of replicas. If you want to replicate across all the GPUs in a single machine, then maybe in-graph replication is the way to go. But one of the things we found out when we tried to apply this technique to a large model like Inception_V, and we tried to scale it up to a couple of hundred machines, was that this graph gets really big if you have to materialize all the replicas in it. And the client gets bogged down trying to coordinate the computation and to build this whole graph.
between-graph replication
And that’s why we came up with an alternative approach, which is called between-graph replication. This is currently what we use most internally. It’s what we recommend in Cloud ML. And it’s also what our high-level APIs are designed to do. So if you’ve ever written an NPI program, between-graph replication should be a kind of familiar concept.
So instead of running one all-powerful client program that knows about all of the worker replicas, we run a smaller client program on each task. And that client program just builds up the graph for a single replica of the model. And this client program is essentially doing the same thing, with one key difference in the device placement. So it takes kind of the non-parameter part of the graph and it puts it on the local devices, or the devices that are local to that worker replica. And so now when you run it, each program is running its smaller graph independently, and they get mapped to different subsets of the devices that intersect on the PS task in the middle. There’s a little bit of magic here which I should probably explain, in the interest of full disclosure. So each replica places its variables on the same PS task. And when you’re running in distributed mode, by default, any two clients that create a variable with the same name on the same device will share the same backing storage for that variable. And if you’re doing replicated training, this is exactly what you want. So the updates from task when it’s applying its gradients, will be visible in task and vice versa. So you’ll train faster. But this brings us to another issue, which is how do you decide where to put the variables?
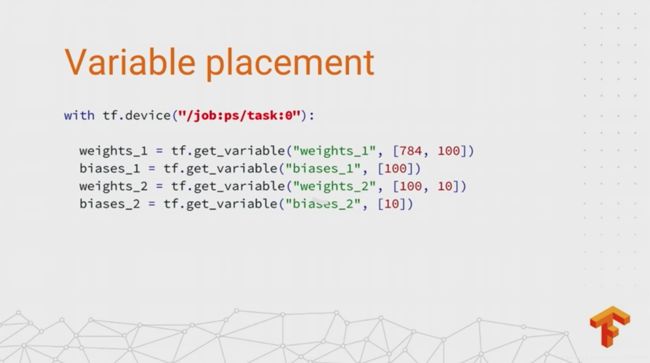
variables placement
round-robin variables
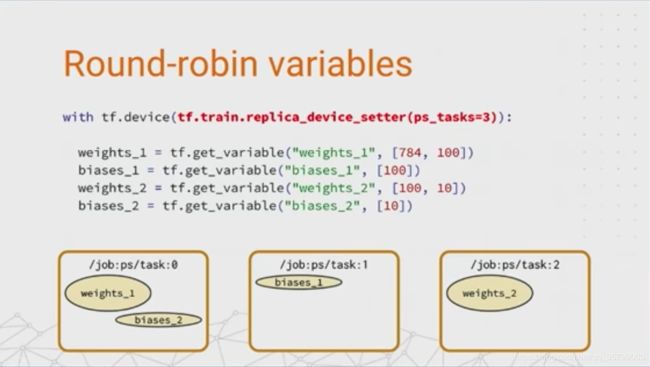
So far, I’ve just been putting them on job PS task and setting that as the explicit device string for the variables. But device strings, you know, they’re all very good if you want to put all of your ops in one particular location. But you often want to do things like have more than one PS task, say if you want to distribute the work of updating the variables or distribute the network load of fetching them to the workers. So instead of passing a device string to tf.device, you can also pass a device function. And we use these to build more complicated, more sophisticated placement strategies. Device functions are pretty general, very powerful. They let you basically customize the placement of every single op in the graph. That makes them a little bit tricky to use. So one of the things we’ve done is to provide a few pre-canned device functions to make your life a bit easier. And the simplest of these is called tf_train_replica_device_setter. And its job is to assign variables to PS tasks in a round-robin fashion as they’re created. One nice thing about this device function is you can just wrap your entire model building code in this with block. It only affects the variables, puts them on PS tasks. And the rest of your ops in the graph will go on a worker. So if you’re doing between-graph replication, this takes care of it all for you. So for this program, it will assign devices to the parameters as they’re created. So the first weight matrix will go on task 0. A bias vector will go on task 1. The second weight’s on task 2. And then the second bias is back on task 0.
load balancing variables
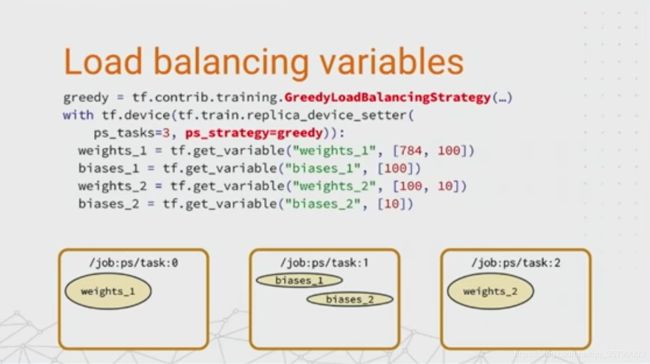
This is obviously not an optimal balanced load for these variables, neither in terms of the memory usage or the amount of work that would need to be done to update these variables. And just think, if we only had two PS tasks here-- I guess I should have drawn a diagram-- we’d end up with an even worse case, because all the weights would be on task 0, and all the biases would be on the other. We’d have an even bigger imbalance between those tasks. So clearly, we can do better here. And one of the ways that we’ve provided to achieve a more balanced load is to use something called a load balancing strategy. And this is an optional argument to the replica device setter. Right now we only have, I think, a simple greedy strategy that does a kind of online bin packing based on the number of bytes in your parameters. And it leads to this more balanced outcome. Each of the weight matrices is put on a separate PS task, and the biases get packed together on task 0. It’s a lot more balanced, and this should give you a lot better performance.
partitioned variables
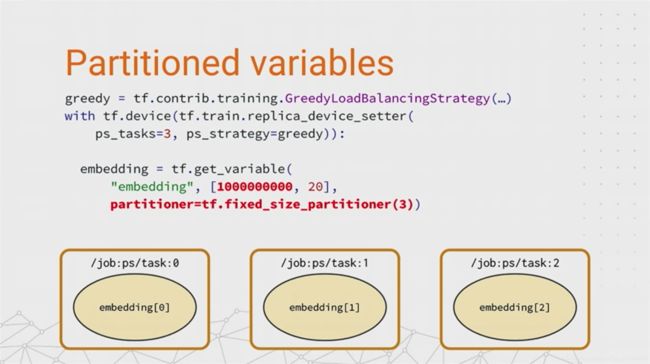
And so far, I’ve only talked about relatively small variables that all fit in a single task. But what about these outrageously large model parameters, things like the large embeddings that might be tens of gigabytes in size? Well, to deal with these, we have something called partitioners. They do exactly what it sounds like they would do. If you create a variable with a partitioner, like this one here, TensorFlow will split the large logical variable into three concrete parts and assign them to different PS tasks. And one nice thing about doing things this way is if you take that embedding variable and then you pass it to some of the embedding-related functions, like embedding look-up, for example, it will take advantage of the knowledge about the fact that it’s going to be partitioned, and it will offload some of the embedding look-up computation and the gradients to the parameter server devices themselves.
variables summary
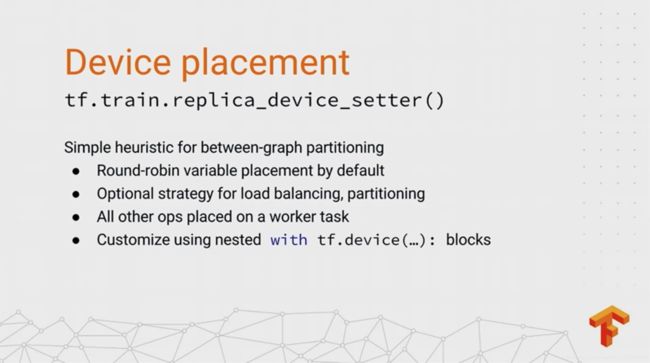
All right. That was a lot of detail about device placement. But it is a very big topic. I guess you could say it’s a combinatorially large problem domain that we have to solve. The main thing I want you to take away is that the tf_train_replica_device_setter is this simple heuristic that works for a lot of distributed training use cases. And you can customize it if you need to by providing these optional strategies for things like load balancing and partitioning, or even writing your own device functions that override the simple policies we provide. And this is definitely an area where we’re always on the lookout for new and better device placement policies. So if you do end up implementing your own and you think it might be generally useful, we really encourage you to send it as a pull request, and we can add it to the set of tools that people have to make their lives easier.
sessions and servers
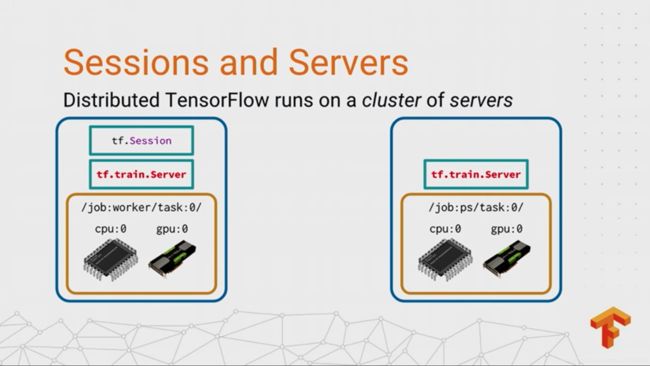
All right. So you’ve built your graph. You’ve got all of the devices set. And now you want to go ahead and run it. But when you create a TensorFlow session using code like this, that session will only know about the devices in a local machine. And let’s say you have computers sitting idle over there. How do you make it use those computers? The answer is that you create this thing called a TensorFlow server in each of those machines. And you configure those servers in a cluster so that they can communicate over the network.
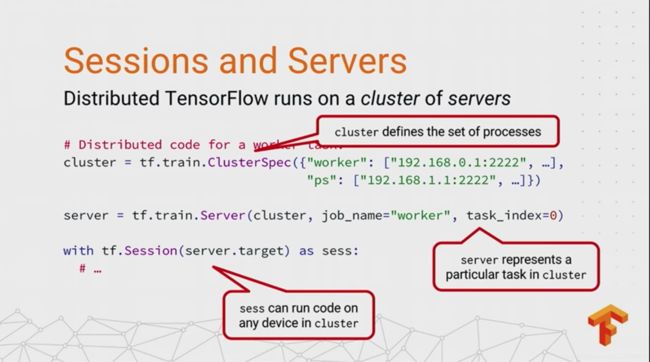
Now, looking at it in more detail, the first thing we need to do is to provide a cluster spec. This is something that tells TensorFlow about the machines that you want to run on. A cluster spec is really just a dictionary that maps the names of jobs-- so that’s things like worker and PS, in this example-- to a list of one or more network addresses that correspond to the tasks in each job. Now, we don’t actually expect you to type in all of these addresses by hand. It gets kind of error prone. But in the next talk, Jonathan’s going to be showing you how a cluster manager like Kubernetes or Mesos will do this for you. And if you’re using a cluster manager, internally we use a cluster manager called Borg that a lot of this stuff was inspired by.
So typically, your cluster manager will run an instance of your program on each machine in the cluster, giving it the same cluster spec. And then it’ll start a TensorFlow server in each program. It’ll pass it a particular job name and task index that matches the address of the local machine in that cluster. And then finally, when you create your session, you specify the local server’s address as the target, which is what enables it to connect through that server to any of the machines mentioned in the cluster spec. And then you’re good to go. So your session run call can run code on any device in the entire cluster. And typically, what the worker will do is it’ll start a training loop that just iterates over its partition of the data, running a training op over and over again. OK. So that’s what a worker looks like.
ps tasks
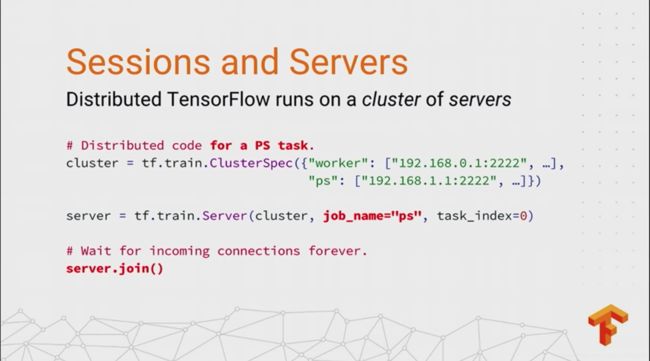
PS task is much simpler. So PS tasks simply-- they have basically no client code. They just respond to incoming bits of graph that are sent to them by other workers. So in this case, you just build the server. You say it’s job name PS. And then you call join on the server. And all that does is it blocks waiting for connections to come in from other nodes in the cluster. And actually, it’s a bit weird. So I deal with a lot of questions on stack overflow. And one of the common ones is, can you show me where in the implementation of server.join the parameter server code lives? And if you go and look at it, it’s like, five, lines of C++. It just does some error checking, and then it blocks on a couple of threads. It joins a couple of threads. That’s why it’s called join. But it’s a reasonable misconception, because this is your PS task. Well, what’s that actually doing? Well, this highlights something quite important about how distributed TensorFlow works. So parameter servers, everything, all the behavior of a parameter server, is not implemented at the low level in these servers or in the execution engine, but instead it’s built out of TensorFlow programming primitives, as these little bits of data flow graph that a worker ships to a server to say, manage some parameters for me and update them this way. And that, representing the way we program the parameter servers as little fragments of data flow graph, is what gives us the flexibility. So unless you change everything about how parameter management is implemented, if you want to customize the optimization algorithm, or maybe change the synchronization scheme for applying the updates, you can do that just by changing the graph. And we’ve gained a lot of performance by doing that in some of our algorithms.
Fault tolerance
save models

All right. So now that your servers are listening, your sessions are all created, and your training loop is running, are we done? Well, whenever you run some long-running training job on a set of machines, I hope you take the wise words of Leslie Lamport to heart, and always use a saver in any long-running training process.
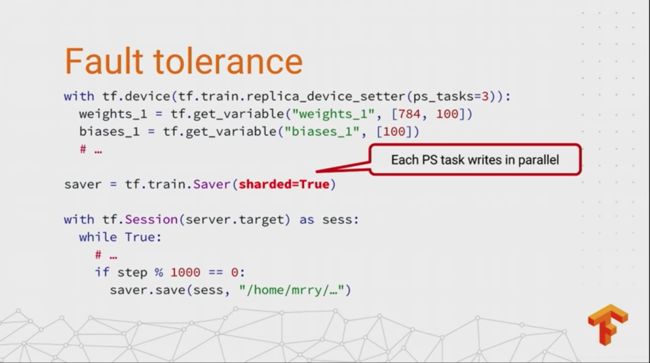
So a saver, for those of you who haven’t seen that before, is just what you use to write out a checkpoint of your model parameters to disk. The same saver can be used for local and distributed training, but it has a couple of useful features in distributed mode that I want to highlight.
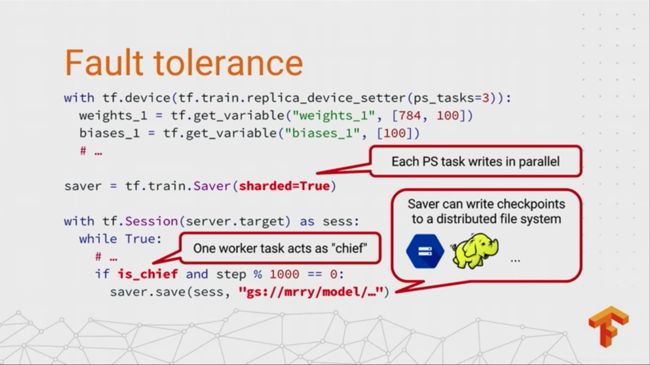
The first one is that you’ll almost certainly want to set sharded equals true when you create your saver. So in this example, we have three PS tasks, and so sharded equals true tells TensorFlow, write the checkpoint in three shards, each containing all the variables from one particular parameter server. And that means that the parameter servers can write directly to the file system, and we don’t have to collect all of the values in one place in order to write them out. So actually the default behavior is kind of pessimal, because if you set sharded equals false, it will bring all of the variables into one save op, meaning they have to be materialized in memory at one process before it writes the first byte. And if you have these really big models, well, that’s a sure way to have a memory error. So always use sharded equals true. That’s if you remember one thing.
OK, second, if you are using between-graph replication, you now have a choice of several worker tasks that could be responsible for writing this checkpoint. And by convention, we give some extra responsibilities to worker task 0. We just picked that because there’s always a worker task in our jobs, because that’s where the numbering starts. And we call it the chief worker. And so the chief worker has a few important maintenance tasks that it has to carry out, doing things like writing checkpoints, in this case. Also things like initializing the parameters at the start of day and logging summaries for TensorBoard. These are all done by the chief.
And then the last thing to note is that savers now support a variety of distributed file systems. So instead of writing to a local file, you can write to Google Cloud Storage, let’s say if you’re running on Cloud ML. Or if you’re running on top of a Hadoop cluster, you can write straight to HDFS. And using a distributed file system here is a smart idea, because it gives you more durable storage. You’re not going to lose your model checkpoints if one of the machines goes on fire. It also makes it easier to read a checkpoint from another machine. So one common pattern we use is we have a separate evaluation task that’s running on a separate machine, and it just goes and picks up the latest checkpoint of the model and evaluates the test set on that. So this makes that kind of loosely-coupled coordination a bit easier.
fault tolerance
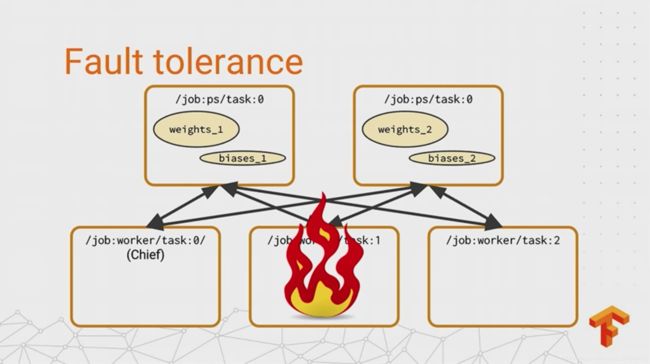

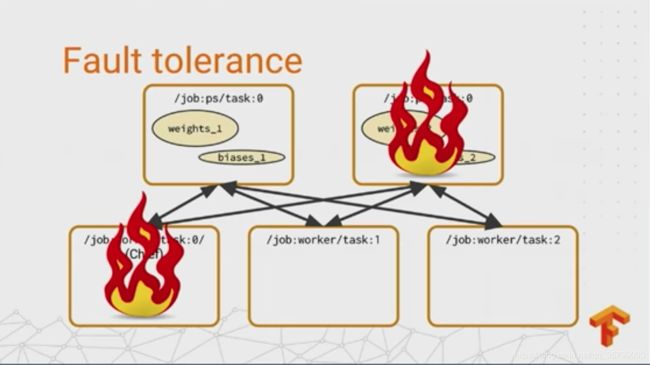
All right. So you’re writing checkpoints now. That’s a good step. That guards against failure. But what actually happens when you experience a fault? In the best case-- there are a few cases to consider. And the best case is that one of your non-chief workers fails. And the reason this is the best case is because these workers are typically sort of effectively stateless. So when a non-chief worker comes back up, all it has to do is contact all the PS tasks again and carry on as if nothing happened. And usually we have a cluster manager that will restart a failed process as soon as it crashes.
If a PS task fails, that’s a little worse, because PS tasks are stateful. All the workers are relying on them to send their gradients and get the new values of the parameters. So in this case, the chief is responsible for noticing the failure. It interrupts training on all of the workers, and restores all the PS tasks from the last checkpoint. The trickiest case is when the chief fails, because we’ve given it all of these extra responsibilities, and we need to make sure that we get back to a good state when it comes back up. So training could continue when the chief is down, but when it comes back up, we don’t know if, for example, another task has failed. So it has to go and restore bits from the last checkpoint. So the thing we do is just to interrupt training when the chief fails. And when it comes back up, we restore from a checkpoint, just like a parameter server fails. This is a pretty simple and a pretty conservative scheme. And it only really works if your machines are reliable enough that they aren’t failing all the time. And it keeps the logic for recovery really, really simple. But depending on how common failures are in your cluster environment, maybe it would be beneficial to use a different policy that tries to keep the training job running without interruption. And I just want to sort of provoke some thinking here. One thing you could do is maybe use a configuration management server, something like Apache ZooKeeper or Etcd, to choose a chief by leader election, rather than saying it always has to be worker 0. And then if you did that, you could pass on the responsibility of being a chief when one of them fails, and kind of do a failover without interrupting the training process. If somebody wanted to try that out and contribute it back, that would be just great.
MonitoredTrainingSession
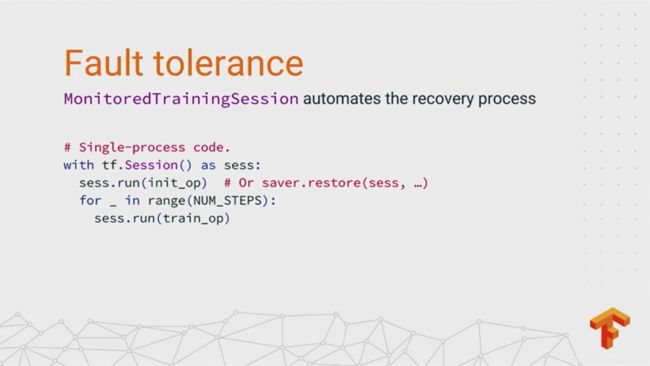
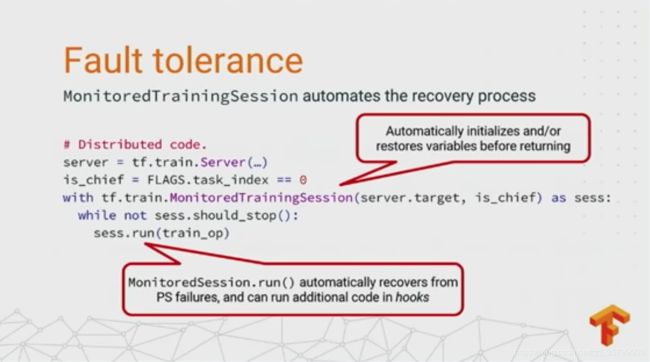
But if you do like that simple policy, we’ve got something for you. So you can use this recently added MonitoredTrainingSession class to automate the recovery process. So going back to our simple, single-process example, when you create a TensorFlow session, usually what you do is you explicitly initialize the variables, or restore them from a checkpoint, before you start training. And MonitoredTrainingSession looks a lot like a regular tf session,
but you’ll see that it kind of takes a little bit more information in its constructor-- needs to know if it’s the chief or not, needs to know what server you’re using. And you’ll note that there’s no init op in the program anymore. Instead, what the MonitoredTrainingSession is going to do is it will automatically ensure that all of the variables have been initialized either from their initial values, like the randomly initialized variables, or by restoring them from the latest checkpoint if one is available, before it returns control back to the user.
And it does something slightly different depending on if you’re the chief or not. So if you’re the chief, it’s going to go and look and see if there is a checkpoint, or it’s going to run the initializers. If you’re not the chief, it just sits there waiting until the chief does its work. And then as soon as it’s done, it can carry on running the training loop. There’s a lot of potential for customization here. So we support these installable hooks that you can attach either when you create the session or before or after doing a session run call.
And the MonitoredTrainingSession is sort of a tastefully curated set of these hooks that makes distributed training a bit easier. So it comes with standard hooks for writing a checkpoint every minutes, writing summaries every steps. And if you want to, you can customize its behavior by adding more hooks or replacing the ones that are there.