能力提升【框架】-- SpringBoot 整合Mybatis 无XML版
SpringBoot 整合Mybatis 无XML版
宗旨
本文介绍SpringBoot整合Mybatis,简单实现分页和返回自增主键功能。旨在提升自升能力,同时,对阅读本文的小伙伴提供一定帮助,有错误的地方欢迎指出。如有转载,请标明原文地址。
博客连接:https://blog.csdn.net/qq_36248731,原创文章持续更新中,欢迎大家阅读、评论、收藏、转发。生命不息,学习不止!
环境
- JDK 1.8
- MySql 5.7
- SpringBoot项目
工具
- IDEA 2019
- Navicat
目录结构
MAVEN依赖
 <!--    springboot starter-parent自动找到最合适的版本 因此不用加version
                    starter-web 提供了MVC AOP等常用的包-->
        <dependency>
            <groupId>org.springframework.boot</groupId>
            <artifactId>spring-boot-starter-web</artifactId>
        </dependency>

        <!--            添加mysql 依赖-->
        <dependency>
            <groupId>mysql</groupId>
            <artifactId>mysql-connector-java</artifactId>
        </dependency>
        <!-- mysql 数据库驱动. -->
        <dependency>
            <groupId>mysql</groupId>
            <artifactId>mysql-connector-java</artifactId>
        </dependency>

        <!--
			spring-boot mybatis依赖:
			请不要使用1.0.0版本,因为还不支持拦截器插件,
	     -->
        <dependency>
            <groupId>org.mybatis.spring.boot</groupId>
            <artifactId>mybatis-spring-boot-starter</artifactId>
            <version>2.0.1</version>
        </dependency>

        <!--
    	MyBatis提供了拦截器接口,我们可以实现自己的拦截器,
    	将其作为一个plugin装入到SqlSessionFactory中。
		Github上有位开发者写了一个分页插件,我觉得使用起来还可以,挺方便的。
		Github项目地址: https://github.com/pagehelper/Mybatis-PageHelper
     -->
        <dependency>
            <groupId>com.github.pagehelper</groupId>
            <artifactId>pagehelper</artifactId>
            <version>4.1.0</version>
        </dependency>
整合Mybatis
1. Demo类
public class Demo {
    private long id;

    private String name;

    public long getId() {
        return id;
    }

    public void setId(long id) {
        this.id = id;
    }

    public String getName() {
        return name;
    }

    public void setName(String name) {
        this.name = name;
    }
}
2. 配置mybatis连接信息
application.properties
spring.datasource.url = jdbc:mysql://localhost:3306/test
spring.datasource.username = root
spring.datasource.password = 123456
spring.datasource.driverClassName = com.mysql.jdbc.Driver
spring.datasource.max-active=20
spring.datasource.max-idle=8
spring.datasource.min-idle=8
spring.datasource.initial-size=10
3. 配置mapper扫描
在启动类中配置@MapperScan注解,扫描指定包下的接口
@SpringBootApplication
@MapperScan("com.*.mapper")
public class App {

    public static void main(String[] args){
        SpringApplication.run(App.class, args);
    }

}
4. 编写Mapper接口【MVC开发习惯可以改成Dao】
方法上添加@Select、@Insert、@Update、@Delete注解,对应相应的sql语句。参数用#{}传入到sql语句中。
import org.apache.ibatis.annotations.Insert;
import org.apache.ibatis.annotations.Options;
import org.apache.ibatis.annotations.Select;

import java.util.List;

public interface DemoMapper {

    @Select("select * from demo where name =  #{name}")
    List<Demo> likeName(String name);

    @Select("select * from demo where id = #{id}")
    Demo getDemo(long id);

    @Select("select * from demo whre id = #{id}")
    String getName(long id);

    @Insert("insert into demo(name) values(#{name}) ")
    Integer save(Demo demo);

	@Delete("delete from demo where id = #{id}")
    Integer delele(long id);

}
5. Service层注入Mapper
import org.springframework.stereotype.Service;

import javax.annotation.Resource;
import java.util.List;

@Service
public class DemoService {

    @Resource
    private DemoMapper demoMapper;

    public List<Demo> getDemoList(String name){
        return demoMapper.likeName(name);
    }

    public Integer save(Demo demo){
        return demoMapper.save(demo);
    }

	public Integer delele(long id){
        return demoMapper.delele(id);
    }
}
6. 添加Controller
import org.springframework.stereotype.Controller;
import org.springframework.web.bind.annotation.RequestMapping;
import org.springframework.web.bind.annotation.ResponseBody;

import javax.annotation.Resource;
import java.util.List;

@Controller
@RequestMapping("/demo")
public class DemoController {

    @Resource
    private DemoService demoService;

    @ResponseBody
    @RequestMapping("/getDemoList")
    public List<Demo> getDemoList(String name){
        return demoService.getDemoList(name);
    }

    @ResponseBody
    @RequestMapping("/save")
    public Demo save(){
        Demo demo = new Demo();
        demo.setName("张三");
        demoService.save(demo);
        return demo;
    }

    @ResponseBody
    @RequestMapping("/delete")
    public Integer delete(long id){
        return demoService.delele(id);
    }

}
至此,SpringBoot整合Mybatis完成。
PageHelper分页
利用github上的pagehelper插件,实现在controller层,方法返回值前进行拦截,达到分页的目的。
1. 添加PageHelper工具类
import com.github.pagehelper.PageHelper;
import org.springframework.context.annotation.Bean;
import org.springframework.context.annotation.Configuration;
import java.util.Properties;

/**
 * @Configuration 自定义配置, 内部包含一个或多个@Bean注释的方法
 */
@Configuration
public class MybatisPageHelper {

	/**
	 * 将方法交给框架管理
	 */
    @Bean
    public PageHelper pageHelper() {
        System.out.println("MyBatisConfiguration.pageHelper()");
        PageHelper pageHelper = new PageHelper();
        Properties p = new Properties();
        p.setProperty("offsetAsPageNum", "true");
        p.setProperty("rowBoundsWithCount", "true");
        p.setProperty("reasonable", "true");
        pageHelper.setProperties(p);
        return pageHelper;
    }
}
2. 添加到Controller
 	@ResponseBody
    @RequestMapping("/getDemoList")
    public List<Demo> getDemoList(String name){
    	// 参数说明:1. pageNum:第几页; 2. pageSize:每页多少条;
        PageHelper.startPage(2, 2);
        return demoService.getDemoList(name);
    }
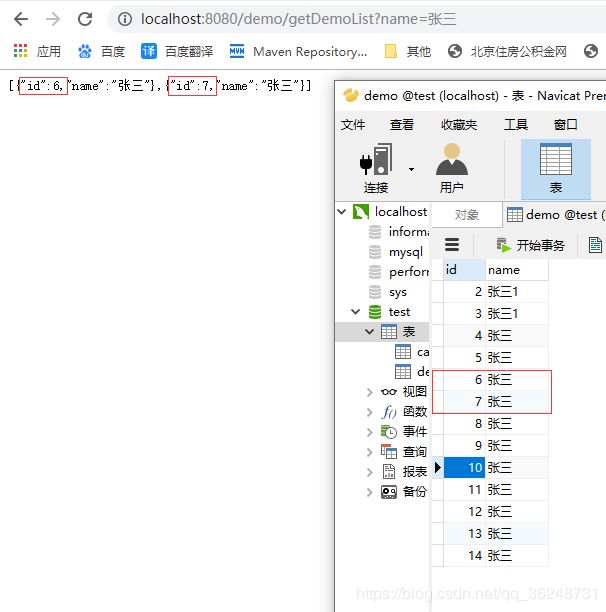
效果: id=4 id=5的数据为第一页,跳过显示第二页id=6,7的数据

获取自增长主键
在开发时,有时候需要知道当前数据插入的主键是多少。在该博文中,使用@Options注解,获取自增长的主键
1. 编辑Mapper接口
在Mapper接口的insert方法上,添加@Options(useGeneratedKeys = true, keyProperty = “id”, keyColumn = “id”)注解,该注解可以在添加操作完成后,直接访问实体类中的主键id字段,即可获取自增长的主键值。
	@Insert("insert into demo(name) values(#{name}) ")
    @Options(useGeneratedKeys = true, keyProperty = "id", keyColumn = "id")
    Integer save(Demo demo);
Controller层:
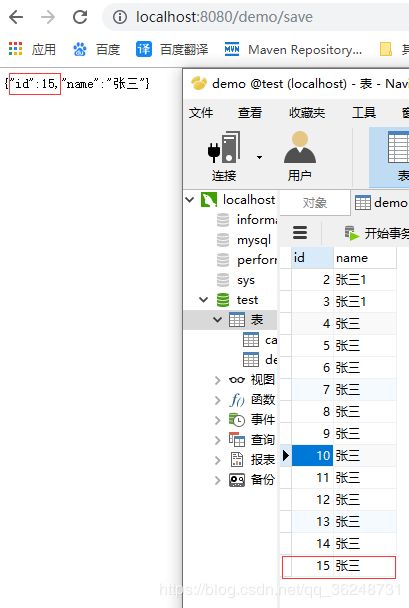
这里没有对demo对象的id做任何操作,值为null。
	@ResponseBody
    @RequestMapping("/save")
    public Demo save(){
        Demo demo = new Demo();
        demo.setName("张三");
        demoService.save(demo);
        return demo;
    }

