MobileNetV3 论文理解,以及tensorflow、pytorch相关代码
MobileNetV3论文理解,以及tensorflow+pytorch代码
- MobileNetV3相关
- 论文地址
- Block结构变化
- 算法内部微结构变化
- 网络整体结构
- 网络性能
- Tensorflow代码
- Pytorch代码
- 总结
MobileNetV3相关
大家好!MobileNet系列一直是我很感兴趣的轻量级神经网络系列,MobileNetV2曾帮我完美解决了嵌入式部署阶段算速过慢的问题。虽然现在工作中都是主用比较大型的神经网络,但一直没有放下关注MobileNet,在MobileNetV2论文发布时隔1年4个月后,最新的MobileNetV3现世了!这里就说一下MobileNetV3相对V2的改变,简单介绍一下这些 黑科技 算法细节 。
论文地址
MobileNetv1论文地址:https://arxiv.org/abs/1704.04861
MobileNetv2论文地址:https://arxiv.org/pdf/1801.04381.pdf
MobileNetv3论文地址:https://arxiv.org/pdf/1905.02244v1.pdf
没有读过v1和v2论文的同学,请戳上面的论文地址,这里只介绍v3相较于v2的变化。
相对于v2,主要有3个变化:
- block结构发生改变,在v2的bottleneck block里加入了Squeeze-and-Excitation block。
- 算法内部微结构变化,把部分relu6使用hard-swish替换,把全部sigmoid使用hard-sigmoid替换。
- 使用Platform-Aware Neural Architecture Search(NAS)来形成网络结构,并利用NetAdapt技术进一步筛选网络层结构。
Block结构变化
首先回忆一下MobileNetV2的bottleneck block结构:

接着看一下MobileNetV3的block结构:

可以很明显的看到,v3的block比v2多加入了一个Squeeze-and-Excitation(SE)结构。这里特别介绍下SE结构,在2018年年中到现在的计算机视觉算法比赛中,各路大神使用的加入了SE-block的ResNet网络结构都会比原始的ResNet网络结果最终的准确率高个1%~3%之间。SE-block起到了很好的attention效果,准确率的提升也是非常明显的。SeNet的论文地址:https://arxiv.org/pdf/1709.01507.pdf
Se-block的详细结构如下图,至于Se-block的具体详情,请不了解的同学仔细阅读上面SeNet的论文体会。

这里要特殊说一下MobileNetV3使用的SE-block,在MobileNetV3的SE-block的位置与在ResNet中是有一点不同的,这一点MobileNetV3的论文也特别提到过了:

在ResNet中的,SE-block是加载residual-block的后面,紧接着x+x’ 层,如下图

而MobileNetV3的block中SE-block是夹在dw和pw层之间,而不是紧接着x+x’ 层,如下图

算法内部微结构变化
MobileNetV3对relu6层以及SE-block中的sigmoid层也做了一些 黑科技 微调,论文中提到,他们使用了一种叫做Hard-swish和Hard-sigmoid的方法分别替换relu6层以及SE-block中的sigmoid层。公式如下: 公式中ReLU6(x+3)/6就是Hard-sigmoid公式,对于h-swish的具体解释,请阅读论文:https://arxiv.org/pdf/1710.05941.pdf
要特别注意的是,MobileNetV3中并不是所有的relu6都用h-swish替换,只是替换了网络结构后半段的relu6层。

具体哪一层使用h-swish在下面网络结构图里,有详细介绍。
网络整体结构
论文提到MobileNetV2中最后阶段的计算量过大,所以重新设计了最后阶段的网络层,如图:

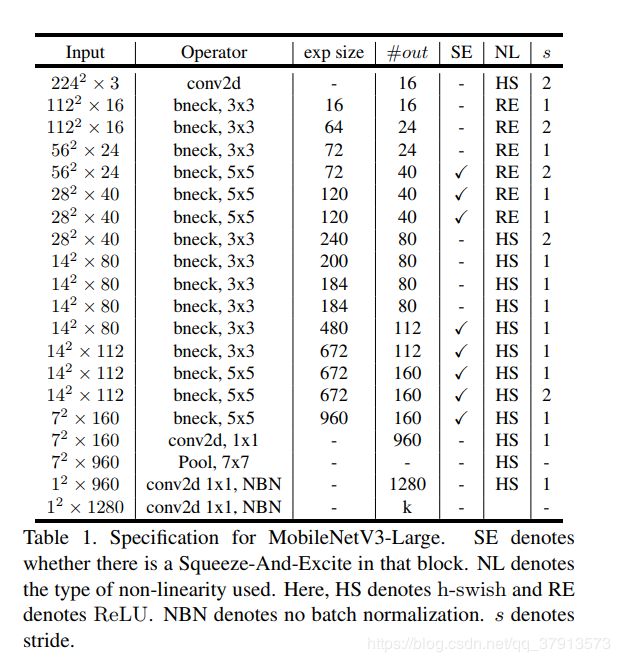
MobileNetV3的总体网络架构使用了NasNet和MnasNet的网络结构构成方法,用基于 RNN 的学习的架构控制器,然后利用了一些强化学习的技术,用算法生成出来。MobileNetV3有large和small两种网络结构,其中MobileNetV3-
Large是利用了platform-aware NAS技术得到的网络结构,结构如下图:
MobileNetV3-Small是**NetAdapt **技术生成的网络结构模型,结构如下图:

上面2个表中右数第二列“NL”列中“HS”表示使用h-swish方法,“RE”表示使用标准的relu6方法。
这里特别说一下NAS这个技术,NAS是使用算法去生成算法构架,在NasNet论文中提到了NAS的训练过程,需要非常强大硬件资源和巨量的时间才能训练出来, 所以这一块技术并不是特别“亲民”,我也只是单纯的根据论文中生成后的网路结构进行复现,并没有尝试过NAS的训练过程。如果有专业搞这一块的大神,希望可以给点实验数据,让大家可以更好的理解NAS。
NasNet论文地址:https://arxiv.org/pdf/1707.07012.pdf
MnasNet论文地址:https://arxiv.org/pdf/1807.11626.pdf
网络性能
ImageNet训练集下的性能:

在detect任务中做backbone时的性能:

在Semantic Segmentation任务中做backbone时的性能:

Tensorflow代码
这是我自己用tensorflow写的MobileNetV3,也没有实测过,可能有些小BUG,代码有引用github一位同学的mobilenetv2的片段,很久以前看到的,现在实在找不到出处了,就不贴reference了。如果原作者看到,请联系我添加reference。
模型代码我上传到我的github上了,地址:https://github.com/philipgao518/Mobilenetv3-Tensorflow
上代码 ,下面是mnv3_layers.py片段:
#coding:utf-8
#created by Philip_Gao

def hard_swish(x,name='hard_swish'):
    with tf.name_scope(name):
        h_swish = x*tf.nn.relu6(x+3)/6
        return h_swish

def hard_sigmoid(x,name='hard_sigmoid'):
    with tf.name_scope(name):
        h_sigmoid = tf.nn.relu6(x+3)/6
        return h_sigmoid

def squeeze_excitation_layer(input, out_dim, ratio, layer_name):
    with tf.name_scope(layer_name) :
        squeeze = global_avg(input)
        excitation = Fully_connected(squeeze, units=out_dim / ratio, layer_name=layer_name+'_excitation1')
        excitation = relu6(excitation)
        excitation = Fully_connected(excitation, units=out_dim, layer_name=layer_name+'_excitation2')
        excitation = hard_sigmoid(excitation)
        excitation = tf.reshape(excitation, [-1,1,1,out_dim])
        scale = input * excitation
        return scale

def mnv3_block(input, k_s, expansion_ratio, output_dim, stride, is_train, name, bias=True, shortcut=True, h_swish=False, ratio=16, se=False):
    with tf.name_scope(name), tf.variable_scope(name):
        # pw
        bottleneck_dim=expansion_ratio#round(expansion_ratio*input.get_shape().as_list()[-1])
        #print(bottleneck_dim)
        net = conv_1x1(input, bottleneck_dim, name='pw', bias=bias)
        net = batch_norm(net, train=is_train, name='pw_bn')
        if h_swish:
                net = hard_swish(net)
        else:
                net = relu6(net)
        # dw
        net = dwise_conv(net, k_w=k_s, k_h=k_s, strides=[1, stride, stride, 1], name='dw', bias=bias)
        net = batch_norm(net, train=is_train, name='dw_bn')
        if h_swish:
                net = hard_swish(net)
        else:
                net = relu6(net)
        # squeeze and excitation
        if se:
                channel = int(np.shape(net)[-1])
                net = squeeze_excitation_layer(net,out_dim=channel, ratio=ratio, layer_name='se_block')
        # pw & linear
        net = conv_1x1(net, output_dim, name='pw_linear', bias=bias)
        net = batch_norm(net, train=is_train, name='pw_linear_bn')
        # element wise add, only for stride==1
        if shortcut and stride == 1:
            in_dim=int(input.get_shape().as_list()[-1])
            net_dim = int(net.get_shape().as_list()[-1])
            if in_dim == net_dim:
                net+=input
                net = tf.identity(net, name='output')
        return net
Pytorch代码
https://github.com/AnjieZheng/MobileNetV3-PyTorch
引用github的大神写的pytorch的MobileNetV3
总结
MobileNetV3添加了很多黑科技改动,这些改动的具体性能实测,还需大家套入自己的训练集自行调参测试网络实际性能。