Android Service保活方法总结(不被杀死)双进程守护
写在前头
保活Service我们需要做什么:
1.在应用被关闭后保活(最难)
2.在内用占用过大,系统自动释放内存时保活(优先杀死占用较高的Service)
3.重启手机后自动开启Service
4.手机息屏后不被释放内存
5.手动清理内存时保活
首先介绍一下Service的等级:
一、前台进程
二、可见进程
三、服务进程
四、后台进程
五、空进程 ---关闭应用后,没有清理缓存
所以为了提高优先级我们可以使用startForeground()方法将Service设置为前台进程。
一、在AndroidManifest中添加Service
二、双进程保护
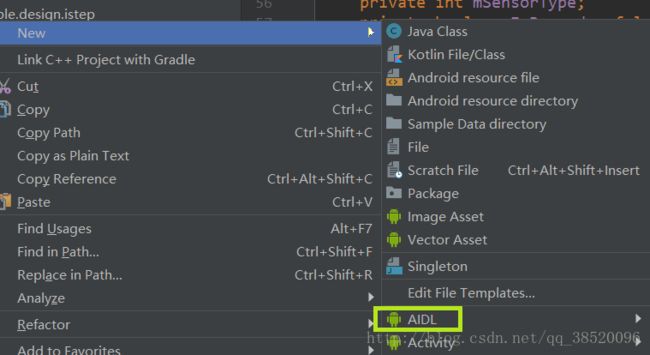
1.创建aidl实现跨进程通信(新建一个aidl)
interface ProcessConnection {
    /**
     * Demonstrates some basic types that you can use as parameters
     * and return values in AIDL.
     */
    //删除不必要方法
 }
2.创建主服务
/**
 * 主进程 双进程通讯
 * Created by db on 2018/1/11.
 */

public class StepService extends Service{
    @Nullable
    @Override
    public IBinder onBind(Intent intent) {
        return new ProcessConnection.Stub() {};
    }

    @Override
    public int onStartCommand(Intent intent, int flags, int startId) {
        startForeground(1,new Notification());
        //绑定建立链接
        bindService(new Intent(this,GuardService.class),
                mServiceConnection, Context.BIND_IMPORTANT);
        return START_STICKY;
    }

    private ServiceConnection mServiceConnection = new ServiceConnection() {
        @Override
        public void onServiceConnected(ComponentName componentName, IBinder iBinder) {
            //链接上
            Log.d("test","StepService:建立链接");
        }

        @Override
        public void onServiceDisconnected(ComponentName componentName) {
            //断开链接
            startService(new Intent(StepService.this,GuardService.class));
            //重新绑定
            bindService(new Intent(StepService.this,GuardService.class),
                    mServiceConnection, Context.BIND_IMPORTANT);
        }
    };

}
3.创建守护服务
 /**
 * 守护进程 双进程通讯
 * Created by db on 2018/1/11.
 */

public class GuardService extends Service{
    @Nullable
    @Override
    public IBinder onBind(Intent intent) {
        return new ProcessConnection.Stub() {};
    }

    @Override
    public int onStartCommand(Intent intent, int flags, int startId) {
        startForeground(1,new Notification());
        //绑定建立链接
        bindService(new Intent(this,StepService.class),
                mServiceConnection, Context.BIND_IMPORTANT);
        return START_STICKY;
    }

    private ServiceConnection mServiceConnection = new ServiceConnection() {
        @Override
        public void onServiceConnected(ComponentName componentName, IBinder iBinder) {
            //链接上
            Log.d("test","GuardService:建立链接");
        }

        @Override
        public void onServiceDisconnected(ComponentName componentName) {
            //断开链接
            startService(new Intent(GuardService.this,StepService.class));
            //重新绑定
            bindService(new Intent(GuardService.this,StepService.class),
                    mServiceConnection, Context.BIND_IMPORTANT);
        }
    };

}
返回参数含义:
- START_STICKY:在Service被关闭后,重新开启Service
- START_NOT_STICKY:服务被异常杀掉后,系统将会被设置为started状态,系统不会重启该服务,直到startService(Intent intent)方法再次被调用。
- START_REDELIVER_INTENT:重传Intent,使用这个返回值时,如果在执行完onStartCommand后,服务被异常kill掉,系统会自动重启该服务,并将Intent的值传入。
- START_STICKY_COMPATIBILITY:START_STICKY的兼容版本,但不保证服务被kill后一定能重启。
三、使用JobService来实现应用退出后重启Service
1、在AndroidManifest中添加Service和权限
2、JobService代码
/**
 * 用于判断Service是否被杀死
 * Created by db on 2018/1/11.
 */
@TargetApi(Build.VERSION_CODES.LOLLIPOP)//5.0以后可用
public class JobWakeUpService extends JobService{
    private int JobWakeUpId = 1;
    @Override
    public int onStartCommand(Intent intent, int flags, int startId) {
        //开启轮寻
        JobInfo.Builder mJobBulider = new JobInfo.Builder(
                JobWakeUpId,new ComponentName(this,JobWakeUpService.class));
        //设置轮寻时间
        mJobBulider.setPeriodic(2000);
        JobScheduler mJobScheduler = (JobScheduler) getSystemService(Context.JOB_SCHEDULER_SERVICE);
        mJobScheduler.schedule(mJobBulider.build());
        return START_STICKY;
    }

    @Override
    public boolean onStartJob(JobParameters jobParameters) {
        //开启定时任务 定时轮寻 判断应用Service是否被杀死
        //如果被杀死则重启Service
        boolean messageServiceAlive = serviceAlive(StepService.class.getName());
        if(!messageServiceAlive){
            startService(new Intent(this,StepService.class));
        }

        return false;
    }

    @Override
    public boolean onStopJob(JobParameters jobParameters) {

        return false;
    }

    /**
     * 判断某个服务是否正在运行的方法
     * @param serviceName
     *            是包名+服务的类名(例如:net.loonggg.testbackstage.TestService)
     * @return true代表正在运行,false代表服务没有正在运行
     */
    private boolean serviceAlive(String serviceName) {
        boolean isWork = false;
        ActivityManager myAM = (ActivityManager)getSystemService(Context.ACTIVITY_SERVICE);
        List myList = myAM.getRunningServices(100);
        if (myList.size() <= 0) {
            return false;
        }
        for (int i = 0; i < myList.size(); i++) {
            String mName = myList.get(i).service.getClassName().toString();
            if (mName.equals(serviceName)) {
                isWork = true;
                break;
            }
        }
        return isWork;
    }
}
四、保证Service在开机后自动启动
(1)注册广播
(2)广播代码
/**
 * 开机完成广播
 */

public class mReceiver extends BroadcastReceiver {
    @Override
    public void onReceive(Context context, Intent intent){
        Intent mIntent = new Intent(context,StepService.class);
        context.startService(mIntent);
    }
}
五、保证息屏后不被释放资源杀死(WakeLock的使用)
(1)添加权限
(2)在创建Service以后调用方法
   /**
     * 同步方法   得到休眠锁
     * @param context
     * @return
     */
    synchronized private void getLock(Context context){
        if(mWakeLock==null){
            PowerManager mgr=(PowerManager)context.getSystemService(Context.POWER_SERVICE);
            mWakeLock=mgr.newWakeLock(PowerManager.PARTIAL_WAKE_LOCK,StepService.class.getName());
            mWakeLock.setReferenceCounted(true);
            Calendar c=Calendar.getInstance();
            c.setTimeInMillis((System.currentTimeMillis()));
            int hour =c.get(Calendar.HOUR_OF_DAY);
            if(hour>=23||hour<=6){
                mWakeLock.acquire(5000);
            }else{
                mWakeLock.acquire(300000);
            }
        }
        Log.v(TAG,"get lock");
    }
(3)在onDestroy()方法中调用释放锁的方法(避免占用内存)
synchronized private void releaseLock()
    {
        if(mWakeLock!=null){
            if(mWakeLock.isHeld()) {
                mWakeLock.release();
                Log.v(TAG,"release lock");
            }

            mWakeLock=null;
        }
}| PARTIAL_WAKE_LOCK | 保持CPU运转,屏幕和键盘灯有可能是关闭的。 |
| SCREEN_DIM_WAKE_LOCK | 保持CPU运转,允许保持屏幕显示但有可能是灰的,允许关闭键盘灯。 |
| SCREEN_BRIGHT_WAKE_LOCK | 保持CPU运转,保持屏幕高亮显示,允许关闭键盘灯。 |
| FULL_WAKE_LOCK | 保持CPU运转,保持屏幕高亮显示,键盘灯也保持亮度。 |
| ACQUIRE_CAUSES_WAKEUP | 不会唤醒设备,强制屏幕马上高亮显示,键盘灯开启。有一个例外,如果有notification弹出的话,会唤醒设备。 |
| ON_AFTER_RELEASE | Wake Lock被释放后,维持屏幕亮度一小段时间,减少Wake Lock循环时的闪烁情况。 |
六、启动所有Service(在Activity中)
   /**
     * 开启所有Service
     */
    private void startAllServices()
    {
        startService(new Intent(this, StepService.class));
        startService(new Intent(this, GuardService.class));
        if(Build.VERSION.SDK_INT >=Build.VERSION_CODES.LOLLIPOP) {
            Log.d(TAG, "startAllServices: ");
            //版本必须大于5.0
            startService(new Intent(this, JobWakeUpService.class));
        }
    }
注意:该方法不能保证在所有机型上有效,而且除非在必要时,否则不建议写这样的流氓软件。特别是谷歌在android7.0以后对管理加强,想要保活Service其实已经变得不太可能了,谷歌这样做无疑是为了减少流氓软件的数量,这样做也是可取的。
