概述:本节主要介绍OpenCV中的人脸检测,以及在视频流中一个取巧的处理方式;同时简要介绍一个更高性能的人脸检测方案;
- 人脸检测原理;
- detectMultiScale 函数;
- 人脸识别简单实现;
- 高性能检测方式;
- 分类器的训练;
一. 人脸检测原理:
通过Haar/LBP特征来识别是否为人脸。特征分类器就是一个XML文件,该文件中会描述人脸的特征值。当然特征值的用途可不止可以用来描述人脸这一种,用来描述眼睛,嘴唇或是其它物体也是可以的。
二. detectMultiScale:
detectMultiScale函数原型:
 void detectMultiScale( const Mat& image,
            CV_OUT vector& objects,
                  double scaleFactor=1.1,
                      int minNeighbors=3,
                             int flags=0,
                     Size minSize=Size(),
                     Size maxSize=Size()
);
/*
* image:        输入图像,使用灰度图以加快检测速度;
* objects:      检测结果输出集合;
* scaleFactor:  前后两次相继的扫描中,搜索窗口的比例系数。默认为1.1即每次搜索窗口依次扩大10%
* minNeighbors: 构成检测目标的相邻矩形的最小个数(默认为3个)。如果组成检测目标的小矩形的个数和小于 min_neighbors - 1 都会被排除。如果min_neighbors 为 0, 则函数不做任何操作就返回所有的被检候选矩形框,这种设定值一般用在用户自定义对检测结果的组合程序上。
* flags:        0;
* minSize:      测窗口的最小值,如果检测结果又很多较小的错误轮廓.可尝试加大minSize
* maxSize:     测窗口的最大值
*/
三.简单实现:
 cv::CascadeClassifier faceCascade;
  ...
  ...
// 加载特征文件
    NSString* filename = [[NSBundle mainBundle]
                          pathForResource:@"haarcascade_frontalface_alt" ofType:@"xml"];

    faceCascade.load([filename UTF8String]);

 // 加载有人脸的示例图片
    NSString* filePath = [[NSBundle mainBundle]
                          pathForResource:@"lena" ofType:@"png"];
    UIImage* image = [UIImage imageWithContentsOfFile:filePath];

    cv::Mat cvImage;
    UIImageToMat(image, cvImage);

// 存储检测结果
    std::vector faces;

    cv::Mat cvGrayImage;
    cvtColor(cvImage, cvGrayImage, CV_BGR2GRAY);
    faceCascade.detectMultiScale(cvGrayImage, faces, 1.1, 2, 0|CV_HAAR_SCALE_IMAGE, cv::Size(30,30));
// 绘制结果
    for(int i = 0; i < faces.size(); i++)
    {
        const cv::Rect& currentFace = faces[i];
        //计算轮廓位置
        cv::Point upLeftPoint(currentFace.x, currentFace.y);
        cv::Point bottomRightPoint = upLeftPoint + cv::Point(currentFace.width, currentFace.height);
// 画圆
//        cv::circle(<#cv::Mat &img#>, <#Point center#>, <#int radius#>, <#const Scalar &color#>)
//画矩形
        cv::rectangle(cvImage, upLeftPoint, bottomRightPoint, cv::Scalar(255,0,255), 4, 8, 0);
//标准文字
//        cv::putText(<#cv::Mat &img#>, <#const string &text#>, <#Point org#>, <#int fontFace#>, <#double fontScale#>, <#Scalar color#>)
    }
    imageView.image = MatToUIImage(cvImage);
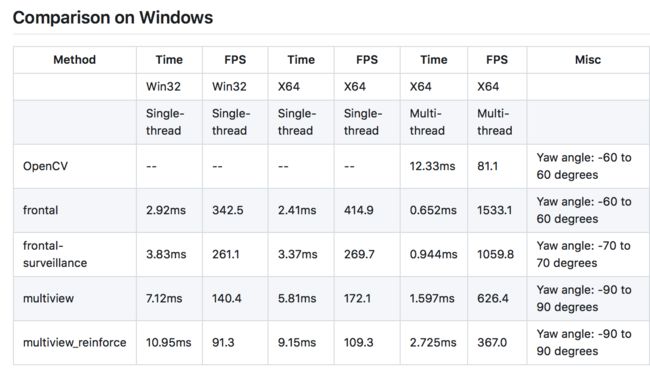
四.高性能检测方式:
- 更高性能的实现
,目前有一套纯C的实现,参考:https://github.com/ShiqiYu/libfacedetection
对比如下:
- 视频流中的人脸实时检测优化
对于视频流中的人脸实时检测,给出一个取巧的方式,开启一个定时器,在视频流的回调中以一个较低的频率(比如10次/秒)获取帧图片监测人脸;在做卡片的边界识别时,我采用的是10次/秒的取样率,同时绘制线的频率也是10次/秒,效果基本看不出任何卡顿和飘移现象; - 尽量选用LBP分类器
Cascade Classi er may be too slow for real-time processing, especially on a mobile device. But there are several ways to improve the situation. First of all, please note that downscaling an image may not help, as the detectMultiScale method builds a pyramid of scales depending on minSize and maxSize parameters. But you can tweak these parameters to achieve better performance. Start from increasing the value of the rst parameter. Next, you can try to increase the scaleFactor parameter. Try to use values such as 1.2 or 1.3, but please note that it may negatively affect the quality of detection!
Apart from parameter tuning, you can try more radical methods. First of all, check if LBP- based cascade is available for your objects (http://bit.ly/3848_LBPCascades). Local Binary Patterns (LBP) features use integer arithmetic; thus they are more ef cient and the detector usually works 2-3 times faster than using classic Haar-features (they use oating- point calculations). Finally, you can try to skip the frames in the video stream and track objects with Optical Flow between detections.
上述引用官方的说法,大概意思是说:
1.可以调大 scaleFactor 参数,取得性能的提升;
2.使用LBP,LBP使用了 integer arithmetic,性能可达到Haar-features的2-3倍;
3.缩放图片源对性能几乎没有帮助;
五.分类器的训练:
这个还没具体训练过,正好在Naotoshi Seo看到,先记录一下,来日再做吧;