1.背景
本文使用的RN(使用RN表示React Native)的版本为0.44版本,从官方文档上看SectionList是从0.43版本才有的,而要列表的吸顶悬浮功能,从0.44版本才开始有。具体可以查看React Native的官方文档。至于为何使用SectionList而不是使用ListView,可以自行百度SectionList(FlatList)的好处,就我了解主要是性能上的差别(这点深受ListView其害)。这里就不加以讨论了,本文主要介绍的是如何使用SectionList打造分组悬停,并且添加右侧的分组的跳转控制(类似微信的通讯录)
2.SectionList简单介绍
首先我们要做的是,如何使用SectionList生成一个分组列表,具体的使用我们可以看下RN官方中文文档http://reactnative.cn/docs/0.44/sectionlist.html 其中对SectionList和FlatList的介绍,我们来看看数据源的格式
在这里我们重点要注意的是,对于每组数据,必须有一个key的字段,并且不同组之间key的内容必须是不一样的,同时每组里面的数据也必须有一个key的字段,key的内容同样是不一致的。(虽然我也不晓得为嘛要这样设计,但是实际使用过程中不添加的话的确会报warning,有兴趣的话可以看下其中的源码)
3.SectionList生成城市列表
3.1 格式化城市列表数据
这里我们有一个city.json的数据源,里面包含了国内的城市列表信息,格式组成如下
{
    "data": [
        {
            "title": "A"
            "city": [
                {
                    "city_child": "阿坝",
                    "city_child_en": "aba",
                    "city_id": 101271901,
                    "city_name_ab": "ab.ab",
                    "city_parent": "阿坝",
                    "city_pinyin_name": "aba.aba",
                    "country": "中国",
                    "latitude": 32,
                    "longitude": 101,
                    "provcn": "四川"
                },
                {
                    "city_child": "阿巴嘎",
                    "city_child_en": "abaga",
                    "city_id": 101080904,
                    "city_name_ab": "xlgl.abg",
                    "city_parent": "锡林郭勒",
                    "city_pinyin_name": "xilinguole.abaga",
                    "country": "中国",
                    "latitude": 44,
                    "longitude": 114,
                    "provcn": "内蒙古"
                },
                 .....]
        },
        .......
      ]
}
现在我们要做的就是把这样的数据源格式化成我们SectionList需要的数据的格式,格式化代码如下
 async getCityInfos() {
        let data = await require('../app/assets/city.json');
        let jsonData = data.data
        //每组的开头在列表中的位置
        let totalSize = 0;
        //SectionList的数据源
        let cityInfos = [];
        //分组头的数据源
        let citySection = [];
        //分组头在列表中的位置
        let citySectionSize = [];
        for (let i = 0; i < jsonData.length; i++) {
            citySectionSize[i] = totalSize;
            //给右侧的滚动条进行使用的
            citySection[i] = jsonData[i].title;
            let section = {}
            section.key = jsonData[i].title;
            section.data = jsonData[i].city;
            for (let j = 0; j < section.data.length; j++) {
                section.data[j].key = j
            }
            cityInfos[i] = section;
            //每一项的header的index
            totalSize += section.data.length + 1
        }
        this.setState({data: cityInfos, sections: citySection, sectionSize: citySectionSize})
    }
在这里我们用async async,然后异步读取city.json里面的数据,然后遍历整个数据我们得到三组我们需要的数据,分别为SectionList的数据源(列表展示使用),分组头的数据源(后面我们在右侧展示是使用),分组头在列表中的位置(做列表跳转的时候使用)。
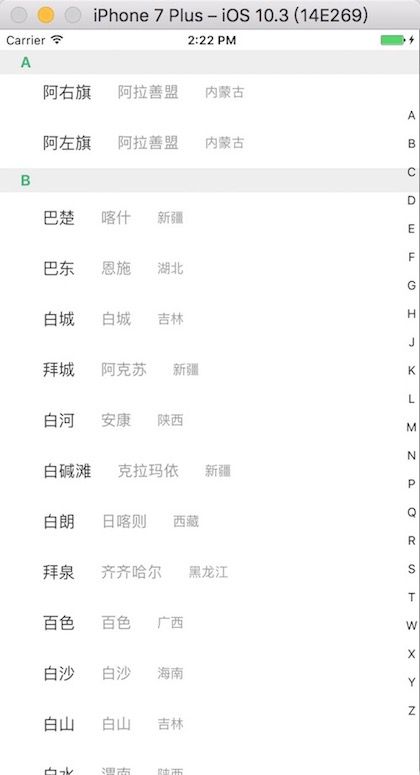
这样我们得到了数据源,然后将其添加到SectionList中,我们来看下效果
3.2 列表右侧分组头展示
在上面中我们得到了分组的头的列表citySection,那么我们改如和将其显示到列表右侧呢?
在这里我们将头部使用Text进行展示,然后外部使用View进行包裹,对外部的View进行手势监听,根据位置和距离来判断当前选中的头部,然后通知SectionList进行相对应的操作。
首先我们生成Text,然后对其进行高度测量(便于之后的手势控制使用)
 _getSections = () => {
        let array = new Array();
        for (let i = 0; i < this.props.sections.length; i++) {
            array.push(

                    {this.props.sections[i]}
                )
        }
        return array;
    }

 componentDidMount() {
        //它们的高度都是一样的,所以这边只需要测量一个就好了
        const sectionItem = this.refs.sectionItem0;

        this.measureTimer = setTimeout(() => {
            sectionItem.measure((x, y, width, height, pageX, pageY) => {
                this.measure = {
                    y: pageY,
                    height
                };
            })
        }, 0);
    }
由于它们每一项的高度是一样的,所以这边只需要测量一个的高度,其他的也就都知道了
然后我们将这些Text展示到View中去,并对View进行手势控制的监听
       {this._getSections()}

const returnTrue = () => true;
从代码中我们可以看出,这边我们需要处理的是手势的Move和抬起事件,那么首先我们来看Move的操作。
detectAndScrollToSection = (e) => {
        var ev = e.nativeEvent.touches[0];
        // 手指按下的时候需要修改颜色
        this.refs.view.setNativeProps({
            style: {
                backgroundColor: 'rgba(0,0,0,0.3)'
            }
        })
        let targetY = ev.pageY;
        const {y, height} = this.measure;
        if (!y || targetY < y) {
            return;
        }
        let index = Math.floor((targetY - y) / height);
        index = Math.min(index, this.props.sections.length - 1);
        if (this.lastSelectedIndex !== index && index < this.props.sections.length) {
            this.lastSelectedIndex = index;
            this.onSectionSelect(this.props.sections[index], index, true);
            this.setState({text: this.props.sections[index], isShow: true});
        }
    }
 onSectionSelect(section, index, fromTouch) {
        this.props.onSectionSelect && this.props.onSectionSelect(section, index);

        if (!fromTouch) {
            this.lastSelectedIndex = null;
        }
    }
从代码中我们可以知道,首先我们要对View的背景颜色进行改变,这样可以让我们知道已经选中了该View了,然后获取我们当前触摸点的坐标,在之前我们已经计算每个Text的高度,然后我们根据这些就可以计算出当前触摸点之下的是哪个分组了。最后通过
this.onSectionSelect(this.props.sections[index], index, true); this.setState({text: this.props.sections[index], isShow: true});
分别进行外部列表的通知和当前View的通知
然后我们来看手势抬起时候的操作
 resetSection = () => {
        // 手指抬起来的时候需要变回去
        this.refs.view.setNativeProps({
            style: {
                backgroundColor: 'transparent'
            }
        })
        this.setState({isShow: false})
        this.lastSelectedIndex = null;
        this.props.onSectionUp && this.props.onSectionUp();
    }
从代码之中我们可以知道,该方法主要是处理View背景的变化,以及抬起时候的一些通知。我们先看下整体的效果
接下来就是选择的一个提示了(类似于微信通讯录中间的弹窗通知)。首先我们创建我们需要的一个视图
        {this.state.isShow ?


               {this.state.text}

        : null
       }

               {this._getSections()}
在这里我们要注意的是,由于我们的展示视图是在屏幕的中间位置,并且在Android上子视图超出父视图的部分无法显示(也就是设置left:-100这样的属性会让视图部分无法看见)。所以这里我们使用的包裹展示视图的父视图是全屏的,那么这个pointerEvents='box-none'就尤其重要,它可以保证当前视图不操作手势控制,而子视图可以操作。假如这边不设置的话,会导致SectionList无法滚动,因为被当前视图盖住了。具体的属性介绍可以查看RN官方文档对View属性的介绍
在上面的方法之中我们有需改state的值,这边就是来控制展示视图的显示隐藏的。我们来看下效果
3.3 列表的分组跳转
上面做到了列表的展示,接下来就是列表的分组跳转了,在RN的介绍文档上可以看到VirtualizedList(FlatList和SectionList都是对它的封装)有如下的方法
scrollToEnd(params?: object)
scrollToIndex(params: object)
scrollToItem(params: object)
scrollToOffset(params: object)
从名称上看就是对列表的滚动,然后找到FlatList,里面有更详细的介绍,这边我们使用的方法是scrollToIndex
scrollToIndex(params: object)
Scrolls to the item at a the specified index such that it is positioned in the viewable area such that viewPosition
 0 places it at the top, 1 at the bottom, and 0.5 centered in the middle.
如果不设置getItemLayout属性的话,可能会比较卡。
那么从最后一句话我们知道在这里我们需要去设置getItemLayout属性,这样就可以告诉SectionList列表的高度以及每个项目的高度了
const ITEM_HEIGHT = 50; //item的高度
const HEADER_HEIGHT = 24;  //分组头部的高度
const SEPARATOR_HEIGHT = 0;  //分割线的高度

_getItemLayout(data, index) {
   let [length, separator, header] = [ITEM_HEIGHT, SEPARATOR_HEIGHT, HEADER_HEIGHT];
   return {length, offset: (length + separator) * index + header, index};
 }
同时我们要注意的是在设置SectionList的renderItem和renderSectionHeader,也就是SectionList的分组内容和分组头部的组件的高度必须是我们上面给定计算时候的高度(这点很重要)
那么这个时候根据上面右侧头部展示组件给的回调的值(配合我们第一步得到的citySectionSize)就可以进行
对应的列表滚动了。
 //这边返回的是A,0这样的数据
_onSectionselect = (section, index) => {
    //跳转到某一项
   this.refs.list.scrollToIndex({animated: true, index: this.state.sectionSize[index]})
 }
但是假如仅仅只是这样的话,你会发现在使用的时候会报错,错误是找不到scrollToIndex方法。wtf?�RN官方文档上明明有这个方法啊。然而其实FlatList对VirtualizedList封装的时候有添加这些方法,而SectionList并没有。那么,只能自己动手添加了,参照
FlatList里面的scrollToIndex方法,为SectionList添加对于的方法。
其中SectionList的路径为
node_modules/react-native/Libraries/Lists/SectionList.js,代码格式化后大概在187行的位置,修改如下
class SectionList>
    extends React.PureComponent, void> {
    props: Props;
    static defaultProps: DefaultProps = defaultProps;

    render() {
        const List = this.props.legacyImplementation ? MetroListView : VirtualizedSectionList;
        return ;
    }

    _captureRef = (ref) => {
        this._listRef = ref;
    };

    scrollToIndex = (params: { animated?: ?boolean, index: number, viewPosition?: number }) => {
        this._listRef.scrollToIndex(params);
    }
}
同时还需要修改VirtualizedSectionList的代码,路径在node_modules/react-native/Libraries/Lists/VirtualizedSectionList.js,大概253行处修改如下
render() {
return 修改完毕,我们来看下效果ios和android平台下的效果如和
从上面的效果上可以看出来ios上的效果比android上的效果要好,然后在ios上有分组悬停的效果而在andorid并没有,这是由于平台特性决定的。在手动滚动的时候白屏的时间较短,而在跳转的时候白屏的时间较长,但是相比与之前ListView时期的长列表的效果而言,要好太多了。也是期待RN以后的发展中对列表更好的改进吧。
4.最后
在完成这个城市选择列表的时候主要参考了
http://reactnative.cn/docs/0.44/sectionlist.html
http://reactnative.cn/docs/0.44/flatlist.html
https://github.com/sunnylqm/react-native-alphabetlistview
最后附上项目地址:https://github.com/hzl123456/SectionListDemo
注意要记得修改SectionList和VirtualizedSectionList的代码


