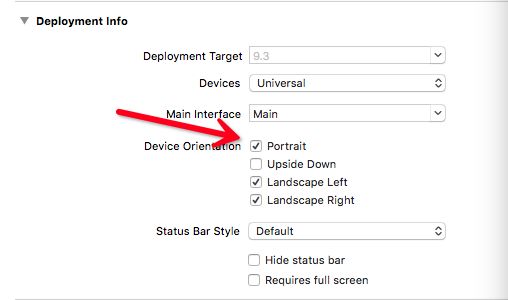
第一步: 要想App能够支持多个方向, 需要在创建工程时设置支持的方向: 在General-->Deployment Info-->Device Orientation中进行设置
第二步: 实现上面的设置, 下面需要通过相应的方法来设置是否支持旋转 + 旋转方向等问题.
主要方法如下:
#1. 是否自动旋转,返回YES可以自动旋转 (假如该方法返回的是NO, 那么你再做什么设置, 工程中都不会有自动旋转屏幕的效果了)
- (BOOL)shouldAutorotate NS_AVAILABLE_IOS(6_0) __TVOS_PROHIBITED;

#2. 返回支持的方向
- (UIInterfaceOrientationMask)supportedInterfaceOrientations;

#3. 这个是返回优先支持的方向
- (UIInterfaceOrientation)preferredInterfaceOrientationForPresentation;```

*如果设置的当前页面, 是App的根视图控制器, 那么实现以上两个步骤就能完成自动旋转了, 上面的主要方法也都是UIViewController中的实例方法.

***
你会发现, 只有App启动时出现的第一个界面(根视图)内重写上面的方法, 会有效果. 而在其他的界面重写之后并没有实现我们想要的翻转. (* 由此证明, 这些设置必须是影响了根视图中的设置, 才会有效果. 所以如果想让根视图以外的视图也支持旋转, 需要告诉视图, 在视图中修改响应的设置)

##例1. 当前controller是根视图控制器
那么很简单, 我们直接在当前Controller中重写上面的两个方法即可:
1. 支持自动旋转
- (BOOL)shouldAutorotate{
return YES;
}
2. 值传的旋转方向
- (UIInterfaceOrientationMask)supportedInterfaceOrientations{
//支持除了倒置的所有方向
return UIInterfaceOrientationMaskAllButUpsideDown;
}```
例2. App的根视图控制器是UINavigationController
这是开发中很常用的, 那么下面介绍怎样在navigationController中做控制:
第一种方法:
这种方式, 主要用在当push到某个视图控制器时, 要求该视图: 支持自动旋转或者强制旋转为横屏.
# 下面的方法实现过程中, 主要用到的是navigationController中的viewControllers属性, 这是一个数组, 数组的最后一个元素就是最后push到的controller.
-(BOOL)shouldAutorotate {
return [[self.viewControllers lastObject] shouldAutorotate];
}

 - (UIInterfaceOrientationMask)supportedInterfaceOrientations {
return [[self.viewControllers lastObject] supportedInterfaceOrientations];
 }
- (UIInterfaceOrientation)preferredInterfaceOrientationForPresentation {
return [[self.viewControllers lastObject] preferredInterfaceOrientationForPresentation];
}
下面在最后push到的controller中调用上面三个方法
-(BOOL)shouldAutorotate{
 return YES;
}
- (UIInterfaceOrientationMask)supportedInterfaceOrientations{
return UIInterfaceOrientationMaskPortraitUpsideDown;
}

- (UIInterfaceOrientation)preferredInterfaceOrientationForPresentation {
return UIInterfaceOrientationPortraitUpsideDown;
}```
其实这样也就是告诉跟视图控制器,这个界面我要特殊设置一下

#####第二种方法:
这种方法是对特定的控制器进行设. 例如我需要只设定firstVC为支持横屏, 只需要修改navigationController中的代码:
-(BOOL)shouldAutorotate{
//判断子控制器是不是firstVC
if ([[self.viewControllers lastObject]isKindOfClass:[FirstViewController class]]) {
//如果是则返回Yes
return YES;
}
//如果是其他视图控制器, 则返回No
return NO;
}
-
(UIInterfaceOrientationMask)supportedInterfaceOrientations{
if ([[self.viewControllers lastObject]isKindOfClass:[FirstViewController class]]) {
//支持向左翻转
return UIInterfaceOrientationMaskLandscapeLeft;
}
//仅支持竖屏
return UIInterfaceOrientationMaskPortrait;
} -
(UIInterfaceOrientation)preferredInterfaceOrientationForPresentation {
if ([[self.viewControllers lastObject]isKindOfClass:[FirstViewController class]]) {
return UIInterfaceOrientationLandscapeLeft;
}
return UIInterfaceOrientationPortrait;
}```
这样的好处是: 可以控制指定的控制器, 也不用在指定的控制器内重写上面的方法. 但如果需要自动翻转的视图比较多的话, 判断比较麻烦
例3: 根视图控制器是UITabBarController
首先,设置一个全局的BOOL值,用于接收通知发送的参数:
#import
@interface BaseTabBar : UITabBarController{
BOOL shouldAutorotate;
}
@end
然后注册一个通知:
//注册旋转屏幕的通知
 [[NSNotificationCenter defaultCenter]addObserver:self selector:@selector(autorotateInterface:) name:@"InterfaceOrientationNotification" object:nil];
实现通知方法:
-(void)autorotateInterface:(NSNotification *)notifition{
shouldAutorotate = [notifition.object boolValue];
}
然后在重写的方法里加入判断:
-(BOOL)shouldAutorotate {
  if (!shouldAutorotate) {
     return NO;
  }
  else{
     return YES;
  }
}

-(UIInterfaceOrientationMask)supportedInterfaceOrientations {
   if (!shouldAutorotate) {
    return UIInterfaceOrientationMaskPortrait;
   }
  return UIInterfaceOrientationMaskAllButUpsideDown;
 }
这里我直接将支持的方向写死了,只是判断了一下是否支持自动旋转屏幕,如果需要将支持的方向传过来,可以修改通知携带的参数;
最后在需要自动转屏的控制器内发送通知:
[[NSNotificationCenter defaultCenter] postNotificationName:@"InterfaceOrientationNotification" object:@"YES"];```
ending ......

#强制转换:
强制旋转屏幕的方法,可以在进入某个视图时,强制转成需要的屏幕方向,用的比较多的是在一个竖屏的应用中强制转换某一个界面为横屏(例如播放视频):
-
(void)orientationToPortrait:(UIInterfaceOrientation)orientation {
SEL selector = NSSelectorFromString(@"setOrientation:");
NSInvocation *invocation = [NSInvocation invocationWithMethodSignature:[UIDevice instanceMethodSignatureForSelector:selector]];
[invocation setSelector:selector];
[invocation setTarget:[UIDevice currentDevice]];
int val = orientation;
[invocation setArgument:&val atIndex:2];//前两个参数已被target和selector占用 [invocation invoke];
}```
使用的时候,只需要把你需要旋转的方向传过去即可!
有一点需要注意:从A进入B的时候,把B强制转换成横屏,返回的时候,需要在A出现的时候再转换为原来的方向,不然会有问题;个人建议可以在B的viewWillAppear调用这个方法,转换屏幕(例如转换为横屏),然后在A的viewWillAppear中转换回来;
文/流火绯瞳(作者)
原文链接:http://www.jianshu.com/p/650ba0ff626b
