之前写过一篇文章 ReactNative Android源码分析,在此文章的基础上分析和总结下RN与Native的通讯流程。
本文基于Android代码分析,iOS实现原理类似。
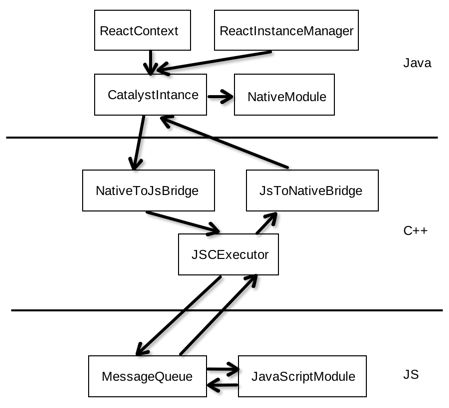
1. �通讯框架图
先来解析下各个模块的角色与作用:
Java层,这块的实现在ReactAndroid中
- ReactContext : Android上下文子类,包含一个CatalystInstance实例,用于获取NativeModule,JSModule、添加各种回调、处理异常等
- ReactInstanceManager : 管理CatalystInstance的实例,处理RN Root View,启动JS页面,管理生命周期
- CatalystInstance : 通讯的关键类,提供调用JS Module也支持JS调用Native Module,与Bridge进行交互,对开发者不可见
C++层,这块实现在ReactCommon中,供Android与iOS使用
- NativeToJsBridge : native与JS的桥接,负责调用JS Module、回调Native(调用JsToNativeBridge)、加载JS代码(调用JavaScriptCore)
- JsToNativeBridge : 调用Native Module的方法
- JSCExecutor : 加载/执行JS代码(调用JavaScriptCore)、调用JS Module、回调native、性能统计等,都是比较核心的功能
JS层,实现在Libraries中,RN JS相关的实现在都这个文件夹中
- MessageQueue : 管理JS的调用队列、调用Native/JS Module的方法、执行callback、管理JS Module等
- JavaScriptModule : 代指所有的JSModule实现,在java层中也有对应的代码(都是interface),使用动态代理调用,统一入口在CatalystInstance中
2. C++与JS间通讯
Native与JS通讯无非就是Java/OC与JS跨语言间的调用,在分析Native与JS通讯前先来了解下Java/OC与JS跨语言间的调用。
在ReactNative中使用JavaScriptCore来执行JS,这部分的关键就是如何利用JavaScriptCore。
看一下Android编译脚本:
- ReactAndroid/build.gradle
  compile 'org.webkit:android-jsc:r174650'

    task downloadJSCHeaders(type: Download) {
        def jscAPIBaseURL = 'https://svn.webkit.org/repository/webkit/  !svn/bc/174650/trunk/Source/JavaScriptCore/API/'
        def jscHeaderFiles = ['JavaScript.h', 'JSBase.h', 'JSContextRef.h', 'JSObjectRef.h',    'JSRetainPtr.h', 'JSStringRef.h', 'JSValueRef.h', 'WebKitAvailability.h']
        def output = new File(downloadsDir, 'jsc')
        output.mkdirs()
        src(jscHeaderFiles.collect { headerName -> "$jscAPIBaseURL$headerName" })
        onlyIfNewer true
        overwrite false
        dest output
    }

    // Create Android.mk library module based on so files from mvn + include headers fetched from webkit    .org
    task prepareJSC(dependsOn: downloadJSCHeaders) << {
        copy {
            from zipTree(configurations.compile.fileCollection { dep -> dep.name == 'android-jsc' }.    singleFile)
            from {downloadJSCHeaders.dest}
            from 'src/main/jni/third-party/jsc/Android.mk'
            include 'jni/**/*.so', '*.h', 'Android.mk'
            filesMatching('*.h', { fname -> fname.path = "JavaScriptCore/${fname.path}"})
            into "$thirdPartyNdkDir/jsc";
        }
    }
- ReactAndroid/src/main/jni/third-party/jsc/Android.mk
LOCAL_SRC_FILES := jni/$(TARGET_ARCH_ABI)/libjsc.so
从这里可以看出RN并没有用系统自带的webkit,WebKit主要包括WebCore排版引擎和JSCore引擎,这里主要使用了JSCore引擎,排版交给Native去做。
在RN中通过下面的方法设置native方法和属性:
JSObjectSetProperty(m_context, globalObject, jsPropertyName, valueToInject, 0, NULL);
这个方法正是上面gradle脚本下载的JSObjectRef.h中,实现在libjsc.so中。这样就可以在Native设置,然后在JS中取出执行,反过来也是同样的。
3. Native与JS通讯
加载bundle文件
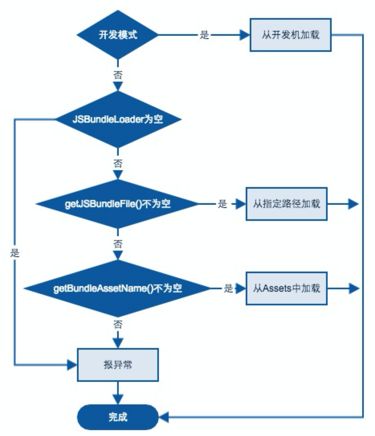
Native与JS的通讯首先需要加载Bundle文件,是在native初始化完成的时候,而Bundle文件的位置是可配置的。
public abstract class ReactNativeHost {

  ...

  /**
   * Returns the name of the main module. Determines the URL used to fetch the JS bundle
   * from the packager server. It is only used when dev support is enabled.
   * This is the first file to be executed once the {@link ReactInstanceManager} is created.
   * e.g. "index.android"
   */
  protected String getJSMainModuleName() {
    return "index.android";
  }

  /**
   * Returns a custom path of the bundle file. This is used in cases the bundle should be loaded
   * from a custom path. By default it is loaded from Android assets, from a path specified
   * by {@link getBundleAssetName}.
   * e.g. "file://sdcard/myapp_cache/index.android.bundle"
   */
  protected @Nullable String getJSBundleFile() {
    return null;
  }

  /**
   * Returns the name of the bundle in assets. If this is null, and no file path is specified for
   * the bundle, the app will only work with {@code getUseDeveloperSupport} enabled and will
   * always try to load the JS bundle from the packager server.
   * e.g. "index.android.bundle"
   */
  protected @Nullable String getBundleAssetName() {
    return "index.android.bundle";
  }

  /**
   * Returns whether dev mode should be enabled. This enables e.g. the dev menu.
   */
  protected abstract boolean getUseDeveloperSupport();

  ...

}
ReactNativeHost中的这些方法会根据需要在Application中重载,这些方法决定了从哪里加载Bundle,方法的注释写的非常清晰,不再介绍了,先看一下流程图:
JSBundleLoader�从哪里加载,也是根据文件的位置,可以看看其loadScript方法,最终都会调用CatalystIntance去加载,有三个实现
  /* package */ native void loadScriptFromAssets(AssetManager assetManager, String assetURL);
  /* package */ native void loadScriptFromFile(String fileName, String sourceURL);
  /* package */ native void loadScriptFromOptimizedBundle(String path, String sourceURL, int flags);
最后一个支持加载优化后的Bundle,目前没有用到。这些方法都是c++实现,主要看一下前两个
void CatalystInstanceImpl::loadScriptFromAssets(jobject assetManager,
                                                const std::string& assetURL) {
  const int kAssetsLength = 9;  // strlen("assets://");
  auto sourceURL = assetURL.substr(kAssetsLength);

  auto manager = react::extractAssetManager(assetManager);
  auto script = react::loadScriptFromAssets(manager, sourceURL);
  if (JniJSModulesUnbundle::isUnbundle(manager, sourceURL)) {
    instance_->loadUnbundle(
      folly::make_unique(manager, sourceURL),
      std::move(script),
      sourceURL);
    return;
  } else {
    instance_->loadScriptFromString(std::move(script), sourceURL);
  }
}

void CatalystInstanceImpl::loadScriptFromFile(jni::alias_ref fileName,
                                              const std::string& sourceURL) {
  return instance_->loadScriptFromFile(fileName ? fileName->toStdString() : "",
                                       sourceURL);
}
从assets中加载就是先读取bundle的内容,当作一个字符串,这里有一个UnBundle,是RN打包的一种方式,除了生成整合JS文件index.android.bundle外,还会生成各个单独的未整合JS文件(但会被优化),全部放在js-modules目录下,同时会生成一个名为UNBUNDLE的标识文件,一并放在其中。UNBUNDLE标识文件的前4个字节固定为0xFB0BD1E5,用于加载前的校验。需要注意的是,js-modules目录会一并打包到apk的assets文件夹中,这里就是处理这种情况的,后面具体的加载暂不分析,可以参考这篇文章。
对于开发模式有点特殊,在创建ReactInstanceManager之前会从server下载Bundle文件,然后保存起来,demo程序的路径为:
/data/user/0/com.awesomeproject/files/ReactNativeDevBundle.js
下载完成后调用CatalystInstance.loadScriptFromFile(),传递缓存后的径路,这个方法也是先读取文件内容,存为字符串,也是调用loadScriptFromString
void Instance::loadScriptFromString(std::unique_ptr string,
                                    std::string sourceURL) {
  callback_->incrementPendingJSCalls();
  SystraceSection s("reactbridge_xplat_loadScriptFromString",
                    "sourceURL", sourceURL);
  // TODO mhorowitz: ReactMarker around loadApplicationScript
  nativeToJsBridge_->loadApplicationScript(std::move(string), std::move(sourceURL));
}
--------------------------------------
void NativeToJsBridge::loadApplicationScript(std::unique_ptr script,
                                             std::string sourceURL) {
  // TODO(t11144533): Add assert that we are on the correct thread
  m_mainExecutor->loadApplicationScript(std::move(script), std::move(sourceURL));
}
loadApplicationScript的作用请参考ReactNative Android源码分析。
这里JS代码已经被执行了。
如何调用JS
在Native中调用JS的方式如下 :
ReactContext.getJSModule(JSModule类名.class).方法名(params);
ReactContext调用的是CatalystInstance的同名方法
  @Override
  public  T getJSModule(Class jsInterface) {
    return getJSModule(mMainExecutorToken, jsInterface);
  }

  @Override
  public  T getJSModule(ExecutorToken executorToken, Class jsInterface) {
    return Assertions.assertNotNull(mJSModuleRegistry)
        .getJavaScriptModule(this, executorToken, jsInterface);
  }
mMainExecutorToken是在initializeBridge时创建的,�根据注释是和web workers相关,是JS多线程相关的,即使用Token来区分线程。当前这种情况使用mMainExecutorToken就可以。看一下CatalystInstance的实现:
  public synchronized  T getJavaScriptModule(
    CatalystInstance instance,
    ExecutorToken executorToken,
    Class moduleInterface) {
    HashMap, JavaScriptModule> instancesForContext =
        mModuleInstances.get(executorToken);
    if (instancesForContext == null) {
      instancesForContext = new HashMap<>();
      mModuleInstances.put(executorToken, instancesForContext);
    }

    JavaScriptModule module = instancesForContext.get(moduleInterface);
    if (module != null) {
      return (T) module;
    }

    JavaScriptModuleRegistration registration =
        Assertions.assertNotNull(
            mModuleRegistrations.get(moduleInterface),
            "JS module " + moduleInterface.getSimpleName() + " hasn't been registered!");
    JavaScriptModule interfaceProxy = (JavaScriptModule) Proxy.newProxyInstance(
        moduleInterface.getClassLoader(),
        new Class[]{moduleInterface},
        new JavaScriptModuleInvocationHandler(executorToken, instance, registration));
    instancesForContext.put(moduleInterface, interfaceProxy);
    return (T) interfaceProxy;
  }
在CatalystInstance创建的时候会把所有JavaScriptModule都收集到JavaScriptModuleRegistry的Map(mModuleRegistrations)中。而mModuleInstances是缓存已经调用过的JS Module的代理对象,如果已经调用过,则从map中直接返回,否则创建其代理对象,然后缓存起来。
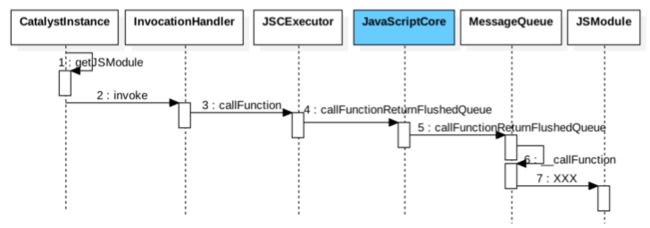
这里使用的是动态代理模式,先创建一个interface的代理对象,当调用其方法时会InvocationHandler的invoke()方法。
  @Override
  public @Nullable Object invoke(Object proxy, Method method, @Nullable Object[] args) throws
Throwable {
    ExecutorToken executorToken = mExecutorToken.get();
    if (executorToken == null) {
      FLog.w(ReactConstants.TAG, "Dropping JS call, ExecutorToken went away...");
      return null;
    }
    NativeArray jsArgs = args != null ? Arguments.fromJavaArgs(args) : new WritableNativeArray();
    mCatalystInstance.callFunction(
      executorToken,
      mModuleRegistration.getName(),
      method.getName(),
      jsArgs
    );
    return null;
  }
这个调用流程已经在ReactNative Android源码分析中分析了。这次会走到JS的MessageQueue.callFunctionReturnFlushedQueue()中了。
JS接收调用和处理
先来解释下为什么会走到callFunctionReturnFlushedQueue。
- 在生成的bundle.js中会把MessageQueue对象放到一个全局的属性中
Object.defineProperty(global,"__fbBatchedBridge",{configurable:!0,value:BatchedBridge})
这里明明是BatchedBridge,为什么说是MessageQueue的对象呢,原来在BatchedBridge.js中有这样几句代码
const BatchedBridge = new MessageQueue(
  () => global.__fbBatchedBridgeConfig,
  serializeNativeParams
);
- 在上面加载bundle文件的时候,会执行下面的方法
void JSCExecutor::bindBridge() throw(JSException) {
      auto global = Object::getGlobalObject(m_context);
      auto batchedBridgeValue = global.getProperty("__fbBatchedBridge");
      if (batchedBridgeValue.isUndefined()) {
        throwJSExecutionException("Could not get BatchedBridge, make sure your bundle is packaged   correctly");
      }

      auto batchedBridge = batchedBridgeValue.asObject();
      m_callFunctionReturnFlushedQueueJS = batchedBridge.getProperty("callFunctionReturnFlushedQueue"). asObject();
      m_invokeCallbackAndReturnFlushedQueueJS = batchedBridge.getProperty(  "invokeCallbackAndReturnFlushedQueue").asObject();
      m_flushedQueueJS = batchedBridge.getProperty("flushedQueue").asObject();
}
这里会把MessageQueue的三个方法会当作对象保存在c++中,当我们调用JS的方法时会直接用到。
void JSCExecutor::callFunction(const std::string& moduleId, const std::string& methodId, const folly::dynamic& arguments) {
      try {
        auto result = m_callFunctionReturnFlushedQueueJS->callAsFunction({
          Value(m_context, String::createExpectingAscii(moduleId)),
          Value(m_context, String::createExpectingAscii(methodId)),
          Value::fromDynamic(m_context, std::move(arguments))
        });
        auto calls = Value(m_context, result).toJSONString();
        m_delegate->callNativeModules(*this, std::move(calls), true);
      } catch (...) {
        std::throw_with_nested(std::runtime_error("Error calling function: " + moduleId + ":" + methodId));
      }
}
Value Object::callAsFunction(JSObjectRef thisObj, int nArgs, const JSValueRef args[]) const {
      JSValueRef exn;
      JSValueRef result = JSObjectCallAsFunction(m_context, m_obj, thisObj, nArgs, args, &exn);
      if (!result) {
        std::string exceptionText = Value(m_context, exn).toString().str();
        throwJSExecutionException("Exception calling object as function: %s", exceptionText.c_str());
      }
      return Value(m_context, result);
}
最终还是通过JavaScriptCore的方法JSObjectCallAsFunction来调用JS的。下面就好办了,直接分析JS代码吧。
在callFunctionReturnFlushedQueue这个方法主要调用了__callFunction,来看一下它的实现:
  __callFunction(module: string, method: string, args: any) {
    ...
    const moduleMethods = this._callableModules[module];
    ...
    const result = moduleMethods[method].apply(moduleMethods, args);
    Systrace.endEvent();
    return result;
  }
方法是从_callableModules中取出来的,那他的值是从哪里来的呢,看了下这个文件原来答案是有往里添加的方法
  registerCallableModule(name, methods) {
    this._callableModules[name] = methods;
  }
也就是说所有的JS Module都需要把该Module中可供Native调用的方法都放到这里来,这样才能够执行。以AppRegistry.js为例,来看看它是怎么往里添加的
var AppRegistry = {
  registerConfig: function(config: Array) {...},

  registerComponent: function(appKey: string, getComponentFunc: ComponentProvider): string {...},

  registerRunnable: function(appKey: string, func: Function): string {...},

  getAppKeys: function(): Array {...},

  runApplication: function(appKey: string, appParameters: any): void {...},

  unmountApplicationComponentAtRootTag: function(rootTag : number) {...},

};

BatchedBridge.registerCallableModule(
  'AppRegistry',
  AppRegistry
);
到这里Native调用JS就已经完成了。
总结一下�整个流程:
- MessageQueue把Native调用的方法放到JavaScriptCore中
- JS Module�把可以调用的方法放到MessageQueue的一个对列中
- Native从JavaScriptCore中拿到JS的调用入口,并把Module Name、Method Name、Parameters传过去
- 执行JS Module的方法
4. JS与Native通讯
JS处理Native Module列表
在ReactNative Android源码分析中分析了Native的初始化流程,这里总结一下对Native 模块的处理。
- 在初始化CatalystInstance时会把所有的Native Module放在一个列表中,并在C++(ModuleRegistry)和Java(NativeModuleRegistry)中都保存了
- 在JavaScriptCore中设置了全局属性__fbBatchedBridgeConfig,其值为Module Name列表
那么问题来了,在JS中只能取到Native Module的名字,怎么调用它的方法呢。下面来分析下这个问题。
在JSCExecutor初始化的时候,向JavaScriptCore中注册了几个c++的方法供JS调用,其中就有获取Native Module详细信息的方法
void JSCExecutor::initOnJSVMThread() throw(JSException) {

  ....
  installNativeHook<&JSCExecutor::nativeRequireModuleConfig>("nativeRequireModuleConfig");
  installNativeHook<&JSCExecutor::nativeFlushQueueImmediate>("nativeFlushQueueImmediate");
  ...

}

JSValueRef JSCExecutor::nativeRequireModuleConfig(
    size_t argumentCount,
    const JSValueRef arguments[]) {
  if (argumentCount != 1) {
    throw std::invalid_argument("Got wrong number of args");
  }

  std::string moduleName = Value(m_context, arguments[0]).toString().str();
  folly::dynamic config = m_delegate->getModuleConfig(moduleName);
  return Value::fromDynamic(m_context, config);
}
从nativeRequireModuleConfig的入参和返回结果就可以看出来
是供JS调用的,用于获取Native Module详情信息,m_delegate-> getModuleConfig的实现下面会分析。
接着来分析下JS是如何处理Native Module的。入口是在MessageQueue.js中处理的。
class MessageQueue {
  constructor(configProvider: () => Config, serializeNativeParams: boolean) {
    ....
    lazyProperty(this, 'RemoteModules', () => {
      const {remoteModuleConfig} = configProvider();
      const modulesConfig = this._genModulesConfig(remoteModuleConfig);
      const modules = this._genModules(modulesConfig)
      ...
      return modules;
    });
  }

  ...

  function lazyProperty(target: Object, name: string, f: () => any) {
  Object.defineProperty(target, name, {
    configurable: true,
    enumerable: true,
    get() {
      const value = f();
      Object.defineProperty(target, name, {
        configurable: true,
        enumerable: true,
        writeable: true,
        value: value,
      });
      return value;
    }
  });
}
在它的构造函数中定义了一个RemoteModules的属性,使用了懒加载的机制,只有真正使用的时候才会为其赋值。返回的是所有Modle列表,只添加了module id,其他信息并没有。
这个RemoteModules是在哪里使用,Module的其他信息又是怎么获取呢,路漫漫其修远兮,接着分析吧
搜了下代码,是在NativeModule.js中
const BatchedBridge = require('BatchedBridge');
const RemoteModules = BatchedBridge.RemoteModules;

...

/**
 * Define lazy getters for each module.
 * These will return the module if already loaded, or load it if not.
 */
const NativeModules = {};
Object.keys(RemoteModules).forEach((moduleName) => {
  Object.defineProperty(NativeModules, moduleName, {
    configurable: true,
    enumerable: true,
    get: () => {
      let module = RemoteModules[moduleName];
      if (module && typeof module.moduleID === 'number' && global.nativeRequireModuleConfig) {
        // The old bridge (still used by iOS) will send the config as
        //  a JSON string that needs parsing, so we set config according
        //  to the type of response we got.
        const rawConfig = global.nativeRequireModuleConfig(moduleName);
        const config = typeof rawConfig === 'string' ? JSON.parse(rawConfig) : rawConfig;
        module = config && BatchedBridge.processModuleConfig(config, module.moduleID);
        RemoteModules[moduleName] = module;
      }
      Object.defineProperty(NativeModules, moduleName, {
        configurable: true,
        enumerable: true,
        value: module,
      });
      return module;
    },
  });
});

module.exports = NativeModules;
这块会遍历RemoteModules中所有的模块名,每个模块名都定义一个对象,使用的时候才会为其赋值。看到在赋值的时候会调用c++的nativeRequireModuleConfig,也就是获取每个Module的详细信息。
�获取详细信息就是调用上面提到的m_delegate->getModuleConfig(moduleName),m_delegate是JsToNativeBridge对象,getModuleConfig直接调用了ModuleRegistry::getConfig(name)
folly::dynamic ModuleRegistry::getConfig(const std::string& name) {
  SystraceSection s("getConfig", "module", name);
  auto it = modulesByName_.find(name);
  if (it == modulesByName_.end()) {
    return nullptr;
  }
  CHECK(it->second < modules_.size());

  NativeModule* module = modules_[it->second].get();

  // string name, [object constants,] array methodNames (methodId is index), [array asyncMethodIds]
  folly::dynamic config = folly::dynamic::array(name);

  {
    SystraceSection s("getConstants");
    folly::dynamic constants = module->getConstants();
    if (constants.isObject() && constants.size() > 0) {
      config.push_back(std::move(constants));
    }
  }

  {
    SystraceSection s("getMethods");
    std::vector methods = module->getMethods();

    folly::dynamic methodNames = folly::dynamic::array;
    folly::dynamic asyncMethodIds = folly::dynamic::array;
    folly::dynamic syncHookIds = folly::dynamic::array;

    for (auto& descriptor : methods) {
      methodNames.push_back(std::move(descriptor.name));
      if (descriptor.type == "remoteAsync") {
        asyncMethodIds.push_back(methodNames.size() - 1);
      } else if (descriptor.type == "syncHook") {
        syncHookIds.push_back(methodNames.size() - 1);
      }
    }

    if (!methodNames.empty()) {
      config.push_back(std::move(methodNames));
      config.push_back(std::move(asyncMethodIds));
      if (!syncHookIds.empty()) {
        config.push_back(std::move(syncHookIds));
      }
    }
  }

  if (config.size() == 1) {
    // no constants or methods
    return nullptr;
  } else {
    return config;
  }
}
这里需要解释两个数据结构,modules_是所有Native模块对象的数组,而modulesByName_是一个Map,key值是模块名字,value是该模块在modules_中的索引值。这个方法返回值是一个数组,它的格式是
[
  "Module Name",
  [Object Constants],
  [Method Name Array],
  [Async Method Ids],
  [Sync Hook Ids]
]
前三个好理解,来解释后两是什么含意,asyncMethod字面意思是异步方法,也就是方法参数是Promise的。而syncHook类的方法,目前是没有遇到,这种方法可以JS线程中直接调用,而其他的方法是扔到后台线程队列,然后等待被调用。
下面重点看一下NativeModule的getConstants和getMethods的实现。
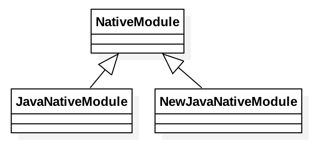
从NativeModule的类图中看出它有两个子类,JavaNativeModule就是普通的Java模块,而NewJavaNativeModule是指c++跨平台模块,目前还未使用到,所以现在只分析下JavaNativeModule。
  std::vector getMethods() override {
    static auto getMDMethod =
      wrapper_->getClass()->getMethod::javaobject()>(
        "getMethodDescriptors");

    std::vector ret;
    auto descs = getMDMethod(wrapper_);
    for (const auto& desc : *descs) {
      static auto nameField =
        JMethodDescriptor::javaClassStatic()->getField("name");
      static auto typeField =
        JMethodDescriptor::javaClassStatic()->getField("type");

      ret.emplace_back(
        desc->getFieldValue(nameField)->toStdString(),
        desc->getFieldValue(typeField)->toStdString()
      );
    }
    return ret;
  }

  folly::dynamic getConstants() override {
    static auto constantsMethod =
      wrapper_->getClass()->getMethod("getConstants");
    auto constants = constantsMethod(wrapper_);
    if (!constants) {
      return nullptr;
    } else {
      // See JavaModuleWrapper#getConstants for the other side of this hack.
      return cthis(constants)->array[0];
    }
  }
这里的wrapper_是指的JavaModuleWrapper,而wrapper_->getClass()是指的Java类:"Lcom/facebook/react/cxxbridge/JavaModuleWrapper;",也就是说上面是使用反射,调用JavaModuleWrapper的getMethodDescriptors和getConstants。
getContants就是调用Java具体模块的getConstants方法,并把返回的map组装成RN可以接受的WritableNativeMap的结构返回,具体看一下getMethodDescriptors的实现
@DoNotStrip
public class MethodDescriptor {
  @DoNotStrip
  Method method;
  @DoNotStrip
  String signature;
  @DoNotStrip
  String name;
  @DoNotStrip
  String type;
}
@DoNotStrip
public List getMethodDescriptors() {
  ArrayList descs = new ArrayList<>();
  for (Map.Entry entry :
         mModule.getMethods().entrySet()) {
    MethodDescriptor md = new MethodDescriptor();
    md.name = entry.getKey();
    md.type = entry.getValue().getType();
    BaseJavaModule.JavaMethod method = (BaseJavaModule.JavaMethod) entry.getValue();
    mMethods.add(method);
    descs.add(md);
  }
  return descs;
}
mModule.getMethods()是在BaseJavaModule中,也是使用反射查找当前模块的方法,方法必须有@ReactMethod的注解才会收集。最终把拿到的信息封装成一个MethodDescriptor的类。
到这里就已经分析了JS是如何拿到Native模块的详细信息的。
如何调用Native
这里演示下在JS中如何调用Native的module,先假设一个场景,用户点击一个TextView,然后弹个Toast提示。
以demo工程的代码为例:
class AwesomeProject extends Component {
  render() {
    return (


          Welcome to React Native!


          To get started, edit index.android.js


          Double tap R on your keyboard to reload,{'\n'}
          Shake or press menu button for dev menu


    );
  }
}

function onClick(){
   var ToastAndroid = require('ToastAndroid')
   ToastAndroid.show('Click TextView...', ToastAndroid.SHORT);
}
来看一下ToastAndroid的实现
var RCTToastAndroid = require('NativeModules').ToastAndroid;
...
var ToastAndroid = {
  ...
  show: function (
    message: string,
    duration: number
  ): void {
    RCTToastAndroid.show(message, duration);
  },
  ...
};
这里调用的是RCTToastAndroid.show(),而RCTToastAndroid是从NativeModules中取出的。 在前面分析JS如何收集Native模块的时候会生成modules属性,调用Native方法时就是执行它里面的函数,看一下这个函数是如何生成的
  _genMethod(module, method, type) {
    let fn = null;
    const self = this;
    if (type === MethodTypes.remoteAsync) {
      ...
    } else if (type === MethodTypes.syncHook) {
      ...
    } else {
      fn = function(...args) {
        const lastArg = args.length > 0 ? args[args.length - 1] : null;
        const secondLastArg = args.length > 1 ? args[args.length - 2] : null;
        const hasSuccCB = typeof lastArg === 'function';
        const hasErrorCB = typeof secondLastArg === 'function';
        hasErrorCB && invariant(
          hasSuccCB,
          'Cannot have a non-function arg after a function arg.'
        );
        const numCBs = hasSuccCB + hasErrorCB;
        const onSucc = hasSuccCB ? lastArg : null;
        const onFail = hasErrorCB ? secondLastArg : null;
        args = args.slice(0, args.length - numCBs);
        return self.__nativeCall(module, method, args, onFail, onSucc);
      };
    }
    fn.type = type;
    return fn;
  }
就是准备好参数,然后__nativeCall。
  __nativeCall(module, method, params, onFail, onSucc) {
    if (onFail || onSucc) {
      ...
      onFail && params.push(this._callbackID);
      this._callbacks[this._callbackID++] = onFail;
      onSucc && params.push(this._callbackID);
      this._callbacks[this._callbackID++] = onSucc;
    }
    var preparedParams = this._serializeNativeParams ? JSON.stringify(params) : params;
    ...
    this._callID++;

    this._queue[MODULE_IDS].push(module);
    this._queue[METHOD_IDS].push(method);
    this._queue[PARAMS].push(preparedParams);

    const now = new Date().getTime();
    if (global.nativeFlushQueueImmediate &&
        now - this._lastFlush >= MIN_TIME_BETWEEN_FLUSHES_MS) {
      global.nativeFlushQueueImmediate(this._queue);
      this._queue = [[], [], [], this._callID];
      this._lastFlush = now;
    }
    Systrace.counterEvent('pending_js_to_native_queue', this._queue[0].length);
    ...
  }
把�模块名、方法名、调用参数放到数组里存起来,如果上次调用和本次调用想着超过5ms则调用c++的nativeFlushQueueImmediate方法,如果小于5ms就直接返回了。
Native接收调用和处理
Native接收JS调用分两种情况:
- 两次调用超过5ms时,进入nativeFlushQueueImmediate
- Native调用JS的时候会把之前存的调用返回到JSCExecutor::flush()
先来看第一种情况
JSValueRef JSCExecutor::nativeFlushQueueImmediate(
    size_t argumentCount,
    const JSValueRef arguments[]) {
  if (argumentCount != 1) {
    throw std::invalid_argument("Got wrong number of args");
  }

  std::string resStr = Value(m_context, arguments[0]).toJSONString();
  flushQueueImmediate(std::move(resStr));
  return JSValueMakeUndefined(m_context);
}

void JSCExecutor::flushQueueImmediate(std::string queueJSON) {
  m_delegate->callNativeModules(*this, std::move(queueJSON), false);
}
再来看一下第二种情况
void JSCExecutor::flush() {
  auto result = m_flushedQueueJS->callAsFunction({});
  try {
    auto calls = Value(m_context, result).toJSONString();
    m_delegate->callNativeModules(*this, std::move(calls), true);
  } catch (...) {
    std::string message = "Error in flush()";
    try {
      message += ":" + Value(m_context, result).toString().str();
    } catch (...) {
      // ignored
    }
    std::throw_with_nested(std::runtime_error(message));
  }
}
结果都是一样的,把JS的调用转成一个Json字符串,然后再调用JsToNativeBridge.callNativeModules().
�这个Json字符串,是一个数组,包含四个元素,�格式如下:
  void callNativeModules(
      JSExecutor& executor, std::string callJSON, bool isEndOfBatch) override {
    ExecutorToken token = m_nativeToJs->getTokenForExecutor(executor);
    m_nativeQueue->runOnQueue([this, token, callJSON=std::move(callJSON), isEndOfBatch] {
      // An exception anywhere in here stops processing of the batch.  This
      // was the behavior of the Android bridge, and since exception handling
      // terminates the whole bridge, there's not much point in continuing.
      for (auto& call : react::parseMethodCalls(callJSON)) {
        m_registry->callNativeMethod(
          token, call.moduleId, call.methodId, std::move(call.arguments), call.callId);
      }
      if (isEndOfBatch) {
        m_callback->onBatchComplete();
        m_callback->decrementPendingJSCalls();
      }
    });
  }
这里根据ModuleId 和 MethodId调用Native模块的方法。m_registry是c++的ModuleRegistry,先介绍它是怎么创建的。在CatalystInstance.initializeBridge()的时候传递一个Java层的ModuleRegistryHolder,同样在c++中也有一个同名的对象,在创建的时候会把Native的Module列表保存起来并创建一个c++的ModuleRegistry,把Native的�模块列表也传过去了。
void ModuleRegistry::callNativeMethod(ExecutorToken token, unsigned int moduleId, unsigned int methodId,
                                      folly::dynamic&& params, int callId) {
    if (moduleId >= modules_.size()) {
      throw std::runtime_error(
        folly::to("moduleId ", moduleId,
                               " out of range [0..", modules_.size(), ")"));
    }

  #ifdef WITH_FBSYSTRACE
    if (callId != -1) {
      fbsystrace_end_async_flow(TRACE_TAG_REACT_APPS, "native", callId);
    }
  #endif

  modules_[moduleId]->invoke(token, methodId, std::move(params));
}
moduleId就是模块在列表中的索引,modules_的类型是
std::vector> modules_;
也就是在创建ModuleRegistryHolder的时候会根据Java层的ModuleRegistryHolder创建c++的NativeModule。来看一下它的invoke方法
  void invoke(ExecutorToken token, unsigned int reactMethodId, folly::dynamic&& params) override {
    static auto invokeMethod =
      wrapper_->getClass()->getMethod("invoke");
    invokeMethod(wrapper_, JExecutorToken::extractJavaPartFromToken(token).get(), static_cast(reactMethodId),
                 ReadableNativeArray::newObjectCxxArgs(std::move(params)).get());
  }
这里主要是通过反射,调用JavaModuleWrapper的invoke方法,同时把methodId和参数传过去。
/* package */ class JavaModuleWrapper {
  ...
  private final ArrayList mMethods;

  ...

  @DoNotStrip
  public void invoke(ExecutorToken token, int methodId, ReadableNativeArray parameters) {
    if (mMethods == null || methodId >= mMethods.size()) {
      return;
    }

    mMethods.get(methodId).invoke(mCatalystInstance, token, parameters);
  }
}
在JavaModuleWrapper中有一个List,包含了这个module中所有JS可以调用的方法,methodId就是方法的索引和MessageQueue里获取的模块方法id是一致的。JavaMethod的invoke就是通过反射调用相关的方法。至此JS调用Native的流程就完成了。
欢迎评论,多多交流


