Preface:
最近看到.net core很火,忍不住体验了一把,发现微软一直在进步。现在的.net core2.0, 除了生态不是很完善(和java系没法比),从开发体验、语言等各个方面,已经足够优秀了。跨平台不说了,关键是开发工具,Visual Studio简直要甩IDEA好几条街啊有木有~~。
但是到了验证这个环节,微软给出了很多个验证方式,甚至还有二维码验证,.net程序员简直不要太幸福。但这些验证几乎全都是基于MVC的。但是现在这个时代有几个人做新项目还用MVC呢?不需要考虑将来的移动端扩展么?
验证这个环节基于Token的jwt才是王道,但官方教程并没有给出明确的示范,上网搜国内国外的基本都基于core1.0版本,步骤很繁琐。偶然之间发现一篇教程,基于2.0,发现步骤大大简化,简化的我都能看懂了,自己实践了一下记录下来:
1. 生成jwt token
在.net core 2.0中,生成jwt token的工作被大大简化了,只需要在控制器中声明一个方法即可,步骤:
1). 使用一个secret key(自定义)生成Credential。
2). 生成token
完整的Controller代码如下:
using System;
using System.IdentityModel.Tokens.Jwt;
using System.Security.Claims;
using System.Text;
using Microsoft.AspNetCore.Authorization;
using Microsoft.AspNetCore.Mvc;
using Microsoft.Extensions.Configuration;
using Microsoft.IdentityModel.Tokens;
namespace DotnetCore2_Jwt.Controllers
{
[Produces("application/json")]
[Route("api/Auth")]
public class AuthController : Controller
{
private readonly IConfiguration _configuration;
public AuthController(IConfiguration configuration)
{
_configuration = configuration;
}
///
/// login
///
///
/// 在appsettings.json文件中设置SecurityKey:"SecurityKey": "dd%88*377f6d&f£$$£$FdddFF33fssDG^!3",
使用Postman测试:Post: api/auth
{
"token": "eyJhbGciOiJIUzI1NiIsInR5cCI6IkpXVCJ9.eyJodHRwOi8vc2NoZW1hcy54bWxzb2FwLm9yZy93cy8yMDA1LzA1L2lkZW50aXR5L2NsYWltcy9uYW1lIjoiQW5nZWxhRGFkZHkiLCJleHAiOjE1MTU0NTgxNTAsImlzcyI6InlvdXJkb21haW4uY29tIiwiYXVkIjoieW91cmRvbWFpbi5jb20ifQ.tFDugoIhYnXJgcucM6biqEyD_oJnwV8RPLCVn5aoa78"
}
2. 使用jwt验证
在Startup.js文件中,定义jwt验证服务:
using Microsoft.AspNetCore.Authentication.JwtBearer;
using Microsoft.AspNetCore.Builder;
using Microsoft.AspNetCore.Hosting;
using Microsoft.Extensions.Configuration;
using Microsoft.Extensions.DependencyInjection;
using Microsoft.IdentityModel.Tokens;
using System.Text;

namespace DotnetCore2_Jwt
{
    public class Startup
    {
        public Startup(IConfiguration configuration)
        {
            Configuration = configuration;
        }

        public IConfiguration Configuration { get; }

        // This method gets called by the runtime. Use this method to add services to the container.
        public void ConfigureServices(IServiceCollection services)
        {
            //添加jwt验证:
            services.AddAuthentication(JwtBearerDefaults.AuthenticationScheme)
                .AddJwtBearer(options=> {
                    options.TokenValidationParameters = new TokenValidationParameters
                    {
                        ValidateIssuer = true,//是否验证Issuer
                        ValidateAudience = true,//是否验证Audience
                        ValidateLifetime = true,//是否验证失效时间
                        ValidateIssuerSigningKey = true,//是否验证SecurityKey
                        ValidAudience = "yourdomain.com",//Audience
                        ValidIssuer = "yourdomain.com",//Issuer,这两项和前面签发jwt的设置一致
                        IssuerSigningKey = new SymmetricSecurityKey(Encoding.UTF8.GetBytes(Configuration["SecurityKey"]))//拿到SecurityKey
                    };
                });
            services.AddMvc();
        }

        // This method gets called by the runtime. Use this method to configure the HTTP request pipeline.
        public void Configure(IApplicationBuilder app, IHostingEnvironment env)
        {
            app.UseAuthentication();//注意添加这一句,启用验证
            if (env.IsDevelopment())
            {
                app.UseDeveloperExceptionPage();
            }

            app.UseMvc();
        }
    }
}
ALL DONE.就这么简单
3. 测试
定义一个TestController
 [Route("api/[controller]")]
    public class TestController : Controller
    {
        // GET api/values
        [HttpGet]
        [Authorize]//添加Authorize标签,可以加在方法上,也可以加在类上
        public IEnumerable Get()
        {
            return new string[] { "value1", "value2" };
        }
         // GET api/values/5
        [HttpGet("{id}")]
        public string Get(int id)
        {
            return "value";
        }
}
启动测试:
GET http://localhost:50276/api/test
GET http://localhost:50276/api/test/1 →
value
POST http://localhost:50276/auth,
POST body:{"username":"AngelaDaddy","password":"123456"}
{
"token": "eyJhbGciOiJIUzI1NiIsInR5cCI6IkpXVCJ9.eyJodHRwOi8vc2NoZW1hcy54bWxzb2FwLm9yZy93cy8yMDA1LzA1L2lkZW50aXR5L2NsYWltcy9uYW1lIjoiQW5nZWxhRGFkZHkiLCJleHAiOjE1MTU0NjE5MTMsImlzcyI6InlvdXJkb21haW4uY29tIiwiYXVkIjoieW91cmRvbWFpbi5jb20ifQ.FtkfsA4tmZ4aILnsgU-So8fgYxPIwcWRAtdsFUEITnA"
}
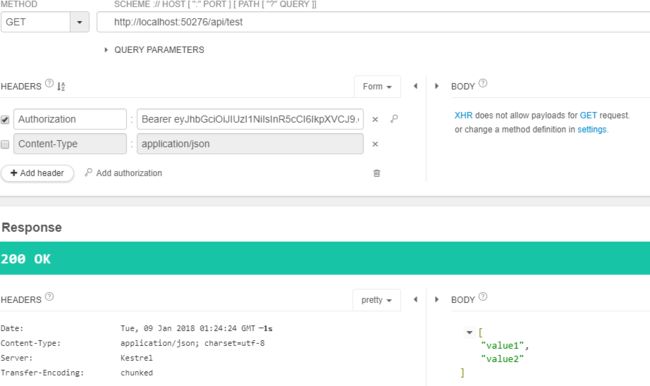
GET GET http://localhost:50276/api/test,在header中添加Auth


