测试设备为iPad Air 2、iOS 9.2。
1、着色器的简要说明
Shaders are simply programs that run on graphics processors (GPUs). The vertex and fragment shader are two important types of shaders, and they run on the vertex processor and fragment processor, respectively.
The main purpose of the vertex shader is to perform the processing of a stream of vertex data.
An important processing task involves the transformation of the position of each vertex from the 3D virtual space to a 2D coordinate for display on the screen. Vertex shaders can also manipulate the color and texture coordinates. Therefore, vertex shaders serve as an important component of the OpenGL pipeline to control movement, lighting, and color.
A fragment shader is primarily designed to compute the final color of an individual pixel(fragment). Oftentimes, we implement various image post-processing techniques, such asblurring or sharpening, at this stage; the end results are stored in the framebuffer, which willbe displayed on screen.
In general, variable names with the prefix gl should not be used inside shader programs in OpenGL as these are reserved for built-in variables. Notice that the final position, gl_Position, is expressed in homogeneous coordinates.
The fragment shader, which again passes the color information forward to the output framebuffer. Notice that the final output (color_out) is expressed in the RGBA format, where A is the alpha value (transparency).
2、绘制矩形
本节运行效果如下。

2.1、代码实现与分析
#import
@interface GLView : UIView

@end

@implementation GLView {
    EAGLContext *context;
    CAEAGLLayer *glLayer;
}

+ (Class)layerClass {
    return [CAEAGLLayer class];
}

- (void)layoutSubviews {
    [super layoutSubviews];

    glLayer = (CAEAGLLayer *)self.layer;
    glLayer.contentsScale = [UIScreen mainScreen].scale;

    context = [[EAGLContext alloc] initWithAPI:kEAGLRenderingAPIOpenGLES3];
    [EAGLContext setCurrentContext:context];

    GLuint renderbuffer;
    glGenRenderbuffers(1, &renderbuffer);
    glBindRenderbuffer(GL_RENDERBUFFER, renderbuffer);
    [context renderbufferStorage:GL_RENDERBUFFER fromDrawable:glLayer];

    GLuint framebuffer;
    glGenFramebuffers(1, &framebuffer);
    glBindFramebuffer(GL_FRAMEBUFFER, framebuffer);
    glFramebufferRenderbuffer(GL_FRAMEBUFFER, GL_COLOR_ATTACHMENT0, GL_RENDERBUFFER, renderbuffer);

    NSString *vertexShaderString = @"#version 300 es \n"
    "layout(location = 0) in vec4 a_Position; \n"
    "layout(location = 1) in vec4 a_Color; \n"
    "out vec4 v_Color; \n"
    "void main() { \n"
    "gl_Position = a_Position;\n"
    "v_Color = a_Color;\n}";

    NSString *fragmentShaderString = @"#version 300 es\n"
    "precision mediump float;\n"
    "in vec4 v_Color;\n"
    "out vec4 o_Color;\n"
    "void main() {\n"
    "o_Color = v_Color;\n}";

    GLint vertexShader = [self compileShaderWithString:vertexShaderString withType:GL_VERTEX_SHADER];
    GLint fragmentShader = [self compileShaderWithString:fragmentShaderString withType:GL_FRAGMENT_SHADER];

    GLuint program = glCreateProgram();
    glAttachShader(program, vertexShader);
    glAttachShader(program, fragmentShader);
    glLinkProgram(program);
    GLint linkStatus;
    glGetProgramiv(program, GL_LINK_STATUS, &linkStatus);
    if (linkStatus == GL_FALSE) {
        GLint length;
        glGetProgramiv(program, GL_INFO_LOG_LENGTH, &length);
        if (length > 0) {
            GLchar *infolog = malloc(sizeof(GLchar) * length);
            glGetProgramInfoLog(program, length, NULL, infolog);
            fprintf(stderr, "link error = %s", infolog);
            if (infolog) {
                free(infolog);
            }
        }
    }
    glValidateProgram(program);
    glUseProgram(program);

    glClearColor(1.0, 1.0, 1.0, 1.0);
    glClear(GL_COLOR_BUFFER_BIT);
    CGRect frame = [UIScreen mainScreen].bounds;
    glViewport(0, 0, frame.size.width * glLayer.contentsScale, frame.size.height * glLayer.contentsScale);

    /*
     顶点
     0 --- 3
     |     |
     1 --- 2
     颜色
     g --- r
     |     |
     b --- g
     */
    GLfloat vertexs[] = {
        -1.0f,  0.5f, 0.0f,  // Position 0
        0, 1, 0, // green
        -1.0f, -0.5f, 0.0f,  // Position 1
        0, 0, 1, // blue
        1.0f, -0.5f, 0.0f,  // Position 2
        0, 1, 0, // green
        1.0f,  0.5f, 0.0f,  // Position 3
        1, 0, 0, // red
    };

    glEnableVertexAttribArray(0);
    glVertexAttribPointer(0, 3, GL_FLOAT, GL_FALSE, 6 * sizeof(GLfloat), vertexs);
    glEnableVertexAttribArray(1);
    glVertexAttribPointer(1, 3, GL_FLOAT, GL_FALSE, 6 * sizeof(GLfloat), &vertexs[3]);

    glDrawArrays(GL_TRIANGLE_FAN, 0, 4);

    [context presentRenderbuffer:GL_RENDERBUFFER];
}

- (GLuint)compileShaderWithString:(NSString *)content withType:(GLenum)type {
    GLuint shader;
    const char *shaderString = content.UTF8String;
    shader = glCreateShader(type);
    glShaderSource(shader, 1, &shaderString, NULL);
    glCompileShader(shader);
    GLint status;
    glGetShaderiv(shader, GL_COMPILE_STATUS, &status);
    if (status == GL_FALSE) {
        GLint length;
        glGetShaderiv(shader, GL_INFO_LOG_LENGTH, &length);
        if (length > 0) {
            GLchar *infolog = malloc(sizeof(GLchar) * length);
            glGetShaderInfoLog(shader, length, NULL, infolog);
            fprintf(stderr, "compile error = %s", infolog);
            if (infolog) {
                free(infolog);
            }
        }
    }
    return shader;
}

@end
2.1.1、绘制顺序
对于顶点,其原点在屏幕中央、左下角为(-1, -1)、右上角为(1, 1),那么以GL_TRIANGLE_FAN方式绘制,顺序如下所示。
/*
 顶点
 0 --- 3
 |     |
 1 --- 2
 颜色
 g --- r
 |     |
 b --- g
 */
GLfloat vertexs[] = {
    -1.0f,  0.5f, 0.0f,  // Position 0
    0, 1, 0, // green
    -1.0f, -0.5f, 0.0f,  // Position 1
    0, 0, 1, // blue
    1.0f, -0.5f, 0.0f,  // Position 2
    0, 1, 0, // green
    1.0f,  0.5f, 0.0f,  // Position 3
    1, 0, 0, // red
};
2.1.2、顶点数据解析
由于本文档代码重新编写,不像前面章节定义了Vertex结构体,那么数据上传后需明确指示GPU如何读取顶点数据。根据数据结构,可知每个顶点数据包含坐标及对应的颜色值,3 + 3共6个浮点数,因此stride设置为6 * sizeof(GLfloat),同时颜色数据的起始位置是在第四个字节处,故设置为&vertexs[3]。
glEnableVertexAttribArray(0);
glVertexAttribPointer(0, 3, GL_FLOAT, GL_FALSE, 6 * sizeof(GLfloat), vertexs);
glEnableVertexAttribArray(1);
glVertexAttribPointer(1, 3, GL_FLOAT, GL_FALSE, 6 * sizeof(GLfloat), &vertexs[3]);
2.1.3、着色器程序分析
颜色值在顶点着色器中不处理,直接传递给片段着色器。
NSString *vertexShaderString = @"#version 300 es \n"
"layout(location = 0) in vec4 a_Position; \n"
"layout(location = 1) in vec4 a_Color; \n"
"out vec4 v_Color; \n"
"void main() { \n"
"gl_Position = a_Position; \n"
"v_Color = a_Color; \n}";
片段着色器接收颜色值并直接输出到管线后续阶段。
NSString *fragmentShaderString = @"#version 300 es \n"
"precision mediump float; \n"
"in vec4 v_Color; \n"
"out vec4 o_Color; \n"
"void main() { \n"
"o_Color = v_Color; \n}";
2.1.4、着色器探索:flat插值方式
修改着色器的插值方式为flat,可得到如下效果。
// vertex shader
"flat out vec4 v_Color; \n"
// fragment shader
"flat in vec4 v_Color; \n"

另外,OpenGL ES 3.0表明支持smooth透视校正插值,实际在真机运行时出现编译错误。

有关着色器插值的更多介绍,可参考OpenGL Interpolation Qualifiers (GLSL)。
3、显示纹理
本节运行效果如下。


SOIL library for simple imageloading and the OpenCV library for more advanced video stream handling and filtering.
SOIL主页没表明其支持iOS,这里懒得折腾,直接使用UIImage加载图片。
3.1、支持的纹理数量(额外内容)
OpenGL ES 3.0标准对支持的纹理数量有作规定,查询具体实现平台的支持数量代码如下。
EAGLContext *context = [[EAGLContext alloc] initWithAPI:kEAGLRenderingAPIOpenGLES3];
[EAGLContext setCurrentContext:context];
GLint params;
glGetIntegerv(GL_MAX_VERTEX_TEXTURE_IMAGE_UNITS, ¶ms);
NSLog(@"GL_MAX_VERTEX_TEXTURE_IMAGE_UNITS = %zi", params);
glGetIntegerv(GL_MAX_TEXTURE_IMAGE_UNITS, ¶ms);
NSLog(@"GL_MAX_TEXTURE_IMAGE_UNITS = %zi", params);
iPad Air 2的输出为GL_MAX_VERTEX_TEXTURE_IMAGE_UNITS(顶点着色器支持的图像纹理个数) = GL_MAX_TEXTURE_IMAGE_UNITS(片段着色器支持的图像纹理个数) = 16。
3.2、加载图片
glTexImage2D最后一个参数data表示内存中指向图像的指针,由于UIImage无此接口,需使用CGImageRef对应的操作,通过CGDataProviderCopyData得到的内存在用完时需调用CFRelease进行释放。图像的宽高和颜色格式也需要在glTexImage2D中指明。
NSString *path = [[NSBundle mainBundle] pathForResource:@"TextureUIImage.png" ofType:nil];
UIImage *image = [UIImage imageWithContentsOfFile:path];
CGImageRef imageRef = [image CGImage];
float width = CGImageGetWidth(imageRef);
float height = CGImageGetHeight(imageRef);
CGDataProviderRef  provider = CGImageGetDataProvider(imageRef);
CFDataRef textureDataRef = CGDataProviderCopyData(provider);
const unsigned char *pixels = CFDataGetBytePtr(textureDataRef);
使用GLKit可简化这些操作,示例如下。
- (void) textureWithContentsOfURL:imageURL
                   options:nil /* 加载需要的额外操作 */
                     queue:nil
         completionHandler:(^GLKTextureLoaderCallback) (GLKTextureInfo *textureInfo, NSError *outError) {
    if (outError) {
        return ;
    }
    // 设置新采样模式
    glEnable(GL_TEXTURE_2D);  // 非必需
    glBindTexture(GL_TEXTURE_2D, textureInfo.name);
    glTexParameterf(GL_TEXTURE_2D, GL_TEXTURE_WRAP_S, GL_REPEAT);
    glTexParameterf(GL_TEXTURE_2D, GL_TEXTURE_WRAP_T, GL_REPEAT);
}
3.3、生成纹理
glActiveTexture(GL_TEXTURE0);
glPixelStorei(GL_UNPACK_ALIGNMENT, 1);
GLuint texture;
glGenTextures(1, &texture);
glBindTexture(GL_TEXTURE_2D, texture);
glTexImage2D(GL_TEXTURE_2D, 0, GL_RGBA, width, height, 0, GL_RGBA, GL_UNSIGNED_BYTE, pixels);
3.4、设置纹理采样模式
glTexParameteri(GL_TEXTURE_2D, GL_TEXTURE_MIN_FILTER, GL_NEAREST);
glTexParameteri(GL_TEXTURE_2D, GL_TEXTURE_MAG_FILTER, GL_NEAREST);
3.5、着色器对纹理的处理
这里,顶点着色器直接传递纹理坐标,片段着色器计算每个像素最终的颜色,所以纹理的采样操作一般也在这里实现。片段着色器的修改内容为,声明使用的采样器,然后将输出颜色修改成采样器所采集的图片数据。
新顶点着色器内容如下。
NSString *vertexShaderString = @"#version 300 es \n"
"layout(location = 0) in vec4 a_Position; \n"
"layout(location = 1) in vec2 a_TexCoord; \n"
"uniform mat4 projection_matrix; \n"
"out vec2 v_TexCoord; \n"
"void main() { \n"
"gl_Position = a_Position * projection_matrix; \n"
"v_TexCoord = a_TexCoord; \n}";
新片段着色器内容如下。
NSString *fragmentShaderString = @"#version 300 es \n"
"precision mediump float; \n"
"uniform sampler2D u_sampler; \n"
"in vec2 v_TexCoord; \n"
"out vec4 o_Color; \n"
"void main() { \n"
"o_Color = texture(u_sampler, v_TexCoord); \n}";
sampler2D表示访问2维纹理。
texture表示按纹理坐标进行采样。
3.6、上传采样器
int sampler = glGetUniformLocation(program, "u_sampler");
glUniform1i(sampler, 0);
3.7、配置纹理坐标
启用纹理则不再直接给顶点指定颜色。
/*
 顶点
 0 --- 3
 |     |
 1 --- 2
 纹理
 0 --- 3
 |     |
 1 --- 2
 */
GLfloat vertexs[] = {
    -1.0f,  0.5f, 0.0f,  // Position 0
    0.0f,  0.0f,        // TexCoord 0
    -1.0f, -0.5f, 0.0f,  // Position 1
    0.0f,  1.0f,        // TexCoord 1
    1.0f, -0.5f, 0.0f,  // Position 2
    1.0f,  1.0f,        // TexCoord 2
    1.0f,  0.5f, 0.0f,  // Position 3
    1.0f,  0.0f         // TexCoord 3
};
3.8、指定坐标解析格式
由于纹理坐标组成为(u, v),只有两个分量,故将stride改成3 + 2。
glEnableVertexAttribArray(0);
glVertexAttribPointer(0, 3, GL_FLOAT, GL_FALSE, 5 * sizeof(GLfloat), vertexs);
glEnableVertexAttribArray(1);
glVertexAttribPointer(1, 2, GL_FLOAT, GL_FALSE, 5 * sizeof(GLfloat), &vertexs[3]);
3.9、保持图片横纵比
为了显示图片时不出现变形,在此加上正交投影来保持图片横纵比。
int projection_matrix_index = glGetUniformLocation(program, "projection_matrix");
CGFloat ratio = frame.size.width / frame.size.height;
GLKMatrix4 orth = GLKMatrix4MakeOrtho(-ratio, ratio, - 1, 1, -1, 1);
glUniformMatrix4fv(projection_matrix_index, 1, GL_FALSE, orth.m);
顶点着色器也有相应的变化。
"uniform mat4 projection_matrix; \n"
// main
"gl_Position = a_Position * projection_matrix; \n"
这里向量左乘是因为GLKit是行优先存储矩阵。
3.10、完整源码
@implementation GLView {
    EAGLContext *context;
    CAEAGLLayer *glLayer;
}

+ (Class)layerClass {
    return [CAEAGLLayer class];
}

- (void)layoutSubviews {
    [super layoutSubviews];

    glLayer = (CAEAGLLayer *)self.layer;
    glLayer.contentsScale = [UIScreen mainScreen].scale;

    context = [[EAGLContext alloc] initWithAPI:kEAGLRenderingAPIOpenGLES3];
    [EAGLContext setCurrentContext:context];

    GLuint renderbuffer;
    glGenRenderbuffers(1, &renderbuffer);
    glBindRenderbuffer(GL_RENDERBUFFER, renderbuffer);
    [context renderbufferStorage:GL_RENDERBUFFER fromDrawable:glLayer];

    GLuint framebuffer;
    glGenFramebuffers(1, &framebuffer);
    glBindFramebuffer(GL_FRAMEBUFFER, framebuffer);
    glFramebufferRenderbuffer(GL_FRAMEBUFFER, GL_COLOR_ATTACHMENT0, GL_RENDERBUFFER, renderbuffer);

    NSString *vertexShaderString = @"#version 300 es \n"
    "layout(location = 0) in vec4 a_Position; \n"
    "layout(location = 1) in vec2 a_TexCoord; \n"
    "uniform mat4 projection_matrix; \n"
    "out vec2 v_TexCoord; \n"
    "void main() { \n"
    "gl_Position = a_Position * projection_matrix; \n"
    "v_TexCoord = a_TexCoord; \n}";

    NSString *fragmentShaderString = @"#version 300 es \n"
    "precision mediump float; \n"
    "uniform sampler2D u_sampler; \n"
    "in vec2 v_TexCoord; \n"
    "out vec4 o_Color; \n"
    "void main() { \n"
    "o_Color = texture(u_sampler, v_TexCoord); \n}";

    GLint vertexShader = [self compileShaderWithString:vertexShaderString withType:GL_VERTEX_SHADER];
    GLint fragmentShader = [self compileShaderWithString:fragmentShaderString withType:GL_FRAGMENT_SHADER];

    GLuint program = glCreateProgram();
    glAttachShader(program, vertexShader);
    glAttachShader(program, fragmentShader);
    glLinkProgram(program);
    GLint linkStatus;
    glGetProgramiv(program, GL_LINK_STATUS, &linkStatus);
    if (linkStatus == GL_FALSE) {
        GLint length;
        glGetProgramiv(program, GL_INFO_LOG_LENGTH, &length);
        if (length > 0) {
            GLchar *infolog = malloc(sizeof(GLchar) * length);
            glGetProgramInfoLog(program, length, NULL, infolog);
            fprintf(stderr, "link error = %s", infolog);
            if (infolog) {
                free(infolog);
            }
        }
    }
    glValidateProgram(program);
    glUseProgram(program);

    glClearColor(1.0, 1.0, 1.0, 1.0);
    glClear(GL_COLOR_BUFFER_BIT);
    CGRect frame = [UIScreen mainScreen].bounds;
    glViewport(0, 0, frame.size.width * glLayer.contentsScale, frame.size.height * glLayer.contentsScale);

    glActiveTexture(GL_TEXTURE0);
    glPixelStorei(GL_UNPACK_ALIGNMENT, 1);

    NSString *path = [[NSBundle mainBundle] pathForResource:@"826HS604CL29_1600x900.jpg" ofType:nil];
    UIImage *image = [UIImage imageWithContentsOfFile:path];
    CGImageRef imageRef = [image CGImage];
    float width = CGImageGetWidth(imageRef);
    float height = CGImageGetHeight(imageRef);
    CGDataProviderRef  provider = CGImageGetDataProvider(imageRef);
    CFDataRef textureDataRef = CGDataProviderCopyData(provider);
    const unsigned char *pixels = CFDataGetBytePtr(textureDataRef);

    GLuint texture;
    glGenTextures(1, &texture);
    glBindTexture(GL_TEXTURE_2D, texture);
    glTexImage2D(GL_TEXTURE_2D, 0, GL_RGBA, width, height, 0, GL_RGBA, GL_UNSIGNED_BYTE, pixels);

    glTexParameteri(GL_TEXTURE_2D, GL_TEXTURE_MIN_FILTER, GL_NEAREST);
    glTexParameteri(GL_TEXTURE_2D, GL_TEXTURE_MAG_FILTER, GL_NEAREST);

    int sampler = glGetUniformLocation(program, "u_sampler");
    glUniform1i(sampler, 0);

    int projection_matrix_index = glGetUniformLocation(program, "projection_matrix");
    CGFloat ratio = frame.size.width / frame.size.height;
    GLKMatrix4 orth = GLKMatrix4MakeOrtho(-ratio, ratio, - 1, 1, -1, 1);
    glUniformMatrix4fv(projection_matrix_index, 1, GL_FALSE, orth.m);

    /*
     顶点
     0 --- 3
     |     |
     1 --- 2
     纹理
     0 --- 3
     |     |
     1 --- 2
     */
    GLfloat vertexs[] = {
        -1.0f,  0.5f, 0.0f,  // Position 0
        0.0f,  0.0f,        // TexCoord 0
        -1.0f, -0.5f, 0.0f,  // Position 1
        0.0f,  1.0f,        // TexCoord 1
        1.0f, -0.5f, 0.0f,  // Position 2
        1.0f,  1.0f,        // TexCoord 2
        1.0f,  0.5f, 0.0f,  // Position 3
        1.0f,  0.0f         // TexCoord 3
    };

    glEnableVertexAttribArray(0);
    glVertexAttribPointer(0, 3, GL_FLOAT, GL_FALSE, 5 * sizeof(GLfloat), vertexs);
    glEnableVertexAttribArray(1);
    glVertexAttribPointer(1, 2, GL_FLOAT, GL_FALSE, 5 * sizeof(GLfloat), &vertexs[3]);

    glDrawArrays(GL_TRIANGLE_FAN, 0, 4);

    [context presentRenderbuffer:GL_RENDERBUFFER];
}

- (GLuint)compileShaderWithString:(NSString *)content withType:(GLenum)type {
    GLuint shader;
    const char *shaderString = content.UTF8String;
    shader = glCreateShader(type);
    glShaderSource(shader, 1, &shaderString, NULL);
    glCompileShader(shader);
    GLint status;
    glGetShaderiv(shader, GL_COMPILE_STATUS, &status);
    if (status == GL_FALSE) {
        GLint length;
        glGetShaderiv(shader, GL_INFO_LOG_LENGTH, &length);
        if (length > 0) {
            GLchar *infolog = malloc(sizeof(GLchar) * length);
            glGetShaderInfoLog(shader, length, NULL, infolog);
            fprintf(stderr, "compile error = %s", infolog);
            if (infolog) {
                free(infolog);
            }
        }
    }
    return shader;
}
@end
3.11、使用元素索引进行绘制
可使用glDrawElements替换glDrawArrays。
GLushort indices[] = { 0, 1, 2, 0, 2, 3 };
glDrawElements(GL_TRIANGLES, 6, GL_UNSIGNED_SHORT, indices);
或者使用VBO。
GLuint index;
glGenBuffers(1, &index);
glBindBuffer(GL_ELEMENT_ARRAY_BUFFER, index);
glBufferData(GL_ELEMENT_ARRAY_BUFFER, sizeof(indices), indices, GL_STATIC_DRAW);
//
glDrawElements(GL_TRIANGLES, 6, GL_UNSIGNED_INT, 0);
3.12、图像处理:热度图
由于原书热度图部分代码较长,在此改为加载源文件方式编译片段着色器。
NSString *fragmentShaderPath = [[NSBundle mainBundle] pathForResource:@"shader.frag" ofType:nil];
NSString *fragmentShaderString = [NSString stringWithContentsOfFile:fragmentShaderPath encoding:NSUTF8StringEncoding error:nil];
新片段着色器的内容与sobel算法说明如下。


#version 300 es
precision mediump float;
uniform sampler2D u_sampler;
uniform int u_screen_width;
uniform int u_screen_height;
in vec2 v_TexCoord;
out vec4 o_Color;

// computes the brightness value
float rgb2gray(vec3 color ) {
    return 0.2126 * color.r + 0.7152 * color.g + 0.0722 *
    color.b;
}

// per-pixel operator operations
float pixel_operator(float dx, float dy) {
    return rgb2gray(texture( u_sampler, v_TexCoord +
                            vec2(dx,dy)).rgb);
}

float sobel_filter()
{
    float dx = 1.0 / float(u_screen_width);
    float dy = 1.0 / float(u_screen_height);

    float s00 = pixel_operator(-dx, dy);
    float s10 = pixel_operator(-dx, 0.0);
    float s20 = pixel_operator(-dx, -dy);
    float s01 = pixel_operator(0.0, dy);
    float s21 = pixel_operator(0.0, -dy);
    float s02 = pixel_operator(dx, dy);
    float s12 = pixel_operator(dx, 0.0);
    float s22 = pixel_operator(dx, -dy);
    float sx = s00 + 2.0 * s10 + s20 - (s02 + 2.0 * s12 + s22);
    float sy = s00 + 2.0 * s01 + s02 - (s20 + 2.0 * s21 + s22);
    float dist = sx * sx + sy * sy;

    return dist;
}

vec4 heatMap(float v, float vmin, float vmax){
    float dv;
    float r, g, b;
    if (v < vmin)
        v = vmin;
    if (v > vmax)
        v = vmax;
    dv = vmax - vmin;
    if (v == 0.0) {
        return vec4(0.0, 0.0, 0.0, 1.0);
    }
    if (v < (vmin + 0.25f * dv)) {
        r = 0.0f;
        g = 4.0f * (v - vmin) / dv;
    } else if (v < (vmin + 0.5f * dv)) {
        r = 0.0f;
        b = 1.0f + 4.0f * (vmin + 0.25f * dv - v) / dv;
    } else if (v < (vmin + 0.75f * dv)) {
        r = 4.0f * (v - vmin - 0.5f * dv) / dv;
        b = 0.0f;
    } else {
        g = 1.0f + 4.0f * (vmin + 0.75f * dv - v) / dv;
        b = 0.0f; }
    return vec4(r, g, b, 1.0);
}

void main(){
    //compute the results of Sobel filter
    float graylevel = sobel_filter();
//    o_Color = heatMap(graylevel, 0.1, 3.0);
//    o_Color = vec4(graylevel, graylevel, graylevel, 1.0);
    // process the right side of the image
    if(v_TexCoord.x > 0.5)
        o_Color = heatMap(graylevel, 0.0, 3.0) + texture
        (u_sampler, v_TexCoord);
    else
        o_Color = vec4(graylevel, graylevel, graylevel, 1.0) + texture
        (u_sampler, v_TexCoord);
}
3.13、上传屏幕宽高
int u_screen_width_index = glGetUniformLocation(program, "u_screen_width");
glUniform1i(u_screen_width_index, frame.size.width * 2);
int u_screen_height_index = glGetUniformLocation(program, "u_screen_height");
glUniform1i(u_screen_height_index, frame.size.height * 2);
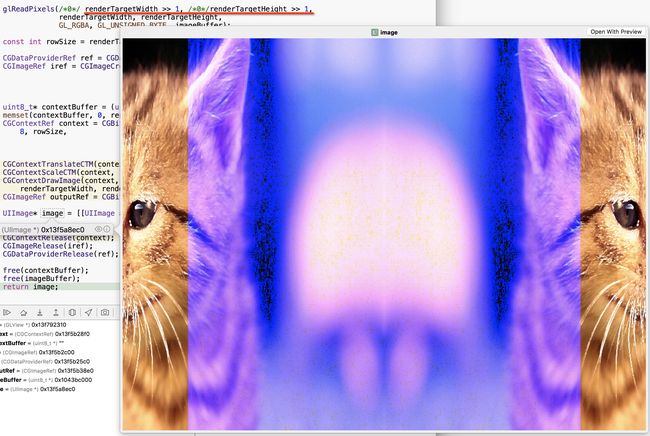
3.13(新增内容)渲染对称纹理
本节效果如下。

实现原理:对称图片的实现,需画两个矩形,第二个矩形(镜像矩形)的顶点正常、纹理坐标需镜像或顶点坐标镜像、纹理坐标正常。下面给出第一种做法的示例。
GLfloat vertexs_left[] = {
    -1.0f,  1.0f, 0.0f,  // Position 0
    0.0f,  0.0f,        // TexCoord 0

    -1.0f, -1.0f, 0.0f,  // Position 1
    //        0, 0, 1, // blue
    0.0f,  1.0f,        // TexCoord 1

    0.f, -1.0f, 0.0f,  // Position 2
    1.0f,  1.0f,        // TexCoord 2

    0.f,  1.0f, 0.0f,  // Position 3
    1.0f,  0.0f,         // TexCoord 3
};

GLfloat vertexs_right[] = {
0.f,  1.0f, 0.0f,  // Position 0
1.0f,  0.0f,       // TexCoord 0

0.0f, -1.0f, 0.0f,  // Position 1
1.0f,  1.0f,        // TexCoord 1

1.f, -1.0f, 0.0f,  // Position 2
0.0f,  1.0f,        // TexCoord 2

1.f,  1.0f, 0.0f,  // Position 3
0.0f,  0.0f,         // TexCoord 3
};
简单起见,这里不使用DrawElement作索引绘制,故需要绘制两个矩阵,参考实现如下:
glEnableVertexAttribArray(0);
glEnableVertexAttribArray(1);
glVertexAttribPointer(0, 3, GL_FLOAT, GL_FALSE, 5 * sizeof(GLfloat), vertexs_left);
glVertexAttribPointer(1, 2, GL_FLOAT, GL_FALSE, 5 * sizeof(GLfloat), &vertexs_left[3]);

glDrawArrays(GL_TRIANGLE_FAN, 0, 4);

glDisableVertexAttribArray(0);
glDisableVertexAttribArray(1);


glEnableVertexAttribArray(0);
glEnableVertexAttribArray(1);
glVertexAttribPointer(0, 3, GL_FLOAT, GL_FALSE, 5 * sizeof(GLfloat), vertexs_right);
glVertexAttribPointer(1, 2, GL_FLOAT, GL_FALSE, 5 * sizeof(GLfloat), &vertexs_right[3]);

glDrawArrays(GL_TRIANGLE_FAN, 0, 4);

glDisableVertexAttribArray(0);
glDisableVertexAttribArray(1);
若继续使用GL_TRIANGLE_FAN方式一次绘图调用绘制两个矩阵,需要修改顶点坐标和对应的纹理坐标,示例如下。
1 -- 0 -- 5
|    |    |
2 -- 3 -- 4
另外,由于原图片(1600 x 900)较大,直接在顶点着色器中作了一次缩放�,详细参考下节:顶点着色器缩放矩阵的存储方式。
3.15(新增内容)顶点着色器缩放矩阵的存储方式
着色器的内置矩阵类型,如mat4,是行还是列优先存储的呢?OpenGL ES 3.0 Programming Guide (Second Edition) 的描述是列优先。下面在真机上作验证。由于着色器不支持中文注释,故使用英文。
1、假设mat行优先存储
// main()
mat4 translate = mat4(1.0, 0.0, 0.0, 0.0,
                  0.0, 1.0, 0.0, 0.0,
                  0.0, 0.0, 1.0, 0.0,
                  2.0, 0.0, 0.0, 1.0);
// constructed matrix
//  1.0    0.0    0.0    0.0
//  0.0    1.0    0.0    0.0
//  0.0    0.0    1.0    0.0
//  2.0    0.0    0.0    1.0
gl_Position = a_Position * translate * projection_matrix;
运行结果如下所示,显然没按x轴平移+2个单位。
修改为gl_Position = translate * a_Position * projection_matrix;且将平移值2.0缩小到0.5,由向量右乘可知这是列优先存储的矩阵,效果如下所示。
当然,使用临时变量也行。
// constructed matrix
//  1.0    0.0    0.0    0.2
//  0.0    1.0    0.0    0.0
//  0.0    0.0    1.0    0.0
//  0.0    0.0    0.0    1.0
vec4 scaled_position = scale * a_Position;
gl_Position = scaled_position * projection_matrix;
2、假设mat列优先存储
// main()
mat4 translate = mat4(1.0, 0.0, 0.0, 0.5,
                  0.0, 1.0, 0.0, 0.0,
                  0.0, 0.0, 1.0, 0.0,
                  0.0, 0.0, 0.0, 1.0);
// constructed matrix
//  1.0    0.0    0.0    0.0
//  0.0    1.0    0.0    0.0
//  0.0    0.0    1.0    0.0
//  0.5    0.0    0.0    1.0
// we define it as translation matrix, so input_vertex * translation_matrix * projection_matrix => final_vertex,
// just like the following sentence.
gl_Position = a_Position  * translate * projection_matrix;
3.14(新增内容)保存GPU渲染内容为图片
算法:在交换前后帧缓冲区([context presentRenderbuffer:GL_RENDERBUFFER];)前,通过glReadPixels读取帧缓冲区中已渲染的图片。示例代码如下。
- (UIImage *)createImageFromFramebuffer {
    GLint params[10];
    glGetIntegerv(GL_VIEWPORT, params);
    int width = params[2];
    int height = params[3];
    const int renderTargetWidth = width;
    const int renderTargetHeight = height;
    const int renderTargetSize = renderTargetWidth*renderTargetHeight * 4;

    uint8_t* imageBuffer = (uint8_t*)malloc(renderTargetSize);
    glReadPixels(/*0*/params[0], /*0*/params[1],
                 renderTargetWidth, renderTargetHeight,
                 GL_RGBA, GL_UNSIGNED_BYTE, imageBuffer);

    const int rowSize = renderTargetWidth*4;

    CGDataProviderRef ref = CGDataProviderCreateWithData(NULL, imageBuffer, renderTargetSize, NULL);
    CGImageRef iref = CGImageCreate(renderTargetWidth, renderTargetHeight, 8, 32, rowSize,
                                    CGColorSpaceCreateDeviceRGB(),
                                    kCGImageAlphaLast | kCGBitmapByteOrderDefault, ref,
                                    NULL, true, kCGRenderingIntentDefault);

    uint8_t* contextBuffer = (uint8_t*)malloc(renderTargetSize);
    memset(contextBuffer, 0, renderTargetSize);
    CGContextRef context = CGBitmapContextCreate(contextBuffer, renderTargetWidth, renderTargetHeight, 8, rowSize,
                                                 CGImageGetColorSpace(iref),
                                                 kCGImageAlphaPremultipliedFirst | kCGBitmapByteOrder32Big);
    CGContextTranslateCTM(context, 0.0, renderTargetHeight);
    CGContextScaleCTM(context, 1.0, -1.0);
    CGContextDrawImage(context, CGRectMake(0.0, 0.0, renderTargetWidth, renderTargetHeight), iref);
    CGImageRef outputRef = CGBitmapContextCreateImage(context);

    UIImage* image = [[UIImage alloc] initWithCGImage:outputRef];

    CGImageRelease(outputRef);
    CGContextRelease(context);
    CGImageRelease(iref);
    CGDataProviderRelease(ref);

    free(contextBuffer);
    free(imageBuffer);
    return image;
}
修改glReadPixels读取的起始位置及宽高,如一半图像,结果如下。
const int renderTargetWidth = width  >> 1;
const int renderTargetHeight = height  >> 1;
glReadPixels(renderTargetWidth >> 1, renderTargetHeight >> 1,
             renderTargetWidth, renderTargetHeight,
             GL_RGBA, GL_UNSIGNED_BYTE, imageBuffer);
本文档内容至此结束。遗留问题:原书使用o_Color = heatMap(graylevel, 0.1, 3.0);得到绿色图,而在iPad Air 2得到蓝色图,可能是颜色通道在iOS上是调转的。
参考:
OpenGL Data Visualization Cookbook, Raymond C. H. Lo. Chapter 4: Rendering 2D Images and Videos with Texture Mapping.