ActivityThread通过Binder将ApplicationThread对象传递给ActivityManagerService,并完成启动Activity的后续工作
到这里ActivityThread的初始化就完成了,但是回想一下前面的工作,我们现在将Launcher切换到了pause状态,但由于目标应用进程和线程还没有创建,所以我们还没有把目标应用的MainActivity切换到resume状态。所以就意味着,我们还需要进行应用进程和ActivityManagerService所在的system_server进程的通信,告诉ActivityManagerService我们已经创建好了进程和线程,接下来把MainActivity状态切换到resume中,就能打开应用了。
这一步工作在哪里完成的呢?
thread.attach(false)
final IActivityManager mgr = ActivityManagerNative.getDefault();看到这行代码有没有熟悉的感觉?前面我们就通过ActivityManagerNative.getDefault()取得ActivityManagerService的代理对象,完成了启动MainActivity的前期工作。这里再次取得代理对象,并调用了ActivityManagerService的attachApplication方法。
public static void main(String[] args) {
            ……

            Process.setArgV0("");

            Looper.prepareMainLooper();

            ActivityThread thread = new ActivityThread();
            thread.attach(false);

            if (sMainThreadHandler == null) {
                sMainThreadHandler = thread.getHandler();
            }

            if (false) {
                Looper.myLooper().setMessageLogging(new
                        LogPrinter(Log.DEBUG, "ActivityThread"));
            }

            // End of event ActivityThreadMain.
            Trace.traceEnd(Trace.TRACE_TAG_ACTIVITY_MANAGER);
            Looper.loop();

            throw new RuntimeException("Main thread loop unexpectedly exited");
        }

        private void attach(boolean system) {
            sCurrentActivityThread = this;
            mSystemThread = system;
            if (!system) {
                ViewRootImpl.addFirstDrawHandler(new Runnable() {
                    @Override
                    public void run() {
                        ensureJitEnabled();
                    }
                });
                android.ddm.DdmHandleAppName.setAppName("",
                        UserHandle.myUserId());
                RuntimeInit.setApplicationObject(mAppThread.asBinder());
                final IActivityManager mgr = ActivityManagerNative.getDefault();
                try {
                    mgr.attachApplication(mAppThread);
                } catch (RemoteException ex) {
                    // Ignore
                }
                ……
            } else {
                ……
            }
            ……
        }
进入到ActivityManagerService的attachApplication方法,前面我们已经存储过目标应用的pid-ProcessRecord键值对了,因此这里的app不为null。然后向下执行,激活ProcessRecord并将ProcessRecord绑定到应用进程。然后通过Binder(thread.bindApplication)将各种应用相关信息传递给应用进程,进行应用进程一些必要的设置。最后调用mStackSupervisor.attachApplicationLocked(app)方法将ApplicationThread对象传递给ActivityManagerService方便后续应用进程与ActivityManagerService的通信(如:将MainActivity切换到resume状态),并完成启动应用的所有工作。
        @Override
        public final void attachApplication(IApplicationThread thread) {
            synchronized (this) {
                int callingPid = Binder.getCallingPid();
                final long origId = Binder.clearCallingIdentity();
                attachApplicationLocked(thread, callingPid);
                Binder.restoreCallingIdentity(origId);
            }
        }

        private final boolean attachApplicationLocked(IApplicationThread thread,
        int pid) {

            // Find the application record that is being attached...  either via
            // the pid if we are running in multiple processes, or just pull the
            // next app record if we are emulating process with anonymous threads.
            ProcessRecord app;
            if (pid != MY_PID && pid >= 0) {
                synchronized (mPidsSelfLocked) {
                    app = mPidsSelfLocked.get(pid);
                }
            } else {
                app = null;
            }

            // 此时app不为null,跳过
            if (app == null) {
                ……
            }

            // 清除ProcessRecord中的信息,以确保没有不相关进程的信息
            if (app.thread != null) {
                handleAppDiedLocked(app, true, true);
            }

            // Tell the process all about itself.

            if (DEBUG_ALL) Slog.v(
                    TAG, "Binding process pid " + pid + " to record " + app);

            // 注册DeathRecipient,确保应用意外关闭时系统进程能收到通知
            final String processName = app.processName;
            try {
                AppDeathRecipient adr = new AppDeathRecipient(
                        app, pid, thread);
                thread.asBinder().linkToDeath(adr, 0);
                app.deathRecipient = adr;
            } catch (RemoteException e) {
                app.resetPackageList(mProcessStats);
                startProcessLocked(app, "link fail", processName);
                return false;
            }

            EventLog.writeEvent(EventLogTags.AM_PROC_BOUND, app.userId, app.pid, app.processName);

            app.makeActive(thread, mProcessStats);
            app.curAdj = app.setAdj = -100;
            app.curSchedGroup = app.setSchedGroup = Process.THREAD_GROUP_DEFAULT;
            app.forcingToForeground = null;
            updateProcessForegroundLocked(app, false, false);
            app.hasShownUi = false;
            app.debugging = false;
            app.cached = false;
            app.killedByAm = false;

            mHandler.removeMessages(PROC_START_TIMEOUT_MSG, app);
            ……
            // 调用ActivityThread的bindApplication方法
            try {
                ……
                thread.bindApplication(processName, appInfo, providers, app.instrumentationClass,
                        profilerInfo, app.instrumentationArguments, app.instrumentationWatcher,
                        app.instrumentationUiAutomationConnection, testMode, enableOpenGlTrace,
                        isRestrictedBackupMode || !normalMode, app.persistent,
                        new Configuration(mConfiguration), app.compat,
                        getCommonServicesLocked(app.isolated),
                        mCoreSettingsObserver.getCoreSettingsLocked());
                updateLruProcessLocked(app, false, null);
                app.lastRequestedGc = app.lastLowMemory = SystemClock.uptimeMillis();
            } catch (Exception e) {
                ……
            }

            ……

            // See if the top visible activity is waiting to run in this process...
            if (normalMode) {
                try {
                    if (mStackSupervisor.attachApplicationLocked(app)) {
                        didSomething = true;
                    }
                } catch (Exception e) {
                    Slog.wtf(TAG, "Exception thrown launching activities in " + app, e);
                    badApp = true;
                }
            }

            // Find any services that should be running in this process...
            if (!badApp) {
                ……
            }

            // Check if a next-broadcast receiver is in this process...
            if (!badApp && isPendingBroadcastProcessLocked(pid)) {
                ……
            }

            // Check whether the next backup agent is in this process...
            if (!badApp && mBackupTarget != null && mBackupTarget.appInfo.uid == app.uid) {
                ……
            }

            ……

            return true;
        }
ActivityManagerService通知ActivityThread启动Activity
回到ActivityThread,先看bindApplication方法,就是将上面传的数据存储在AppBindData中,然后通过Message、Handler发送出去,我们再看看Handler是怎么处理H.BIND_APPLICATION类型的Message的。
public final void bindApplication(String processName, ApplicationInfo appInfo,
                List providers, ComponentName instrumentationName,
                ProfilerInfo profilerInfo, Bundle instrumentationArgs,
                IInstrumentationWatcher instrumentationWatcher,
                IUiAutomationConnection instrumentationUiConnection, int debugMode,
        boolean enableOpenGlTrace, boolean isRestrictedBackupMode, boolean persistent,
        Configuration config, CompatibilityInfo compatInfo, Map services,
                Bundle coreSettings) {
            ……

            AppBindData data = new AppBindData();
            data.processName = processName;
            data.appInfo = appInfo;
            data.providers = providers;
            data.instrumentationName = instrumentationName;
            data.instrumentationArgs = instrumentationArgs;
            data.instrumentationWatcher = instrumentationWatcher;
            data.instrumentationUiAutomationConnection = instrumentationUiConnection;
            data.debugMode = debugMode;
            data.enableOpenGlTrace = enableOpenGlTrace;
            data.restrictedBackupMode = isRestrictedBackupMode;
            data.persistent = persistent;
            data.config = config;
            data.compatInfo = compatInfo;
            data.initProfilerInfo = profilerInfo;
            sendMessage(H.BIND_APPLICATION, data);
        }
这里我就直接截出代码段了,最终调用了handleBindApplication方法。
case BIND_APPLICATION:
Trace.traceBegin(Trace.TRACE_TAG_ACTIVITY_MANAGER, "bindApplication");
AppBindData data = (AppBindData)msg.obj;
handleBindApplication(data);
Trace.traceEnd(Trace.TRACE_TAG_ACTIVITY_MANAGER);
break;
进入到handleBindApplication方法,首先进行一些初始化操作,然后取出data中存储的进程名,为应用进程设置进程名。然后创建应用的Context,也就是应用的运行上下文,通过Context我们可以访问到应用相关的各种资源文件(图片、布局文件等等)。然后创建进程的Instrumentation对象、Application对象,装载Provider,最终调用mInstrumentation.callApplicationOnCreate(app)方法,也就是调用我们开发App时,Application类(或子类)的onCreate()方法。
至此应用进程相关的初始化和相关的设置就完成了,接下来只要切换MainActivity的状态就大功告成了。
private void handleBindApplication(AppBindData data) {
            ……

            // send up app name; do this *before* waiting for debugger
            Process.setArgV0(data.processName);
            android.ddm.DdmHandleAppName.setAppName(data.processName,
                    UserHandle.myUserId());

            ……设置进程运行信息……

            final ContextImpl appContext = ContextImpl.createAppContext(this, data.info);

            ……继续进程的初始化……

            if (data.instrumentationName != null) {
                ……

            } else {
                mInstrumentation = new Instrumentation();
            }

            ……

            try {
                // If the app is being launched for full backup or restore, bring it up in
                // a restricted environment with the base application class.
                Application app = data.info.makeApplication(data.restrictedBackupMode, null);
                mInitialApplication = app;

                // don't bring up providers in restricted mode; they may depend on the
                // app's custom Application class
                if (!data.restrictedBackupMode) {
                    List providers = data.providers;
                    if (providers != null) {
                        installContentProviders(app, providers);
                        // For process that contains content providers, we want to
                        // ensure that the JIT is enabled "at some point".
                        mH.sendEmptyMessageDelayed(H.ENABLE_JIT, 10*1000);
                    }
                }

                ……

                try {
                    mInstrumentation.callApplicationOnCreate(app);
                } catch (Exception e) {
                    if (!mInstrumentation.onException(app, e)) {
                        throw new RuntimeException(
                                "Unable to create application " + app.getClass().getName()
                                        + ": " + e.toString(), e);
                    }
                }
            } finally {
                StrictMode.setThreadPolicy(savedPolicy);
            }
        }
进入到ActivityStackSupervisor类的attachApplicationLocked方法,该方法遍历mActivityDisplays列表得到当前所有ActivityStack,然后取得前台ActivityStack栈顶的ActivityRecord,不为空则启动该对该ActivityRecord调用realStartActivityLocked方法。
boolean attachApplicationLocked(ProcessRecord app) throws RemoteException {
            final String processName = app.processName;
            boolean didSomething = false;
            for (int displayNdx = mActivityDisplays.size() - 1; displayNdx >= 0; --displayNdx) {
                ArrayList stacks = mActivityDisplays.valueAt(displayNdx).mStacks;
                for (int stackNdx = stacks.size() - 1; stackNdx >= 0; --stackNdx) {
                    final ActivityStack stack = stacks.get(stackNdx);
                    if (!isFrontStack(stack)) {
                        continue;
                    }
                    ActivityRecord hr = stack.topRunningActivityLocked(null);
                    if (hr != null) {
                        if (hr.app == null && app.uid == hr.info.applicationInfo.uid
                                && processName.equals(hr.processName)) {
                            try {
                                if (realStartActivityLocked(hr, app, true, true)) {
                                    didSomething = true;
                                }
                            } catch (RemoteException e) {
                                Slog.w(TAG, "Exception in new application when starting activity "
                                        + hr.intent.getComponent().flattenToShortString(), e);
                                throw e;
                            }
                        }
                    }
                }
            }
            if (!didSomething) {
                ensureActivitiesVisibleLocked(null, 0);
            }
            return didSomething;
        }
ActivityThread调度执行Activity生命周期方法,完成Activity的启动
进入到realStartActivityLocked方法,进行一些前期处理后调用ActivityThread的scheduleLaunchActivity方法,将创建ActivityClientRecord存储我们传入的各种应用相关的数据,通过Handler机制发送。当Handler接收到LAUNCH_ACTIVITY类型的消息时,执行handleLaunchActivity方法。
app.thread.scheduleLaunchActivity(new Intent(r.intent), r.appToken,
System.identityHashCode(r), r.info, new Configuration(mService.mConfiguration),
new Configuration(stack.mOverrideConfig), r.compat, r.launchedFromPackage,
task.voiceInteractor, app.repProcState, r.icicle, r.persistentState, results,
newIntents, !andResume, mService.isNextTransitionForward(), profilerInfo);

@Override
public final void scheduleLaunchActivity(Intent intent, IBinder token, int ident,
ActivityInfo info, Configuration curConfig, Configuration overrideConfig,
CompatibilityInfo compatInfo, String referrer, IVoiceInteractor voiceInteractor,
int procState, Bundle state, PersistableBundle persistentState,
List pendingResults, List pendingNewIntents,
boolean notResumed, boolean isForward, ProfilerInfo profilerInfo) {

updateProcessState(procState, false);

ActivityClientRecord r = new ActivityClientRecord();

r.token = token;
r.ident = ident;
r.intent = intent;
r.referrer = referrer;
r.voiceInteractor = voiceInteractor;
r.activityInfo = info;
r.compatInfo = compatInfo;
r.state = state;
r.persistentState = persistentState;

r.pendingResults = pendingResults;
r.pendingIntents = pendingNewIntents;

r.startsNotResumed = notResumed;
r.isForward = isForward;

r.profilerInfo = profilerInfo;

r.overrideConfig = overrideConfig;
updatePendingConfiguration(curConfig);

sendMessage(H.LAUNCH_ACTIVITY, r);
}

case LAUNCH_ACTIVITY: {
Trace.traceBegin(Trace.TRACE_TAG_ACTIVITY_MANAGER, "activityStart");
final ActivityClientRecord r = (ActivityClientRecord) msg.obj;

r.packageInfo = getPackageInfoNoCheck(
r.activityInfo.applicationInfo, r.compatInfo);
handleLaunchActivity(r, null);
Trace.traceEnd(Trace.TRACE_TAG_ACTIVITY_MANAGER);
} break;
进入到handleLaunchActivity方法,首先进行参数设置,然后调用performLaunchActivity方法得到目标应用的MainActivity并使其分别调用onCreate、onStart方法,然后调用handleResumeActivity方法让MainActivity进入resume状态,完成启动。
private void handleLaunchActivity(ActivityClientRecord r, Intent customIntent) {
            ……

            Activity a = performLaunchActivity(r, customIntent);

            if (a != null) {
                r.createdConfig = new Configuration(mConfiguration);
                Bundle oldState = r.state;
                handleResumeActivity(r.token, false, r.isForward,
                        !r.activity.mFinished && !r.startsNotResumed);

                ……
            } else {
                ……
            }
        }

    private Activity performLaunchActivity(ActivityClientRecord r, Intent customIntent) {
        // 初始化设置
        ……

        // 通过反射获得MainActivity
        Activity activity = null;
        try {
            java.lang.ClassLoader cl = r.packageInfo.getClassLoader();
            activity = mInstrumentation.newActivity(
                    cl, component.getClassName(), r.intent);
            StrictMode.incrementExpectedActivityCount(activity.getClass());
            r.intent.setExtrasClassLoader(cl);
            r.intent.prepareToEnterProcess();
            if (r.state != null) {
                r.state.setClassLoader(cl);
            }
        } catch (Exception e) {
            if (!mInstrumentation.onException(activity, e)) {
                throw new RuntimeException(
                        "Unable to instantiate activity " + component
                                + ": " + e.toString(), e);
            }
        }

        try {
            ……

            if (activity != null) {
                // 为MainActivity创建运行的上下文环境Context,并与Activity绑定
                Context appContext = createBaseContextForActivity(r, activity);
                CharSequence title = r.activityInfo.loadLabel(appContext.getPackageManager());
                Configuration config = new Configuration(mCompatConfiguration);
                if (DEBUG_CONFIGURATION) Slog.v(TAG, "Launching activity "
                        + r.activityInfo.name + " with config " + config);
                activity.attach(appContext, this, getInstrumentation(), r.token,
                        r.ident, app, r.intent, r.activityInfo, title, r.parent,
                        r.embeddedID, r.lastNonConfigurationInstances, config,
                        r.referrer, r.voiceInteractor);

                ……
                // 回调MainActivity生命周期的onCreate方法
                if (r.isPersistable()) {
                    mInstrumentation.callActivityOnCreate(activity, r.state, r.persistentState);
                } else {
                    mInstrumentation.callActivityOnCreate(activity, r.state);
                }
                ……
                // 回调MainActivity生命周期的onStart方法
                if (!r.activity.mFinished) {
                    activity.performStart();
                    r.stopped = false;
                }
                ……

            } catch (SuperNotCalledException e) {
                throw e;

            } catch (Exception e) {
                if (!mInstrumentation.onException(activity, e)) {
                    throw new RuntimeException(
                            "Unable to start activity " + component
                                    + ": " + e.toString(), e);
                }
            }

            return activity;
        }

    final void handleResumeActivity(IBinder token,
                                    boolean clearHide, boolean isForward, boolean reallyResume) {
        // If we are getting ready to gc after going to the background, well
        // we are back active so skip it.
        unscheduleGcIdler();
        mSomeActivitiesChanged = true;

        // TODO Push resumeArgs into the activity for consideration
        ActivityClientRecord r = performResumeActivity(token, clearHide);

        ……
    }
总结
用文字总结App启动流程可以分为以下步骤:
- Launcher通过Binder建立Launcher所在进程与system_server进程(ActivityManagerService所在进程)的通信,通知ActivityManagerService即将要启动一个Activity
- ActivityManagerService通过Binder让Launcher进入pause状态
- Launcher进入pause状态后,通过Binder告知ActivityManagerService,随后ActivityManagerService创建一个进程(将要打开的应用进程)并启动ActivityThread(应用的UI线程)
- ActivityThread通过Binder将ApplicationThread类型的Binder对象传递给ActivityManagerService,方便ActivityManagerService后续与其的通信
- 准备工作完成后,ActivityManagerService通知ActivityThread启动Activity
- ActivityThread调度执行Activity的生命周期方法,完成启动Activity的工作
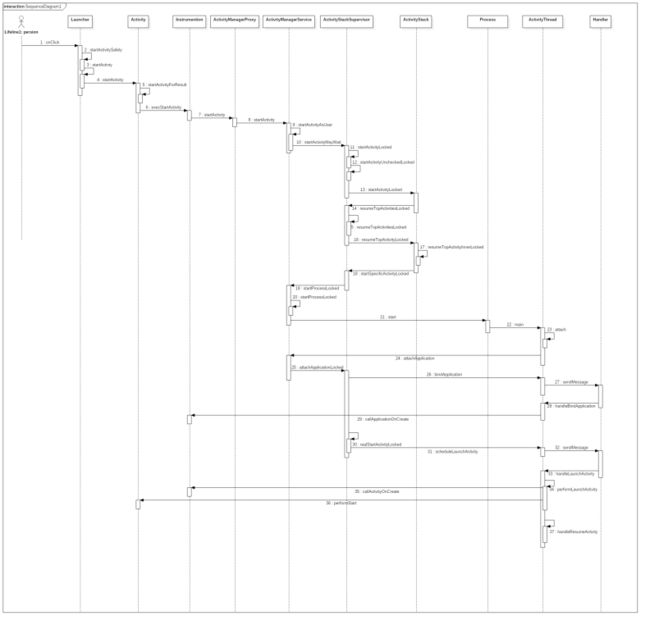
相关函数调用的时序图: