使用Xib制作简单的AlertView
不仅仅是个AlertView
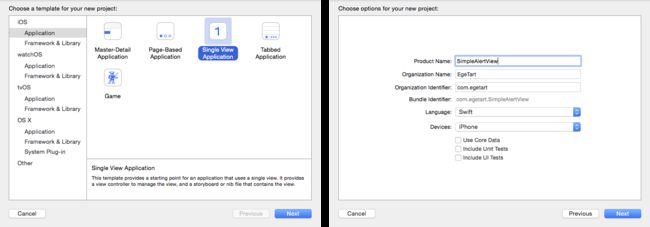
1.启动Xcode, 新建一个Single View Application, 填写项目名称SimpleAlertView, 点击下一步, 找一个位置存放项目, 完成创建.
2.新建一个Xib文件, 文件名为SimpleAlertView.

3.打开SimpleAlertView.xib文件, 选中view, 对它的属性做一些修改:
修改列表
| 属性 | 属性值 |
|---|---|
| Size | FreeForm |
| Status Bar | None |
| Width | 280 |
| Height | 130 |

改完之后, view将不会那么巨大......

4.摆放控件
- Label
拖放两个label到view中, 对label的字体属性分别做以下修改

字体大的做为标题, 小的做为提示信息. 然后分别给两个label增加一些约束, 左图是要给标题label添加的, 右图是针对提示信息label的.

最后选中提示信息label, 修改它的一个属性, 让label中的文字可以适应label的大小.

- Button
拖两个button到view中, 一个是取消按钮, 另一个是确定按钮.

选中刚刚添加的两个button, 使用StackView对它们进行布局. 选中button之后, 点击设计面板右下角的Stack按钮, 这样就将两个button放在StackView中了.

ok, 现在选中stackView, 只要对它添加一些约束以及修改一两个属性, button就布局好了.

最后只要修改button的一些属性, 所有的布局就完成啦!!!!!!!!
| 属性 | 取消按钮 | 确定按钮 |
|---|---|---|
| Title | Cancle | Confirm |
| Text Color | Black | White |
| background(RGB) | 235 235 235 | 149 77 235 |
完成后的截图如下:

现在进入代码环节
1.创建一个新的类文件, 选择Cocoa Touch Class, 点击下一步. 类的名称为SimpleAlertView, 继承自UIView, 完成创建.

2.打开SimpleAlertView.xib, 把它和刚刚创建的类绑定起来, 这样就可以在SimpleAlertView.swift代码文件中对自定义的SimpleAlertView进行额外的修改.

3.第一次尝试, 看能否把SimpleAlertView显示出来.
-
打开Main.storyboard, 在设计面板中往ViewController添加一个button, 把button的title改为Show AlertView, 之后打开辅助视图为button关联一个IBAction.

- 在showAlertView函数中添加以下的代码段
//加载xib文件, 拿到自定义的SimpleAlertView, 设置大小和位置并添加到根视图中
let alertView = NSBundle.mainBundle().loadNibNamed("SimpleAlertView", owner: nil, options: nil).first as! SimpleAlertView
alertView.frame.size = CGSize(width: 280, height: 130)
alertView.center = self.view.center
self.view.addSubview(alertView)
- 运行程序, 点击Show AlertView按钮, 可以看到alertView成功创建啦. 截屏效果图...

貌似效果不是特别明显, 没关系, 接下来慢慢修饰!!
4.打开SimpleAlertView.xib文件, 再打开辅助视图, 为label和button生成相应的outlei以及action.
import UIKit

class SimpleAlertView: UIView {

    @IBOutlet weak var titleLabel: UILabel!
    @IBOutlet weak var messageLabel: UILabel!
    @IBOutlet weak var cancleButton: UIButton!
    @IBOutlet weak var confirmButton: UIButton!


    @IBAction func cancle(sender: UIButton) {
    }

    @IBAction func confirm(sender: UIButton) {
    }

}
5.打开SimpleAlertView.swift代码文件, 在这里可以对SimpleAlertView的外观和行为进行控制.
- 在confirm IBAction的下方添加 awakeFromNib()函数, 这个函数会在加载xib文件时调用, 可以在这时修改控件的外观.
- awakeFromNib()函数中添加以下代码
super.awakeFromNib()
//view的位置和大小
self.frame.size = CGSize(width: 280.0, height: 130.0)
self.center = CGPoint(x: UIScreen.mainScreen().bounds.midX, y: UIScreen.mainScreen().bounds.midY)

//view的阴影
self.layer.shadowColor = UIColor(white: 0, alpha: 1).CGColor
self.layer.shadowOffset = CGSize(width: 0, height: 5)
self.layer.shadowOpacity = 0.5

//view的边框
self.layer.borderWidth = 0.3
self.layer.borderColor = UIColor(white: 0, alpha: 0.5).CGColor

//设置按钮的圆角
cancleButton.layer.cornerRadius = 5
cancleButton.clipsToBounds = true
confirmButton.layer.cornerRadius = 5
confirmButton.clipsToBounds = true
- 回到ViewController.swift代码文件中, 修改showAlertView, 将下面两行代码删掉.然后打开Main.storyboard, 将ViewController的view的背景颜色修改为RGB(200, 200, 200)
alertView.frame.size = CGSize(width: 280, height: 130)
alertView.center = self.view.center
6.ok, 现在再一次运行程序, 发现效果比上一次好多了.

7.可不可以有更好的效果呢, 给它加点动画吧.
改变SimpleAlertView的初始位置, 让它一开始在屏幕之外.
self.center = CGPoint(x: UIScreen.mainScreen().bounds.midX, y: -self.frame.size.height)
接着在 awakeFromNib()函数中添加以下代码段, 添加confirmButton.clipsToBounds = true这句代码的下方.
//把view的透明度设为0, 逆时针旋转45度
self.layer.opacity = 0
self.transform = CGAffineTransformMakeRotation(CGFloat(-M_PI_4))

//持续0.3秒的动画, 实现渐变效果和旋转效果
UIView.animateWithDuration(0.3, animations: { () -> Void in
    self.center = CGPoint(x: UIScreen.mainScreen().bounds.midX, y: UIScreen.mainScreen().bounds.midY)
    self.layer.opacity = 1
    self.transform = CGAffineTransformMakeRotation(CGFloat(0))
    }, completion: nil)
运行一遍就可以看到动画效果了!!!!
重点部分, 对按钮的点击做出响应(用3种方式来实现)
第一种方式-----闭包函数
8.awakeFromNib()函数的上方定义两个私有变量, 它们的类型都是(() -> Void)?的闭包.它们分别用来对取消或者确定做出响应.
private var cancleHandler: (() -> Void)?
private var confirmHandler: (() -> Void)?
接着在awakeFromNib()函数的下方定义一个方法, 暴露给外界, 用来设置刚刚定义的私有变量.
    func setActionHandler(actionType: String, handler: () -> Void) {

        if actionType == "cancle" {
            cancleHandler = handler
        }else {
            confirmHandler = handler
        }
    }
这里的actionType有两种, cancle或者confirm. 根据第一个参数的值来设置不同的handler.
完成这一步之后, 在生成的IBAction中调用响应的handler.
@IBAction func cancle(sender: UIButton) {
     UIView.animateWithDuration(0.3, animations: { () -> Void in
            self.center = CGPoint(x: UIScreen.mainScreen().bounds.midX, y: UIScreen.mainScreen().bounds.maxY)
            self.layer.opacity = 0
            }) { (_) -> Void in
                if self.cancleHandler == nil {
                    return
                }
                self.cancleHandler!()
        }
    }

    @IBAction func confirm(sender: UIButton) {
        UIView.animateWithDuration(0.3, animations: { () -> Void in
            self.center = CGPoint(x: UIScreen.mainScreen().bounds.midX, y: UIScreen.mainScreen().bounds.maxY)
            self.layer.opacity = 0
            }) { (_) -> Void in
                if self.confirmHandler == nil {
                    return
                }
                self.confirmHandler!()
        }
    }
这两个IBAction都先把SimpleAlertView移到屏幕的下方, 在完成这个动画之后就会执行相应的handler.
到现在为止, SimpleAlertView.swift的完整代码如下:
import UIKit

class SimpleAlertView: UIView {

    @IBOutlet weak var titleLabel: UILabel!
    @IBOutlet weak var messageLabel: UILabel!
    @IBOutlet weak var cancleButton: UIButton!
    @IBOutlet weak var confirmButton: UIButton!

    private var cancleHandler: (() -> Void)?
    private var confirmHandler: (() -> Void)?

    override func awakeFromNib() {
        super.awakeFromNib()
        //view的位置和大小
        self.frame.size = CGSize(width: 280.0, height: 130.0)
        self.center = CGPoint(x: UIScreen.mainScreen().bounds.midX, y: -self.frame.size.height)

        //view的阴影
        self.layer.shadowColor = UIColor(white: 0, alpha: 1).CGColor
        self.layer.shadowOffset = CGSize(width: 0, height: 5)
        self.layer.shadowOpacity = 0.5

        //view的边框
        self.layer.borderWidth = 0.3
        self.layer.borderColor = UIColor(white: 0, alpha: 0.5).CGColor

        //设置按钮的圆角
        cancleButton.layer.cornerRadius = 5
        cancleButton.clipsToBounds = true
        confirmButton.layer.cornerRadius = 5
        confirmButton.clipsToBounds = true

        //把view的透明度设为0, 逆时针旋转45度
        self.layer.opacity = 0
        self.transform = CGAffineTransformMakeRotation(CGFloat(-M_PI_4))

        //持续0.3秒的动画, 实现渐变效果和旋转效果
        UIView.animateWithDuration(0.3, animations: { () -> Void in
            self.center = CGPoint(x: UIScreen.mainScreen().bounds.midX, y: UIScreen.mainScreen().bounds.midY)
            self.layer.opacity = 1
            self.transform = CGAffineTransformMakeRotation(CGFloat(0))
            }, completion: nil)
    }

    func setActionHandler(actionType: String, handler: () -> Void) {

        if actionType == "cancle" {
            cancleHandler = handler
        }else {
            confirmHandler = handler
        }
    }

    @IBAction func cancle(sender: UIButton) {
        UIView.animateWithDuration(0.3, animations: { () -> Void in
            self.center = CGPoint(x: UIScreen.mainScreen().bounds.midX, y: UIScreen.mainScreen().bounds.maxY)
            self.layer.opacity = 0
            }) { (_) -> Void in
                if self.cancleHandler == nil {
                    return
                }
                self.cancleHandler!()
        }
    }

    @IBAction func confirm(sender: UIButton) {
        UIView.animateWithDuration(0.3, animations: { () -> Void in
            self.center = CGPoint(x: UIScreen.mainScreen().bounds.midX, y: UIScreen.mainScreen().bounds.maxY)
            self.layer.opacity = 0
            }) { (_) -> Void in
                if self.confirmHandler == nil {
                    return
                }
                self.confirmHandler!()
        }
    }

}
接下来, 回到ViewController.swift代码文件, 在showAlertView() IBAction中添加以下代码, 来验证闭包函数是否有备执行到.
alertView.setActionHandler("cancle") { () -> Void in
    print("test")
    alertView.removeFromSuperview()
}
点击cancle按钮, 可以看到SimpleAlertView逐渐往屏幕下方淡出, 而且在控制打印出了test.

这里的handler闭包只是简单把SimpleAlertView移除, 可以根据实际情况做更多的事.
第二种方式-----通知
9.首先注释掉刚刚在showAlertView()添加的代码, 以及在cancle(sender: UIButton), confirm(sender: UIButton)中的所有代码.
然后在cancle(sender: UIButton)中添加下面这行代码. 这行代码的作用是发一个通知, 第一个参数是通知的名称, 最后一个参数是附加信息.
NSNotificationCenter.defaultCenter().postNotificationName("buttonClick", object: nil, userInfo: ["actionType": "cancle"])
同样在onfirm(sender: UIButton)中添加一行类似的代码.
NSNotificationCenter.defaultCenter().postNotificationName("buttonClick", object: nil, userInfo: ["actionType": "confirm"])
回到ViewController.swift代码文件, 在viewDidLoad()中添加一行代码, 让ViewController成为这个消息的接收者.
NSNotificationCenter.defaultCenter().addObserver(self, selector: "receiveNotification:", name: "buttonClick", object: nil)
在接收到通知之后就会调用receiveNotification()函数, 可以在这个函数里面做出对应的响应. 这个函数现在实现如下:
func receiveNotification(notification: NSNotification) {

        let alertView = self.view.viewWithTag(101) as! SimpleAlertView

        let action = notification.userInfo!["actionType"] as! String

        if action == "cancle" {

            UIView.animateWithDuration(0.3, animations: { () -> Void in
                alertView.center = CGPoint(x: UIScreen.mainScreen().bounds.midX, y: UIScreen.mainScreen().bounds.maxY)
                alertView.layer.opacity = 0
                }) { (_) -> Void in
                    alertView.removeFromSuperview()
            }

        }else {
            alertView.removeFromSuperview()
        }
    }
为了让这段代码能够执行, 还要把alertView的tag设置为101. 在showAlertView(sender: UIButton)中添加这行代码.
alertView.tag = 101
ok, 运行一次程序, 效果和第一种方式类似.
第三种方式-----代理
10.注释掉viewDidLoad()中的那行接收通知的代码.打开SimpleAlertView.swift代码文件, 在import UIKit的下方定义一个协议.
@objc protocol SimpleAlertViewDelegate {
    optional func simpleAlertView(actionType: String)
}
在awakeFromNib()函数的上方定义一个代理变量.
var delegate: SimpleAlertViewDelegate!
注释掉cancle(sender: UIButton), confirm(sender: UIButton)中发送通知的代码.
在cancle(sender: UIButton)中添加这行代码.
delegate.simpleAlertView!("cancle")
在confirm(sender: UIButton)中添加响应的代码.
delegate.simpleAlertView!("confirm")
回到ViwController.swift代码文件, 让ViewController实现SimpleAlertViewDelegate.
在ViewController的最下方的大括号之外, 添加以下代码段.
extension ViewController: SimpleAlertViewDelegate {
    func simpleAlertView(action: String) {

        let alertView = self.view.viewWithTag(101) as! SimpleAlertView

        if action == "cancle" {

            UIView.animateWithDuration(0.3, animations: { () -> Void in
                alertView.center = CGPoint(x: UIScreen.mainScreen().bounds.midX, y: UIScreen.mainScreen().bounds.maxY)
                alertView.layer.opacity = 0
                }) { (_) -> Void in
                    alertView.removeFromSuperview()
            }

        }else {
            alertView.removeFromSuperview()
        }
    }
}
最后在showAlertView(sender: UIButton)中添加一行代码, 让ViewController成为SimpleAlertView的代理人.
alertView.delegate = self
到这里就完成这个demo了.
demo的地址SimpleAlertView