BEGIN
Netty 是一个基于NIO的客户,服务器端编程框架,使用Netty 可以确保你快速和简单的开发出一个网络应用,例如实现了某种协议的客户,服务端应用。Netty相当简化和流线化了网络应用的编程开发过程,例如,TCP和UDP的socket服务开发。
Netty是一个异步服务端网络编程框架,使用netty可以快速开发出需要的服务。目前有不少公司使用netty开发游戏服务器。Netty的高效性吸引了不少开发者的注意。
由于Netty不是一个专门的web/Restful服务器框架,所有使用Netty开发Restful服务需要自己添加一些额外的模块。这里简单实现一份restful 服务,用于计算身体质量指数和基础代谢率(Basal Metabolic Rate,简称BMR),并部署到VPS上。
BMI指数(身体质量指数,简称体质指数又称体重指数,英文为Body Mass Index,简称BMI。
基础代谢率(Basal Metabolic Rate,简称BMR)是指:我们在安静状态下(通常为静卧状态)消耗的最低热量,人的其他活动都建立在这个基础上。
启动 ServerBootstrap(建立连接)
到netty 的官方网站下载netty的jar http://netty.io/,这里使用的netty版本是4.1.6。下载的压缩包解压后,在
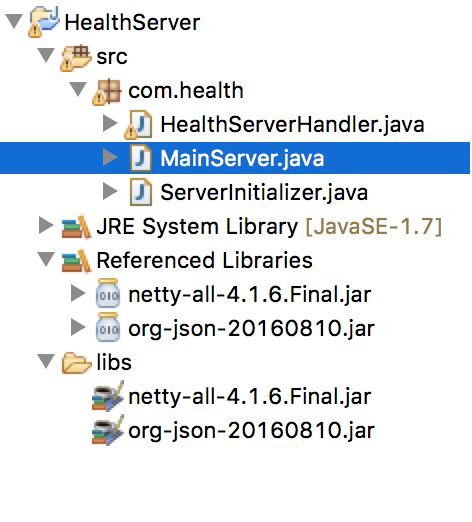
/jar/all-in-one下有nettyall-4.1.6.Final.jar文件,这个就是netty编译出来的jar。使用Eclipse新建一个工程,在工程中新建一个
lib的文件夹,把上面的jar放入文件夹中,并通过Build Path把jar 加入到工程中。这个项目使用了orgJson作为json的解析库,同样的把org-json-20160810.jar加入工程中(org-json-Jar下载地址)。
- 新建一个Java类MainServer,加入 ServerBootstrap的启动代码。这部分代码源自Netty 的Http Example,所有的Netty 服务启动代码和这类似。
package com.health;
import io.netty.bootstrap.ServerBootstrap;
import io.netty.channel.Channel;
import io.netty.channel.ChannelOption;
import io.netty.channel.EventLoopGroup;
import io.netty.channel.nio.NioEventLoopGroup;
import io.netty.channel.socket.nio.NioServerSocketChannel;
import io.netty.handler.logging.LogLevel;
import io.netty.handler.logging.LoggingHandler;
import io.netty.handler.ssl.SslContext;
import io.netty.handler.ssl.SslContextBuilder;
import io.netty.handler.ssl.util.SelfSignedCertificate;


/**
 * 服务的主入口
 * @author superzhan
 *
 */
public final class MainServer {

    /*是否使用https协议*/
    static final boolean SSL = System.getProperty("ssl") != null;
    static final int PORT = Integer.parseInt(System.getProperty("port", SSL? "8443" : "6789"));

    public static void main(String[] args) throws Exception {
        // Configure SSL.
        final SslContext sslCtx;
        if (SSL) {
            SelfSignedCertificate ssc = new SelfSignedCertificate();
            sslCtx = SslContextBuilder.forServer(ssc.certificate(), ssc.privateKey()).build();
        } else {
            sslCtx = null;
        }

        // Configure the server.
        EventLoopGroup bossGroup = new NioEventLoopGroup(1);
        EventLoopGroup workerGroup = new NioEventLoopGroup();
        try {
            ServerBootstrap b = new ServerBootstrap();
            b.option(ChannelOption.SO_BACKLOG, 1024);
            b.group(bossGroup, workerGroup)
             .channel(NioServerSocketChannel.class)
             .handler(new LoggingHandler(LogLevel.INFO))
             .childHandler(new ServerInitializer(sslCtx));

            Channel ch = b.bind(PORT).sync().channel();

            System.err.println("Open your web browser and navigate to " +
                    (SSL? "https" : "http") + "://127.0.0.1:" + PORT + '/');

            ch.closeFuture().sync();
        } finally {
            bossGroup.shutdownGracefully();
            workerGroup.shutdownGracefully();
        }
    }
}
ChannelInitializer(初始化连接)
在工程中新建一个class ServerInitializer,用于连接的初始化。
package com.health;

import io.netty.channel.ChannelInitializer;
import io.netty.channel.ChannelPipeline;
import io.netty.channel.socket.SocketChannel;
import io.netty.handler.codec.http.HttpObjectAggregator;
import io.netty.handler.codec.http.HttpServerCodec;
import io.netty.handler.ssl.SslContext;

public class ServerInitializer extends ChannelInitializer {

    private final SslContext sslCtx;

    public ServerInitializer(SslContext sslCtx) {
        this.sslCtx = sslCtx;
    }

    @Override
    public void initChannel(SocketChannel ch) {
        ChannelPipeline p = ch.pipeline();
        if (sslCtx != null) {
            p.addLast(sslCtx.newHandler(ch.alloc()));
        }
        p.addLast(new HttpServerCodec());/*HTTP 服务的解码器*/
        p.addLast(new HttpObjectAggregator(2048));/*HTTP 消息的合并处理*/
        p.addLast(new HealthServerHandler()); /*自己写的服务器逻辑处理*/
    }
}
ChannelHandler(业务控制器)
以上两份代码是固定功能的框架代码,业务控制器Handler才是自有发挥的部分。
- 需要获取客户端的请求uri做路由分发,不同的请求做不同的响应。
- 把客户端的请求数据解析成Json对象,方便做运算。
- 把计算好的结果生成一个Json 数据发回客户端。
package com.health;

import io.netty.buffer.ByteBuf;
import io.netty.buffer.Unpooled;
import io.netty.channel.ChannelFutureListener;
import io.netty.channel.ChannelHandlerContext;
import io.netty.channel.ChannelInboundHandlerAdapter;
import io.netty.handler.codec.http.DefaultFullHttpResponse;
import io.netty.handler.codec.http.FullHttpRequest;
import io.netty.handler.codec.http.FullHttpResponse;
import io.netty.handler.codec.http.HttpMethod;
import io.netty.handler.codec.http.HttpUtil;
import io.netty.util.AsciiString;
import io.netty.util.CharsetUtil;

import static io.netty.handler.codec.http.HttpResponseStatus.*;
import static io.netty.handler.codec.http.HttpVersion.*;


import org.json.JSONObject;

public class HealthServerHandler extends ChannelInboundHandlerAdapter {

    private static final AsciiString CONTENT_TYPE = new AsciiString("Content-Type");
    private static final AsciiString CONTENT_LENGTH = new AsciiString("Content-Length");
    private static final AsciiString CONNECTION = new AsciiString("Connection");
    private static final AsciiString KEEP_ALIVE = new AsciiString("keep-alive");

    @Override
    public void channelReadComplete(ChannelHandlerContext ctx) {
        ctx.flush();
    }

    @Override
    public void channelRead(ChannelHandlerContext ctx, Object msg) {

        if (msg instanceof FullHttpRequest) {
            FullHttpRequest req = (FullHttpRequest) msg;//客户端的请求对象
            JSONObject responseJson = new JSONObject();//新建一个返回消息的Json对象

            //把客户端的请求数据格式化为Json对象
            JSONObject requestJson = null;
            try{
               requestJson = new JSONObject(parseJosnRequest(req));
            }catch(Exception e)
            {
                ResponseJson(ctx,req,new String("error json"));
                return;
            }

            String uri = req.uri();//获取客户端的URL

            //根据不同的请求API做不同的处理(路由分发),只处理POST方法
            if (req.method() == HttpMethod.POST) {
                if(req.uri().equals("/bmi"))
                {
                    //计算体重质量指数
                    double height =0.01* requestJson.getDouble("height");
                    double weight =requestJson.getDouble("weight");
                    double bmi =weight/(height*height);
                    bmi =((int)(bmi*100))/100.0;
                    responseJson.put("bmi", bmi +"");

                }else if(req.uri().equals("/bmr"))
                {
                    //计算基础代谢率
                    boolean isBoy = requestJson.getBoolean("isBoy");
                    double height = requestJson.getDouble("height");
                    double weight = requestJson.getDouble("weight");
                    int age = requestJson.getInt("age");
                    double bmr=0;
                    if(isBoy)
                    {
                        //66 + ( 13.7 x 体重kg ) + ( 5 x 身高cm ) - ( 6.8 x 年龄years )
                        bmr = 66+(13.7*weight) +(5*height) -(6.8*age);

                    }else
                    {
                        //655 + ( 9.6 x 体重kg ) + ( 1.8 x 身高cm ) - ( 4.7 x 年龄years )
                        bmr =655 +(9.6*weight) +1.8*height -4.7*age;
                    }

                    bmr =((int)(bmr*100))/100.0;
                    responseJson.put("bmr", bmr+"");
                }else {
                    //错误处理
                    responseJson.put("error", "404 Not Find");
                }

            } else {
                //错误处理
                responseJson.put("error", "404 Not Find");
            }

            //向客户端发送结果
            ResponseJson(ctx,req,responseJson.toString());
        }
    }

    /**
     * 响应HTTP的请求
     * @param ctx
     * @param req
     * @param jsonStr
     */
    private void ResponseJson(ChannelHandlerContext ctx, FullHttpRequest req ,String jsonStr)
    {

        boolean keepAlive = HttpUtil.isKeepAlive(req);
        byte[] jsonByteByte = jsonStr.getBytes();
        FullHttpResponse response = new DefaultFullHttpResponse(HTTP_1_1, OK, Unpooled.wrappedBuffer(jsonByteByte));
        response.headers().set(CONTENT_TYPE, "text/json");
        response.headers().setInt(CONTENT_LENGTH, response.content().readableBytes());

        if (!keepAlive) {
            ctx.write(response).addListener(ChannelFutureListener.CLOSE);
        } else {
            response.headers().set(CONNECTION, KEEP_ALIVE);
            ctx.write(response);
        }
    }

    @Override
    public void exceptionCaught(ChannelHandlerContext ctx, Throwable cause) {
        cause.printStackTrace();
        ctx.close();
    }

    /**
     * 获取请求的内容
     * @param request
     * @return
     */
    private String parseJosnRequest(FullHttpRequest request) {
        ByteBuf jsonBuf = request.content();
        String jsonStr = jsonBuf.toString(CharsetUtil.UTF_8);
        return jsonStr;
    }
}
运行测试
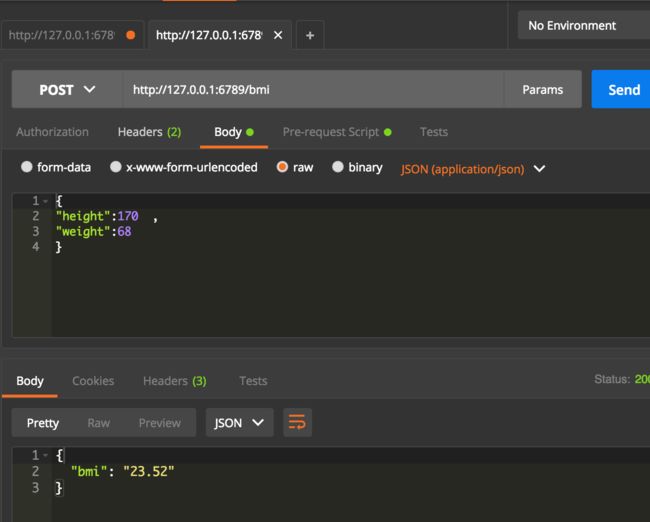
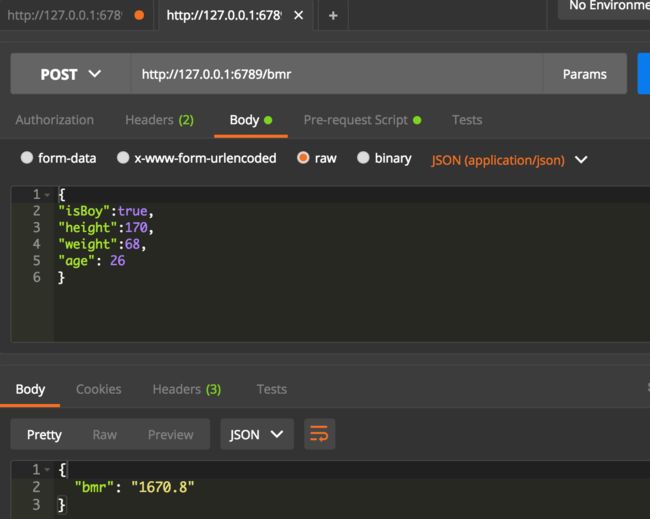
再Eclipse 中直接Run as Java Application,就可以开启Netty的服务。Netty 的服务不需要放到任何容器中,可以单独运行。
这里使用google 的PostMan测试。
导出jar
netty服务向外发布的时候不能只在Eclipse 中Run as Application。 所以发布服务的时候需要导出可运行的jar,然后运行这个jar文件。
在Eclipse中右击当前工程->Export->在Export窗口中选择Java选项下的Runnable Jar File ->Next -> 在窗口中选择导出的文件路径和启动的入口类 -> Finish。
打开命令行终端,切换到当前目录,执行 java -jar Server.jar ,便可以启动服务了(Server.jar是导出来的jar)。可以通过PostMan来测试。
把代码部署在VPS上
实际使用的Restful服务需要部署在某台服务器上。在这里我把Server.jar 部署在搬瓦工VPS上。VPS安装的系统是Centos 6 x86 minimal。系统本身没有安装JDK,需用通过yum 命令安装openjdk。
yum list java*列出所有的openjdk版本。这里通过yum 安装jdk1.8yum install java-1.8.0-openjdk.i686, 通过java -version命令查看openjdk版本。Server.jar 可以通过sftp上传的vps服务器上,这里使用Cyberduck这款mac系统下的软件。或者可以通过Linux 的SCP 命令把Jar上传到vps 服务器上,具体操作可以参照http://blog.csdn.net/marujunyy/article/details/8809481
Linux 的命令行窗口实际上的单任务模式的,如果直接运行jar,关掉窗口之后,jar也会自动关掉,不会长期驻留服务器上。 这时候需要用到 Screen 这个多窗口管理软件(可通过yum安装)。
screen -S HealthServer新开一个窗口,执行java -jar Server.jar运行服务,这样服务就可以作为一个独立的任务运行单独运行。可以通过快捷键ctl+a+d切换回主窗口。screen -ls命令可以列出当前所有的窗口任务。screen -r HealthServer命令切换到服务运行的窗口。
The End
最终的接口可以通过PostMan来做测试。
参考资料
- 官方网站http://netty.io/
- 《Netty 实战(精髓)》https://waylau.gitbooks.io/essential-netty-in-action/content/GETTING%20STARTED/Introducing%20Netty.html
- Netty构建游戏服务器https://my.oschina.net/acitiviti/blog/745206


