今天,我拿Web HA一例来学习heartbeat。
WEB OS:Centos5.5
WEB Software:nginx
WEB Scripts Name:Start_Nginx
Start_Nginx
#!/usr/bin/env bash
case "$1" in
start)
/usr/local/nginx/sbin/nginx
;;
stop)
killall nginx
;;
status)
;;
esac.
(因此脚本不是这篇文章要讲述的重点,所以我们只是将其功能展示出来。不做深入的脚本探讨。记住,这个脚本很重要,因为它是heartbeat的资源噢)
大家如果能heartbet有兴趣的话,不妨看下
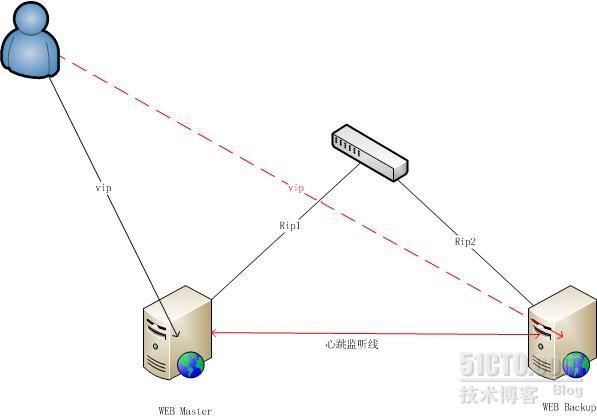
在这里,我简单的画下拓扑,
简单说明下,
在正常情况下用户的请求会全部到Web Master上,只有当WEB Backup在指定的时间内没有接收到Master的心跳时,Backup将会接管Master的工作,包括vip,资源(此处的资源就是指提供的网络服务),当然,heartbeat在监听心跳方面,容易出现”脑裂”,为此,我们可以将监听心跳的手段多增加点,这里我增加了一条交叉线连接彼此。
以下是我假定的IP信息:
角色 |
Ip信息 |
WEB Master |
VIP:172.16.1.64,RIP:172.16.1.23,心跳IP: 10.168.1.23 |
WEB Master |
RIP:172.16.1.24,心跳ip:10.168.1.24 |
注意:主/备的heartbeat配置文件一样。
Master端服务安装与配置
(1) HeartBeat安装
[root@ha ~]# yum -y install heartbeat
安装过程中会报错:
useradd: user hacluster exists
error: %pre(heartbeat-2.1.3-3.el5.centos.i386) scriptlet failed, exit status 9
error: install: %pre scriptlet failed (2), skipping heartbeat-2.1.3-3.el5.centos
退出后,再次执行:
[root@ha ~]# yum -y install heartbeat
(2)配置
[root@ha ~]#cd /etc/ha.d/
[root@ha ha.d]# more README.config
You need three configuration files to make heartbeat happy,
and they all go in this directory.
They are:
ha.cf Main configuration file
haresources Resource configuration file
authkeys Authentication information
These first two may be readable by everyone, but the authkeys file
must not be.
The good news is that sample versions of these files may be found in
the documentation directory (providing you installed the documentation).
If you installed heartbeat using rpm packages then
this command will show you where they are on your system:
rpm -q heartbeat -d
If you installed heartbeat using Debian packages then
the documentation should be located in /usr/share/doc/heartbeat
执行如下命令:
[root@ha ha.d]# cp /usr/share/doc/heartbeat-2.1.3/authkeys /etc/ha.d/
[root@ha ha.d]# cp /usr/share/doc/heartbeat-2.1.3/ha.cf /etc/ha.d/
[root@ha ha.d]# cp /usr/share/doc/heartbeat-2.1.3/haresources /etc/ha.d/
[root@ha ~]# more /etc/ha.d/ha.cf
logfile /var/log/ha-log
keepalive 2
deadtime 20
warntime 10
initdead 60
udpport 694
bcast eth0 eth1 #eth0电信,eth1交叉网线链接
auto_failback on #当Master恢复后,能将Backup的工作自动接替过来
node ha.tiancity.com
node nagiosmm.tiancity.com.cn
[root@ha ~]# more /etc/ha.d/authkeys
auth 1
1 crc
[root@ha ~]# more /etc/ha.d/haresources
ha.tiancity.com 172.16.1.64/255.255.255.0/172.16.1.255 Start_Nginx
#需要将其test脚本放到/etc/ha.d/resource.d/目录下。切记。。。
Backup端服务安装与配置
将其Master端服务端的配置文件(ha.cf,authkeys,haresources)放置到/etc/ha.d
启动
Master端观察:
[root@ha ha.d]# tail -f /var/log/ha-log
heartbeat[7295]: 2010/12/08_13:40:32 info: Version 2 support: false
heartbeat[7295]: 2010/12/08_13:40:32 WARN: Logging daemon is disabled --enabling logging daemon is recommended
heartbeat[7295]: 2010/12/08_13:40:32 info: **************************
heartbeat[7295]: 2010/12/08_13:40:32 info: Configuration validated. Starting heartbeat 2.1.3
heartbeat[7296]: 2010/12/08_13:40:32 info: heartbeat: version 2.1.3
heartbeat[7296]: 2010/12/08_13:40:32 info: Heartbeat generation: 1291211142
heartbeat[7296]: 2010/12/08_13:40:32 info: glib: UDP Broadcast heartbeat started on port 694 (694) interface eth0
heartbeat[7296]: 2010/12/08_13:40:32 info: glib: UDP Broadcast heartbeat closed on port 694 interface eth0 - Status: 1
heartbeat[7296]: 2010/12/08_13:40:32 info: glib: UDP Broadcast heartbeat started on port 694 (694) interface eth1
heartbeat[7296]: 2010/12/08_13:40:32 info: glib: UDP Broadcast heartbeat closed on port 694 interface eth1 - Status: 1
heartbeat[7296]: 2010/12/08_13:40:32 info: G_main_add_TriggerHandler: Added signal manual handler
heartbeat[7296]: 2010/12/08_13:40:32 info: G_main_add_TriggerHandler: Added signal manual handler
heartbeat[7296]: 2010/12/08_13:40:32 info: G_main_add_SignalHandler: Added signal handler for signal 17
heartbeat[7296]: 2010/12/08_13:40:32 info: Local status now set to: 'up'
heartbeat[7296]: 2010/12/08_13:40:34 info: Link ha.tiancity.com:eth0 up.
heartbeat[7296]: 2010/12/08_13:40:34 info: Link ha.tiancity.com:eth1 up.
以上是启动heartbeat基本信息
[root@ha resource.d]# ip addr list
1: lo:
link/loopback 00:00:00:00:00:00 brd 00:00:00:00:00:00
inet 127.0.0.1/8 scope host lo
inet6 ::1/128 scope host
valid_lft forever preferred_lft forever
2: eth0:
link/ether 00:22:19:63:a2:d4 brd ff:ff:ff:ff:ff:ff
inet 172.16.1.23/24 brd 172.16.1.255 scope global eth0
inet6 fe80::222:19ff:fe63:a2d4/64 scope link
valid_lft forever preferred_lft forever
3: eth1:
link/ether 00:22:19:63:a2:d6 brd ff:ff:ff:ff:ff:ff
inet 10.168.1.23/24 brd 10.168.1.255 scope global eth1
inet6 fe80::222:19ff:fe63:a2d6/64 scope link
valid_lft forever preferred_lft forever
4: sit0:
link/sit 0.0.0.0 brd 0.0.0.0
[root@ha resource.d]# netstat -an|egrep '80?>'
需要等initdead 60(1分钟,ha.cf中的配置)才能将服务开启与vip添加成功
………………
1分钟后,再观察
heartbeat[7296]: 2010/12/08_13:41:33 WARN: node nagiosmm.tiancity.com.cn: is dead
heartbeat[7296]: 2010/12/08_13:41:33 info: Comm_now_up(): updating status to active
heartbeat[7296]: 2010/12/08_13:41:33 info: Local status now set to: 'active'
heartbeat[7296]: 2010/12/08_13:41:33 WARN: No STONITH device configured.
heartbeat[7296]: 2010/12/08_13:41:33 WARN: Shared disks are not protected.
heartbeat[7296]: 2010/12/08_13:41:33 info: Resources being acquired from nagiosmm.tiancity.com.cn.
harc[7307]: 2010/12/08_13:41:33 info: Running /etc/ha.d/rc.d/status status
mach_down[7336]: 2010/12/08_13:41:33 info: /usr/share/heartbeat/mach_down: nice_failback: foreign resources acquired
mach_down[7336]: 2010/12/08_13:41:33 info: mach_down takeover complete for node nagiosmm.tiancity.com.cn.
heartbeat[7296]: 2010/12/08_13:41:33 info: mach_down takeover complete.
heartbeat[7296]: 2010/12/08_13:41:33 info: Initial resource acquisition complete (mach_down)
IPaddr[7379]: 2010/12/08_13:41:33 INFO: Resource is stopped
heartbeat[7308]: 2010/12/08_13:41:33 info: Local Resource acquisition completed.
harc[7437]: 2010/12/08_13:41:33 info: Running /etc/ha.d/rc.d/ip-request-resp ip-request-resp
ip-request-resp[7437]: 2010/12/08_13:41:33 received ip-request-resp 172.16.1.64/255.255.255.0/172.16.1.255 OK yes
ResourceManager[7456]: 2010/12/08_13:41:33 info: Acquiring resource group: ha.tiancity.com 172.16.1.64/255.255.255.0/172.16.1.255 Start_Nginx
IPaddr[7482]: 2010/12/08_13:41:33 INFO: Resource is stopped
ResourceManager[7456]: 2010/12/08_13:41:33 info: Running /etc/ha.d/resource.d/IPaddr 172.16.1.64/255.255.255.0/172.16.1.255 start
IPaddr[7573]: 2010/12/08_13:41:33 INFO: Using calculated nic for 172.16.1.64: eth0
IPaddr[7573]: 2010/12/08_13:41:33 INFO: eval ifconfig eth0:0 172.16.1.64 netmask 255.255.255.0 broadcast 172.16.1.255
IPaddr[7547]: 2010/12/08_13:41:33 INFO: Success
ResourceManager[7456]: 2010/12/08_13:41:33 info: Running /etc/ha.d/resource.d/Start_Nginx start
heartbeat[7296]: 2010/12/08_13:41:43 info: Local Resource acquisition completed. (none)
heartbeat[7296]: 2010/12/08_13:41:43 info: local resource transition completed.
[root@ha resource.d]# ip addr list
1: lo:
link/loopback 00:00:00:00:00:00 brd 00:00:00:00:00:00
inet 127.0.0.1/8 scope host lo
inet6 ::1/128 scope host
valid_lft forever preferred_lft forever
2: eth0:
link/ether 00:22:19:63:a2:d4 brd ff:ff:ff:ff:ff:ff
inet 172.16.1.23/24 brd 172.16.1.255 scope global eth0
inet 172.16.1.64/24 brd 172.16.1.255 scope global secondary eth0:0
inet6 fe80::222:19ff:fe63:a2d4/64 scope link
valid_lft forever preferred_lft forever
3: eth1:
link/ether 00:22:19:63:a2:d6 brd ff:ff:ff:ff:ff:ff
inet 10.168.1.23/24 brd 10.168.1.255 scope global eth1
inet6 fe80::222:19ff:fe63:a2d6/64 scope link
valid_lft forever preferred_lft forever
4: sit0:
link/sit 0.0.0.0 brd 0.0.0.0
[root@ha resource.d]# netstat -an|egrep '80\>'
tcp 0 0 0.0.0.0:80 0.0.0.0:* LISTEN
Backup启动,
观察,结果是它既不启动服务,也不添加vip,只是开启了一个udp 694
接管测试,
关闭WEB Master端的heartbeat,你会发现WEB Backup很快接管了主的VIP,以及资源。
在这里,不贴log了….
如果大家在用heartbeat有什么疑问,可以一起讨论.
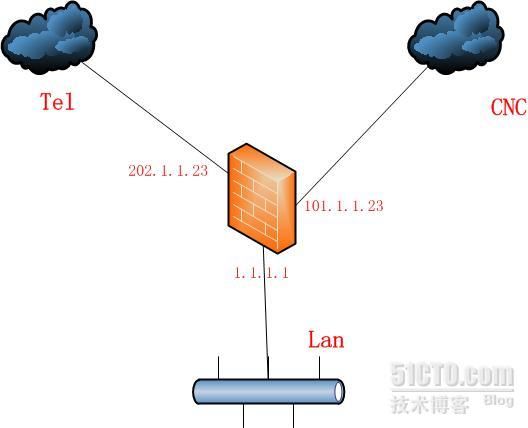
以下是我构想的防火墙HA,不过还没机会试验,请大家看看思路是否有问题。
防火墙的拓扑图如下:
Firewall OS:Centos5.5
Firewall Software:iptables
Firewall Function:snat,dnat
Firewall Scripts Name:Start_firewall.sh,Add_route.sh
Start_firewall.sh|Add_route.sh
略(因防火墙和添加路由脚本不是这篇文章要讲述的重点,所以防火墙脚本暂且搁置!不过,这两个脚本很重要,因为它是heartbeat的资源噢)
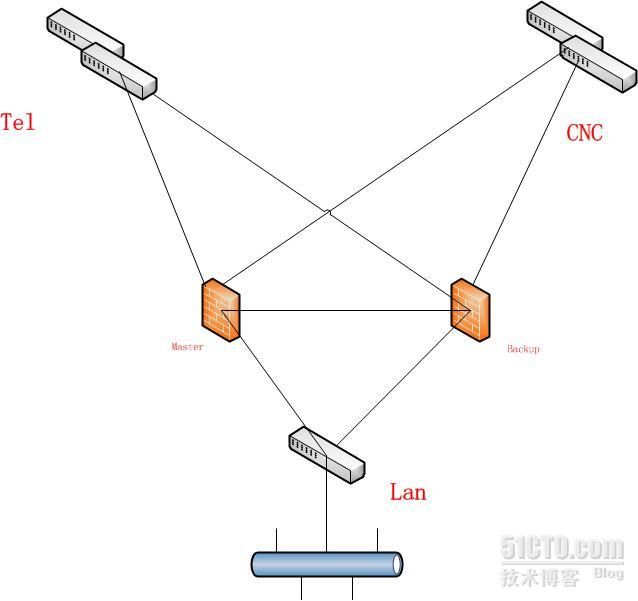
我们要做的事,就是当主防火墙挂了,备份的防火墙能将其主防火墙的工作完全接替过来。所以我们还需要以下资源:
IP角色 |
IP信息 |
VIP |
202.1.1.23(TEL),101.1.1.23(CNC),1.1.1.1(Lan) |
RIP |
202.1.1.22(TEL_M),101.1.1.22(CNC_M),1.1.1.2(Lan_M) |
HeatIP |
10.1.1.1(Heartbeat) ,10.1.1.2(Heartbeat) |
现在的拓扑,如下:
注意:主/备的heartbeat配置文件一样。
Master端服务安装与配置
(1) HeartBeat安装
[root@ha ~]# yum -y install heartbeat
安装过程中会报错:
useradd: user hacluster exists
error: %pre(heartbeat-2.1.3-3.el5.centos.i386) scriptlet failed, exit status 9
error: install: %pre scriptlet failed (2), skipping heartbeat-2.1.3-3.el5.centos
退出后,再次执行:
[root@ha ~]# yum -y install heartbeat
(2)配置
[root@ha ~]#cd /etc/ha.d/
[root@ha ha.d]# more README.config
You need three configuration files to make heartbeat happy,
and they all go in this directory.
They are:
ha.cf Main configuration file
haresources Resource configuration file
authkeys Authentication information
These first two may be readable by everyone, but the authkeys file
must not be.
The good news is that sample versions of these files may be found in
the documentation directory (providing you installed the documentation).
If you installed heartbeat using rpm packages then
this command will show you where they are on your system:
rpm -q heartbeat -d
If you installed heartbeat using Debian packages then
the documentation should be located in /usr/share/doc/heartbeat
执行如下命令:
[root@ha ha.d]# cp /usr/share/doc/heartbeat-2.1.3/authkeys /etc/ha.d/
[root@ha ha.d]# cp /usr/share/doc/heartbeat-2.1.3/ha.cf /etc/ha.d/
[root@ha ha.d]# cp /usr/share/doc/heartbeat-2.1.3/haresources /etc/ha.d/
[root@ha ~]# more /etc/ha.d/ha.cf
logfile /var/log/ha-log
keepalive 2
deadtime 20
warntime 10
initdead 60
udpport 694
bcast eth0 eth1 eth2 #eth0电信,eth1网通,eth2交叉网线链接
auto_failback on
node ha.firewall.com.cn
node backup.firewall.com.cn
[root@ha ~]# more /etc/ha.d/authkeys
auth 1
1 crc
[root@ha ~]# more /etc/ha.d/haresources
ha.tiancity.com vip(tel) Start_Firewall.sh Add_route.sh #将其脚本资源放置到
ha.tiancity.com vip(cnc) #/etc/ha.d/resource.d/
ha.tiancity.com vip(lan)
Backup端服务安装与配置
将其Master端服务端的配置文件()放置到/etc/ha.d
如果想了解更多,请关注我们的公众号
公众号ID:opdevos
扫码关注


