前言
应用性能的衡量标准有很多,从用户的角度来看,卡顿是最明显的表现,但这不意味看起来不卡顿的应用就不存在性能问题。从开发角度来看,衡量一段代码或者说算法的标准包括空间复杂度和时间复杂度,分别对应内存和CPU两种重要的计算机硬件。只有外在与内在都做没问题,才能说应用的性能做好了。因此,一套应用性能监控系统对开发者的帮助是巨大的,它能帮助你找到应用的性能瓶颈。
CPU
线程是程序运行的最小单位,换句话来说就是:我们的应用其实是由多个运行在CPU上面的线程组合而成的。要想知道应用占用了CPU多少资源,其实就是获取应用所有线程占用CPU的使用量。结构体thread_basic_info封装了单个线程的基本信息:
struct thread_basic_info {
    time_value_t    user_time;      /* user run time */
    time_value_t    system_time;    /* system run time */
    integer_t       cpu_usage;      /* scaled cpu usage percentage */
    policy_t        policy;         /* scheduling policy in effect */
    integer_t       run_state;      /* run state (see below) */
    integer_t       flags;          /* various flags (see below) */
    integer_t       suspend_count;  /* suspend count for thread */
    integer_t       sleep_time;     /* number of seconds that thread
                                   has been sleeping */
};
问题在于如何获取这些信息。iOS的操作系统是基于Darwin内核实现的,这个内核提供了task_threads接口让我们获取所有的线程列表以及接口thread_info来获取单个线程的信息:
kern_return_t task_threads
(
    task_inspect_t target_task,
    thread_act_array_t *act_list,
    mach_msg_type_number_t *act_listCnt
);

kern_return_t thread_info
(
    thread_inspect_t target_act,
    thread_flavor_t flavor,
    thread_info_t thread_info_out,
    mach_msg_type_number_t *thread_info_outCnt
);
第一个函数的target_task传入进程标记,这里使用mach_task_self()获取当前进程,后面两个传入两个指针分别返回线程列表和线程个数,第二个函数的flavor通过传入不同的宏定义获取不同的线程信息,这里使用THREAD_BASIC_INFO。此外,参数存在多种类型,实际上大多数都是mach_port_t类型的别名:
因此可以得到下面的代码来获取应用对应的CPU占用信息。宏定义TH_USAGE_SCALE返回CPU处理总频率:
- (double)currentUsage {
    double usageRatio = 0;
    thread_info_data_t thinfo;
    thread_act_array_t threads;
    thread_basic_info_t basic_info_t;
    mach_msg_type_number_t count = 0;
    mach_msg_type_number_t thread_info_count = THREAD_INFO_MAX;

    if (task_threads(mach_task_self(), &threads, &count) == KERN_SUCCESS) {
        for (int idx = 0; idx < count; idx++) {
            if (thread_info(threads[idx], THREAD_BASIC_INFO, (thread_info_t)thinfo, &thread_info_count) == KERN_SUCCESS) {
                basic_info_t = (thread_basic_info_t)thinfo;
                if (!(basic_info_t->flags & TH_FLAGS_IDLE)) {
                    usageRatio += basic_info_t->cpu_usage / (double)TH_USAGE_SCALE;
                }
            }
        }
        assert(vm_deallocate(mach_task_self(), (vm_address_t)threads, count * sizeof(thread_t)) == KERN_SUCCESS);
    }
    return usageRatio * 100.;
}
实践
由于硬件爆发式的性能增长,使用旧设备进行性能监控来优化代码的可行性更高。另外,不要害怕CPU的使用率过高。越高的占用率代表对CPU的有效使用越高,即便出现超出100%的使用率也不要害怕,需要结合FPS来观察是否对使用造成了影响。
拿笔者最近的一次优化来说,机型iPhone5c,性能瓶颈出现在启动应用之后第一次进入城市选择列表后出现的卡顿。通过监控CPU发现在进行的时候达到了187%左右的使用率,帧数下降到27帧左右。最初的伪代码如下:
static BOOL kmc_should_update_cities = YES;

- (void)fetchCities {
    if (kmc_should_update_cities) {
        [self fetchCitiesFromRemoteServer: ^(NSDictionary * allCities) {
            [self updateCities: allCities];
            [allCities writeToFile: [self localPath] atomically: YES];
        }];
    } else {
        [self fetchCitiesFromLocal: ^(NSDictionary * allCities) {
            [self updateCities: allCities];
        }];
    }
}
上述的代码对于数据的处理基本都放在子线程中处理,主线程实际上处理的工作并不多,但是同样引发了卡顿。笔者的猜测是:CPU对所执行的线程一视同仁,并不会因为主线程的关系就额外分配更多的处理时间。因此当子线程的任务处理超出了某个阙值时,主线程照样会受到影响,因此将耗时任务放到子线程处理来避免主线程卡顿是存在前提的。那么可以比较轻松的找到代码中CPU消耗最严重的地方:文件写入
在多线程陷阱一文中我提到过并发存在的缺陷,这种缺陷同上面的代码是一致的。数据在写入本地的时候会占据CPU资源,直到写入操作完成,如果此时其他核心上同样处理着大量任务,应用基本逃不开卡顿出现。笔者的解决方案是使用流将数据分片写入本地,由于NSStream自身的设计,可以保证写入操作的流畅性:
case NSStreamEventHasSpaceAvailable: {
    LXDDispatchQueueAsyncBlockInUtility(^{
        uint8_t * writeBytes = (uint8_t *)_writeData.bytes;
        writeBytes += _currentOffset;
        NSUInteger dataLength = _writeData.length;

        NSUInteger writeLength = (dataLength - _currentOffset > kMaxBufferLength) ? kMaxBufferLength : (dataLength - _currentOffset);
        uint8_t buffer[writeLength];
        (void)memcpy(buffer, writeBytes, writeLength);
        writeLength = [self.outputStream write: buffer maxLength: writeLength];
        _currentOffset += writeLength;
    });
} break;
替换文件写入的操作时候,再次进入帧数已经上升到了40左右了,但是仍然会在进行之后发生短暂的卡顿。进一步猜测原因是:在异步实现流写入的操作时,同样异步进行数据处理。多个线程与主线程抢占CPU资源,因此将数据处理的操作进一步延后,放到写入操作完成之后:
case NSStreamEventOpenCompleted: {
    [self fetchCitiesFromLocal: ^(NSDictionary * allCities) {
        [self updateCities: allCities];
    }];
} break;
完成这一步之后,除了页面跳转时帧数会降到40左右,跳转完成之后基本保持在52以上的帧数。此外,其他的优化方案还包括UI展示时对数据的懒加载等,不过上面二个处理更符合CPU相关优化的概念,因此其他的就不再多说。
内存
进程的内存使用信息同样放在了另一个结构体mach_task_basic_info中,存储了包括多种内存使用信息:
#define MACH_TASK_BASIC_INFO     20         /* always 64-bit basic info */
struct mach_task_basic_info {
    mach_vm_size_t  virtual_size;       /* virtual memory size (bytes) */
    mach_vm_size_t  resident_size;      /* resident memory size (bytes) */
    mach_vm_size_t  resident_size_max;  /* maximum resident memory size (bytes) */
    time_value_t    user_time;          /* total user run time for
                                           terminated threads */
    time_value_t    system_time;        /* total system run time for
                                           terminated threads */
    policy_t        policy;             /* default policy for new threads */
    integer_t       suspend_count;      /* suspend count for task */
};
对应的获取函数名为task_info,传入进程名、获取的信息类型、信息存储结构体以及数量变量:
kern_return_t task_info
(
    task_name_t target_task,
    task_flavor_t flavor,
    task_info_t task_info_out,
    mach_msg_type_number_t *task_info_outCnt
);
由于mach_task_basic_info中的内存使用bytes作为单位,在显示之前我们还需要进行一层转换。另外为了方便实际使用中的换算,笔者使用结构体来存储内存相关信息:
#ifndef NBYTE_PER_MB
#define NBYTE_PER_MB (1024 * 1024)
#endif

typedef struct LXDApplicationMemoryUsage
{
    double usage;   ///< 已用内存(MB)
    double total;   ///< 总内存(MB)
    double ratio;   ///< 占用比率
} LXDApplicationMemoryUsage;
获取内存占用量的代码如下:
- (LXDApplicationMemoryUsage)currentUsage {
    struct mach_task_basic_info info;
    mach_msg_type_number_t count = sizeof(info) / sizeof(integer_t);
    if (task_info(mach_task_self(), MACH_TASK_BASIC_INFO, (task_info_t)&info, &count) == KERN_SUCCESS) {
        return (LXDApplicationMemoryUsage){
            .usage = info.resident_size / NBYTE_PER_MB,
            .total = [NSProcessInfo processInfo].physicalMemory / NBYTE_PER_MB,
            .ratio = info.virtual_size / [NSProcessInfo processInfo].physicalMemory,
        };
    }
    return (LXDApplicationMemoryUsage){ 0 };
}
展示
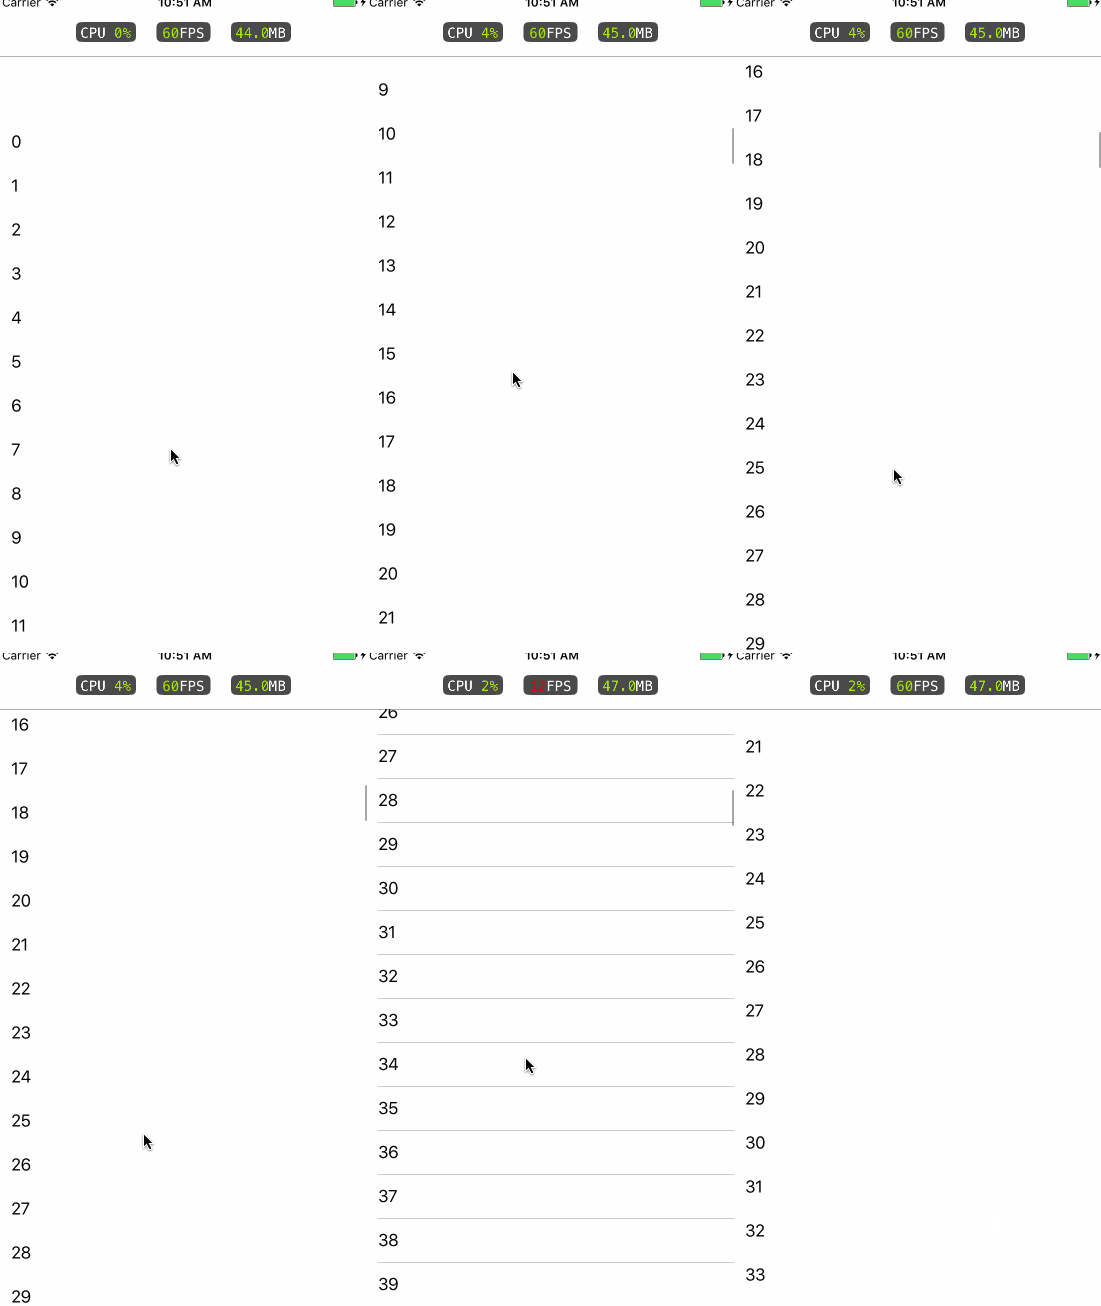
内存和CPU的监控并不像其他设备信息一样,能做更多有趣的事情。实际上,这两者的获取是一段枯燥又固定的代码,因此并没有太多可说的。对于这两者的信息,基本上是开发阶段展示出来观察性能的。因此设置一个良好的查询周期以及展示是这个过程中相对好玩的地方。笔者最终监控的效果如下:
不知道什么原因导致了task_info获取到的内存信息总是比Xcode自身展示的要多20M左右,因此使用的时候自行扣去这一部分再做衡量。为了保证展示器总能显示在顶部,笔者创建了一个UIWindow的单例,通过设置windowLevel的值为CGFLOAT_MAX来保证显示在最顶层,并且重写了一部分方法保证不被修改:
- (instancetype)initWithFrame: (CGRect)frame {
    if (self = [super initWithFrame: frame]) {
        [super setUserInteractionEnabled: NO];
        [super setWindowLevel: CGFLOAT_MAX];

        self.rootViewController = [UIViewController new];
        [self makeKeyAndVisible];
    }
    return self;
}

- (void)setWindowLevel: (UIWindowLevel)windowLevel { }
- (void)setBackgroundColor: (UIColor *)backgroundColor { }
- (void)setUserInteractionEnabled: (BOOL)userInteractionEnabled { }
三个标签栏采用异步绘制的方式保证更新文本的时候不影响主线程,核心代码:
CGSize textSize = [attributedText.string boundingRectWithSize: size options: NSStringDrawingUsesLineFragmentOrigin attributes: @{ NSFontAttributeName: self.font } context: nil].size;
textSize.width = ceil(textSize.width);
textSize.height = ceil(textSize.height);

CGMutablePathRef path = CGPathCreateMutable();
CGPathAddRect(path, NULL, CGRectMake((size.width - textSize.width) / 2, 5, textSize.width, textSize.height));
CTFramesetterRef frameSetter = CTFramesetterCreateWithAttributedString((CFAttributedStringRef)attributedText);
CTFrameRef frame = CTFramesetterCreateFrame(frameSetter, CFRangeMake(0, attributedText.length), path, NULL);
CTFrameDraw(frame, context);

UIImage * contents = UIGraphicsGetImageFromCurrentImageContext();
UIGraphicsEndImageContext();
CFRelease(frameSetter);
CFRelease(frame);
CFRelease(path);
dispatch_async(dispatch_get_main_queue(), ^{
    self.layer.contents = (id)contents.CGImage;
});
其他
除了监控应用本身占用的CPU和内存资源之外,Darwin提供的接口还允许我们去监控整个设备本身的内存和CPU使用量,笔者分别封装了额外两个类来获取这些数据。最后统一封装了LXDResourceMonitor类来监控这些资源的使用,通过枚举来控制监控内容:
typedef NS_ENUM(NSInteger, LXDResourceMonitorType)
{
    LXDResourceMonitorTypeDefault = (1 << 2) | (1 << 3),
    LXDResourceMonitorTypeSystemCpu = 1 << 0,   ///<    监控系统CPU使用率,优先级低
    LXDResourceMonitorTypeSystemMemory = 1 << 1,    ///<    监控系统内存使用率,优先级低
    LXDResourceMonitorTypeApplicationCpu = 1 << 2,  ///<    监控应用CPU使用率,优先级高
    LXDResourceMonitorTypeApplicationMemoty = 1 << 3,   ///<    监控应用内存使用率,优先级高
};
这里使用到了位运算的内容,相比起其他的手段要更简洁高效。APM系列至此已经完成了大半,当然除了网上常用的APM手段之外,笔者还会加入包括RunLoop优化运用相关的技术。
Demo在此


