本篇的目的是要了解:
- 坐标轴绘制
- 空间变换(space transformation)封装
- 下一步安排说明
今天涉及到空间变换(Space Transformation)的封装,具体数学细节不会在本篇中涉及(下一个主题是数学和动画,会重点了解矢量,矩阵,四元数,插值,变换,碰检,贝塞尔基矩阵,计算几何,投影几何等等等等....之类的数学概念和原理)。
1. 为了更好的演示以后的数学操作,先实现坐标系的绘制:
增加线条的绘制操作:
drawLine(x0, y0, x1, y1, style = 'red') {
        let ctx = this.context;
        ctx.save();
        ctx.strokeStyle = style;
        ctx.beginPath();
        ctx.moveTo(x0, y0);
        ctx.lineTo(x1, y1);
        ctx.stroke();
        ctx.restore();
    }
坐标轴绘制:
//dir = 'x'|'y'
    drawAxis(x, y, len, dir = 'x', space = 10, style = 'red') {
        if (dir == 'x')
            this.drawLine(x, y, x + len, y, style);
        else
            this.drawLine(x, y, x, y + len, style);

        let delta;
        let numTicks = len / space;
        let ctx = this.context;
        ctx.save();
        ctx.strokeStyle = style;
        for (let i = 1; i < numTicks; ++i) {

            ctx.beginPath();

            if (i % 5 === 0)
                delta = 10;
            else
                delta = 10 / 2;

            if (dir == 'x') {
                ctx.moveTo(x + i * space, y - delta);
                ctx.lineTo(x + i * space, y + delta);
                ctx.stroke();
            } else {
                context.moveTo(x - delta, y + i * space);
                context.lineTo(x + delta, y + i * space);
                context.stroke();
            }
        }
        ctx.restore();
    }
提供一个简便方法绘制x和y轴以及标尺
drawCoords(rect, space = 10, style = 'red') {
        this.drawAxis(rect.x, rect.y, rect.width, 'x', space, style);
        this.drawAxis(rect.x, rect.y, rect.height, 'y', space, style);
    }
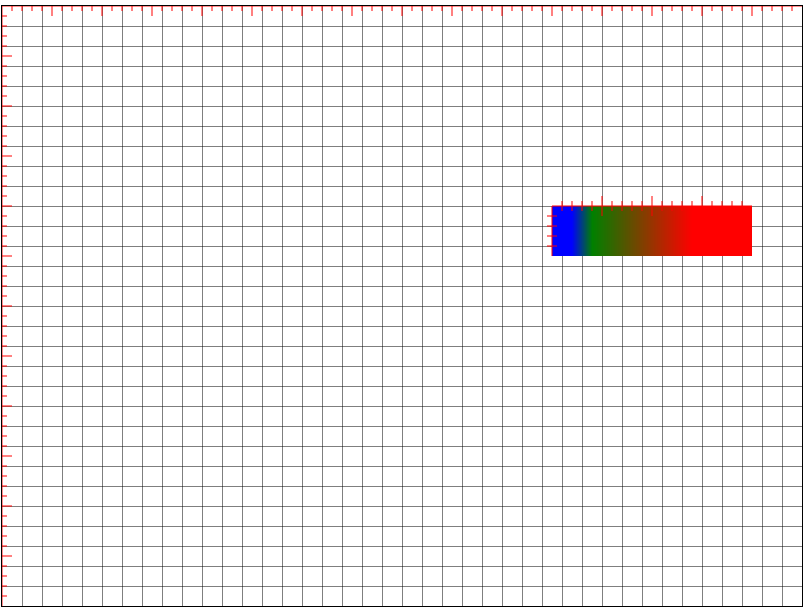
我们来测试一下:
        render.clear();

        //网格
        render.drawGrid('white', 'black', 20, 20);

         //绘制整个canvas的坐标标尺
        render.drawAxis(0, 0, 800);
        render.drawAxis(0, 0, 600, 'y');

        //使用drawCoords方法绘制某个物体的坐标标尺
        let coords = [550, 225, 750, 225]; //线性 4个参数[x0,y0,x1,y1] 组成一条直线
        let g = render.createGradient(coords, colors);
        let rc = new Rect(550, 200, 200, 50);
        render.drawRect(rc, g);
        render.drawCoords(rc);
2. 空间变换:
请区分tranform(To/By):
transformTo: 变换到,相对与原点的offset(偏移)表示,canvas2d.setTransform表示To概念
transformBy: 变换了,相对与上一个点的offset(偏移)表示,canvas2d.transform表示By概念
更简单的方式描述:
To 100: let x = 100;
By 100: let x += 100;上述两个方法是2D 仿射变换的通用表示。
目前只要知道2D 仿射变换(2D affine transformation):包含平移(Translation)、缩放(Scale)、翻转(Mirror/Flip)、旋转(Rotation)和错切(Skew/Shear)中的一个或多个或者全部的组合操作
canvas2d中的translate/rotate/scale方法是canvas2d.transform(By)的特殊表示
- 最常用的变换操作是:translate/rotate/scale
- By方式的操作,用术语表示为累积矩阵( Accumulate Matrix),累积上一次的结果。
- 我们来封装或实现一些变换操作方法:
取消累积效果,让矩阵恢复到原始状态
resetTransform() {
        this.context.resetTransform();
}
translate/rotate/scale
   translate(dx, dy) {
        this.context.translate(dx, dy);
    }

    //绕default原点旋转
    //参数为角度而不是弧度表示
    rotate(degree) {
        let radian = BLFUtil.toRadian(degree);
        this.context.rotate(radian);
    }

   scale(sx, sy) {
        this.context.scale(sx, sy);
    }
由于default情况下,旋转和缩放是以原点为中心的,原点可能在左上角之类的,如果要以中心点进行旋转或缩放,就需要调整原点位置,因此增加rotateAt/scaleAt这两个便利的方法
    //绕任意点旋转
    rotateAt(dx, dy, degree) {
        this.context.translate(dx, dy);
        this.rotate(degree);
        this.context.translate(-dx, -dy);
    }
   //以任意点为中心缩放
   scaleAt(dx, dy, sx, sy) {
        this.context.translate(dx, dy);
        this.scale(sx, sy);
        this.context.translate(-dx, -dy);
    }
实现仿射变换中的mirror/flip操作:
    //true为水平反转,false为垂直反转
    //反转镜像只是scale的特殊形式
    mirror(horizontal = true) {
        if (horizontal == true)
            this.context.scale(-1, 1);
        else
            this.context.scale(1, -1);
    }
实现仿射变换中的skew/shear操作:
    //错切矩阵,输入为角度
    skew(x = 0, y = 0) {

        if (x == 0 && y == 0)
            return;

        let tanX = 0;
        let tanY = 0;

        if (x != 0)
            tanX = Math.tan(BLFUtil.toRadian(x));

        if (y != 0)
            tanY = Math.tan(BLFUtil.toRadian(y));

        //矩阵参数a,b,c,d,e,f
        //b决定Y轴倾斜程度,c决定X轴倾斜程度
        this.context.transform(1, tanY, tanX, 1, 0, 0);
    }
封装To/By的通用操作(必要时,需要直接操作矩阵中的行列值)
   transformTo(a, b, c, d, e, f) {
        this.context.setTransform(a, b, c, d, e, f);
    }

    //累积矩阵
    transformBy(a, b, c, d, e, f) {
        this.context.transform(a, b, c, d, e, f);
    }
关于用法和demo,会在后续的动画及数学篇章中进行演示。本篇就仅进行相关封装。
本篇是创建一个演示用的渲染库系列文章的最后一篇。
canvas2d的十一个分类:
渲染状态的save/restore
全局阴影
全局alpha blend和像素合成操作(globalAlpha/globalCompositeOperation)
样式(color/gradient/pattern)
线条属性(lineWidth/lineCap/lineJoin/meterLimit)
矩形操作(clearRect/strokeRect/fillRect)
文本绘制
路径绘制(除贝塞尔外,其他都有涉及)
图像绘制
图像像素操作(未涉及)
空间变换
我们会看到,除了路径中的贝塞尔及图像像素操作外,其他基本都封装到了自定义的render中去了。
关于贝塞尔曲线及曲面,是一个很精彩的领域。在动画及数学篇中会详细说明,并且提供一些非常高效先进的算法来了解贝塞尔动画及造型艺术。
图像像素的处理,实际是图像学范畴。ps的滤镜效果就是逐像素处理的结果。比较有名的开源图像操作库是:opencv,提供大量预置操作,以及识别操作等等。
后面也会提供图像操作方面的知识。主要在webgl的gpu编程中体现。用js直接cpu进行像素操作,效率上折扣太大。
