接着上一篇文章,这一篇我把自己上传到npm上的react-native-segmented-android开发步骤和大家分享。
下载react-native组件命令:
$ npm install react-native-segmented-android --save
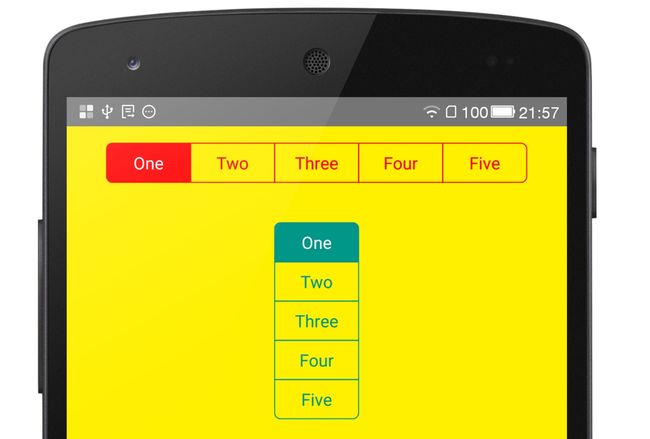
这是效果图:
这次要实现的是View组件,所以要通过继承SimpleViewManager 来实现,步骤和(一)基本保持一致。
开始
Step 1 - 新建react-native工程 ReactNativeSegmentedAndroid
$ react-native init ReactNativeSegmentedAndroid
Step 2 - 将新建的工程导入android studio然后新建空library(以react-native-segmented-android为library的名称)
Step 3 - 新建空library(以react-native-segmented-android为library的名称)
在library目录下的build.gradle中添加react-native的依赖
// file: android/react-native-segmented-android/build.gradle
...

dependencies {
    ...
    compile 'info.hoang8f:android-segmented:1.0.6'
    compile 'com.facebook.react:react-native:0.16.+'
}
Step 4 - 创建AndroidSegmented类继承SegmentedGroup
public class AndroidSegmented extends SegmentedGroup{


    public void setSegmentOrientation(String str){
        if(str.equals("horizontal")){
            setOrientation(RadioGroup.HORIZONTAL);
        }else if(str.equals("vertical")){
            setOrientation(RadioGroup.VERTICAL);
        }
    }


    public AndroidSegmented(ThemedReactContext context) {
        super(context);
        setGravity(Gravity.CENTER);

        setLayoutParams(new ViewGroup.LayoutParams(
                ViewGroup.LayoutParams.WRAP_CONTENT,
                ViewGroup.LayoutParams.WRAP_CONTENT
        ));
    }

    private final Runnable mLayoutRunnable = new Runnable() {
        @Override
        public void run() {
            measure(MeasureSpec.makeMeasureSpec(getWidth(), MeasureSpec.EXACTLY),
                    MeasureSpec.makeMeasureSpec(getHeight(), MeasureSpec.EXACTLY));
            layout(getLeft(), getTop(), getRight(), getBottom());
        }
    };

    @Override
    public void requestLayout() {
        super.requestLayout();
        post(mLayoutRunnable);
    }

    @Override
    protected void onLayout(boolean changed, int l, int t, int r, int b) {
        super.onLayout(changed, l, t, r, b);
    }

}
Step 5 - 继承SimpleViewManager,注意这时就不是继承ReactContextBaseJavaModule了 ,大家可以很明显的发现setChildText()方法上多了一个‘@ReactProp(name = "childText")’,加上了‘@ReactProp'的,segmented控件多了一个name为childText的属性,值为ReadableArray ( js端代码:childText={['One','Two','Three','Four',"Five"]})。
public class AndroidSegmentedManager extends SimpleViewManager {

    public static final String REACT_CLASS = "AndroidSegmented";

    private static final String COLOR_REGEX = "^#([0-9A-Fa-f]{6}|[0-9A-Fa-f]{8})$";

    private Context context;

    @Override
    public String getName() {
        return REACT_CLASS;
    }

    @Override
    protected AndroidSegmented createViewInstance(ThemedReactContext reactContext) {
        this.context = reactContext;
        return new AndroidSegmented(reactContext);
    }


    @Override
    protected void addEventEmitters(final ThemedReactContext reactContext, final AndroidSegmented view) {
        view.setOnCheckedChangeListener(new RadioGroup.OnCheckedChangeListener() {
            @Override
            public void onCheckedChanged(RadioGroup group, int checkedId) {

                int childCount = view.getChildCount();
                for (int i = 0; i < childCount; i++) {
                    ((RadioButton)view.getChildAt(i)).setChecked(false);
                    if (view.getChildAt(i).getId() == checkedId) {
                        ((RadioButton)view.getChildAt(i)).setChecked(true);

                        reactContext.getNativeModule(UIManagerModule.class).getEventDispatcher()
                                .dispatchEvent(
                                        new AndroidSegmentedEvent(
                                                view.getId(),
                                                SystemClock.uptimeMillis(),
                                                i));
                    }
                }
            }
        });


    }


    @ReactProp(name = "childText")
    public void setChildText(AndroidSegmented view, ReadableArray data) {
        int childCount = data.size();
        Log.e("TAG", "___" + childCount);

        for (int i = 0; i < childCount; i++) {
            RadioButton child = (RadioButton) LayoutInflater.from(context).inflate(R.layout.radio_button, null);

            child.setText(data.getString(i));
            view.addView(child);
        }
    }


    @ReactProp(name = "selectedPosition")
    public void setSelectedChild(AndroidSegmented view, int position) {
        RadioButton radioBt= (RadioButton)(view.getChildAt(position));
        radioBt.setChecked(true);
    }


    @ReactProp(name = "orientation")
    public void setOrientation(AndroidSegmented view, String orientation) {
        view.setSegmentOrientation(orientation);
    }


    @ReactProp(name = "tintColor")
    public void setTintColor(AndroidSegmented view, ReadableArray data) {

        String type0 = data.getType(0).name();
        String type1 = data.getType(1).name();

        if ("String".equals(type0) && "String".equals(type1)) {
            String color0 = data.getString(0);
            String color1 = data.getString(1);
            if (color0 != null && color1 != null) {
                if (color0.matches(COLOR_REGEX) && color1.matches(COLOR_REGEX)) {

                    view.setTintColor(Color.parseColor(color0), Color.parseColor(color1));
                } else {
                    throw new JSApplicationIllegalArgumentException("Invalid arrowColor property: " + color0);
                }
            }
        }
    }
}
Step 6 - 创建AndroidSegmentedEvent类继承Event
public class AndroidSegmentedEvent extends Event {

    public static final String EVENT_NAME = "topChange";
    private final int selectedPosition;

    public AndroidSegmentedEvent(int viewId, long timestampMs, int selectedPosition) {
        super(viewId, timestampMs);
        this.selectedPosition = selectedPosition;
    }


    @Override
    public String getEventName() {
        return EVENT_NAME;
    }

    @Override
    public void dispatch(RCTEventEmitter rctEventEmitter) {
        rctEventEmitter.receiveEvent(getViewTag(), getEventName(), serializeEventData());

    }


    @Override
    public short getCoalescingKey() {
        return 0;
    }

    private WritableMap serializeEventData() {
        WritableMap eventData = Arguments.createMap();
        eventData.putInt("selected", getPosition());
        Log.e("AAA","position="+getPosition());

        return eventData;
    }

    private int getPosition() {
        return selectedPosition;
    }
}
Step 7 - 继承ReactPackage,注意createNativeModules()返回的是加入了 AndroidToastModule 的集合,createJSModules()与createViewManagers()返回的都是空集合,如果Step 4 步继承的是BaseViewManager或其子类,那么createViewManagers()中返回的就是加入了BaseViewManager的集合,其他的就是空集合,一般情况createJSModules()的返回值都是空集合。
public class AndroidSegmentedPackage implements ReactPackage {

    @Override
    public List createNativeModules(ReactApplicationContext reactContext) {
        return Collections.emptyList();
    }

    @Override
    public List> createJSModules() {
        return Collections.emptyList();
    }

    @Override
    public List createViewManagers(ReactApplicationContext reactContext) {
        return Arrays.asList(new AndroidSegmentedManager());
    }
}
Step 8 - 新建AndroidSegmented.js,文件位置
‘ android/react-native-segmented-android/AndroidSegmented.js ’代码如下,然后在 ‘android/react-native-segmented-android/’下运行如下命令生成package.json文件
$ npm init //生成package.json文件
//AndroidSegmented.js
'use strict';

var React = require('react-native');
var { requireNativeComponent, PropTypes, View } = React;

var NativeAndroidSegmented = requireNativeComponent('AndroidSegmented', AndroidSegmented);

class AndroidSegmented extends React.Component {
  constructor() {
    super();
    this._onChange = this._onChange.bind(this);
  }

  _onChange(event) {
    if (this.props.onChange) {
      this.props.onChange(event.nativeEvent);
    }
  }

  render() {
    return (

    );
  }
}

var colorType = function (props, propName, componentName) {
  var checker = function() {
    var color = props[propName];
    var regex = /^#([0-9A-Fa-f]{6}|[0-9A-Fa-f]{8})$/;
    if (!regex.test(color)) {
      return new Error('Only accept color formats: #RRGGBB and #AARRGGBB');
    }
  };

  return PropTypes.string(props, propName, componentName) || checker();
}

AndroidSegmented.propTypes = {
  ...View.propTypes,
  childText: PropTypes.arrayOf(PropTypes.oneOfType([ PropTypes.string ])),
  orientation:PropTypes.string,
  tintColor:PropTypes.arrayOf(PropTypes.oneOfType([ PropTypes.string ])),
  selectedPosition:PropTypes.number,
  onChange: PropTypes.func,
}

AndroidSegmented.defaultProps = {

};

module.exports = AndroidSegmented;
//package.json内容
{
  "name": "react-native-segmented-android",
  "version": "1.0.3",
  "description": "a high imitation of iOS segmented Controls",
  "main": "AndroidSegmented.js",
  "scripts": {
    "test": "react-native start"
  },
  "repository": {
    "type": "git",
    "url": "https://github.com/zzyyppqq/react-native-segmented-android.git"
  },
  "keywords": [
    "android",
    "segmented",
    "react-component",
    "react-native"
  ],
  "author": "zzyyppqq",
  "license": "ISC",
  "peerDependencies": {
    "react-native": "^1.0.3"
  }
}
Step 9 - 复制AndroidSegmented.js 文件到‘/ReactNativeSegmentedAndroid/ ’ 目录下,如下是index.android.js代码,然后运行测试
'use strict';

var React = require('react-native');
var {
  AppRegistry,
  StyleSheet,
  Text,
  Dimensions,
  ToastAndroid,
  View,
} = React;

//var AndroidSegmented = require('react-native-segmented-android');
var AndroidSegmented = require('./AndroidSegmented');
var deviceWidth = Dimensions.get('window').width;
var deviceHeight = Dimensions.get('window').height;

var ReactNativeSegmentedExample = React.createClass({
  onSelectPosition:function(event){
    console.log(event);
    ToastAndroid.show('segment '+event.selected, ToastAndroid.SHORT)
  },
  render: function() {
    return (


    );
  }
});
Install
Step 1 - Install the npm package
$ npm install react-native-degment-android --save
Step 2 - Update Gradle Settings
// file: android/settings.gradle
...

include ':react-native-degment-android', ':app'
project(':react-native-degment-android').projectDir = new File(rootProject.projectDir,'../node_modules/react-native-degment-android')
Step 3 - Update app Gradle Build
// file: android/app/build.gradle
...

dependencies {
    ...
    compile project(':react-native-degment-android')
}
Step 4 - Register React Package
...
import com.higo.zhangyp.segmented.AndroidSegmentedPackage; // <-- import

public class MainActivity extends FragmentActivity implements DefaultHardwareBackBtnHandler {

    private ReactInstanceManager mReactInstanceManager;
    private ReactRootView mReactRootView;

    @Override
    protected void onCreate(Bundle savedInstanceState) {
        super.onCreate(savedInstanceState);
        mReactRootView = new ReactRootView(this);
        mReactInstanceManager = ReactInstanceManager.builder()
                .setApplication(getApplication())
                .setBundleAssetName("index.android.bundle")
                .setJSMainModuleName("index.android")
                .addPackage(new MainReactPackage())
                .addPackage(new AndroidSegmentedPackage()) // <-- Register package here
                .setUseDeveloperSupport(BuildConfig.DEBUG)
                .setInitialLifecycleState(LifecycleState.RESUMED)
                .build();
        mReactRootView.startReactApplication(mReactInstanceManager, "AwesomeProject", null);
        setContentView(mReactRootView);
    }
...
从react-native的官方文档中我们已经知道facebook的react-native团队已经为我们实现了很多组件,例如 Image、Text、ViewPagerAndroid等,我们在index.android.js中可以直接使用这些组件,这些组件为什么能直接使用呢?
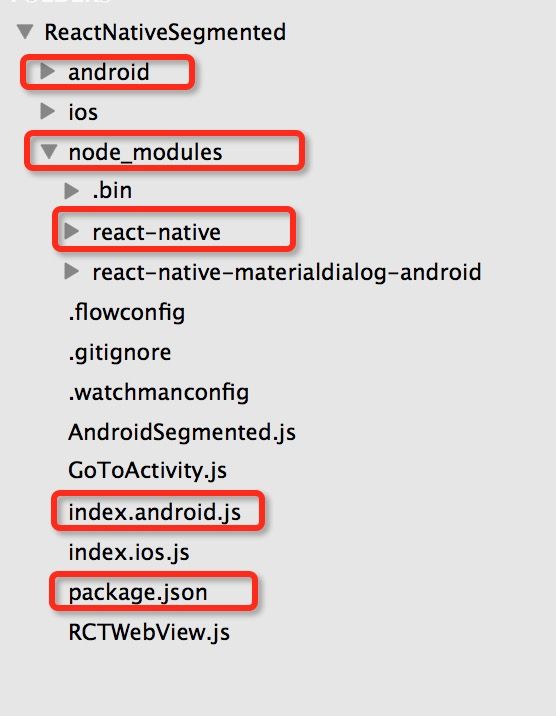
大家会很自然的想到已经封装好了呗。那在哪封装的?如何封装的?其实只要通过命令react-native init ProjectName创建过react-native工程的同学来说,在哪儿封装的一目了然。我们来看react-native工程的结构图:
react-native工程中,在node_modules下有一个很特别的react-native文件夹,android的工程中的build.gradle 文件多了一个依赖,不用想肯定在这两个地方封装的,这也是react-native的关键。
dependencies {
      compile 'com.facebook.react:react-native:0.16.+'
 }
首先我们从入口MainActivity开始,看了我的前两篇文章,如何自定义react-native的android组件(一)和(二),要使用一个自定义组件,必须在MainActivity中加入【.addPackage(new AndroidSegmentedPackage()) 】才能使用。
...
  @Override
    protected void onCreate(Bundle savedInstanceState) {
        super.onCreate(savedInstanceState);
        mReactRootView = new ReactRootView(this);

        mReactInstanceManager = ReactInstanceManager.builder()
                .setApplication(getApplication())
                .setBundleAssetName("index.android.bundle")
                .setJSMainModuleName("index.android")
                .addPackage(new MainReactPackage())
                .addPackage(new AndroidSegmentedPackage())
                .setUseDeveloperSupport(BuildConfig.DEBUG)
                .setInitialLifecycleState(LifecycleState.RESUMED)
                .build();

        mReactRootView.startReactApplication(mReactInstanceManager, "ReactNativeSegmented", null);

        setContentView(mReactRootView);
    }
...
那么官方的Android组件是如何实现的呢,我们肯定注意到了【.addPackage(new MainReactPackage())】和自定义的是不是很像,格式也一样,我想肯定在这里面有实现,进入MainReactPackage类中,代码如下:
//react-native 源码
public class MainReactPackage implements ReactPackage {

  @Override
  public List createNativeModules(ReactApplicationContext reactContext) {
    return Arrays.asList(
      new AsyncStorageModule(reactContext),
      new FrescoModule(reactContext),
      new IntentModule(reactContext),
      new LocationModule(reactContext),
      new NetworkingModule(reactContext),
      new WebSocketModule(reactContext),
      new ToastModule(reactContext));
  }

  @Override
  public List> createJSModules() {
    return Collections.emptyList();
  }

  @Override
  public List createViewManagers(ReactApplicationContext reactContext) {
    return Arrays.asList(
      new ReactDrawerLayoutManager(),
      new ReactHorizontalScrollViewManager(),
      new ReactImageManager(),
      new ReactProgressBarViewManager(),
      new ReactRawTextManager(),
      new ReactScrollViewManager(),
      new ReactSwitchManager(),
      new ReactTextInputManager(),
      new ReactTextViewManager(),
      new ReactToolbarManager(),
      new ReactViewManager(),
      new ReactViewPagerManager(),
      new ReactTextInlineImageViewManager(),
      new ReactVirtualTextViewManager(),
      new SwipeRefreshLayoutManager());
  }
}
看了MainReactPackage中的代码,果不其然,首先我们看createViewManagers()方法中的集合,看看集合子集的命名是不是很熟悉,
看看这里一共实现了多少原生控件:DrawerLayout、HorizontalScrollView、HorizontalScrollView、Image等等,还有SwipeRefreshLayout官网上还没有更新这个组件,其实这个版本已经可以使用了。
1.public class ReactDrawerLayoutManager extends ViewGroupManager
2.public class ReactImageManager extends SimpleViewManager
3.public class ReactProgressBarViewManager extends BaseViewManager
...
//贴上一个ReactDrawerLayoutManager源码,大家看看实现
public class ReactDrawerLayoutManager extends ViewGroupManager {

  private static final String REACT_CLASS = "AndroidDrawerLayout";

  public static final int OPEN_DRAWER = 1;
  public static final int CLOSE_DRAWER = 2;

  @Override
  public String getName() {
    return REACT_CLASS;
  }

  @Override
  protected void addEventEmitters(ThemedReactContext reactContext, ReactDrawerLayout view) {
    view.setDrawerListener(
        new DrawerEventEmitter(
            view,
            reactContext.getNativeModule(UIManagerModule.class).getEventDispatcher()));
  }

  @Override
  protected ReactDrawerLayout createViewInstance(ThemedReactContext context) {
    return new ReactDrawerLayout(context);
  }

  @ReactProp(name = "drawerPosition", defaultInt = Gravity.START)
  public void setDrawerPosition(ReactDrawerLayout view, int drawerPosition) {
    if (Gravity.START == drawerPosition || Gravity.END == drawerPosition) {
      view.setDrawerPosition(drawerPosition);
    } else {
      throw new JSApplicationIllegalArgumentException("Unknown drawerPosition " + drawerPosition);
    }
  }

  @ReactProp(name = "drawerWidth", defaultFloat = Float.NaN)
  public void getDrawerWidth(ReactDrawerLayout view, float width) {
    int widthInPx = Float.isNaN(width) ?
        ReactDrawerLayout.DEFAULT_DRAWER_WIDTH : Math.round(PixelUtil.toPixelFromDIP(width));
    view.setDrawerWidth(widthInPx);
  }

  @Override
  public boolean needsCustomLayoutForChildren() {
    // Return true, since DrawerLayout will lay out it's own children.
    return true;
  }

  @Override
  public @Nullable Map getCommandsMap() {
    return MapBuilder.of("openDrawer", OPEN_DRAWER, "closeDrawer", CLOSE_DRAWER);
  }

  @Override
  public void receiveCommand(
      ReactDrawerLayout root,
      int commandId,
      @Nullable ReadableArray args) {
    switch (commandId) {
      case OPEN_DRAWER:
        root.openDrawer();
        break;
      case CLOSE_DRAWER:
        root.closeDrawer();
        break;
    }
  }

  @Override
  public @Nullable Map getExportedViewConstants() {
    return MapBuilder.of(
        "DrawerPosition",
        MapBuilder.of("Left", Gravity.START, "Right", Gravity.END));
  }

  @Override
  public @Nullable Map getExportedCustomDirectEventTypeConstants() {
    return MapBuilder.of(
        DrawerSlideEvent.EVENT_NAME, MapBuilder.of("registrationName", "onDrawerSlide"),
        DrawerOpenedEvent.EVENT_NAME, MapBuilder.of("registrationName", "onDrawerOpen"),
        DrawerClosedEvent.EVENT_NAME, MapBuilder.of("registrationName", "onDrawerClose"),
        DrawerStateChangedEvent.EVENT_NAME, MapBuilder.of(
            "registrationName", "onDrawerStateChanged"));
  }

  /**
   * This method is overridden because of two reasons:
   * 1. A drawer must have exactly two children
   * 2. The second child that is added, is the navigationView, which gets panned from the side.
   */
  @Override
  public void addView(ReactDrawerLayout parent, View child, int index) {
    if (getChildCount(parent) >= 2) {
      throw new
          JSApplicationIllegalArgumentException("The Drawer cannot have more than two children");
    }
    if (index != 0 && index != 1) {
      throw new JSApplicationIllegalArgumentException(
          "The only valid indices for drawer's child are 0 or 1. Got " + index + " instead.");
    }
    parent.addView(child, index);
    parent.setDrawerProperties();
  }

  public static class DrawerEventEmitter implements DrawerLayout.DrawerListener {

    private final DrawerLayout mDrawerLayout;
    private final EventDispatcher mEventDispatcher;

    public DrawerEventEmitter(DrawerLayout drawerLayout, EventDispatcher eventDispatcher) {
      mDrawerLayout = drawerLayout;
      mEventDispatcher = eventDispatcher;
    }

    @Override
    public void onDrawerSlide(View view, float v) {
      mEventDispatcher.dispatchEvent(
          new DrawerSlideEvent(mDrawerLayout.getId(), SystemClock.uptimeMillis(), v));
    }

    @Override
    public void onDrawerOpened(View view) {
      mEventDispatcher.dispatchEvent(
        new DrawerOpenedEvent(mDrawerLayout.getId(), SystemClock.uptimeMillis()));
    }

    @Override
    public void onDrawerClosed(View view) {
      mEventDispatcher.dispatchEvent(
          new DrawerClosedEvent(mDrawerLayout.getId(), SystemClock.uptimeMillis()));
    }

    @Override
    public void onDrawerStateChanged(int i) {
      mEventDispatcher.dispatchEvent(
          new DrawerStateChangedEvent(mDrawerLayout.getId(), SystemClock.uptimeMillis(), i));
    }
  }
}
原生控件的实现步骤、方法、例子等其实在源码中都有了,想实现什么组件就照着源码开发,绝不会出错啦。
到此只是完成了android端的java代码,那么组件如何与js代码联系起来,并且供js代码调用呢,我们来看看工程中的react-navie文件夹吧,秘密都在它里面。
react-navie文件结构:
打开react-native文件夹,我一眼就注意到了ReactAndroid目录(因为做Android嘛,对含有Android的词比较敏感>_<), 翻遍了其下所有的目录文件,终于找到一个有用点的文件package.json,在其中找到关键的一句话
【"main": "Libraries/react-native/react-native.js"】图上用红框标注了。
下一步就该看看Libraries目录了,Libraries目录结构:
图上我用红框标注了几个我们熟悉的控件命名的文件家,我们重点关注两个文件夹
Components与CustomComponents 我们看看里面有什么:
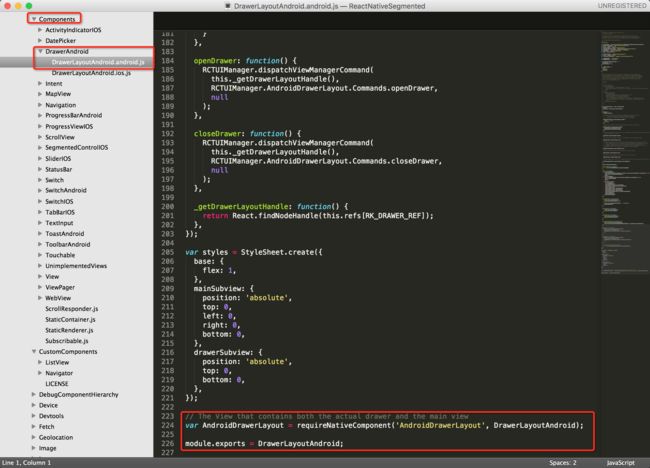
红线标注的控件是不是很熟悉,我们随便找一个控件进去看看,就看DrawerAndroid吧,截图如下:
大家遇到的各种不解之处,其实大部分都可以在源码中得到解答,我也在继续学习中,我只是和大家分享我学习的过程,我也只是顺藤摸瓜了解了如何方便的去自定义组件。其实里面的好多ES6语法我也不是特别理解,只是照猫画虎。欢迎大家来吐槽>_<。
1.如何自定义react-native的android组件(一)
3.react-native-0.16.1 自定义Android组件部分的源码初探


