作者介绍:高阔(京东金融客户端研发工程师,前360手机助手安装模块技术负责人)
在Android系统中如何实现静默安装,所谓静默安装就是在不展示安装界面的情况下,后台悄悄的安装某个应用,虽然看上去不打扰用户,但会存在以下两个风险。
第一,但是由于在安装的时候,Installer会展示该应用所申请的权限,由用户根据申请的权限选择是否安装,静默安装相当于用户被动的接受了这些权限。第二:在未经用户允许的情况下安装某个应用,极易造成病毒的传播,符合计算机病毒的传染特性。很显然这种做法是非常危险的,所以Android系统不会把此功能提供给普通开发者。而在Google Play,小米应用市场,华为应用市场下载的应用也无需弹出安装界面,是因为相关厂家的ROM赋予了自家应用市场静默安装权限。自家的ROM想怎么折腾就怎么折腾,普通开发者也不需要关注静默安装的功能,只要把自己的应用上传的某个应用市场即可
如360手机助手,广泛的安装在各型号的手机上,它没有小米市场,华为市场等手机厂商赋予的特殊权利,360手机助手是如何做到的?360手机助手提供了两个功能:秒装和智能安装
一:秒装
秒装就是在应用拥有Root权限的情况下,实现静默安装(用户无感知)
方法1:在开发者安装安装应用时,多数会采取adb shell pm install命令,我们也可以在有root权限的情况下使用Runtime来调用此命令。
我们创建install(String apk_path,int flag)方法
private void install(String apk_path,String flag) {
String command ="pm install "+flag + filePath;
Process process =null;
DataOutputStream os =null;
try {
process = Runtime.getRuntime().exec("su");
os =new DataOutputStream(process.getOutputStream());
os.writeBytes(command +"\n");
os.writeBytes("exit\n");
os.flush();
}catch (Exception e) {
e.printStackTrace();
}
}
首先组装一个安装命令,命令的格式就是pm install -r ,-r参数表示如果要安装的apk已经存在了就覆盖安装的意思。然后调用 Runtime.getRuntime().exec("su") 来申请root权限,随后执行组装的安装命令即可,这种方法理解起来比较简单,但是会存在一定的局限性,因为在中国这个特殊的市场环境下,很多的国产ROM厂商已经禁用了app来执行pm命令,接下来我会着重介绍第二种安装方法
方法2:
在应用中安装第三方应用是通过
Intent intent =new Intent(Intent.ACTION_VIEW);
intent.setDataAndType(Uri.fromFile(new File(mUrl)),
"application/vnd.android.package-archive");
mContext.startActivity(intent);
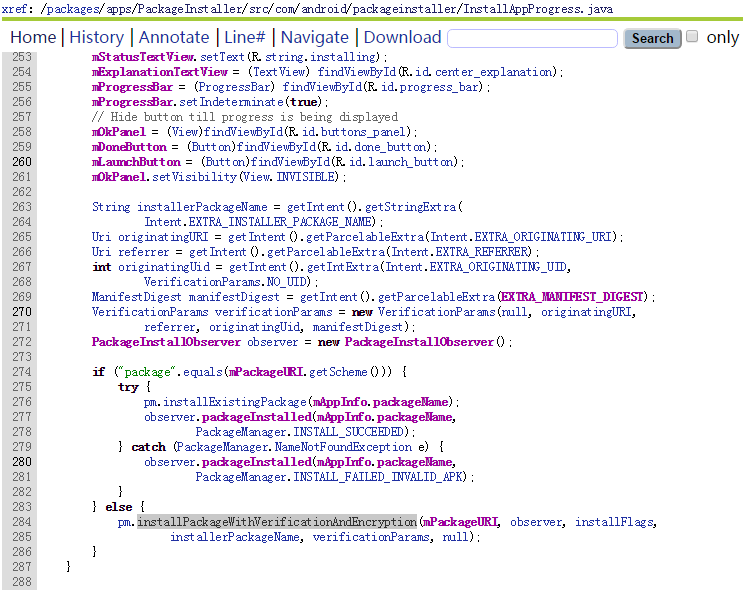
此段代码实现的,而最终处理安装的是PackageInstaller程序,既然PackageInstaller可以实现安装,那程序在拥有root权限的情况下,就可以使用期核心安装方法来实现,好在android是开源的,下面分析PackageInstaller代码:
http://androidxref.com/5.0.0_r2/xref/packages/apps/PackageInstaller/src/com/android/packageinstaller/InstallAppProgress.java
通过以上代码可得,PackageInstaller最终调用的是PackageManager的installPackageWithVerificationAndEncryption实现的静默安装。但现在又有一个问题摆在我们面前,应用启动的进程是一个普通用户进程,linux里也无法动态的改变进程的用户组,如何在root进程中运行我们编写的秒装代码?继续去android源代码中找答案
在Android系统中,所有的应用程序进程以及系统服务进程SystemServer都是由Zygote进程孕育(fork)出来的,我们知道,Android系统是基于Linux内核的,而在Linux系统中,所有的进程都是init进程的子孙进程,也就是说,所有的进程都是直接或者间接地由init进程fork出来的。Zygote进程也不例外,它是在系统启动的过程,由init进程创建的。在系统启动脚本system/core/rootdir/init.rc文件中,我们可以看到启动Zygote进程的脚本命令:
前面的关键字service告诉init进程创建一个名为"zygote"的进程,这个zygote进程要执行的程序是/system/bin/app_process,后面是要传给app_process的参数。因此我们可以得知app_process是可以调用Java代码的。
让我们看下app_process的说明:
root@android:/ # app_process
app_process [vm-options] cmd-dir [options] start-class-name [main-options]
vm-options – VM 选项
cmd-dir –父目录 (/system/bin)
options –运行的参数 :
–zygote
–start-system-server
–application (api>=14)
–nice-name=nice_proc_name (api>=14)
所以第二种秒装实现思路应为
1:编写InstallCommand.java类
public class InstallCommand{
public static void main(String[] args) {
int returnCode = installPackageCore(packageName, strInstallPath, installParam);
}
//核心安装方法
private static int installPackageCore(String packageName, String path, String installToParam) {
Object ipm = ReflectUtils.invokeStaticMethod("android.app.ActivityThread", "getPackageManager", null);
final AtomicInteger resultType = new AtomicInteger(Code.SilentlyInstallCommandCoreInit);
if (ipm == null) {
resultType.set(Code.SilentlyInstallIPackageManagerNULL);
return resultType.get();
}
Constructor constructor = null;
try {
constructor = ReflectUtils.getDeclaredConstructor("android.app.ApplicationPackageManager", Class.forName("android.app.ContextImpl"), Class.forName("android.content.pm.IPackageManager"));
} catch (ClassNotFoundException e) {
e.printStackTrace();
log(TAG, "installPackageCore_getDeclaredConstructor:" + e.getMessage());
}
if (constructor == null) {
resultType.set(Code.SilentlyInstallApplicationPackageManagerConstructorException);
return resultType.get();
}
Object mApplicationPackageManager = null;
try {
Object context = null;
if (Build.VERSION.SDK_INT >= 24) {
context = createFakeContextImpl();
if (context == null) {
resultType.set(Code.SilentlyInstallCreateFakeContextException);
return resultType.get();
}
}
mApplicationPackageManager = constructor.newInstance(context, ipm);
} catch (InstantiationException e) {
e.printStackTrace();
log(TAG, "installPackageCore_ConstructApplicationPackageManager:" + e.getMessage());
} catch (IllegalAccessException e) {
e.printStackTrace();
log(TAG, "installPackageCore_ConstructApplicationPackageManager:" + e.getMessage());
} catch (InvocationTargetException e) {
e.printStackTrace();
log(TAG, "installPackageCore_ConstructApplicationPackageManager:" + e.getMessage());
}
if (mApplicationPackageManager == null) {
resultType.set(Code.SilentlyInstallConstructApplicationPackageManagerException);
return resultType.get();
}
final Method method;
final CountDownLatch countDownLatch = new CountDownLatch(1);
try {
method = ReflectUtils.getMethod(mApplicationPackageManager.getClass().getName(), "installPackage", Uri.class, Class.forName("android.content.pm.IPackageInstallObserver"), int.class, String.class);
method.setAccessible(true);
Object IPackageInstallObserver = WrapIPackageHelper.wrapIPackageInstallObserverStub(new IPackageInstallObserver.Stub() {
@Override
public void packageInstalled(String packageName, int returnCode) throws RemoteException {
log(TAG, String.format("IPackageInstallObserver packageInstalled packageName:%s,returnCode:%s", packageName, returnCode));
resultType.set(returnCode);
countDownLatch.countDown();
}
});
method.invoke(mApplicationPackageManager, Uri.fromFile(new File(path)), IPackageInstallObserver, parseInstallParam(installToParam), packageName);
countDownLatch.await(90, TimeUnit.SECONDS);
} catch (ClassNotFoundException e) {
e.printStackTrace();
log(TAG, "installPackageCore_installPackage:" + e.getMessage());
resultType.set(Code.SilentlyInstallClassNotFoundException);
} catch (InvocationTargetException e) {
e.printStackTrace();
log(TAG, "installPackageCore_installPackage:" + e.getMessage());
resultType.set(Code.SilentlyInstallInvocationTargetException);
} catch (IllegalAccessException e) {
e.printStackTrace();
log(TAG, "installPackageCore_installPackage:" + e.getMessage());
resultType.set(Code.SilentlyInstallIllegalAccessException);
} catch (InterruptedException e) {
e.printStackTrace();
log(TAG, "installPackageCore_installPackage:" + e.getMessage());
resultType.set(Code.SilentlyInstallInterruptedException);
} catch (Exception e) {
e.printStackTrace();
log(TAG, "installPackageCore_installPackage:" + e.getMessage());
resultType.set(Code.SilentlyInstallOtherException);
}
return resultType.get();
}
@TargetApi(24)
private static Object createFakeContextImpl() {
Looper.prepare();
Constructor constructor = ReflectUtils.getDeclaredConstructor("android.app.ActivityThread");
Object mActivityThread = null;
try {
mActivityThread = constructor.newInstance();
} catch (InstantiationException e) {
e.printStackTrace();
log(TAG, "createFakeContextImpl:" + e);
} catch (IllegalAccessException e) {
e.printStackTrace();
log(TAG, "createFakeContextImpl:" + e);
} catch (InvocationTargetException e) {
e.printStackTrace();
StringBuffer s = new StringBuffer(e.getTargetException().toString() + "\n");
StackTraceElement elements[] = e.getTargetException().getStackTrace();
for (StackTraceElement element : elements) {
s.append(element.toString()).append("\n");
}
log(TAG, "createFakeContextImpl:" + s.toString());
}
if (mActivityThread == null) {
mActivityThread = ReflectUtils.invokeStaticMethod("android.app.ActivityThread", "systemMain", null);
}
if (mActivityThread != null) {
Object mContext = ReflectUtils.invokeMethod(mActivityThread, "getSystemContext", null);
if (mContext == null) {
try {
mContext = ReflectUtils.invokeStaticMethod("android.app.ContextImpl", "createSystemContext", new Class[]{Class.forName("android.app.ActivityThread")}, mActivityThread);
} catch (Exception e) {
e.printStackTrace();
}
}
log(TAG, "createFakeContextImpl mContext:" + mContext);
return mContext;
}
return null;
}
}
2:在通过Runtime.getRuntime().exec("su") 调用app_process启动InstallCommand.java进行秒装
未完待续(下一章会讲解通过辅助功能进行智能安装)

