摘要
文章是根据江南一点雨(松哥)的视频进行总结
江南一点雨博客
全局异常处理
通常情况下,我们都需要对自己定义的异常进行相应的处理。捕获指定的异常方式如下:
@ControllerAdvice
public class ExceptionHandlers {

    // 捕获自定义异常类进行处理
    @ExceptionHandler(CustomException.class)
    public ModelAndView handler(CustomException e) {
        ModelAndView modelAndView = new ModelAndView("customException"); //自定义异常错误页面
        modelAndView.addObject("msg", e.getMessage());
        // ...
        return modelAndView;
    }
}
自定义错误页面
若服务器抛出404错误码(页面找不到)时,通常会返回如下页面:

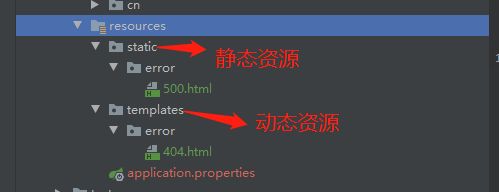
而我们需要指定在服务器抛出相应的错误码时,跳转到指定的动态或静态页面。
源码阅读
参考默认的视图解析器org.springframework.boot.autoconfigure.web.servlet.error.DefaultErrorViewResolver源码,取出部分代码片段如下:
public class DefaultErrorViewResolver implements ErrorViewResolver, Ordered {
   private static final Map SERIES_VIEWS; // 存放不同错误码对应的视图

   // 添加默认的视图
   static {
      Map views = new EnumMap<>(Series.class);
      views.put(Series.CLIENT_ERROR, "4xx");
      views.put(Series.SERVER_ERROR, "5xx");
      SERIES_VIEWS = Collections.unmodifiableMap(views);
   }
   ...

   // 开始解析错误视图
   @Override
   public ModelAndView resolveErrorView(HttpServletRequest request, HttpStatus status, Map model) {
      // status.value() 得到的是错误码
      // 寻找错误码指定的页面,如404就找名为404的页面
      ModelAndView modelAndView = resolve(String.valueOf(status.value()), model);

      // 若找不到错误码指定的页面,则400,401,403,404...都会去找4xx的页面
      if (modelAndView == null && SERIES_VIEWS.containsKey(status.series())) {
         modelAndView = resolve(SERIES_VIEWS.get(status.series()), model);
      }
      // 若modelAndView还是null,那么就返回上面的那个图片了
      return modelAndView;
   }

   private ModelAndView resolve(String viewName, Map model) {
      String errorViewName = "error/" + viewName;
      //首先去动态资源中查看是否存在对应的页面
      TemplateAvailabilityProvider provider = this.templateAvailabilityProviders.getProvider(errorViewName,
            this.applicationContext);
      if (provider != null) {
         return new ModelAndView(errorViewName, model);
      }
      //若动态资源中找不到则到静态资源中寻找对应的页面
      return resolveResource(errorViewName, model);
   }

   //获取静态页面资源
   private ModelAndView resolveResource(String viewName, Map model) {
      // 遍历静态资源,查找是否有对应的页面
      for (String location : this.resourceProperties.getStaticLocations()) {
         try {
            Resource resource = this.applicationContext.getResource(location);
            resource = resource.createRelative(viewName + ".html");
            if (resource.exists()) {
               return new ModelAndView(new HtmlResourceView(resource), model);
            }
         }
         catch (Exception ex) {
         }
      }
      return null;
   }
   ...
}
阅读源码总结
1.首先会去找指定错误码的页面,若指定页面找不到则找4xx、5xx页面,(400、401...都会找4xx)
2.先到动态资源下的error目录寻找,再到静态资源中的error目录寻找
实现
如果为动态资源的页面,返回的ModelAttribute可以查看org.springframework.boot.web.servlet.error.DefaultErrorAttributes, 返回的数据如下:
timestamp
status
error
message
...
thymeleaf下页面使用如下:
若需要扩展,则继承DefaultErrorAttributes,对扩展类加@Component注释:
@Component
public class CustomErrorAttribute extends DefaultErrorAttributes {
   // 扩展
}
CORS跨域
在前后端分离进行开发的情况下,一般都需要设置跨域访问,springBoot提供CORS跨域设置如下:
@Configuration
public class WebMvcConfig implements WebMvcConfigurer {
    @Override
    public void addCorsMappings(CorsRegistry registry) {
        registry.addMapping("/**") //所有前缀
                .allowedOrigins("http://localhost:8081") //跨域地址(前端地址)
                .allowedHeaders("*") //允许所有请求头
                .allowedMethods("*") //允许通过所有方法
                .maxAge(30 * 1000); //探测请求的有效期
    }
}
注册拦截器
拦截器可以拦截request请求,若自定义权限认证的功能,就可以使用拦截器去进行实现。
public class MyInterceptor implements HandlerInterceptor {
    @Override
    public boolean preHandle(HttpServletRequest request, HttpServletResponse response, Object handler) throws Exception {
        return false;
    }
    public void postHandle ...
    public void afterCompletion ...
}preHandler执行方法前调用,postHandler在返回视图前调用,afterCompletion在方法执行完后调用。
添加拦截器到配置中,重写addInterceptors方法
@Configuration
public class WebMvcConfig implements WebMvcConfigurer {

    @Override
    public void addInterceptors(InterceptorRegistry registry) {
        registry.addInterceptor(myInterceptor())
                .addPathPatterns("/**"); //拦截所有路径
    }

    @Bean
    MyInterceptor myInterceptor() {
        return new MyInterceptor();
    }
}
整合Servlet
首先自定义的Servelt继承javax.servlet.http.HttpServlet;使用@WebServlet进行url映射
@WebServlet(urlPatterns = "/myservlet")
public class MyServlet extends HttpServlet {

    @Override
    protected void doGet(HttpServletRequest req, HttpServletResponse resp) throws ServletException, IOException {
        System.out.println("doget");
    }
}在启动类xxxApplication对自定义的Servlet的目录进行扫描
@ServletComponentScan(basePackages = "org.java.servlet")这就可以成功访问到啦!localhost:8080/myservlet
扩展(怕忘记了,记一下):
request监听实现接口javax.servlet.ServletRequestListener, 然后对request监听类使用javax.servlet.annotation.WebListener注解;
request拦截器实现接口javax.servlet.Filter,然后对拦截器使用javax.servlet.annotation.WebFilter注解,如:
@WebListener
public class MyRequestListener implements ServletRequestListener {
    @Override
    public void requestDestroyed(ServletRequestEvent sre) {System.out.println("requestDestroyed");}
    @Override
    public void requestInitialized(ServletRequestEvent sre) {System.out.println("requestInitialized");}
}

@WebFilter(urlPatterns = "/*") //对所有目录进行拦截
public class MyFilter implements Filter {
    @Override
    public void doFilter(ServletRequest request, ServletResponse response, FilterChain chain) throws IOException, ServletException {
        System.out.println("doFilter");
        chain.doFilter(request,response);
    }
}上述的监听器和拦截器一定要在@ServletComponentScan的扫描目录下或子目录。
若文章有错误或疑问,可在下方评论,Thanks♪(・ω・)ノ。
个人博客网址: https://colablog.cn/
如果我的文章帮助到您,可以关注我的微信公众号,第一时间分享文章给您

