一、理论基础
1、iOS Hacker obfuscator-llvm Xcode集成配置
https://m.aliyun.com/jiaocheng/353659.html?spm=5176.100034.3.1.4f171a01rmKmoP
2、obfuscator-llvm/obfuscator
https://github.com/obfuscator-llvm/obfuscator/wiki/Installation
3、obfuscator-llvm-6.0.0:
https://github.com/spelle/obfuscator/tree/llvm-6.0.0
二、方法步骤
1.下载代码
git clone https://github.com/spelle/obfuscator obfuscator.src
cd obfuscator.src
git checkout llvm-6.0.0
2.准备编译环境并编译
Retrieve dependencies:
curl -E -fsSL http://releases.llvm.org/6.0.0/cfe-6.0.0.src.tar.xz -o cfe-6.0.0.src.tar.xz && \
curl -E -fsSL http://releases.llvm.org/6.0.0/compiler-rt-6.0.0.src.tar.xz -o compiler-rt-6.0.0.src.tar.xz && \
curl -E -fsSL http://releases.llvm.org/6.0.0/libcxx-6.0.0.src.tar.xz -o libcxx-6.0.0.src.tar.xz && \
curl -E -fsSL http://releases.llvm.org/6.0.0/libcxxabi-6.0.0.src.tar.xz -o libcxxabi-6.0.0.src.tar.xz && \
curl -E -fsSL http://releases.llvm.org/6.0.0/libunwind-6.0.0.src.tar.xz -o libunwind-6.0.0.src.tar.xz && \
curl -E -fsSL http://releases.llvm.org/6.0.0/lld-6.0.0.src.tar.xz -o lld-6.0.0.src.tar.xz && \
curl -E -fsSL http://releases.llvm.org/6.0.0/lldb-6.0.0.src.tar.xz -o lldb-6.0.0.src.tar.xz && \
curl -E -fsSL http://releases.llvm.org/6.0.0/openmp-6.0.0.src.tar.xz -o openmp-6.0.0.src.tar.xz && \
curl -E -fsSL http://releases.llvm.org/6.0.0/polly-6.0.0.src.tar.xz -o polly-6.0.0.src.tar.xz && \
curl -E -fsSL http://releases.llvm.org/6.0.0/clang-tools-extra-6.0.0.src.tar.xz -o clang-tools-extra-6.0.0.src.tar.xz && \
curl -E -fsSL http://releases.llvm.org/6.0.0/test-suite-6.0.0.src.tar.xz -o test-suite-6.0.0.src.tar.xz && \
for f in $(ls *.tar.xz) ; do tar xf $f ; done
Create links for projects:
cd obfuscator.src && \
cd projects && \
ln -snf ../../compiler-rt-6.0.0.src compiler-rt && \
ln -snf ../../libcxx-6.0.0.src libcxx && \
ln -snf ../../libcxxabi-6.0.0.src libcxxabi && \
ln -snf ../../libunwind-6.0.0.src libunwind && \
ln -snf ../../openmp-6.0.0.src openmp && \
ln -snf ../../test-suite-6.0.0.src test-suite && \
cd ..
Create links for tools:
cd tools && \
ln -snf ../../cfe-6.0.0.src clang && \
ln -snf ../../lld-6.0.0.src lld && \
ln -snf ../../lldb-6.0.0.src lldb && \
ln -snf ../../polly-6.0.0.src polly && \
cd clang && \
cd tools && \
ln -snf ../../clang-tools-extra-6.0.0.src extra && \
cd .. && \
cd .. && \
cd .. && \
cd ..
Launch the build:
cd build
mkdir buildcmake -G "Unix Makefiles" -DLLDB_CODESIGN_IDENTITY='' ../obfuscator.src (如果此处报错,找不到swig,则按照之 brew install swig)
make -j7
三、集成到xcode9.2
1.编写xcode插件
$ cd /Applications/Xcode.app/Contents/PlugIns/Xcode3Core.ideplugin/Contents/SharedSupport/Developer/Library/Xcode/Plug-ins/
$ sudo cp -r Clang\ LLVM\ 1.0.xcplugin/ Obfuscator.xcplugin
$ cd Obfuscator.xcplugin/Contents/
$ sudo plutil -convert xml1 Info.plist
$ sudo vim Info.plist
Change:
Then:
$ sudo plutil -convert binary1 Info.plist
$ cd Resources/
$ sudo mv Clang\ LLVM\ 1.0.xcspec Obfuscator.xcspec
$ sudo vim Obfuscator.xcspec
Change:
Then:
$ cd English.lproj/
$ sudo mv Apple\ LLVM\ 9.0.strings "Obfuscator 6.0.strings"
$ sudo plutil -convert xml1 Obfuscator\ 6.0.strings
$ sudo vim Obfuscator\ 6.0.strings
Change:
Then:
$ sudo plutil -convert binary1 Obfuscator\ 6.0.strings
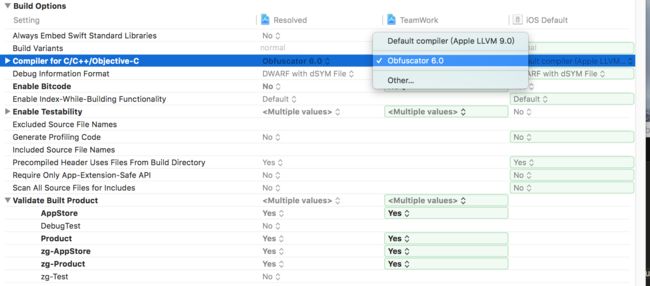
2.xcode配置
先重启xcode,已加载新创建的插件
设置obfuscator混淆器,如下图:
然后就可以正常编译工程,打包上传到App Store了。
四、问题
xcode连接真机运行时,报错cannot specify -o when generating multiple output files,解决方法:Build Setting 中搜索 Index-While-Building 设置为 NO 可编译成功。


