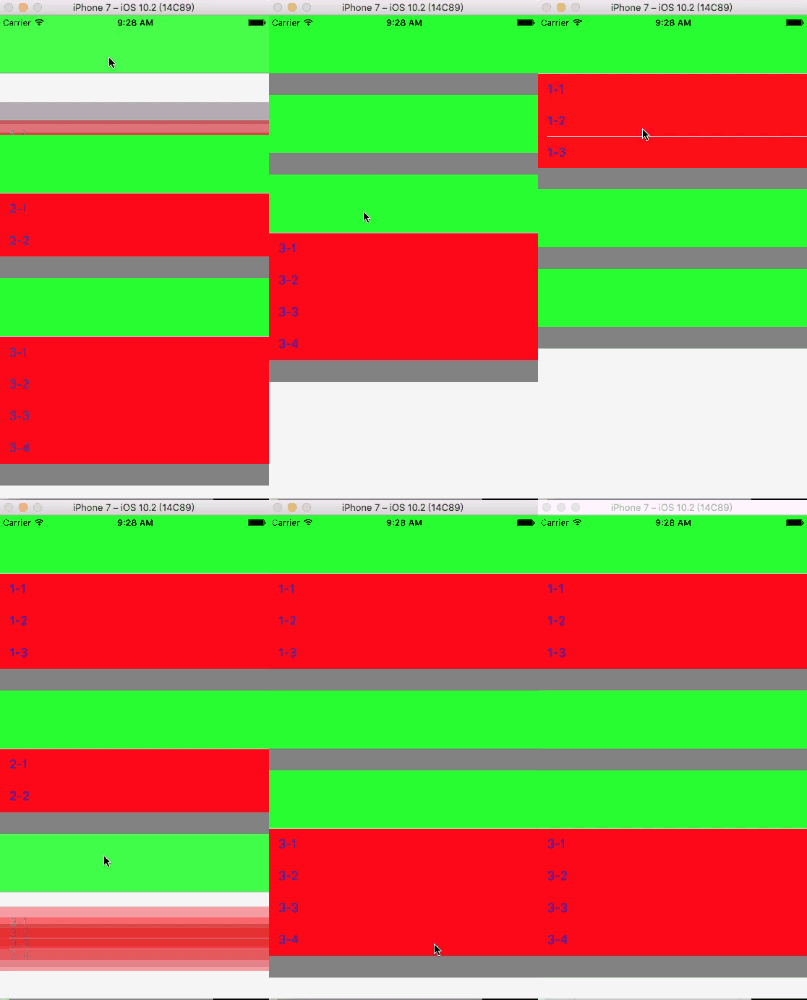
看到很多小伙伴在问如何实现一个可展开收缩的UITableView,网上有许许多多的Demo,两级的,三级的,很多级的,这些Demo都十分不错,功能强大,界面美观,封装的十分完善,但对于很多新学习的朋友来说理解起来并不容易,这里我就写一个最简单的可折叠的TableView。
为了便于分辨我将sectionHeader,sectionFooter,cell都设置了不同的颜色。
首先在viewDidLoad方法中初始化TableView以及初始化一个数组用于cell的显示
- (void)viewDidLoad {
    [super viewDidLoad];

    self.countArray = @[
                    @[@"1-1",@"1-2",@"1-3"],
                    @[@"2-1",@"2-2"],
                    @[@"3-1",@"3-2",@"3-3",@"3-4"],
                    ];

    self.title = @"折叠列表";
    //自动调整view与父视图上边距,以保证下边距不变
    self.selectTable.autoresizingMask = UIViewAutoresizingFlexibleHeight;
    self.selectTable = [[UITableView alloc] initWithFrame:CGRectMake(0, 0, self.view.frame.size.width, self.view.frame.size.height) style:UITableViewStyleGrouped];
    self.selectTable.delegate = self;
    self.selectTable.dataSource = self;
    [self.view addSubview:self.selectTable];

}
实现TableView的代理方法
//组数
- (NSInteger)numberOfSectionsInTableView:(UITableView *)tableView {

            return self.countArray.count;
}
//cell内容
- (UITableViewCell *)tableView:(UITableView *)tableView cellForRowAtIndexPath:(NSIndexPath *)indexPath {
    static NSString *identifier = @"Cell";
    UITableViewCell *cell = [tableView dequeueReusableCellWithIdentifier:identifier];

    if (cell == nil) {
        cell = [[UITableViewCell alloc]initWithStyle:UITableViewCellStyleDefault reuseIdentifier:identifier];
        cell.backgroundColor = [UIColor redColor];
        [cell setSelectionStyle:UITableViewCellSelectionStyleNone];
    }

    for (int i = 0; i < self.countArray.count; i++) {
        NSArray *titleArr = self.countArray[i];
        for (int j = 0; j < titleArr.count; j++) {
            if (indexPath.section == i) {
                if (indexPath.row == j) {
                cell.textLabel.text = [NSString stringWithFormat:@"%@",titleArr[j]];
                cell.textLabel.textColor = [UIColor blueColor];
            }
        }
    }
}

return cell;
}
//section底部间距
- (CGFloat)tableView:(UITableView *)tableView heightForFooterInSection:(NSInteger)section
{
    return 30;
}
//section底部视图
-  (UIView *)tableView:(UITableView *)tableView viewForFooterInSection:(NSInteger)section
{
    UIView *view=[[UIView alloc] initWithFrame:CGRectMake(0, 0, 320, 30)];
    view.backgroundColor = [UIColor grayColor];
    return view;
}
//cell高度
- (CGFloat)tableView:(UITableView *)tableView heightForRowAtIndexPath:(NSIndexPath *)indexPath{
        return 44;
}
为section设置头部高度并且在头部添加点击事件,将视图的tag值与section相关联
//section头部间距
 - (CGFloat)tableView:(UITableView *)tableView heightForHeaderInSection:(NSInteger)section
{
        return 80;//section头部高度
}
//section头部视图
- (UIView *)tableView:(UITableView *)tableView viewForHeaderInSection:(NSInteger)section
{
        UITapGestureRecognizer *headerTap = [[UITapGestureRecognizer alloc] initWithTarget:self action:@selector(refreshSection:)];
        UIView *view=[[UIView alloc] initWithFrame:CGRectMake(0, 0, 320, 80)];
        view.userInteractionEnabled = YES;
        view.tag = 5000+section;
        view.backgroundColor = [UIColor greenColor];
        [view addGestureRecognizer:headerTap];
        return view ;
}
头部点击事件方法,初始化一个可变数组,点击时将获得的tag值加入数组记录点击了哪一组,点击时数组进行判断,是否包含TableView的section,若包含移除,不包含则加入,使用TableView的刷新组功能来改变每组的行数
- (void)refreshSection:(id)tap{
    UITapGestureRecognizer *selectTap = (UITapGestureRecognizer *)tap;
    NSString *section = [NSString stringWithFormat:@"%ld",selectTap.view.tag-5000];

    if ([self.selectArray containsObject:section]) {
        [self.selectArray removeObject:section];
    }else{
        [self.selectArray addObject:section];
    }

    NSIndexSet *indexSet=[[NSIndexSet alloc]initWithIndex:selectTap.view.tag-5000];
    [self.selectTable reloadSections:indexSet withRowAnimation:UITableViewRowAnimationFade];
}
如果数组包含所点击的section则返回行数为0,否则返回该组应包含的行数
//每组行数
- (NSInteger)tableView:(UITableView *)tableView numberOfRowsInSection:(NSInteger)section {

        if ([self.selectArray containsObject:[NSString stringWithFormat:@"%ld",section]]) {
            return 0;
        }else{
            NSArray *rowArray;
            for (int i = 0 ; i < self.countArray.count; i++) {
            if (section == i) {
            rowArray = self.countArray[i];
                }
            }
            return rowArray.count;
        }
}
这就是最简单的可伸展TableView的实现方法,大家可以点击下方的地址去查看源码。
github地址:TableViewDemo
