前言
关于 initWithNibName 和 loadNibNamed 的区别和联系
参考:关于 initWithNibName 和 loadNibNamed 的区别和联系
如果执行
NSArray *views = [[NSBundle mainBundle] loadNibNamed:@"RemarkView" owner:self options:nil];
语句,发现崩溃,请检查对应的.xib文件中的控件关联是否正确。比如如果控件类型错了等就会导致此句崩溃。
嵌套使用xib
参考:Nested Xib Views - 使用XIB实现嵌套自定义视图
有一个复杂的视图viewA,上面有很多的subview,我们为了更加解耦,将viewA的某部分子视图,又独立成一个viewB。
现在的问题是,你的viewB已经是用xib来生成的了。那么
当你viewA也是使用xib时候,你会发现即使你做了该做的在A.xib中添加一个UIView,然后将这个view的定制类从UIView改为类B。发现B压根没显示出来。这是什么情况呢?
父视图superView添加子视图subView的两种方法
方法①:[self.view addSubView:view1];
方法②:xib上添加subView
subView的创建的两种方式:
1、代码生成,
CustomView1 *view1 = [[CustomView1 alloc] init];
view1.titleLabel = [[UILabel alloc] init....
view1.imageView = [[UIImage alloc] init..
....

2、xib生成
xib生成也有几种方法
①一个类只有一种xib,通过设置File's Owner将其设为某个类的所有者,同时进行关联
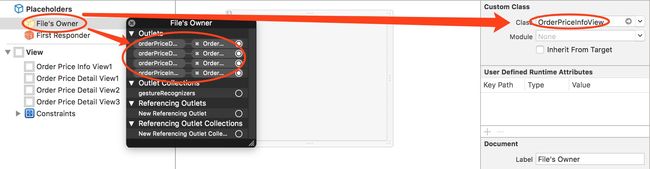
这种xib方式创建的view,提取CustomView 的 xib 中的内容的方法为:
        UINib *nib = [UINib nibWithNibName:NSStringFromClass([self class]) bundle:nil];
        NSArray *views = [nib instantiateWithOwner:self options:nil];
        UIView *containerView = [views objectAtIndex:0];
如果CustomView.m(如OrderPriceInfoView1.m)未做任何处理,则其他需要添加CustomView的view上的写法应为如下:
- (instancetype)initWithFrame:(CGRect)frame {
    self = [super initWithFrame:frame];
    if (self) {
        [self commonInit];
    }
    return self;
}

- (void)commonInit {
    UINib *nib1 = [UINib nibWithNibName:NSStringFromClass([OrderPriceInfoView1 class]) bundle:nil];
    NSArray *views1 = [nib1 instantiateWithOwner:self options:nil];
    OrderPriceInfoView1 *orderPriceInfoView1 = [views1 objectAtIndex:0];
    orderPriceInfoView1.frame = self.bounds;
    [self addSubview:orderPriceInfoView1];
    self.orderPriceInfoView1 = orderPriceInfoView1;

    UINib *nib2 = [UINib nibWithNibName:NSStringFromClass([OrderPriceInfoView2 class]) bundle:nil];
    NSArray *views2 = [nib2 instantiateWithOwner:self options:nil];
    OrderPriceInfoView2 *orderPriceInfoView2 = [views2 objectAtIndex:0];
    orderPriceInfoView2.frame = self.bounds;
    [self addSubview:orderPriceInfoView2];
    self.orderPriceInfoView2 = orderPriceInfoView2;

    UINib *nib3 = [UINib nibWithNibName:NSStringFromClass([OrderPriceInfoView3 class]) bundle:nil];
    NSArray *views3 = [nib3 instantiateWithOwner:self options:nil];
    OrderPriceInfoView3 *orderPriceInfoView3 = [views3 objectAtIndex:0];
    orderPriceInfoView3.frame = self.bounds;
    [self addSubview:orderPriceInfoView3];
    self.orderPriceInfoView3 = orderPriceInfoView3;
}
而我们这里为了不频繁的在每个需要使用到这个CustomView的时候,都要写一遍这个xib中的内容加载代码,所以我们选择将这个xib中的内容加载代码写到CustomView初始化方法中。
例如:
//CustomXibView.m
- (instancetype)init {
    self = [super init];
    if (self) {
        [self commonInit];
    }
    return self;
}

- (instancetype)initWithFrame:(CGRect)frame {
    self = [super initWithFrame:frame];
    if (self) {
        [self commonInit];
    }
    return self;
}

- (instancetype)initWithCoder:(NSCoder *)aDecoder {
    self = [super initWithCoder:aDecoder];
    if (self) {
        [self commonInit];
    }
    return self;
}

- (void)commonInit {
    UINib *nib = [UINib nibWithNibName:NSStringFromClass([self class]) bundle:nil];
    NSArray *views = [nib instantiateWithOwner:self options:nil];
    UIView *containerView = [views objectAtIndex:0];
    [self addSubview:containerView];

    //CGRect newFrame = CGRectMake(0, 0, self.frame.size.width, self.frame.size.height);
    //containerView.frame = newFrame;
    [containerView mas_makeConstraints:^(MASConstraintMaker *make) {
        make.edges.mas_equalTo(self);
    }];
}
这样操作后,就不用再每次需要使用到CustomView的时候,都需要重复写一遍xib中内容的加载代码了。
也因此,这样改后,上面的代码可改成如下
- (instancetype)initWithFrame:(CGRect)frame {
    self = [super initWithFrame:frame];
    if (self) {
        [self commonInit];
    }
    return self;
}

- (void)commonInit {
    OrderPriceInfoView1 *orderPriceInfoView1 = [[OrderPriceInfoView1 alloc] init];
    orderPriceInfoView1.frame = self.bounds;
    [self addSubview:orderPriceInfoView1];
    self.orderPriceInfoView1 = orderPriceInfoView1;

    OrderPriceInfoView2 *orderPriceInfoView2 = [[OrderPriceInfoView2 alloc] init];
    orderPriceInfoView2.frame = self.bounds;
    [self addSubview:orderPriceInfoView2];
    self.orderPriceInfoView2 = orderPriceInfoView2;

    OrderPriceInfoView3 *orderPriceInfoView3 = [[OrderPriceInfoView3 alloc] init];
    orderPriceInfoView3.frame = self.bounds;
    [self addSubview:orderPriceInfoView3];
    self.orderPriceInfoView3 = orderPriceInfoView3;
}
但其实这个更方便的地方是,当你的这个CustomView是通过xib嵌套到其他xib中的时候,只需要拖动一个view上去,并将该view的类设置好就可以啦。
②一个类可能有多种xib,
试想如果你的viewA是使用代码的话呢,你是不是会在创建A类子视图的时候,把B通过[NSBundle mainBundle] loadNib...]的方法写进去。
所以这里的问题,也是一样,针对我们将一个xib文件作为subview放入另一个xib中的话,作为subview的这个xib并不会自动被系统载入内存,这就出现了上面例子中的看不到B.xib。所以我们需要手动载入B.xib。具体的做法是在类A的initWithCoder:(NSCoder)方法中使用
  //正确做法
  UINib *nib1 = [UINib nibWithNibName:NSStringFromClass([OrderPriceInfoView1 class]) bundle:nil];
   NSArray *views1 = [nib1 instantiateWithOwner:self options:nil];
   self.view1 = [views1 objectAtIndex:0];
而不是(会导致崩溃原因不详)
  //错误做法
  NSArray *views1 = [[NSBundle mainBundle] loadNibNamed:[self class] owner:nil options:nil];
  self.view1 = [views1 objectAtIndex:0];
方法手动载入B.xib即可,然后将其作为subview添加到当前view中。
eg:
使用IB自定义了一个View,然后又在其他的xib文件中使用了这个View