闲暇时间做了个条形码扫描的功能:包括界面的搭建(只能在矩形框内扫描出结果,并且中间清晰 周边模糊效果)、功能的实现。
一、利用AVFoundation框架属性设置(5个重要的变量):
<记录变量>
// 输入输出的中间桥梁
@property(nonatomic, strong) AVCaptureSession *session;
// layer
@property(nonatomic, strong) AVCaptureVideoPreviewLayer *layer;
@property(nonatomic, strong) AVCaptureMetadataOutput *output;
1、 初始化设备为视频设备 AVCaptureDevice *device
AVCaptureDevice *device = [AVCaptureDevice defaultDeviceWithMediaType:AVMediaTypeVideo];
2、初始化输入设备是摄像头视频设备 AVCaptureDeviceInput *input
NSError *error = nil;
AVCaptureDeviceInput *input = [AVCaptureDeviceInput deviceInputWithDevice:device error:&error];

// 如果没有摄像头,或者摄像头不可用就调用代理方法传出错误信息
if (error) {
    if ([self.delegate respondsToSelector:@selector(openFailureWithError:)]) {
        [self.delegate openFailureWithError:error];
        NSLog(@"您的手机不支持条形码扫描");
    }
    return;
}
3、初始化输出设备 AVCaptureMetadataOutput *output
    AVCaptureMetadataOutput *output = [[AVCaptureMetadataOutput alloc] init];
    // 设置输出设备的代理 为当前控制器 并且设置队列为主队列
    [output setMetadataObjectsDelegate:self queue:dispatch_get_main_queue()];
    self.output  = output;
4、初始化会话连接对象 AVCaptureSession *session
    self.session = [[AVCaptureSession alloc] init];
    // 高质量采集率
    [_session setSessionPreset:AVCaptureSessionPresetHigh];
    [_session addInput:input];
    [_session addOutput:output];

    // 设置扫码支持的编码格式(如下设置为全部条形码的可能)
    output.metadataObjectTypes = @[AVMetadataObjectTypeEAN13Code,
                                   AVMetadataObjectTypeEAN8Code,
                                   AVMetadataObjectTypeUPCECode,
                                   AVMetadataObjectTypeCode39Code,
                                   AVMetadataObjectTypeCode39Mod43Code,
                                   AVMetadataObjectTypeCode93Code,
                                   AVMetadataObjectTypeCode128Code,
                                   AVMetadataObjectTypePDF417Code];
5、用会话初始化一个能拍照扫描的AVCaptureVideoPreviewLayer *layer 大小是导航条除外屏幕的大小--size是传入的参数代表着想照射的范围,本例设置为屏幕的大小
    AVCaptureVideoPreviewLayer *layer = [AVCaptureVideoPreviewLayer layerWithSession:_session];
    layer.videoGravity = AVLayerVideoGravityResizeAspectFill;
    // 设置layer的frame
    layer.frame = CGRectMake((SCREENWIDTH - size.width) * 0.5, 64, size.width, size.height - 64);
    // 把拍摄的layer添加到主视图的layer
    [self.view.layer  addSublayer:layer];
    self.layer = layer;

    // 开始捕获图像
    [_session startRunning];
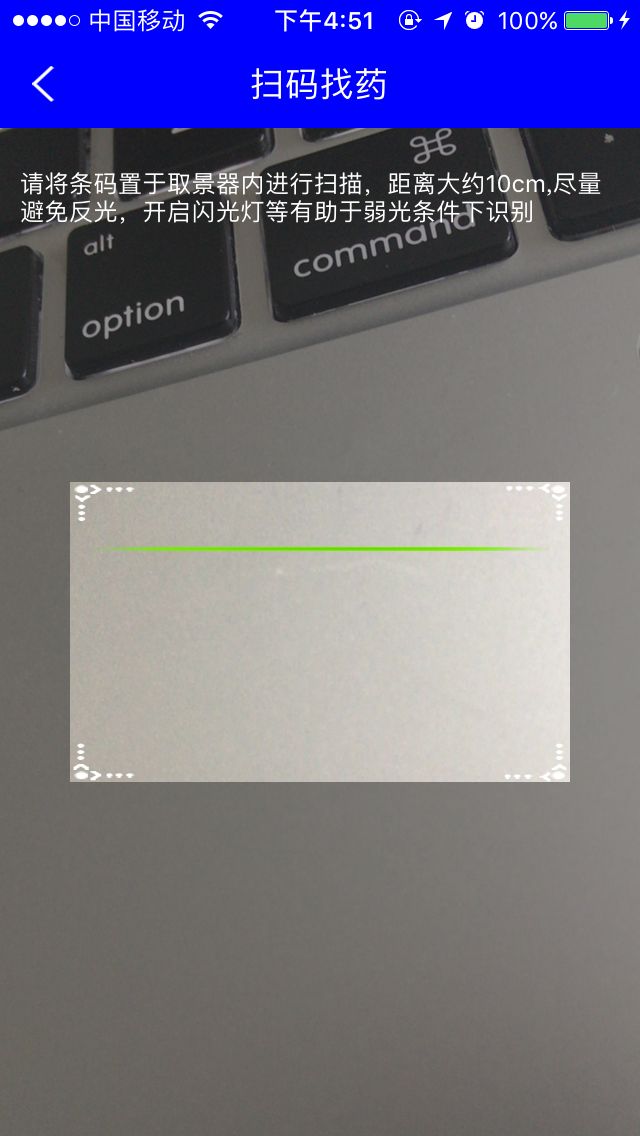
二、界面的搭建(内清外模糊,并且只在矩形框内才能扫描出结果----抽取自定义视图)
<保存自定义视图>
@property(nonatomic, weak) PLScanView *scanView; // 扫描视图
// 视图布局
PLScanView *scanView = [[PLScanView alloc] initScanView];
scanView.frame = CGRectMake(0, 64, SCREENWIDTH, SCREENHEIGHT - 64);
[self.view addSubview:scanView];
self.scanView = scanView;
在自定的PLScanView(继承自UIView)的文件中,写了一个其他文件可以调用的实例方法:
- (instancetype)initScanView;
在这个方法的实现中,添加必要的视图 并且
视图背景色必须设置为clearColor,是为了可以看到摄像头照射的内容。
1、添加视图
   // 1、添加描述信息
    UILabel *messageLbl = [[UILabel alloc] init];
    messageLbl.text = @"请将条码置于取景器内进行扫描,距离大约10cm,尽量避免反光,开启闪光灯等有助于弱光条件下识别";
    messageLbl.numberOfLines = 0;
    messageLbl.font = [UIFont systemFontOfSize:12.0];
    messageLbl.textColor = [UIColor whiteColor];
    [self addSubview:messageLbl];
    self.messageLbl = messageLbl;

    // 2、添加imageView与滚动线
    // 2.1 设置中间扫描区域的背景图片
    UIImageView *imageView = [[UIImageView alloc] initWithImage:[UIImage imageNamed:@"pick_bg.png"]];
    //添加到视图上
    [self addSubview:imageView];
    self.imageView = imageView;

    // 2.2 初始化二维码的扫描线
    UIImageView *lineImageView = [[UIImageView alloc] init];
    lineImageView.image = [UIImage imageNamed:@"line.png"];
    [imageView addSubview:lineImageView];
    self.lineImageView = lineImageView;

    //开启定时器
    [NSTimer scheduledTimerWithTimeInterval:2 target:self selector:@selector(animation) userInfo:nil repeats:YES];
2、在layoutSubviews中设置布局--设置矩形宽250 高150:
  - (void)layoutSubviews
 {
     [super layoutSubviews];
    //描述的label
    self.messageLbl.frame = CGRectMake(10, 20, self.width - 20, 30);
    //设置位置到界面的中间
    self.imageView.frame = CGRectMake(self.bounds.size.width * 0.5 - 250 * 0.5, self.bounds.size.height * 0.5 - 150 * 0.5, 250, 150);
  // 开始位置
    self.lineImageView.frame  = CGRectMake(10, 10, 230, 2);
}
3、定时器的实现:
   - (void)animation
{
     [UIView animateWithDuration:1.8 delay:0 options:UIViewAnimationOptionCurveLinear animations:^{
    // 最低位置
    self.lineImageView.frame = CGRectMake(10, 130, 230, 2);

     } completion:^(BOOL finished) {
    // 开始位置
        self.lineImageView.frame = CGRectMake(10, 10, 230, 2);
    }];
}
4、中间清晰 周围模糊的界面实现,在drawRect中绘制,代码如下:
// 1 获得图形上下文
CGContextRef ctx = UIGraphicsGetCurrentContext();
// 2 画整个屏幕的视图颜色
CGContextSetRGBFillColor(ctx, 40/255.0, 40/255.0, 40/255.0, 0.5);
CGContextFillRect(ctx, CGRectMake(0, 0, self.width, self.height));

// 3 画中间透明视图 clearRect
CGRect clearRect = CGRectMake((self.width - 250) * 0.5, (self.height - 150) * 0.5, 250, 150);
CGContextClearRect(ctx, clearRect);
5、在控制器的viewWillAppear中,如果该控制器被pop之后,还要再次可以扫描,那么AVFoundation的5个变量,要依然存在,所以只需要重新调用上文“一”的代码即可:
  if (!self.session.running) {
      // 调用代码一...
   }
6、只能在中间区域内扫描出功能实现rectOfInterest属性 -- 修正扫描区域 右上角为坐标原点,但是传入的值依然按右上角坐标原点的Y/X/H/W进行理解(右上角为原点下的YXHW)
CGFloat scaleY = (SCREENHEIGHT - 150) * 0.5 / SCREENHEIGHT;
CGFloat scaleX = (SCREENWIDTH - 250) * 0.5 / SCREENWIDTH;
CGFloat scaleH = 150 / SCREENHEIGHT;
CGFloat scaleW = 250 / SCREENWIDTH;
self.output.rectOfInterest = CGRectMake(scaleY, scaleX, scaleH, scaleW);
注:关于self.output.rectOfInterest方法,使用解析如下
//这个CGRectMake(Y,X,H,W) 1代表最大值 原点是导航右上角 为起始点
[output setRectOfInterest:CGRectMake(0, 0.5, 0.5, 0.5)];//左上角 1/4 屏幕
[output setRectOfInterest:CGRectMake(0.5, 0.5, 0.5, 0.5)];//左下角 1/4 屏幕
[output setRectOfInterest:CGRectMake(0.5, 0, 0.5, 0.5)]; //右下角 1/4 屏幕
[output setRectOfInterest:CGRectMake(0, 0, 0.5, 0.5)]; //右上角 1/4 屏幕
[output setRectOfInterest:CGRectMake(0.25,0.25, 0.5, 0.5)]; //貌似 中间的感觉!!!