前言
好久没有更新,最近在阅读flutter相关源码。之后会整理一下,把自己的学习源码思考写出来。最近看到了flutter的http请求,dio相关的源码,不由的想到在Android开发中常用网络请求,OKHttp是怎么工作的。想起这一块没有做总结,也就来写写OkHttp的源码原理总结。
要弄懂OkHttp,我们需要大致理解OkHttp的框架脉络。为什么OkHttp的命名要冠以Ok的前缀?究其根源,是因为OkHttp的所有io操作都建立在Okio之上,因此研究Okio是必要的。
我大致上把OkHttp划分为如下几个模块来分别讲解:
- 1.Okio源码解析,关于OkHttp是如何提高IO的执行性能
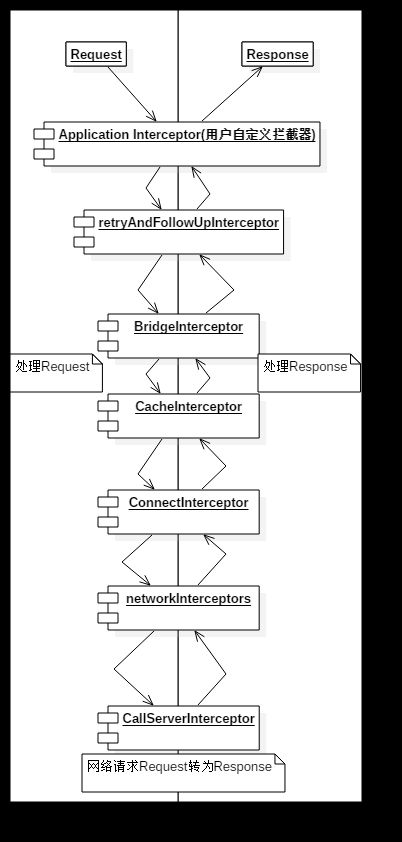
- 2.OKHttp把整个网络请求逻辑拆成7个拦截器,设计成责任链模式的处理。
- 3.retryAndFollowUpInterceptor 重试拦截器
- 4.BridgeInterceptor 建立网络桥梁的拦截器,主要是为了给网络请求时候,添加各种各种必要参数。如Cookie,Content-type
- 5.CacheInterceptor 缓存拦截器,主要是为了在网络请求时候,根据返回码处理缓存。
- 6.ConnectInterceptor 链接拦截器,主要是为了从链接池子中查找可以复用的socket链接。
- 7.CallServerInterceptor 真正执行网络请求的逻辑。
- 8.Interceptor 用户定义的拦截器,在重试拦截器之前执行
- 9.networkInterceptors 用户定义的网络拦截器,在CallServerInterceptor(执行网络请求拦截器)之前运行。
本文将和大家讲述Okio的设计原理,以及从源码的角度看看Okio为何如此设计。
当然这部分代码应该很多人熟悉,如果熟悉这些的人来说,本文是在浪费你的时间。
正文
NIO的原理时序图
OKio本质上是对Java的NIO的一次扩展,并且做了缓存的优化,为了彻底明白OKio为何如此设计,我们先来看看一个Java中如何使用简单的NIO。
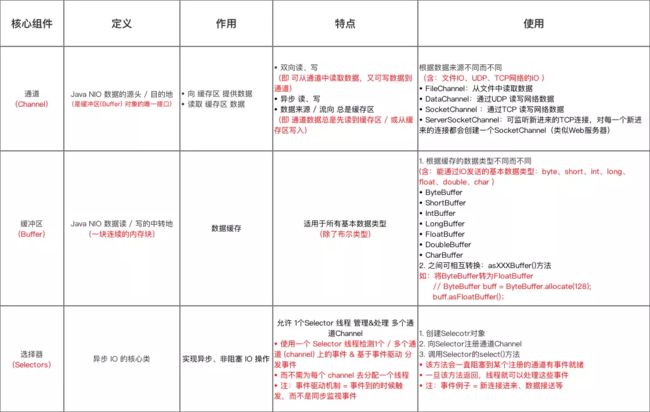
NIO有三个基本角色:
- 1.Channel 通道: 数据的源头和重点
- 2.Buffer 缓冲区: 数据的缓冲区
- 3.Selector 选择器:实现异步,非阻塞IO
借用网上一副总结比较好的图:
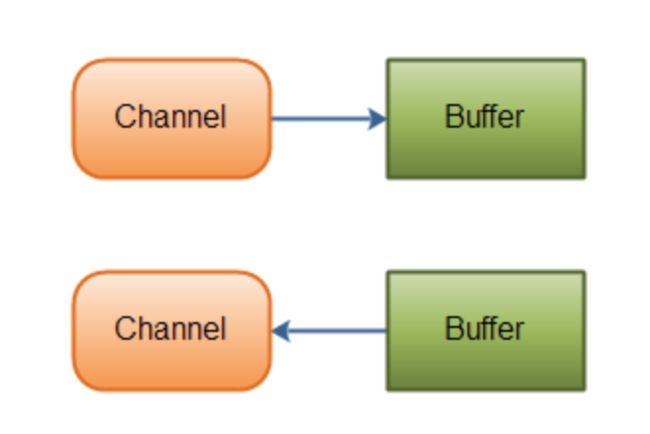
channel和buffer之间的关系如图:
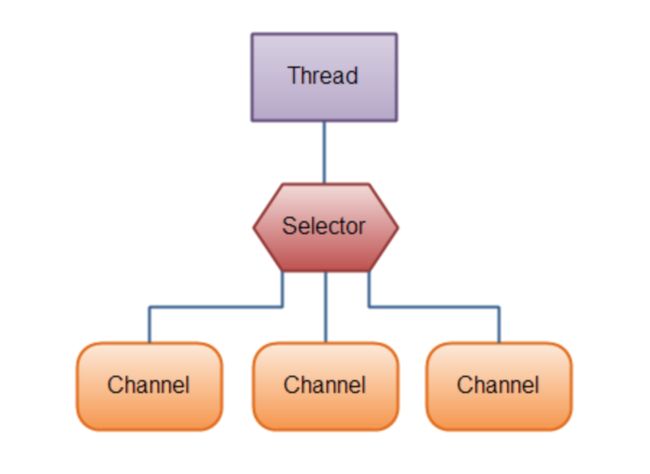
而selector会作为非阻塞IO,对多个Channnel进行管理,关系如图:
那么NIO和IO有什么区别呢?
Java NIO和IO之间第一个最大的区别是,IO是面向流的,NIO是面向缓冲区的。NIO可以是非阻塞式的IO操作,IO则是面向流的阻塞式IO。
闲话不多少来看看NIO中Buffer和Channel的简单例子:
public void testNIO(){
        try {
            File file = new File("./test.txt");
            if(!file.exists()){
                file.createNewFile();
            }
//声明一个输出流
            FileOutputStream fout = new FileOutputStream(file);
//获得输出流的通道
            FileChannel channel = fout.getChannel();

            String sendString="hello";
//声明一个Byte缓冲区
            ByteBuffer sendBuff = ByteBuffer.wrap(sendString.getBytes());
//写入通道
            channel.write(sendBuff);
            sendBuff.clear();
            channel.close();
            fout.close();
//声明一个流
            FileInputStream fin = new FileInputStream(file);
//获得输入流的通道
            FileChannel inchannel = fin.getChannel();
//声明一个固定大小的Byte缓冲区
            ByteBuffer readBuff = ByteBuffer.allocate(256);

  //读取第一段数据到缓冲区,获得结果,-1时候结束
            int bytesRead = inchannel.read(readBuff);

            while (bytesRead != -1){
//写模式变成读模式缓存
                readBuff.flip();
                while (readBuff.hasRemaining()){
                    System.out.println((char)readBuff.get());
                }
//清空已读的区域
                readBuff.compact();
//继续读取
                bytesRead = inchannel.read(readBuff);

            }

            readBuff.clear();
            inchannel.close();
            fin.close();

        }catch (Exception e){
            e.printStackTrace();
        }
    }
能看到NIO的所有的操作都要经过Buffer和Channel进行操作。
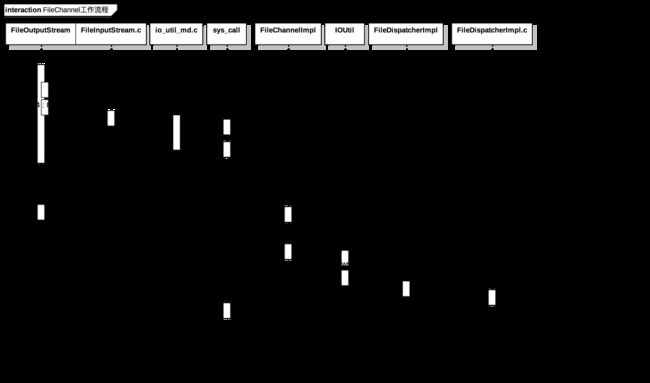
我们稍微来看看NIO中FileOutputStream的源码时序图:
能根据上面的时序图,可以简单的看到实际上JDK首先简单的封装了一层Java API在顶层,接着会层层解封进入到native层,最后通过FileChannel调用到系统调用。
注意上述流程图,并没有涉及到Selector.至于Selector的核心原理本质上是对系统调用poll()进行一次封装,不是本文重点,而且FileChannel因为不能设置为非阻塞模式,在这里就不讨论。
为了真正明白其原理,就以普通IO和NIO的write为例子看看,Java是怎么优化整个读写思路。
NIO和IO的设计比较
我们直接看看,假如使用FileOutStream的核心逻辑如下:
    public void write(byte b[], int off, int len) throws IOException {
        // Android-added: close() check before I/O.
        if (closed && len > 0) {
            throw new IOException("Stream Closed");
        }

        // Android-added: Tracking of unbuffered I/O.
        tracker.trackIo(len);

        // Android-changed: Use IoBridge instead of calling native method.
        IoBridge.write(fd, b, off, len);
    }
能看到如果使用FileOutStream直接写入一个字节数组,就会直接调用IoBridgede.write方法,而这个方法会教过Libcore的Linux调用writeBytes的jni方法,最后会跑到动态注册好的方法:
文件:/libcore/luni/src/main/native/libcore_io_Linux.cpp
static jint Linux_pwriteBytes(JNIEnv* env, jobject, jobject javaFd, jbyteArray javaBytes, jint byteOffset, jint byteCount, jlong offset) {
    ScopedBytesRO bytes(env, javaBytes);
    if (bytes.get() == NULL) {
        return -1;
    }
    return IO_FAILURE_RETRY(env, ssize_t, pwrite64, javaFd, bytes.get() + byteOffset, byteCount, offset);
}
能看到我们调用流的时候,本质上是直接调用系统调用pwrite(随机写)。
如果研究过Linux编程的哥们必定会清楚这么做有一个十分大的缺陷,十分致命。
Linux优化write的方案
在Linux编程中,肯定有人会比较过同样是文件写操作的fwrite和系统调用write。
试着思考一下,假如调用10000次fwrite和10000次write谁的耗时会更加少?
我第一次接触的时候,想当然的以为当然是write啊,write是系统调用,更加接近内核的核心api。但是事实恰恰是相反。fwrite的速度比write快的多。
为什么会是这样的结果呢?实际上恰恰是因为太频繁的调用调用系统调用,每一次调用系统调用进入内核态都必须存储当前寄存器中所有的状态,当恢复会到用户态的时候,又要还原回去,一来二去反而开销更大。
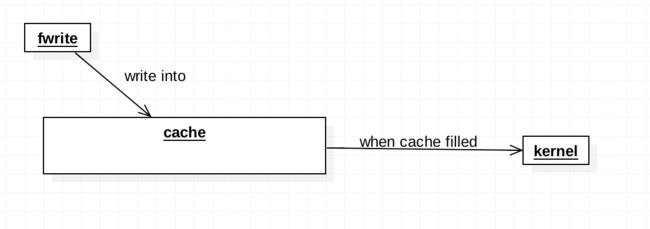
那么fwrite的实现,很容易猜想到本质上也是对系统调用write上进行了一次封装。
其核心思路如下图:
通过一个缓冲区,等到缓冲区填满之后,在调用系统调用write写入磁盘中。通过这种方式调用,减少系统调用的次数,从而增加io读写的效率。
FileChannel的优化
那么Linux是如此优化,那么Java又是如何优化的?本质上和Linux优化十分相似。
我们看看其核心代码:
文件:/libcore/ojluni/src/main/java/sun/nio/ch/IOUtil.java
    static int write(FileDescriptor fd, ByteBuffer src, long position,
                     NativeDispatcher nd)
        throws IOException
    {
        if (src instanceof DirectBuffer)
            return writeFromNativeBuffer(fd, src, position, nd);

        // Substitute a native buffer
        int pos = src.position();
        int lim = src.limit();
        assert (pos <= lim);
        int rem = (pos <= lim ? lim - pos : 0);
        ByteBuffer bb = Util.getTemporaryDirectBuffer(rem);
        try {
            bb.put(src);
            bb.flip();
            // Do not update src until we see how many bytes were written
            src.position(pos);

            int n = writeFromNativeBuffer(fd, bb, position, nd);
            if (n > 0) {
                // now update src
                src.position(pos + n);
            }
            return n;
        } finally {
            Util.offerFirstTemporaryDirectBuffer(bb);
        }
    }

    private static int writeFromNativeBuffer(FileDescriptor fd, ByteBuffer bb,
                                             long position, NativeDispatcher nd)
        throws IOException
    {
        int pos = bb.position();
        int lim = bb.limit();
        assert (pos <= lim);
        int rem = (pos <= lim ? lim - pos : 0);

        int written = 0;
        if (rem == 0)
            return 0;
        if (position != -1) {
            written = nd.pwrite(fd,
                                ((DirectBuffer)bb).address() + pos,
                                rem, position);
        } else {
            written = nd.write(fd, ((DirectBuffer)bb).address() + pos, rem);
        }
        if (written > 0)
            bb.position(pos + written);
        return written;
    }
首先解释一下DirectBuffer,它在native下面申请一段空间,这一段空间会随着DirectBuffer对象存在而存在,最后会通过Cleaner的方式调用native的方法释放native下面空间,详细的可以看我写的Binder的死亡代理一文中,有详细的描述这种技术。
因此我们拿到对象的地址,就能根据写入的类型进行对这段地址的随机读写。这就是DirectBuffer的本质。
当然Java不会随意的开辟新的DirectBuffer,而是通过享元设计,减少DirectBuffer开辟,把不需要的对象暂时存放到cache中,核心如下:
    public static ByteBuffer getTemporaryDirectBuffer(int size) {
        BufferCache cache = bufferCache.get();
        ByteBuffer buf = cache.get(size);
        if (buf != null) {
            return buf;
        } else {
            // No suitable buffer in the cache so we need to allocate a new
            // one. To avoid the cache growing then we remove the first
            // buffer from the cache and free it.
            if (!cache.isEmpty()) {
                buf = cache.removeFirst();
                free(buf);
            }
            return ByteBuffer.allocateDirect(size);
        }
    }
总结:Java对文件读写有着一样的理解。Channel+Buffer的读写方式本质上是对缓存区进行读写操作。当我们把缓冲区中的写满时候,再进行一次write的写入,就能避免频繁的调用系统调用。
这也是Android性能优化中IO优化的核心思想之一,为了避免过多频繁的调用读写操作,我们必须适当的设置读写大小,避免过度调用系统调用,或者一口气写入过多的内容导致一口气申请过多的pageCache,导致内存骤降,可能会触发脏数据的写到磁盘中,导致系统cpu过于繁忙。
关于Android更多的优化之后会开一个专栏来聊聊。
Okio的概述
当我们得知Linux,Java api中是如何优化io的.那么Okio又是如何优化的呢?本质上还是无法脱离这个思路,让我们一探究竟吧。在使用之前,按照惯例,看看Okio是如何使用的?
    @Test
    public void testOkio(){
        try {
            File file = new File("./test.txt");
            if(!file.exists()){
                file.createNewFile();
            }
            Sink sink = Okio.sink(file);
            BufferedSink bufferedSink = Okio.buffer(sink);
            bufferedSink.writeUtf8("hello world\n");
            bufferedSink.flush();
            bufferedSink.close();


            Source source = Okio.source(file);
            BufferedSource bufferedSource= Okio.buffer(source);
            while(true){
                String line = bufferedSource.readUtf8Line();
                if(line == null){
                    break;
                }
                System.out.println(line);
            }

        }catch (Exception e){
            e.printStackTrace();
        }
    }
这段事例代码包含了Okio是如何读写的。我们能够看到在Okio中,存在着三个核心对象:
- Source 数据读取对象
- Sink 数据写入对象
- Buffer Okio的读写缓冲对象
通过上面两个例子,虽然没有看到Buffer的存在,是因为Okio在操作的过程中隐藏了这个对象的操作。
为了更好的理解这几个对象之间的关系,我画了一副UML图:
能看到整个Okio继承和实现的关系比较复杂。但是面向我们的api一般是Buffer,以及封装好的Source,Sink。RealBufferedSource和RealBufferedSink往往承载着核心的读写操作。Buffer则作为Okio的缓冲区。
当然还有其他的,如GzipSource,GzipSink,HashingSource,HashingSin读写操作对象。不过这一期我们把重点放在RealBuffered系列上。
从类的关系图上就能看到,我为什么说Okio是对nio的一次扩展。因为Okio的读写操作对象Source和Sink,继承的是Channel对象。本质上是一种读写流的通道。因此可以联合Selector进行nio读写操作。
总结一下,Okio的读写操作一般是按照如下顺序进行读写:
- 1.Okio生成一个Sink或者Source对象
- 2.Okio通过调用buffer对象,把生成的Sink或者Source对象包裹起来,变成可以操作Buffer的读写操作对象
- 3.调用Sink或者Source的读写操作
如果熟悉这个操作,就不难理解上面设计。因为我们需要装饰设计模式,层层包裹。那么前提就是需要对外暴露一致的接口,因此我们能够看到整个UML的类关系图中,面向真正的读写操作继承的核心操作几乎都是一致的。
既然如此,接下来的源码分析就按照这个调用流程走,就是最清晰的思路。
Okio的读写优化
接下来,我们就以写操作为例子,看看OKio是如何优化读写的。这里我选择是2.4kotlin的版本进行分析,顺道记录一下一些kotlin有趣的特性。
Okio阅读准备
首先我们已经没有办法看到以前版本的Okio.java的类,取而代之的是Okio.kt文件。
这个文件定义了若干个扩展方法。如果是在文件中直接声明方法,那么调用方式如OkioKt.sink().因此这里是使用了一个注解在package上,重新定义调用对象:
@file:JvmName("Okio")

package okio
了解了这个,我们来看看下面的所有常用的静态方法:
actual fun Source.buffer(): BufferedSource = RealBufferedSource(this)

actual fun Sink.buffer(): BufferedSink = RealBufferedSink(this)

/** Returns a sink that writes to `out`. */
fun OutputStream.sink(): Sink = OutputStreamSink(this, Timeout())

/** Returns a source that reads from `in`. */
fun InputStream.source(): Source = InputStreamSource(this, Timeout())

/** Returns a sink that writes to `file`. */
@JvmOverloads
@Throws(FileNotFoundException::class)
fun File.sink(append: Boolean = false): Sink = FileOutputStream(this, append).sink()

/** Returns a source that reads from `file`. */
@Throws(FileNotFoundException::class)
fun File.source(): Source = inputStream().source()
能看到sink()和source()有几种参数如File,InputStream,OutputStream等。
这里解释一下,前面的File.xxx 的前缀File指的是什么类的扩展方法,同时需要外部作为参数传递进来。
Okio生成一个Sink或者Source对象
以write操作为例子:
fun File.sink(append: Boolean = false): Sink = FileOutputStream(this, append).sink()
这里以File作为参数输入,此时该方法中的this就是指传递进来的参数。接着继续.sink()。意思是继续以FileOutputStream作为参数,调用OutputStream扩展方法sink。
fun OutputStream.sink(): Sink = OutputStreamSink(this, Timeout())
只有new一个OutputStreamSink对象,这个对象本质上就是一个Sink对象,写数据对象:
private class OutputStreamSink(
  private val out: OutputStream,
  private val timeout: Timeout
) : Sink {

  override fun write(source: Buffer, byteCount: Long) {
    checkOffsetAndCount(source.size, 0, byteCount)
    var remaining = byteCount
    while (remaining > 0) {
      timeout.throwIfReached()
      val head = source.head!!
      val toCopy = minOf(remaining, head.limit - head.pos).toInt()
      out.write(head.data, head.pos, toCopy)

      head.pos += toCopy
      remaining -= toCopy
      source.size -= toCopy

      if (head.pos == head.limit) {
        source.head = head.pop()
        SegmentPool.recycle(head)
      }
    }
  }
能看到当我们使用了Okio.Sink方法之后,将会生成一个OutputStreamSink包裹着OutputStream让我们操作,当我们调用写的时候,本质上就是调用这个write中复写的对象。
这是最内的部分,但是还不具有优化。我们能看到,本质上还是在调用Java的OutputStream进行write的操作。关于更多的,我稍后解释,不过在这里记住一个重要的对象SegmentPool。
类似的,Okio可以通过source方法生成InputStreamSource对象。
Okio生成操作Buffer的读写操作对象
接下来我们将会调用buffer的方法,生成对应的缓冲区操作对象
actual fun Source.buffer(): BufferedSource = RealBufferedSource(this)

actual fun Sink.buffer(): BufferedSink = RealBufferedSink(this)
我们一样以写操作RealBufferedSink为例子看看源码。
internal class RealBufferedSink(
  @JvmField val sink: Sink
) : BufferedSink {
  @JvmField val bufferField = Buffer()
  @JvmField var closed: Boolean = false

  @Suppress("OVERRIDE_BY_INLINE") // Prevent internal code from calling the getter.
  override val buffer: Buffer
    inline get() = bufferField

override fun buffer() = bufferField
我们能看到在类初始化中,就存在了一个bufferField的Buffer对象,一切在RealBufferedSink和RealBufferedSource中的操作对视对应使用bufferField这个对象进行读写。
稍微学习一个这里面的内联属性
  override val buffer: Buffer
    inline get() = bufferField
意思是buffer的get方法实际上是bufferField。当我们使用buffer这个对象的时候,会默认使用bufferField。
调用RealBufferedSource或者RealBufferedSink的读写操作
接下来,会使用读写操作,把数据写入或者读进缓冲区。就以writeUtf8方法为例子看看里面做了什么事情。
  override fun writeUtf8(string: String): BufferedSink {
    check(!closed) { "closed" }
    buffer.writeUtf8(string)
    return emitCompleteSegments()
  }
我们依次看看这两个方法做了什么。
Buffer.writeUtf8
  actual override fun writeUtf8(string: String): Buffer = writeUtf8(string, 0, string.length)

  actual override fun writeUtf8(string: String, beginIndex: Int, endIndex: Int): Buffer =
    commonWriteUtf8(string, beginIndex, endIndex)
writeUtf8会拿到String的Index,确定读写范围之后,调用commonWriteUtf8。
字符串写入核心commonWriteUtf8
internal inline fun Buffer.commonWriteUtf8(string: String, beginIndex: Int, endIndex: Int): Buffer {
  require(beginIndex >= 0) { "beginIndex < 0: $beginIndex" }
  require(endIndex >= beginIndex) { "endIndex < beginIndex: $endIndex < $beginIndex" }
  require(endIndex <= string.length) { "endIndex > string.length: $endIndex > ${string.length}" }

  // Transcode a UTF-16 Java String to UTF-8 bytes.
  var i = beginIndex
  while (i < endIndex) {
    var c = string[i].toInt()

    when {
      c < 0x80 -> {
        val tail = writableSegment(1)
        val data = tail.data
        val segmentOffset = tail.limit - i
        val runLimit = minOf(endIndex, Segment.SIZE - segmentOffset)

        // Emit a 7-bit character with 1 byte.
        data[segmentOffset + i++] = c.toByte() // 0xxxxxxx

        // Fast-path contiguous runs of ASCII characters. This is ugly, but yields a ~4x performance
        // improvement over independent calls to writeByte().
        while (i < runLimit) {
          c = string[i].toInt()
          if (c >= 0x80) break
          data[segmentOffset + i++] = c.toByte() // 0xxxxxxx
        }

        val runSize = i + segmentOffset - tail.limit // Equivalent to i - (previous i).
        tail.limit += runSize
        size += runSize.toLong()
      }

      c < 0x800 -> {
        // Emit a 11-bit character with 2 bytes.
        val tail = writableSegment(2)
        /* ktlint-disable no-multi-spaces */
        tail.data[tail.limit    ] = (c shr 6          or 0xc0).toByte() // 110xxxxx
        tail.data[tail.limit + 1] = (c       and 0x3f or 0x80).toByte() // 10xxxxxx
        /* ktlint-enable no-multi-spaces */
        tail.limit += 2
        size += 2L
        i++
      }

      c < 0xd800 || c > 0xdfff -> {
        // Emit a 16-bit character with 3 bytes.
        val tail = writableSegment(3)
        /* ktlint-disable no-multi-spaces */
        tail.data[tail.limit    ] = (c shr 12          or 0xe0).toByte() // 1110xxxx
        tail.data[tail.limit + 1] = (c shr  6 and 0x3f or 0x80).toByte() // 10xxxxxx
        tail.data[tail.limit + 2] = (c        and 0x3f or 0x80).toByte() // 10xxxxxx
        /* ktlint-enable no-multi-spaces */
        tail.limit += 3
        size += 3L
        i++
      }

      else -> {
        // c is a surrogate. Make sure it is a high surrogate & that its successor is a low
        // surrogate. If not, the UTF-16 is invalid, in which case we emit a replacement
        // character.
        val low = (if (i + 1 < endIndex) string[i + 1].toInt() else 0)
        if (c > 0xdbff || low !in 0xdc00..0xdfff) {
          writeByte('?'.toInt())
          i++
        } else {
          // UTF-16 high surrogate: 110110xxxxxxxxxx (10 bits)
          // UTF-16 low surrogate:  110111yyyyyyyyyy (10 bits)
          // Unicode code point:    00010000000000000000 + xxxxxxxxxxyyyyyyyyyy (21 bits)
          val codePoint = 0x010000 + (c and 0x03ff shl 10 or (low and 0x03ff))

          // Emit a 21-bit character with 4 bytes.
          val tail = writableSegment(4)
          /* ktlint-disable no-multi-spaces */
          tail.data[tail.limit    ] = (codePoint shr 18          or 0xf0).toByte() // 11110xxx
          tail.data[tail.limit + 1] = (codePoint shr 12 and 0x3f or 0x80).toByte() // 10xxxxxx
          tail.data[tail.limit + 2] = (codePoint shr  6 and 0x3f or 0x80).toByte() // 10xxyyyy
          tail.data[tail.limit + 3] = (codePoint        and 0x3f or 0x80).toByte() // 10yyyyyy
          /* ktlint-enable no-multi-spaces */
          tail.limit += 4
          size += 4L
          i += 2
        }
      }
    }
  }

  return this
}
能看到,在这个写入字符串核心方法中分为几种情况:
- 1.当字符小于0x80
- 2.当字符小于0x800
- 3.当字符小于0xd800大于0xdfff
- 4.其他情况
为什么分为这几种情况呢?在16进制中0x80用二进制表示:1000 0000.还记得一字节就是8位吗。此时代表的是一个字节最大位数,也就是一个Byte。
同理第二个情况是指2个字节的情况,第三个是指3字节的情况。最后一种是3自己以上的情况。为什么要怎么处理呢?
就以一个字节的情况为例子看看Okio究竟做了什么:
        val tail = writableSegment(1)
        val data = tail.data
        val segmentOffset = tail.limit - i
        val runLimit = minOf(endIndex, Segment.SIZE - segmentOffset)

        // Emit a 7-bit character with 1 byte.
        data[segmentOffset + i++] = c.toByte() // 0xxxxxxx

        // Fast-path contiguous runs of ASCII characters. This is ugly, but yields a ~4x performance
        // improvement over independent calls to writeByte().
        while (i < runLimit) {
          c = string[i].toInt()
          if (c >= 0x80) break
          data[segmentOffset + i++] = c.toByte() // 0xxxxxxx
        }

        val runSize = i + segmentOffset - tail.limit // Equivalent to i - (previous i).
        tail.limit += runSize
        size += runSize.toLong()
我们能够看到,在buffer写入数据之前都会调用writableSegment方法申请一个对象出来。
关于Segment
这个对象是一个Segment:
companion object {
    /** The size of all segments in bytes.  */
    const val SIZE = 8192

    /** Segments will be shared when doing so avoids `arraycopy()` of this many bytes.  */
    const val SHARE_MINIMUM = 1024
  }

internal class Segment {
  @JvmField val data: ByteArray

  /** The next byte of application data byte to read in this segment.  */
  @JvmField var pos: Int = 0

  /** The first byte of available data ready to be written to.  */
  @JvmField var limit: Int = 0

  /** True if other segments or byte strings use the same byte array.  */
  @JvmField var shared: Boolean = false

  /** True if this segment owns the byte array and can append to it, extending `limit`.  */
  @JvmField var owner: Boolean = false

  /** Next segment in a linked or circularly-linked list.  */
  @JvmField var next: Segment? = null

  /** Previous segment in a circularly-linked list.  */
  @JvmField var prev: Segment? = null


  constructor() {
    this.data = ByteArray(SIZE)
    this.owner = true
    this.shared = false
  }
这个对象内部包含这数组,我们会把所有的需要写入的数据都转化位字节,并且写入到data数组中。同时包含next,pre这个Segment对象,还有一个limit限制大小大小。
看到这个对象,就能立即反应过来这是一个双向链表中某一项。
写入原理
在写入数据的过程中,我们能够看到有几个关键的属性segmentOffset以及runLimit。
runLimit是通过Segment.SIZE - segmentOffset计算得出。
segmentOffset是通过tail.limit - index。虽然limit初始化为0,但是在第一次写入数组的时候,segmentOffset = segmentOffset +i+1.因此不用担心数组越界
每一次循环的时候都以runLimit重点或者遇到了大于一字节的字符串终止。每次写入一个字符串segmentOffset都会自增。
所以我们可以得出如下结论:
- Okio中以buffer作为流的操作对象,而每一次操作本质上都会由更加细粒的segment控制
- limit是一个segment剩余可以写入大小极限
- 每一次写入都需要按照当前条件的,如在一字节中情况只允许写入一字节,当写入达到了segment的上限就不允许写入。
同理,整个情况放到2,3,4字节也可以通用。只是每一次计算剩余空间的增加计数不同罢了。
Segment的管理
那么Segment是如何管理的呢?其实上面就通过Segment的数据结构就猜测是应该是双向链表。
我们直接看看,核心writableSegment方法:
internal inline fun Buffer.commonWritableSegment(minimumCapacity: Int): Segment {
  require(minimumCapacity >= 1 && minimumCapacity <= Segment.SIZE) { "unexpected capacity" }

  if (head == null) {
    val result = SegmentPool.take() // Acquire a first segment.
    head = result
    result.prev = result
    result.next = result
    return result
  }

  var tail = head!!.prev
  if (tail!!.limit + minimumCapacity > Segment.SIZE || !tail.owner) {
    tail = tail.push(SegmentPool.take()) // Append a new empty segment to fill up.
  }
  return tail
}
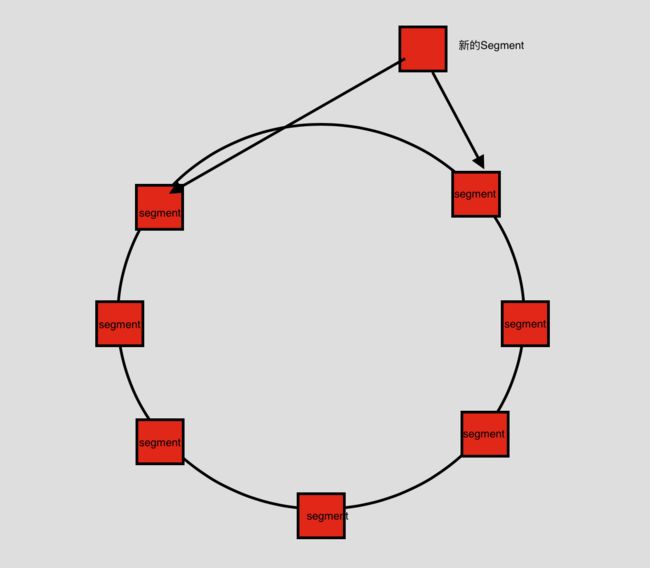
每一个Buffer都会持有一个名为head的Segment对象。当head为空,说明Buffer是新创建出来,则从SegmentPool中获取一个Segment是指到头部,头尾相互指引。这是很经典的链表环设计。
当head不为空的时候,则获取head的前一个Segment对象tail,如果tail的剩余空间不能存放,则需要一个新的Segment,从SegmentPool中获取一个新的。最后通过push方法,链接到链表中。
  fun push(segment: Segment): Segment {
    segment.prev = this
    segment.next = next
    next!!.prev = segment
    next = segment
    return segment
  }
新建的segment的prev为tail,新建的segment的next为tail的next,tail的next的prev为新建的segment,tail的next为segment。
换句话说,就是每一个新的segment都会添加到链表里面,最后把整个环链接起来。
大致上整个链表结构如下图:
SegmentPool管理Segment对象
而在这个过程中,你能发现所有的Segment都被SegmentPool管理。这本质上就是一个享元设计模式。
在这里面包含如下几个基础方法:
@ThreadLocal
internal object SegmentPool {
  /** The maximum number of bytes to pool.  */
  // TODO: Is 64 KiB a good maximum size? Do we ever have that many idle segments?
  const val MAX_SIZE = 64 * 1024L // 64 KiB.

  /** Singly-linked list of segments.  */
  var next: Segment? = null

  /** Total bytes in this pool.  */
  var byteCount = 0L

  fun take(): Segment {
    synchronized(this) {
      next?.let { result ->
        next = result.next
        result.next = null
        byteCount -= Segment.SIZE
        return result
      }
    }
    return Segment() // Pool is empty. Don't zero-fill while holding a lock.
  }

  fun recycle(segment: Segment) {
    require(segment.next == null && segment.prev == null)
    if (segment.shared) return // This segment cannot be recycled.

    synchronized(this) {
      if (byteCount + Segment.SIZE > MAX_SIZE) return // Pool is full.
      byteCount += Segment.SIZE
      segment.next = next
      segment.limit = 0
      segment.pos = segment.limit
      next = segment
    }
  }
}
SegmentPool会缓存固定大小的Segment进来,每一次通过take从中获取一个Segment出去,就会减少内部的缓存大小。通过release则会增加内部缓存大小,等待Okio的使用。
这样就能极大的减少很多Segment对象生成。实际上这种思路到处都是。甚至连Activity启动中都能看到。
Okio读写结束的收尾工作
最后writeUtf8调用如下方法,结束整个调用:
  override fun emitCompleteSegments(): BufferedSink {
    check(!closed) { "closed" }
    val byteCount = buffer.completeSegmentByteCount()
    if (byteCount > 0L) sink.write(buffer, byteCount)
    return this
  }
还记得,OutStreamSink最后传递进来,让RealBufferedSink调用写入,最后写入的就是在Okio.kt文件复写write方法。
  override fun write(source: Buffer, byteCount: Long) {
    checkOffsetAndCount(source.size, 0, byteCount)
    var remaining = byteCount
    while (remaining > 0) {
      timeout.throwIfReached()
      val head = source.head!!
      val toCopy = minOf(remaining, head.limit - head.pos).toInt()
      out.write(head.data, head.pos, toCopy)

      head.pos += toCopy
      remaining -= toCopy
      source.size -= toCopy

      if (head.pos == head.limit) {
        source.head = head.pop()
        SegmentPool.recycle(head)
      }
    }
  }
能看到其中,还是调用OutputSream的写入方法,不过这一次写入的是保存在缓存中的数组.当buffer每写入一部分就把Segment中的pos进行变化。记录已经写入了多少了。每一次执行写入结束后,当发现Segment的pos刚好达到限制的大小,说明Segement内部已经满了,就清空内部缓存加入到SegmentPool等待新的使用者调用。
总结
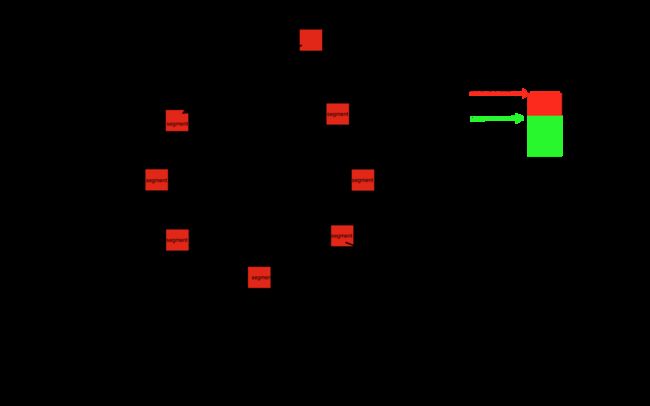
经过上面几个源码片段的阅读,我大致上能够整理出整个设计核心,如下:
从图上可以对比出结论,Okio和Linux的fwrite,Java的Channel读写思路一致。都是通过做缓存来减少系统调用的次数。而Okio做的更加的完善,内部所有的操作都要经过buffer缓冲区处理,而缓冲区内部管理细粒度更加细小的Segment,是通过一个链表环加上一个缓冲池来管理,这样就能更大限度的使用内存,同时避免了过多的缓存对象生成。
在互联网时代,网络请求数目日益增加。为了拥有更好的IO性能,更加细粒化管理内存,找出合适的读写缓冲块大小,是一个很好的思路。
后话
为什么突发奇想要写Okio呢?
因为最近公司要搞flutter,因此我研究flutter源码,看到了dart中的异步机制以及Isolate源码。发现现在流行的网络请求框架dio也好还是原生的httpclient也好,都是在主线程中编写网络请求,这样就极大的浪费我们的自己线程。自己也尝试着写了一个基于Isolate的网络请求框架,也就回顾了一下Okio,Okhttp的源码。
比较了一下,发现整个flutter的社区还是很稚嫩,很多优化点也没有考虑进去。之后有机会,会整理一下,试着写写flutter相关的专题。实际上在阅读flutter的底层原理,发现还是和Android有很多地方设计思路互通的,这也印证了那句话,学习东西要学本质。现在新技术层出不穷,不要被“乱花渐欲迷人”,今天出一个新技术就去追捧,不如静下心去看看Android的底层思想,去多思考其中设计的优缺点。
