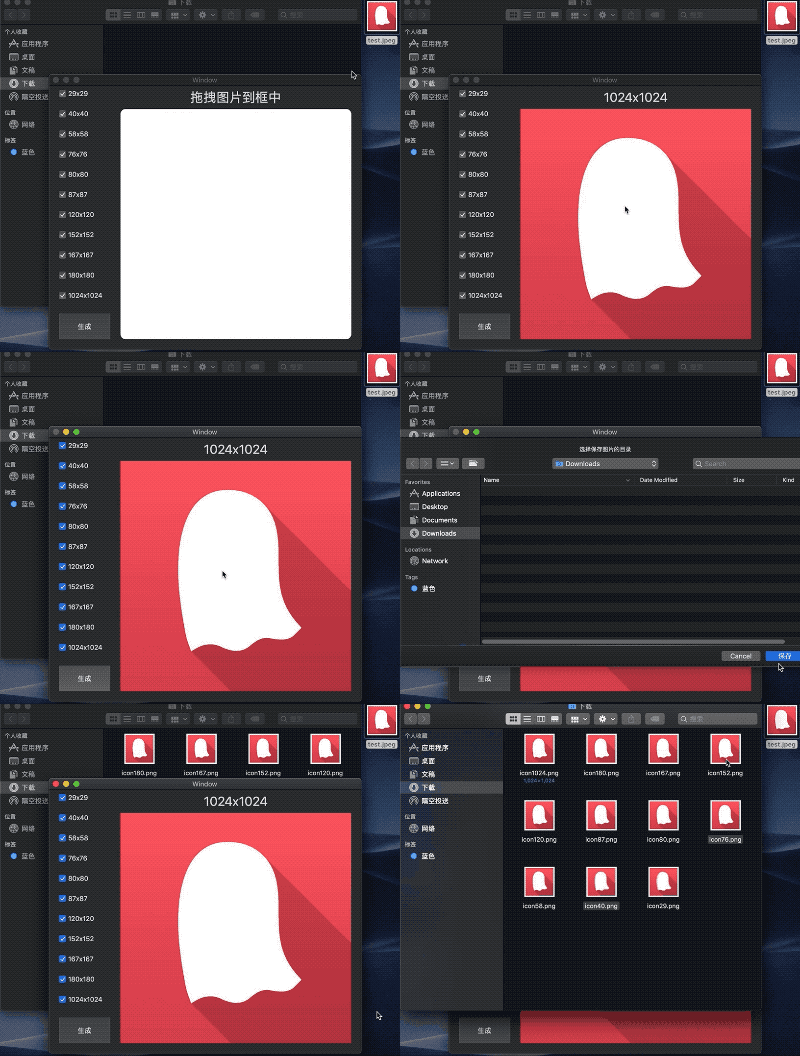
本文始发于我的博文手把手教你实现macOS应用文件拖拽进窗口功能-批量生成APP的多尺寸icon实战,现转发至此。
目录
- 前言
- 拖拽功能
- Source 、 Destination 和 Dragging Session
- 需要处理的事情
- Demo 功能实现
- 功能拆解
- 实现
- 文件的读写权限
- NSView 设置问题
- 关于 Retina 设备生成图片大小问题
- 总结
前言
最近公司项目的 APP 更换 icon,UI 设计师提供的素材缺少几个尺寸,因为不清楚具体需要哪些尺寸,且经过交流发现,UI 设计师生成不同尺寸时,是一个一个生成的,这样效率比较低,于是想做个小工具提高下这种工作的效率,当作玩玩 macOS 开发咯(之前开发过对接 jira 的批量新建分配任务的小工具且一直在使用)。
关于批量生成 icon 的,朋友推荐了一个在线工具,这个功能已经比较完善,可以了解下。当然,自己开发的话可以定制。
拖拽功能
讲讲拖拽那点事,更多具体信息可以看的官方文档。
苹果官方文档 Drag and Drop
Source 、 Destination 和 Dragging Session
操作拖拽,那么就涉及到三个元素,拖拽的起点,称为源 Source;拖拽的终点,称为目的地 Destination;拖拽的对象,称为 Item 吧。源对应协议 NSDraggingSource,目的地对应协议 NSDraggingDestination;拖拽过程就是一个 Dragging Session;拖拽的对象是 NSDraggingItem,放在 NSPasteboard 中。
大概过程:
- 从 Source 开始拖拽,Dragging Session 生成并进行
- 选择拖拽对象,生成拖拽信息,拖拽的数据会存在拖拽粘贴板上
- 拖拽放到 Destination,接收到拖拽信息,可以选择拒绝或接收,并进行一些操作
- Dragging Session 结束
需要处理的事情
操作拖拽的 NSView 需要实现 NSDraggingSource 协议,拖拽的目的地 NSView 需要实现 NSDraggingDestination 协议。另外可以通过 NSView 的拖拽相关 Extension 去注册支持拖拽的类型 NSPasteboard.PasteboardType。目前支持的类型有几种图片类型、字体、颜色、URL、fileURL 等。拖拽之后,从 NSDraggingInfo 中获取相关信息进行处理。
协议具体需要实现的方法比较简单,没有什么特别要讲的。
NSDraggingSource
func draggingSession(_ session: NSDraggingSession, sourceOperationMaskFor context: NSDraggingContext) -> NSDragOperation
optional func draggingSession(_ session: NSDraggingSession, willBeginAt screenPoint: NSPoint)
optional func draggingSession(_ session: NSDraggingSession, movedTo screenPoint: NSPoint)
optional func draggingSession(_ session: NSDraggingSession, endedAt screenPoint: NSPoint, operation: NSDragOperation)
optional func ignoreModifierKeys(for session: NSDraggingSession) -> Bool
NSDraggingDestination
optional func draggingEntered(_ sender: NSDraggingInfo) -> NSDragOperation
optional func draggingUpdated(_ sender: NSDraggingInfo) -> NSDragOperation
optional func draggingExited(_ sender: NSDraggingInfo?)
optional func prepareForDragOperation(_ sender: NSDraggingInfo) -> Bool
optional func performDragOperation(_ sender: NSDraggingInfo) -> Bool
optional func concludeDragOperation(_ sender: NSDraggingInfo?)
optional func draggingEnded(_ sender: NSDraggingInfo)
optional func wantsPeriodicDraggingUpdates() -> Bool
optional func updateDraggingItemsForDrag(_ sender: NSDraggingInfo?)
NSView 拖拽相关的 Extension
open func beginDraggingSession(with items: [NSDraggingItem], event: NSEvent, source: NSDraggingSource) -> NSDraggingSession
open var registeredDraggedTypes: [NSPasteboard.PasteboardType] { get }
open func registerForDraggedTypes(_ newTypes: [NSPasteboard.PasteboardType])
open func unregisterDraggedTypes()
Demo 功能实现
简单实现下功能。本文 Demo 详见文章末尾的链接。
功能拆解
- 需求
- 基于提供的大尺寸图片,批量生成不同尺寸的 icon
好吧,需求总是简单一句话描述,大概所有程序猿都讨厌产品经理这么说哈哈。
- 设想用户操作
- 设计生成 icon 大尺寸图片
- 支持拖拽来指定该文件为生成的基准
- 勾选需要的尺寸
- 指定生成目录
实现
拖拽是从别的文件夹窗口拖拽过来的,所以不需要定义一个 NSView 去实现 NSDraggingSource 协议。
下面定义 DestinationView,NSView 类型,实现 NSDraggingDestination 协议。因为 NSView 默认扩展了该协议,所以不需要声明扩展。
定义 Delegate 代理,DestinationViewDelegate,通知外部。
protocol DestinationViewDelegate {
  func processImage(_ image: NSImage)
}
awakeFromNib 中注册支持的类型 NSPasteboard.PasteboardType.fileURL
registerForDraggedTypes([NSPasteboard.PasteboardType.fileURL])
然后实现 NSDraggingDestination 协议几个方法
draggingEntered 需要判断拖拽的内容是否接收,本 Demo 没有处理。
override func draggingEntered(_ sender: NSDraggingInfo) -> NSDragOperation {
    return .copy
}
可以进行以下处理:
let pasteBoard = sender.draggingPasteboard
let accept = NSImage(pasteboard: pasteBoard) != nil
return accept ? .copy : NSDragOperation()
The data represented by the image can be copied. 返回 .copy 是为了后面展示图片;
具体参考 NSDragoperation。
draggingExited,当拖拽退出时,需要设置 needsDisplay 为 true。
needsDisplay,NSView 用于确定在显示之前是否需要重绘视图。
performDragOperation,判断是否图片,并处理。
下面是 DestinationView 完整的代码。
//  DestinationView.swift
import Cocoa

protocol DestinationViewDelegate {
  func processImage(_ image: NSImage)
}

class DestinationView: NSView {

  var delegate: DestinationViewDelegate?

  override func awakeFromNib() {
      registerForDraggedTypes([NSPasteboard.PasteboardType.fileURL])
  }

  var isReceivingDrag = false {
      didSet {
          needsDisplay = true
      }
  }

  override func draggingEntered(_ sender: NSDraggingInfo) -> NSDragOperation {
      return .copy
  }

  override func draggingExited(_ sender: NSDraggingInfo?) {
      isReceivingDrag = false
  }

  override func prepareForDragOperation(_ sender: NSDraggingInfo) -> Bool {
      return true
  }

  override func performDragOperation(_ sender: NSDraggingInfo) -> Bool {

      isReceivingDrag = false
      let pasteBoard = sender.draggingPasteboard
      guard let image = NSImage(pasteboard: pasteBoard) else {
          return false
      }
      delegate?.processImage(image)
      return true
  }
}
文件的读写权限
macOS开发,文件相关的组件有两个 NSOpenPanel 和 NSSavePanel。前者用于选择文件或者文件夹,后者用于保存单个文件。因为需要批量保存,NSSavePanel 无法实现,所以使用 Data 的 write 方法。
public func write(to url: URL, options: Data.WritingOptions = []) throws
文件读写,需要修改对应 Target 的 Capabilities 中的 App Sanbox - File Access 权限。
User Selected File 修改为 Read/Write 即可读写。
也可以关闭 App Sanbox 。
try? imageData?.write(to: path.appendingPathComponent("icon\(iconSize.rawValue).png"))
发布到 Mac AppStore 的应用,必须遵守沙盒约定。macOS APP 不需要上架,可以不开启 Sandbox 功能,随意访问 mac 上的文件。
NSView 设置问题
NSView 没有 backgroundColor 属性,修改背景色需要修改 layer 的。
backgroundView.layer?.backgroundColor = NSColor.white.cgColor
并且需要设置 wantsLayer 生效。
backgroundView.wantsLayer = true
包括设置圆角,也需要设置 wantsLayer。
backgroundView.layer?.cornerRadius = 10
关于 Retina 设备生成图片大小问题
public convenience init(size: NSSize, flipped drawingHandlerShouldBeCalledWithFlippedContext: Bool, drawingHandler: @escaping (NSRect) -> Bool)
在 Retina 设备上,NSImage 的初始化方法传递参数 size ,生成的图片的尺寸会是 size 的两倍。不了解,暂时先除以 2 解决。后面找到原因再处理下,如果了解原因欢迎给我留言哈。
总结
没什么好总结的哈哈。
本文Demo:https://github.com/sapphirezzz/AppIconReducer)
-END-
欢迎到我的博客交流:https://zackzheng.info
