一、介绍
Splash 跟之前我们介绍的 Selenium ( 参考 Selenium 与自动化测试 —— 《Selenium 2 自动化测试实战》读书笔记) 很类似,都可以理解成一个浏览器,提供网页动态渲染(css、javascript、flash 等)服务,并且都支持 HTTP API 与之交互。
但不同点在于:
Splash 更轻量级,但缺点是功能没有Selenium丰富。(所以 Selenium 才称得上是自动化测试框架,Splash更多的算一种网页渲染服务)
Splash 的安装、配置、使用更简单
Splash 支持异步,能提高爬取效率
文档地址:https://splash.readthedocs.io/en/stable/
二、安装
注意:事先安装好 docker。
docker run -p 8050:8050 scrapinghub/splash
部署在远程服务器记得加 -d 参数,它代表将 Docker 容器以守护态运行,这样在断开远程服务器连接后,不会终止 Splash 服务的运行。
三、使用
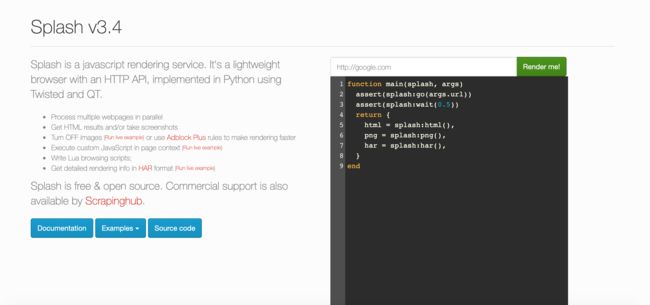
安装好后,打开 http://localhost:8050 即可访问,页面如下:
本文安装版本为 v3.4。
可以在此 web 页面来使用,也可以用下面介绍的 API 调用方式,更灵活。
三、Splash API 调用
http://localhost:8050/render.html?url=https://www.baidu.com

http://localhost:8050/render.png?url=https://www.baidu.com

http://localhost:8050/render.jpeg?url=https://www.baidu.com

http://localhost:8050/render.har?url=https://www.baidu.com

http://localhost:8050/render.json?url=https://www.baidu.com除了上面指定的最简单的url、render类型,还可以通过 Lua 脚本执行更复杂的渲染操作和交互逻辑(即用 execute)。
我们用 python 代码为例:
import requests
from urllib.parse import quote

lua = """
function main(splash)
    return 'hello'
end
"""
url = 'http://localhost:8050/execute?lua_source=' + quote(lua)
response = requests.get(url)
print(response.text)
下面我们对 Lua 脚本的写法做更多的介绍。
四、Splash 的 Lua 脚本
1、base demo
function main(splash, args)
  assert(splash:go(args.url))
  assert(splash:wait(0.5))

  return {
    html = splash:html(),
    png = splash:png(),
    har = splash:har(),
  }
end
接下来针对这个最基本的 demo,来展开介绍。
2、main() 函数
main 函数就是 splash 默认要调用的函数,所以这里保持固定写法就好。
而 main 的返回值,既可以是字典形式,也可以是字符串形式,最后都会转化为 HTTP Response。
3、splash 对象
splash 类似于 Selenium 中的 WebDriver 对象。
(1)splash 属性
上面提到的 main 函数的第二个参数 args 其实是 splash 对象的其中一个属性,即:
splash.args = args
splash.resource_timeout = 0.1 - 设置超时时间。如果设置为 0 或 nil (类似 Python 中的None),代表不检测超时。
此属性适合在网页加载速度较慢的情况下设置
splash.js_enabled = false - 是否执行 js(默认为 ture)
splash.images_enabled = false 是否加载图片(默认为 ture)
小心 image 不加载导致个别 DOM 渲染出错
splash.plugins_enabled = false - 是否加载浏览器插件,如 Flash 插件 (默认 false)
splash.scroll_position = {x=100, y=200} = 页面上下或左右滚动
(3)splash 方法
go() - 模拟 GET 和 POST 请求
http_get() - 模拟 GET 请求
http_post() - 模拟 POST 请求
function main(splash, args)
    -- 错误处理
    local ok, reason = splash:go{"http://httpbin.org/post",                 http_method="POST", body="name=Germey"}


    if ok then
        return splash:html()
    end
end
wait() - 等待。类似 python 中的 sleep(多与 go 配合,紧接在 go 后面)
为什么 splash 没有 selenium 的 expected_conditions(预期条件判断)方法,如presence_of_element_located。
call_later() - 类似 JavaScript 的 settimeout
evaljs() - 执行 js 代码
local title = splash:evaljs("document.title")runjs() 跟 evaljs() 功能类似,只不过语义上更倾向于只调用不关心返回值。
autoload() 跟 evaljs() 功能类似,只不过语义上更倾向于预先加载。
jsfunc() - JavaScript 方法转换为 Lua 脚本
这个好,毕竟我 Lua 语法不熟。
function main(splash, args)
    local get_div_count = splash:jsfunc([[
    function () {
        var body = document.body;
        var divs = body.getElementsByTagName('div');
        return divs.length;
    }
    ]])
    splash:go("https://www.baidu.com")
    return("There are %s DIVs"):format(get_div_count())
end
url() - 获取/设置 url
html() / set_content() - 获取/设置 html 内容
splash:set_content (" hello ")
png() / jpeg() - 获取页面截图
har() - 获取页面加载过程描述
get_cookies() / add_cookie() / clear_ cookies() - 获取/设置/清除 html 内容
splash:add_cookie({"sessionid", "asdasd", "/", domain="http://example.com" })
set_user_agent() - 设置 user-agent
set_custom_headers() - 设置 header
自定义程度更高,可以设置 user_agent、cookies 等等
splash:set_custom_headers({
    ["User-Agent"] = "Splash",
    ["Site"] = "Splash",
})
get_viewport_size() / set_viewport_size(width, height) - 获取/设置页面大小
set_viewport_full() - 设置全屏
select() - css 选择器 (选择首个)
input = splash:select("#kw”)
-- 点击控件
input:mouse_click()
-- 给控件输入文本
input:send_text('Splash')
selectAll() - css 选择器 (选择全部)
-- 通过 css 选择器选中了节点的正文内容,随后遍历了所有节点,将其中的文本获取下来
local texts = splash:select_all('.quote .text')
local results = {}
for index, text in ipairs(texts) do
    results[index] = text.node.innerHTML
end
五、Splash 负载均衡配置
待写。具体可看原书。
六、参考资料
《Python 3网络爬虫开发实战》
