0824ab18972bd4078f84c1027b899e510eb30989.jpg
参考链接
0.首先创建一个SegmentView 集成于Uivew
1.在.h中声明一个传入标题数组的方法,我们用这个方法创建label
/**
 传入标题数组

 @params titlesArray 存放标题的数组
 */
- (void)creatWithTitlesArray: (NSArray *)titlesArray;
2.在.m中实现- (void)creatWithTitlesArray: (NSArray *)titlesArray;
/**
    循环创建label
 */
- (void)creatWithTitlesArray: (NSArray *)titlesArray {
    /// 如果数组为空,返回
    if (titlesArray.count == 0) {
        return;
    }
    /// 循环便利数组
    for (NSInteger index = 0; index < titlesArray.count; index++) {
        /// 0. 创建label
        UILabel *label = [[UILabel alloc]init];
        /// 1. 设置label的文字
        label.userInteractionEnabled = YES;
        label.text = titlesArray[index];
        /// 2. 设置label的tag, 用于区分是哪个label
        label.tag = index + 10;
        /// 3. 添加label
        [self addSubview:label];
        [self.labelArray addObject:label];
    }
}
注意:这里为什么label.tag = index + 10 ?其实除了加0都是可以的,主要是为了和当前SegmentView 区分开,因为SegmentView .tag不设置的话就是0,有可能会取到SegmentView
3.在layoutSubviews方法找那个设置label的frame
- (void)layoutSubviews {
    [super layoutSubviews];

    if (self.labelArray.count == 0) {
        return;
    }
    for (NSInteger index = 0; index < self.labelArray.count; index++) {
        /// 0. 从数组中取出label
        UILabel *label = self.labelArray[index];
        /// 1. 返回label的外包围
        CGRect rect = [self boundsWithLabel:label];
        /// 2 设置label的frame
        label.frame = CGRectMake(100 + index * rect.size.width, 0, rect.size.width, rect.size.height);

    }

}
其中boundsWithLabel:方法是返回label的宽度.需要传入label,实现如下:
/**
    boundingRectWithSize:CGSizeMake
    CGSize:外包围的限制
    CGFLOAT_MAX返回的是最大的浮点数, 也就是这里在计算宽度时不做限
    NSStringDrawingUsesFontLeading属性表示用自字体作为计算行高的标准
    attributes字典传入的是文字的渲染样式,NSFontAttributeName键传入文字的字体和字号,。

 @param label 传入的label
 @return 返回的CGRect是文字根据以上要求,渲染出来的外包围
 */
- (CGRect)boundsWithLabel:(UILabel*)label {
    return [label.text boundingRectWithSize:CGSizeMake(CGFLOAT_MAX, label.frame.size.height) options:NSStringDrawingUsesFontLeading attributes:@{NSFontAttributeName:label.font} context:nil];
}
4.接下来是实现label的点击方法,在这个方法里计算是哪个lable被点击了
- (void)touchesEnded:(NSSet *)touches withEvent:(UIEvent *)event {
    [super touchesEnded:touches withEvent:event];

    UITouch *touch = [touches anyObject];
    CGPoint point = [touch locationInView:self];
    NSInteger detla = self.frame.size.width / self.labelArray.count;
    NSInteger touchNumber = point.x / detla;
    self.selected = touchNumber;

    [self setSelectItemAtIndex:touchNumber animate:YES];
}
[self setSelectItemAtIndex:touchNumber animate:YES]; 是点击label实现的动画
- (void)setSelectItemAtIndex:(NSUInteger)idx animate:(BOOL)animated {

    self.selected = idx;

    [self.subviews enumerateObjectsUsingBlock:^(id obj, NSUInteger idx, BOOL *stop) {
        if ([obj isKindOfClass:[UILabel class]]) {
            UILabel* label = obj;
            if (self.selected + 10 == label.tag ) {
                label.textColor = self.tintColor;
            }
            else {
                label.textColor = [UIColor redColor];
            }

        }
    }];


}
便利所有的lable如果是当前被点击的label颜色变色
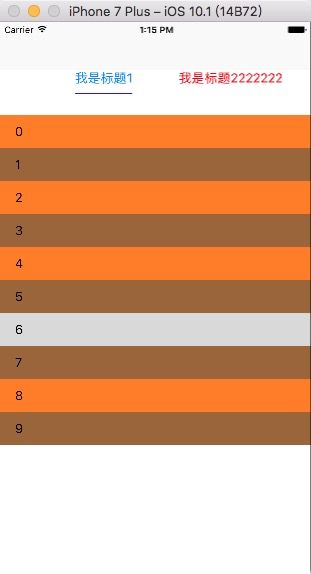
5.在控制器把SegmentView实例出来,就是一下效果
SegmentView *segmentView = [[SegmentView alloc]initWithFrame:CGRectMake(0, 100, [UIScreen mainScreen].bounds.size.width, [UIScreen mainScreen].bounds.size.height)];
    [segmentView creatWithTitlesArray:@[@"我是标题1",@"我是标题2222222"]];

    [self.view addSubview:segmentView];
6.在lable下面添加一根线,当点击lable的有一个滑动的动画,在SegmentView.m中声明一个selectView
@property (nonatomic, strong) UIView *selectView;
懒加载selectView
- (UIView *)selectView
{
    if (!_selectView) {

        UILabel *label = self.labelArray[0];
        _selectView = [[UIView alloc] initWithFrame:CGRectMake(label.frame.origin.x, label.frame.size.height + label.frame.origin.y   + 10, label.frame.size.width,1)];        [self addSubview:_selectView];
        _selectView.backgroundColor = [UIColor blueColor];
    }
    return _selectView;
}
selectView的默认位置要根据第一个label的frame来计算,所有从数组中取出第一个label的frame
7.- (void)setSelectItemAtIndex:(NSUInteger)idx animate:(BOOL)animated 在这方法加滑动动画
 [UIView animateWithDuration:0.5 animations:^{

        UILabel *label = (UILabel*)[self viewWithTag:idx + 10];
        [self.selectView setFrame:CGRectMake(label.frame.origin.x, label.frame.size.height + label.frame.origin.y   + 10, label.frame.size.width,1)];


    }];
8.现在想在增加两个子控制器并把他们显示出来
建立一个控制器Test1ViewController继承自UIViewController,在主控制器建立父子关系
  Test1ViewController *test1Vc = [[Test1ViewController alloc]init];
    Test1ViewController *test2Vc = [[Test1ViewController alloc]init];

    [self addChildViewController:test1Vc];
    [self addChildViewController:test2Vc];
9. SegmentView.h中增加两个控制器的属性.并在.m中实现set方法
@property (nonatomic , strong)UIViewController *test1Vc;
@property (nonatomic , strong)UIViewController *test2Vc;
- (void)setTest2Vc:(UIViewController *)test2Vc {
    _test2Vc = test2Vc;
    if (self.test2Vc) {
        self.test2Vc.view.frame = CGRectMake([UIScreen mainScreen].bounds.size.width, 60, [UIScreen mainScreen].bounds.size.width, self.bounds.size.height - 40);
        self.test2Vc.view.backgroundColor = [UIColor orangeColor];
//        [self addSubview:self.test2Vc.view];
    }
}
- (void)setTest1Vc:(UIViewController *)test1Vc {
    _test1Vc = test1Vc;
    if (self.test1Vc) {
        self.test1Vc.view.frame = CGRectMake(0, 60, [UIScreen mainScreen].bounds.size.width, self.bounds.size.height - 40);
        self.test1Vc.view.backgroundColor = [UIColor redColor];
//        [self addSubview:self.test1Vc.view];
    }
}
这样控制器就加上了,因为每个控制的view宽度是屏幕的宽度,所有要点击label的时候以动画的形势切换他们的位置在- (void)setSelectItemAtIndex:(NSUInteger)idx animate:(BOOL)animated 方法实现动画
- (void)setSelectItemAtIndex:(NSUInteger)idx animate:(BOOL)animated {

    self.selected = idx;

    [self.subviews enumerateObjectsUsingBlock:^(id obj, NSUInteger idx, BOOL *stop) {
        if ([obj isKindOfClass:[UILabel class]]) {
            UILabel* label = obj;
            if (self.selected + 10 == label.tag ) {
                label.textColor = self.tintColor;
            }
            else {
                label.textColor = [UIColor redColor];
            }

        }
    }];

    //这里是我们下方的那根线,移动的动画,下面详细说
    [UIView animateWithDuration:0.5 animations:^{

        UILabel *label = (UILabel*)[self viewWithTag:idx + 10];
        [self.selectView setFrame:CGRectMake(label.frame.origin.x, label.frame.size.height + label.frame.origin.y   + 10, label.frame.size.width,2)];

        if (label.tag == 10) {
            self.test2Vc.view.frame = CGRectMake([UIScreen mainScreen].bounds.size.width, 60, [UIScreen mainScreen].bounds.size.width, self.bounds.size.height - 40);
            self.test1Vc.view.frame = CGRectMake(0, 60, [UIScreen mainScreen].bounds.size.width, self.bounds.size.height - 40);
        } else if (label.tag == 11) {
             self.test2Vc.view.frame = CGRectMake(0, 60, [UIScreen mainScreen].bounds.size.width, self.bounds.size.height - 40);
             self.test1Vc.view.frame = CGRectMake(-[UIScreen mainScreen].bounds.size.width, 60, [UIScreen mainScreen].bounds.size.width, self.bounds.size.height - 40);
        }

    }];
}
10 在Test1ViewController创建一个tableView,实现代理数据源方法
//
//  Test1ViewController.m
//  GHSegmentLabel
//
//  Created by admin on 17/7/29.
//  Copyright © 2017年 admin. All rights reserved.
//

#import "Test1ViewController.h"
#import "PushViewController.h"

@interface Test1ViewController ()
@property (nonatomic , strong) UITableView *tableView;
@end

@implementation Test1ViewController

- (void)viewDidLoad {
    [super viewDidLoad];
    // Do any additional setup after loading the view.

    [self.view addSubview:self.tableView];
    NSLog(@"子控制器:%@",self.navigationController);
}


- (void)tableView:(UITableView *)tableView didSelectRowAtIndexPath:(NSIndexPath *)indexPath {


    NSLog(@"%@",self.navigationController);
}
- (NSInteger)tableView:(UITableView *)tableView numberOfRowsInSection:(NSInteger)section {
    return 10;
}

- (UITableViewCell *)tableView:(UITableView *)tableView cellForRowAtIndexPath:(NSIndexPath *)indexPath {
    UITableViewCell *cell = [tableView dequeueReusableCellWithIdentifier:@"cell"];
    cell.textLabel.text = [NSString stringWithFormat:@"%ld",(long)indexPath.row];
    cell.backgroundColor = indexPath.row % 2 == 0 ? [UIColor orangeColor]:[UIColor brownColor];
    return cell;
}
- (UITableView *)tableView {
    if (_tableView == nil) {
        _tableView = [[UITableView alloc]initWithFrame:self.view.bounds style:UITableViewStylePlain];
        _tableView.delegate = self;
        _tableView.dataSource = self;
        [_tableView registerClass:[UITableViewCell class] forCellReuseIdentifier:@"cell"];
    }
    return _tableView;
}

@end
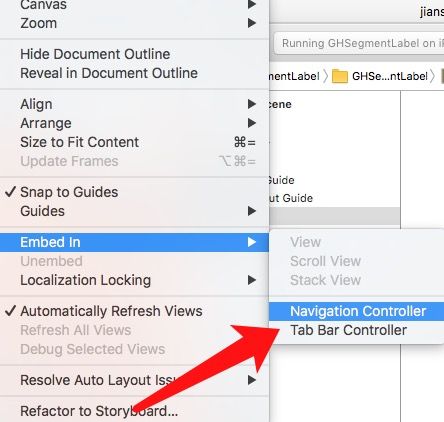
11.给ViewController增加一个导航条
BE0CC3CC-BC51-4B77-9BB5-CD17C29AAD59.png
在tableView的点击事件里打印导航条
NSLog(@"%@",self.navigationController);
控制台输出:
A5705EB3-C9C7-41FC-856F-9B56E96D2982.png
说明建立父子控制器成功,并且拿到了导航条
最后效果
10590187-6985-438F-967F-1B9196B0856C.png


