角点与目标检测(Corners and Object Detection)
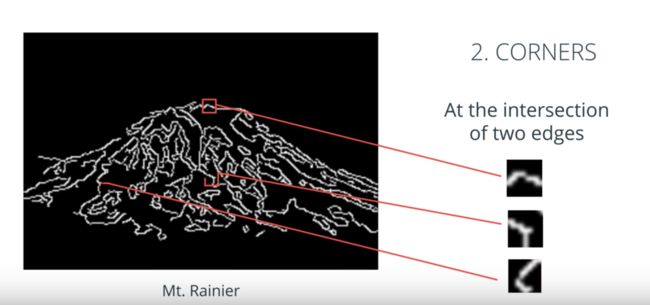
已经可以从图像中提取基于形状的特征,如何使用这一组特征来检测整个对象,以山峰图像角点检测举例:
假设想要在其他图像中检测这座山的方法,单个角点不足以在任何其他图像中识别这座山峰,但是,我们可以定义一组这座山峰的形状特征,将它们组合后蹭一个数组或者向量,然后使用这组特征来查UN构造一个山峰检测器。
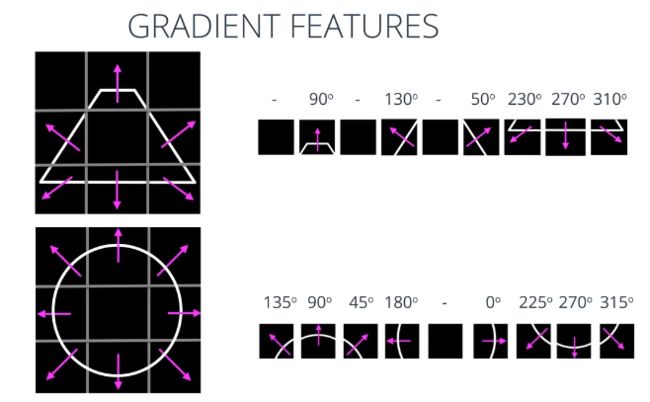
以这个梯形及其相应的梯度为例 这个图像已经检测好了边缘,以梯形中心为基准 观察每个单元的梯度方向,我们就可以将这个数据平面化 创建出一个一维数组,这就是特征向量;同样的操作可应用于其它形状 如这个圆圈,取梯度计算网格每个单元的梯度方向。我们就得到了这两种形状的特征向量。
实时特征检测-ORB(Oriented Fast and Rotated Brief)
-
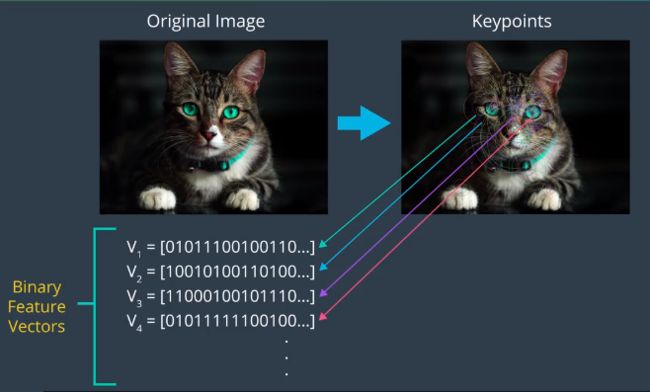
首先在图像中找到称为关键点的特殊区域,可以将关键点视为图像中的一个容易辨识小区域,例如角点。
以猫的图像举例:
- orb为每个关键点计算相应的特征向量,orb算法创建仅包含1和0的特征向量,因此也被称为二元特征向量
ORB,不仅速度快,不受噪声照明、和图像变换,如旋转的影响
FAST 特征提取
ORB特征检测第一步第一步是找到图像中的关键点,这是由FAST算法完成的。
-
粗提取
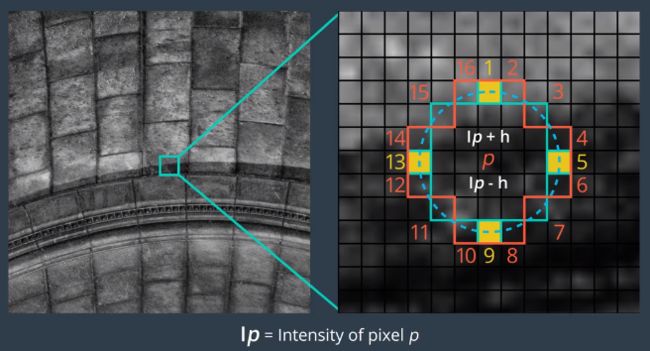
从图像选取一个像素P,判断P是不是特征点的方法:以P为圆心,画一个半径为3pixel的圆,如果圆周上有连续n个像素点灰度值比p点大或者小,则认为p为特征点.一般n设置12或者8。FAST之所以可以这么快,因为它首先检测的1、5、9、13位置上的灰度值,如果p是特征点,那么这四个位置至少有3个或者3个以上的像素都大于或者小于P点的灰度值。如果不满足,则直接排除该点。
FAST发现的关键点提供有关图像中定义边缘对象的信息,但是这些关键点只给出了一个边缘位置,并不包括任何有关强度变化方向的信息
Brief 特征描述
Brief将关键点转化为二进制特征向量。BRIEF stands for binary robust independent elementary features。
简而言之,每个关键点由具有的二进制特征向量描述,一个128-512位的字符串,只包含1和0。每一位只能容纳一位二进制。
Brief怎么为关键点生成二进制描述:
- 首先BRIEF使用高斯内核平滑给定图像,防止对高频噪声过于敏感。
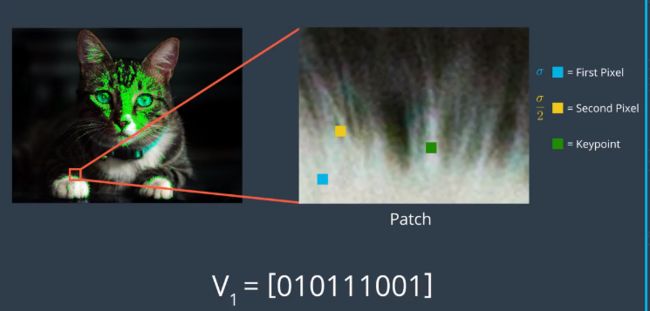
- 然后,选取一个关键点,在关键点附近定义的邻域内选择一对随机像素,关键点周围的邻域称为补丁,它是具有一定像素宽度和高度的正方形。
随机对中的第一个像素,这里显示的是蓝色正方形,是从以关键点为中心的高斯分布绘制的,具有标准偏差或Sigma的扩展。随机对中的第二个像素,这里显示为黄色正方形,是从以该第一像素为中心的高斯分布绘制的,标准偏差Sigma大于2。经验表明,这种高斯选择提高了特征匹配率。
然后,BRIEF通过如下比较两个像素的亮度开始为关键点构造二进制描述符:如果第一像素比第二像素亮,则它将数值1分配给描述符中的对应位,否则它分配的值为零。
在这个例子中,我们看到,第二个像素比第一个像素亮,所以我们给特征向量的第一个比特位赋值为0。特征向量的第一位对应于该关键点的第一对随机点。
现在,对于相同的关键点,BRIEF选择一个新的随机像素对,比较它们的亮度并将一或零分配给下一个比特和特征向量。在我们的例子中,我们看到现在第一个像素比第二个更亮,因此我们在特征向量中为第二位分配一。对于256位向量,BRIEF然后在移动到下一个关键点之前对相同的关键点重复此过程256次。然后将256像素亮度比较的结果放入该一个关键点的二进制特征向量中。
ORB 比例和旋转不变性
ORB使用FAST检测图像中的关键点,它需要做几个额外的步骤确保他可以检测到物体,无论它们的大小或图像中的位置。
- ORB算法从构建图像金字塔开始
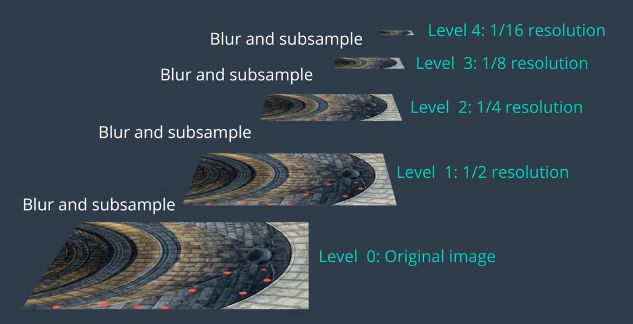
图像金字塔是单个图像的多尺度表示,其由一系列图像组成,所有图像都是不同分辨率的原始图像的版本。
金字塔中的每个级别都包含上一级图像的下采样版本。下采样意味着图像分辨率已降低。
在该示例中,图像被下采样两倍,因此最初为四乘四平方区域的部分现在是两乘二的方形区域。
图像的下采样版本包含像素减少,尺寸缩小了两倍。在这里,我们看到一个五层图像金字塔的例子。在每个级别,图像被下采样两倍,到第四级,我们有一个图像十六分之一原始图像的分辨率。
一旦ORB创建了图像金字塔,它使用快速算法在每个级别快速定位不同大小的图像中的关键点。由于金字塔的每个级别由原始图像的较小版本组成,因此原始图像中的任何对象也将在金字塔的每个级别上减小尺寸。因此,通过在每个级别定位关键点,ORB有效地定位不同比例的对象的关键点。 以这种方式,ORB部分尺度不变的。这非常重要,因为对象不太可能在每个图像中以完全相同的尺寸出现。
所以,ORB具有与该图像金字塔的每个级别相关联的关键点。 - 在金字塔的所有层面的关键点都被找到后ORB现在为每个关键点指定方向。像左或右面对,取决于强度水平如何围绕该关键点变化。ORB将首先选择金字塔零级的图像。对于此图像,它现在将计算其关键点的方向。首先计算以关键点为中心的盒子内的强度质心,强度质心可以被认为是给定贴片中的平均像素强度的位置。一旦计算出强度质心,就可以通过将关键点的矢量绘制到强度质心来获得关键点的方向,如此处所示。
该特定关键点的方向向下并朝向左侧,因为图像的该区域中的亮度在该方向上增加。一旦为金字塔零级图像中的每个关键点指定了方向,ORB现在对所有其他金字塔等级的图像重复相同的处理。值得注意的是,在图像金字塔的每个级别上,补丁大小的大小都没有减小。因此,在金字塔的每个级别由相同补丁覆盖的图像区域将更大。
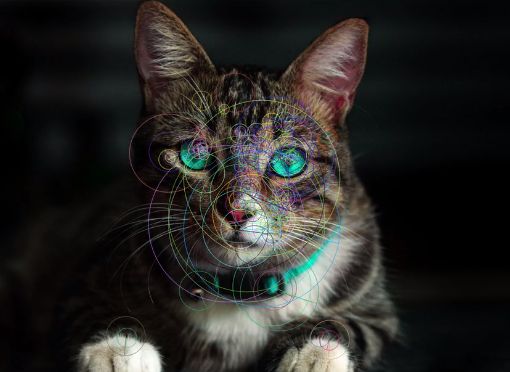
在此图像中,圆圈表示每个关键点的大小。在金字塔的较高级别中找到具有较大尺寸的关键点。
- 找到并指定关键点的方向后,ORB现在使用修改后的brief来创建特征向量,称为rBRIEF。无论对象的方向如何,都可以为关键点创建相同的矢量。这使ORB算法旋转不变,这意味着它可以检测到以任何角度旋转的图像中的相同关键点。RBRIEF以与Brief相同的方式开始,通过在给定关键点周围的定义补丁内选择256个随机像素对来构造256位向量。然后它按照关键点的方向角,旋转这些随机像素对,以便将随机点与关键点的方向对齐。最后,rBRIEF比较随机像素对的亮度,并相应地分配1和0来创建相应的特征向量。图像中找到的所有关键点的所有特征向量的集合,被称为ORB描述符
首先,我们将读入图像,然后构建并显示图像金字塔的几个层
import numpy as np
import matplotlib.pyplot as plt
import cv2

%matplotlib inline

# Read in the image
image = cv2.imread('images/rainbow_flag.jpg')

# Change color to RGB (from BGR)
image = cv2.cvtColor(image, cv2.COLOR_BGR2RGB)

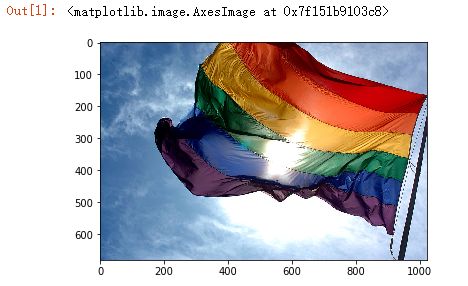
plt.imshow(image)
level_1 = cv2.pyrDown(image)
level_2 = cv2.pyrDown(level_1)
level_3 = cv2.pyrDown(level_2)

# Display the images
f, (ax1,ax2,ax3,ax4) = plt.subplots(1, 4, figsize=(20,10))

ax1.set_title('original')
ax1.imshow(image)

ax2.imshow(level_1)
ax2.set_xlim([0, image.shape[1]])
ax2.set_ylim([image.shape[0], 0])

ax3.imshow(level_2)
ax3.set_xlim([0, image.shape[1]])
ax3.set_ylim([image.shape[0], 0])

ax4.imshow(level_3)
ax4.set_xlim([0, image.shape[1]])
ax4.set_ylim([image.shape[0], 0])
视频中ORB
ORB常用的一种, 是跟踪和识别实时视频流中的对象。 然后,对于传入视频流中的每个帧,我们计算ORB描述符,并使用匹配函数进行比较。 如果我们发现匹配函数返回超过某个匹配阈值的匹配数,我们就可以断定对象在帧中。网格阈值是一个可以设置的自由参数。例如,如果特定对象的ORB描述符具有100个关键点,则可以将阈值设置为该特定对象的关键点数量的35%,50%或90%。如果将阈值设置为35%,则意味着描述该对象的100个关键点中至少有35个关键点必须匹配,以便说明该对象在帧中。所有这些步骤都可以在近乎实时的情况下完成,因为ORBS二进制描述符, 计算和比较非常快。 当您想要检测具有许多不受图像背景影响的一致特征的对象时,ORB算法工作得最好。例如,ORB可以很好地用于面部检测,因为脸部有很多特征,比如眼睛和嘴角,无论人身在何处,这种情况都不会改变。
Oriented FAST and Rotated BRIEF (ORB)
- Loading Images and Importing Resources
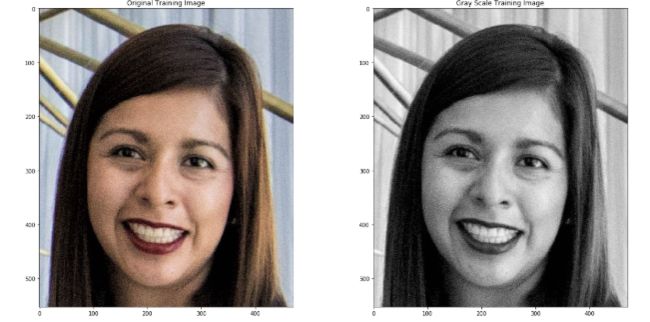
cv2.imread()函数将图像加载为BGR,我们将图像转换为RGB,将BGR图像转换为灰度进行分析。
%matplotlib inline

import cv2
import matplotlib.pyplot as plt

# Set the default figure size
plt.rcParams['figure.figsize'] = [20,10]

# Load the training image
image = cv2.imread('./images/face.jpeg')

# Convert the training image to RGB
training_image = cv2.cvtColor(image, cv2.COLOR_BGR2RGB)

# Convert the training image to gray Scale
training_gray = cv2.cvtColor(image, cv2.COLOR_BGR2GRAY)

# Display the images
plt.subplot(121)
plt.title('Original Training Image')
plt.imshow(training_image)
plt.subplot(122)
plt.title('Gray Scale Training Image')
plt.imshow(training_gray, cmap = 'gray')
plt.show()
- 定位关键点
ORB算法的第一步是定位训练图像中的所有关键点。 找到关键点后,ORB会创建相应的二进制特征向量,并在ORB描述符中将它们组合在一起。使用OpenCV的ORB类来定位关键点并创建相应的ORB描述符。 使用ORB_create()函数设置ORB算法的参数。 ORB_create()函数的参数及其默认值如下:
cv2.ORB_create(nfeatures = 500, scaleFactor = 1.2, nlevels = 8, edgeThreshold = 31, firstLevel = 0, WTA_K = 2, scoreType = HARRIS_SCORE, patchSize = 31, fastThreshold = 20)
参数:
- nfeatures - int
确定要定位的最大特征数(关键点)。 - scaleFactor - float
金字塔抽取率必须大于1. ORB使用图像金字塔来查找要素,因此必须提供金字塔中每个图层与金字塔所具有的级别数之间的比例因子。scaleFactor = 2表示经典金字塔,其中每个下一级的像素比前一级少4倍。大比例因子将减少发现特征数量。 - nlevels - int
金字塔等级的数量,最小级别的线性大小等于input_image_linear_size / pow(scaleFactor,nlevels)。 - edgeThreshold - - int
未检测到要素的边框大小。 由于关键点具有特定的像素大小,因此必须从搜索中排除图像的边缘。 边缘阈值的大小应等于或大于patchSize参数。 - firstLevel - int
此参数允许您确定应将哪个级别视为金字塔中的第一级别。 它在当前实现中应为0。 通常,具有统一标度的金字塔等级被认为是第一级。 - WTA_K - int
用于生成定向的BRIEF描述符的每个元素的随机像素的数量。 可能的值为2,3和4,其中2为默认值。 例如,值3意味着一次选择三个随机像素来比较它们的亮度。 返回最亮像素的索引。 由于有3个像素,因此返回的索引将为0,1或2。 - scoreType - int
此参数可以设置为HARRIS_SCORE或FAST_SCORE。 默认的HARRIS_SCORE表示Harris角算法用于对要素进行排名。 该分数仅用于保留最佳功能。 FAST_SCORE生成的关键点稍差,但计算起来要快一些。 - patchSize - int
面向BRIEF描述符使用的补丁的大小。 当然,在较小的金字塔层上,由特征覆盖的感知图像区域将更大。
我们可以看到,cv2。 ORB_create()函数支持各种参数。 前两个参数(nfeatures和scaleFactor)可能是您最有可能改变的参数。 其他参数可以安全地保留其默认值,您将获得良好的结果。
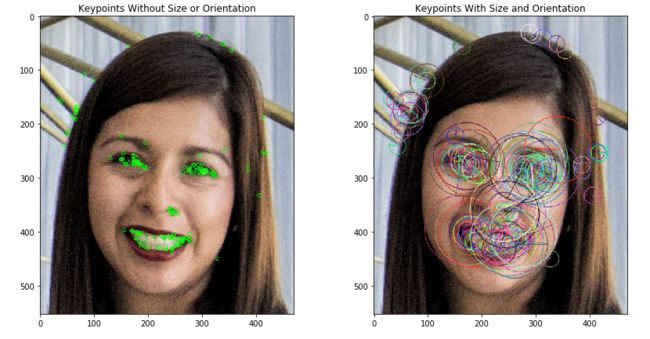
在下面的代码中,我们将使用ORB_create()函数将我们想要检测的关键点的最大数量设置为200,并将金字塔抽取率设置为2.1。 然后,我们将使用.detectAndCompute(image)方法定位给定训练图像中的关键点并计算其对应的ORB描述符。 最后,我们将使用cv2.drawKeypoints()函数来可视化ORB算法找到的关键点。
# Import copy to make copies of the training image
import copy

# Set the default figure size
plt.rcParams['figure.figsize'] = [14.0, 7.0]

# Set the parameters of the ORB algorithm by specifying the maximum number of keypoints to locate and
# the pyramid decimation ratio
orb = cv2.ORB_create(200, 2.0)

# Find the keypoints in the gray scale training image and compute their ORB descriptor.
# The None parameter is needed to indicate that we are not using a mask.
keypoints, descriptor = orb.detectAndCompute(training_gray, None)

# Create copies of the training image to draw our keypoints on
keyp_without_size = copy.copy(training_image)
keyp_with_size = copy.copy(training_image)

# Draw the keypoints without size or orientation on one copy of the training image
cv2.drawKeypoints(training_image, keypoints, keyp_without_size, color = (0, 255, 0))

# Draw the keypoints with size and orientation on the other copy of the training image
cv2.drawKeypoints(training_image, keypoints, keyp_with_size, flags = cv2.DRAW_MATCHES_FLAGS_DRAW_RICH_KEYPOINTS)

# Display the image with the keypoints without size or orientation
plt.subplot(121)
plt.title('Keypoints Without Size or Orientation')
plt.imshow(keyp_without_size)

# Display the image with the keypoints with size and orientation
plt.subplot(122)
plt.title('Keypoints With Size and Orientation')
plt.imshow(keyp_with_size)
plt.show()

# Print the number of keypoints detected
print("\nNumber of keypoints Detected: ", len(keypoints))
正如我们在右图所示,每个关键点都有一个中心,一个大小和一个角度。 中心确定图像中每个关键点的位置; 每个关键点的大小由BRIEF用来创建其特征向量的补丁大小决定; 角度告诉我们由rBRIEF确定的关键点的方向。
特征匹配
一旦我们获得了训练和查询图像的ORB描述符,最后一步就是使用相应的ORB描述符在两个图像之间进行关键点匹配。 这种匹配通常由匹配函数执行。 最常用的匹配函数之一称为Brute-Force。
在下面的代码中,我们将使用OpenCV的BFMatcher类来比较训练和查询图像中的关键点。使用cv2.BFMatcher()函数设置Brute-Force匹配器的参数。 cv2.BFMatcher()函数的参数及其默认值如下:
- normType
指定用于确定匹配质量的度量。默认情况下,NoMyType=CV2..NoqILL2,它测量两个描述符之间的距离。然而,对于二进制描述符,如由ORB创建的,汉明度量(Hamming metric)更适合。汉明度量通过计算二进制描述符之间的不同位的数目来确定距离。当使用WTAYK=2创建ORB描述符时,选择两个随机像素并在亮度上进行比较。最亮像素的索引以0或1返回。这样的输出只占用1位,因此应该使用CV2..NojyHaMin度量。另一方面,如果使用WTA_K=3创建ORB描述符,则选择三个随机像素并在亮度方面进行比较。最亮像素的索引以0, 1或2的形式返回。这种输出将占用2比特,因此应该使用汉明距离的特殊变体,称为cv2.NORM_HAMMING2(2代表2比特)。然后,对于所选择的任何度量,当比较训练和查询图像中的关键点时,认为度量较小(它们之间的距离)的对是最佳匹配。 - crossCheck - bool
一个布尔变量,可以设置为“True”或“False”。 交叉检查对于消除错误匹配非常有用。 交叉检查通过执行两次匹配过程来工作。 第一次将训练图像中的关键点与查询图像中的关键点进行比较; 然而,第二次,将查询图像中的关键点与训练图像中的关键点进行比较(即比较向后进行)。 启用交叉检查时,只有当训练图像中的关键点A与查询图像中的关键点B最佳匹配时,匹配才被视为有效,反之亦然(即,如果查询中的关键点B 图像是训练图像中点A的最佳匹配。
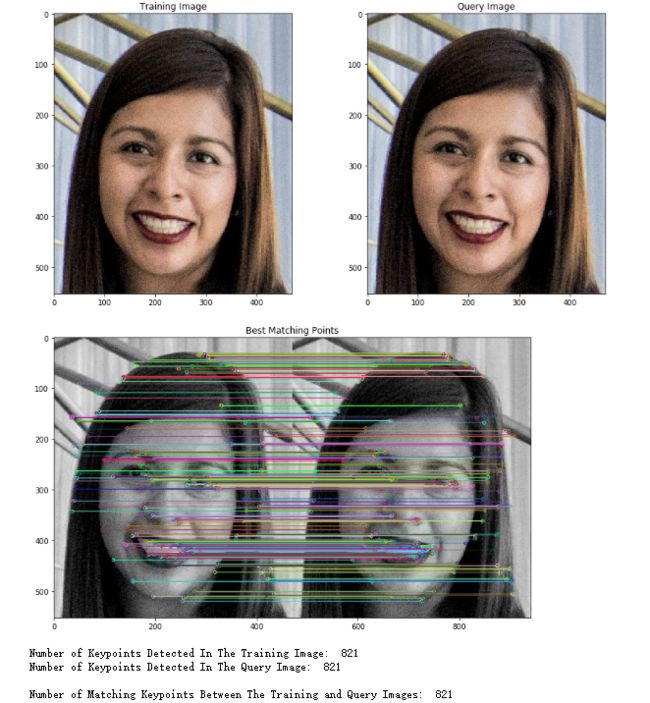
一旦设置了* BFMatcher *的参数,我们就可以使用.match(descriptors_train,descriptors_query)方法,使用它们的ORB描述符找到训练图像和查询图像之间的匹配关键点。 最后,我们将使用cv2.drawMatches()函数来可视化Brute-Force匹配器找到的匹配关键点。 此函数水平堆叠训练和查询图像,并将训练图像中关键点的线条绘制到查询图像中对应的最佳匹配关键点。 请记住,为了更清楚地查看ORB算法的属性,在以下示例中,我们将使用与我们的训练和查询图像相同的图像。
import cv2
import matplotlib.pyplot as plt

# Set the default figure size
plt.rcParams['figure.figsize'] = [14.0, 7.0]

# Load the training image
image1 = cv2.imread('./images/face.jpeg')

# Load the query image
image2 = cv2.imread('./images/face.jpeg')

# Convert the training image to RGB
training_image = cv2.cvtColor(image1, cv2.COLOR_BGR2RGB)

# Convert the query image to RGB
query_image = cv2.cvtColor(image2, cv2.COLOR_BGR2RGB)

# Display the training and query images
plt.subplot(121)
plt.title('Training Image')
plt.imshow(training_image)
plt.subplot(122)
plt.title('Query Image')
plt.imshow(query_image)
plt.show()

# Convert the training image to gray scale
training_gray = cv2.cvtColor(training_image, cv2.COLOR_BGR2GRAY)

# Convert the query image to gray scale
query_gray = cv2.cvtColor(query_image, cv2.COLOR_BGR2GRAY)

# Set the parameters of the ORB algorithm by specifying the maximum number of keypoints to locate and
# the pyramid decimation ratio
orb = cv2.ORB_create(1000, 2.0)

# Find the keypoints in the gray scale training and query images and compute their ORB descriptor.
# The None parameter is needed to indicate that we are not using a mask in either case.
keypoints_train, descriptors_train = orb.detectAndCompute(training_gray, None)
keypoints_query, descriptors_query = orb.detectAndCompute(query_gray, None)

# Create a Brute Force Matcher object. Set crossCheck to True so that the BFMatcher will only return consistent
# pairs. Such technique usually produces best results with minimal number of outliers when there are enough matches.
bf = cv2.BFMatcher(cv2.NORM_HAMMING, crossCheck = True)

# Perform the matching between the ORB descriptors of the training image and the query image
matches = bf.match(descriptors_train, descriptors_query)

# The matches with shorter distance are the ones we want. So, we sort the matches according to distance
matches = sorted(matches, key = lambda x : x.distance)

# Connect the keypoints in the training image with their best matching keypoints in the query image.
# The best matches correspond to the first elements in the sorted matches list, since they are the ones
# with the shorter distance. We draw the first 300 mathces and use flags = 2 to plot the matching keypoints
# without size or orientation.
result = cv2.drawMatches(training_gray, keypoints_train, query_gray, keypoints_query, matches[:300], query_gray, flags = 2)

# Display the best matching points
plt.title('Best Matching Points')
plt.imshow(result)
plt.show()

# Print the number of keypoints detected in the training image
print("Number of Keypoints Detected In The Training Image: ", len(keypoints_train))

# Print the number of keypoints detected in the query image
print("Number of Keypoints Detected In The Query Image: ", len(keypoints_query))

# Print total number of matching points between the training and query images
print("\nNumber of Matching Keypoints Between The Training and Query Images: ", len(matches))
ORB 主要属性
- 比例不变性
- 旋转不变性
- 照明不变性
- 噪音不变性
Scale Invariance
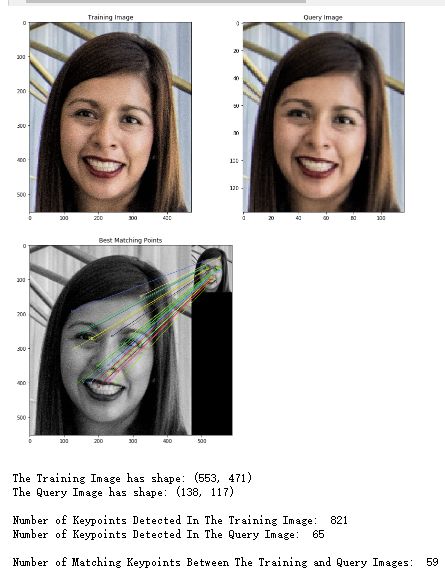
ORB算法是尺度不变的。 这意味着它能够检测图像中的对象,无论其大小如何。 为了看到这一点,我们现在将使用我们的蛮力匹配器来匹配训练图像和原始训练图像大小的1/4的查询图像之间的点。
import cv2
import matplotlib.pyplot as plt

# Set the default figure size
plt.rcParams['figure.figsize'] = [14.0, 7.0]

# Load the training image
image1 = cv2.imread('./images/face.jpeg')

# Load the query image
image2 = cv2.imread('./images/faceQS.png')

# Convert the training image to RGB
training_image = cv2.cvtColor(image1, cv2.COLOR_BGR2RGB)

# Convert the query image to RGB
query_image = cv2.cvtColor(image2, cv2.COLOR_BGR2RGB)

# Display the images
plt.subplot(121)
plt.title('Training Image')
plt.imshow(training_image)
plt.subplot(122)
plt.title('Query Image')
plt.imshow(query_image)
plt.show()

# Convert the training image to gray scale
training_gray = cv2.cvtColor(training_image, cv2.COLOR_BGR2GRAY)

# Convert the query image to gray scale
query_gray = cv2.cvtColor(query_image, cv2.COLOR_BGR2GRAY)

# Set the parameters of the ORB algorithm by specifying the maximum number of keypoints to locate and
# the pyramid decimation ratio
orb = cv2.ORB_create(1000, 2.0)

# Find the keypoints in the gray scale training and query images and compute their ORB descriptor.
# The None parameter is needed to indicate that we are not using a mask in either case.
keypoints_train, descriptors_train = orb.detectAndCompute(training_gray, None)
keypoints_query, descriptors_query = orb.detectAndCompute(query_gray, None)

# Create a Brute Force Matcher object. Set crossCheck to True so that the BFMatcher will only return consistent
# pairs. Such technique usually produces best results with minimal number of outliers when there are enough matches.
bf = cv2.BFMatcher(cv2.NORM_HAMMING, crossCheck = True)

# Perform the matching between the ORB descriptors of the training image and the query image
matches = bf.match(descriptors_train, descriptors_query)

# The matches with shorter distance are the ones we want. So, we sort the matches according to distance
matches = sorted(matches, key = lambda x : x.distance)

# Connect the keypoints in the training image with their best matching keypoints in the query image.
# The best matches correspond to the first elements in the sorted matches list, since they are the ones
# with the shorter distance. We draw the first 30 mathces and use flags = 2 to plot the matching keypoints
# without size or orientation.
result = cv2.drawMatches(training_gray, keypoints_train, query_gray, keypoints_query, matches[:30], query_gray, flags = 2)

# Display the best matching points
plt.title('Best Matching Points')
plt.imshow(result)
plt.show()

# Print the shape of the training image
print('\nThe Training Image has shape:', training_gray.shape)

#Print the shape of the query image
print('The Query Image has shape:', query_gray.shape)

# Print the number of keypoints detected in the training image
print("\nNumber of Keypoints Detected In The Training Image: ", len(keypoints_train))

# Print the number of keypoints detected in the query image
print("Number of Keypoints Detected In The Query Image: ", len(keypoints_query))

# Print total number of matching points between the training and query images
print("\nNumber of Matching Keypoints Between The Training and Query Images: ", len(matches))
在上面的示例中,请注意训练图像是553 x 471像素,而查询图像是138 x 117像素,是原始训练图像大小的1/4。 另请注意,查询图像中检测到的关键点数量仅为65,远小于训练图像中的831个关键点。 然而,我们可以看到我们的蛮力匹配器可以将查询图像中的大多数关键点与训练图像中的相应关键点进行匹配。
Rotational Invariance
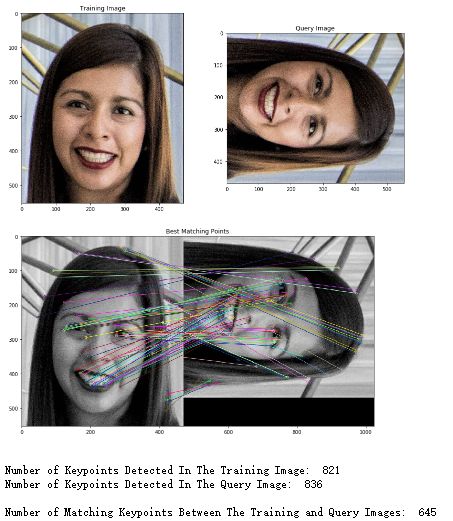
ORB算法也是旋转不变的。 这意味着无论方向如何,它都能够检测图像中的对象。 为了看到这一点,我们现在将使用我们的Brute-Force匹配器来匹配训练图像和旋转了90度的查询图像之间的点。
import cv2
import matplotlib.pyplot as plt

# Set the default figure size
plt.rcParams['figure.figsize'] = [14.0, 7.0]

# Load the training image
image1 = cv2.imread('./images/face.jpeg')

# Load the query image
image2 = cv2.imread('./images/faceR.jpeg')

# Convert the training image to RGB
training_image = cv2.cvtColor(image1, cv2.COLOR_BGR2RGB)

# Convert the query image to RGB
query_image = cv2.cvtColor(image2, cv2.COLOR_BGR2RGB)

# Display the images
plt.subplot(121)
plt.title('Training Image')
plt.imshow(training_image)
plt.subplot(122)
plt.title('Query Image')
plt.imshow(query_image)
plt.show()

# Convert the training image to gray scale
training_gray = cv2.cvtColor(training_image, cv2.COLOR_BGR2GRAY)

# Convert the query image to gray scale
query_gray = cv2.cvtColor(query_image, cv2.COLOR_BGR2GRAY)

# Set the parameters of the ORB algorithm by specifying the maximum number of keypoints to locate and
# the pyramid decimation ratio
orb = cv2.ORB_create(1000, 2.0)

# Find the keypoints in the gray scale training and query images and compute their ORB descriptor.
# The None parameter is needed to indicate that we are not using a mask in either case.
keypoints_train, descriptors_train = orb.detectAndCompute(training_gray, None)
keypoints_query, descriptors_query = orb.detectAndCompute(query_gray, None)

# Create a Brute Force Matcher object. Set crossCheck to True so that the BFMatcher will only return consistent
# pairs. Such technique usually produces best results with minimal number of outliers when there are enough matches.
bf = cv2.BFMatcher(cv2.NORM_HAMMING, crossCheck = True)

# Perform the matching between the ORB descriptors of the training image and the query image
matches = bf.match(descriptors_train, descriptors_query)

# The matches with shorter distance are the ones we want. So, we sort the matches according to distance
matches = sorted(matches, key = lambda x : x.distance)

# Connect the keypoints in the training image with their best matching keypoints in the query image.
# The best matches correspond to the first elements in the sorted matches list, since they are the ones
# with the shorter distance. We draw the first 100 mathces and use flags = 2 to plot the matching keypoints
# without size or orientation.
result = cv2.drawMatches(training_gray, keypoints_train, query_gray, keypoints_query, matches[:100], query_gray, flags = 2)

# Display the best matching points
plt.title('Best Matching Points')
plt.imshow(result)
plt.show()

# Print the number of keypoints detected in the training image
print("\nNumber of Keypoints Detected In The Training Image: ", len(keypoints_train))

# Print the number of keypoints detected in the query image
print("Number of Keypoints Detected In The Query Image: ", len(keypoints_query))

# Print total number of matching points between the training and query images
print("\nNumber of Matching Keypoints Between The Training and Query Images: ", len(matches))
在上面的例子中,我们看到在两个图像中检测到的关键点的数量非常相似,即使查询图像被旋转,我们的Brute-Force匹配器仍然可以匹配找到的关键点的大约78%。 此外,请注意大多数匹配关键点都接近特定的面部特征,例如眼睛,鼻子和嘴巴。
Illumination Invariance
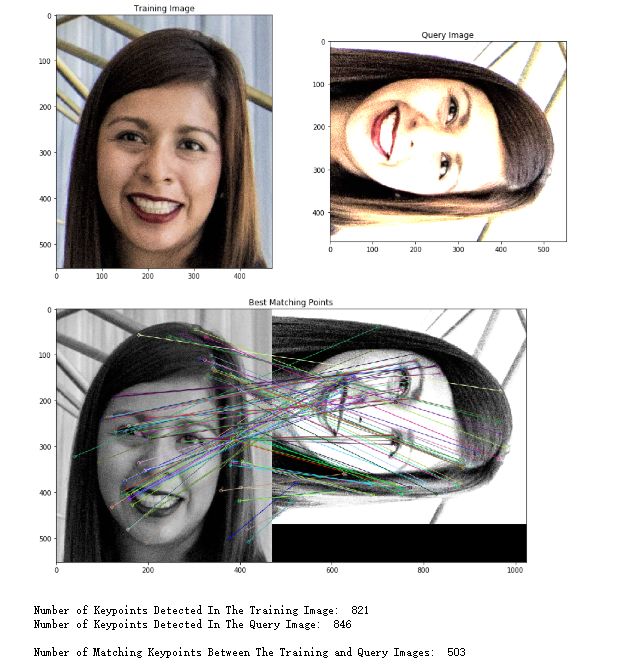
ORB算法也是照明不变的。 这意味着无论照明如何,它都能够检测图像中的物体。 为了看到这一点,我们现在将使用我们的Brute-Force匹配器来匹配训练图像和更亮的查询图像之间的点。
import cv2
import matplotlib.pyplot as plt

# Set the default figure size
plt.rcParams['figure.figsize'] = [14.0, 7.0]

# Load the training image
image1 = cv2.imread('./images/face.jpeg')

# Load the query image
image2 = cv2.imread('./images/faceRI.png')

# Convert the training image to RGB
training_image = cv2.cvtColor(image1, cv2.COLOR_BGR2RGB)

# Convert the query image to RGB
query_image = cv2.cvtColor(image2, cv2.COLOR_BGR2RGB)

# Display the images
plt.subplot(121)
plt.title('Training Image')
plt.imshow(training_image)
plt.subplot(122)
plt.title('Query Image')
plt.imshow(query_image)
plt.show()

# Convert the training image to gray scale
training_gray = cv2.cvtColor(training_image, cv2.COLOR_BGR2GRAY)

# Convert the query image to gray scale
query_gray = cv2.cvtColor(query_image, cv2.COLOR_BGR2GRAY)

# Set the parameters of the ORB algorithm by specifying the maximum number of keypoints to locate and
# the pyramid decimation ratio
orb = cv2.ORB_create(1000, 2.0)

# Find the keypoints in the gray scale training and query images and compute their ORB descriptor.
# The None parameter is needed to indicate that we are not using a mask in either case.
keypoints_train, descriptors_train = orb.detectAndCompute(training_gray, None)
keypoints_query, descriptors_query = orb.detectAndCompute(query_gray, None)

# Create a Brute Force Matcher object. Set crossCheck to True so that the BFMatcher will only return consistent
# pairs. Such technique usually produces best results with minimal number of outliers when there are enough matches.
bf = cv2.BFMatcher(cv2.NORM_HAMMING, crossCheck = True)

# Perform the matching between the ORB descriptors of the training image and the query image
matches = bf.match(descriptors_train, descriptors_query)

# The matches with shorter distance are the ones we want. So, we sort the matches according to distance
matches = sorted(matches, key = lambda x : x.distance)

# Connect the keypoints in the training image with their best matching keypoints in the query image.
# The best matches correspond to the first elements in the sorted matches list, since they are the ones
# with the shorter distance. We draw the first 100 mathces and use flags = 2 to plot the matching keypoints
# without size or orientation.
result = cv2.drawMatches(training_gray, keypoints_train, query_gray, keypoints_query, matches[:100], query_gray, flags = 2)

# Display the best matching points
plt.title('Best Matching Points')
plt.imshow(result)
plt.show()

# Print the number of keypoints detected in the training image
print("\nNumber of Keypoints Detected In The Training Image: ", len(keypoints_train))

# Print the number of keypoints detected in the query image
print("Number of Keypoints Detected In The Query Image: ", len(keypoints_query))

# Print total number of matching points between the training and query images
print("\nNumber of Matching Keypoints Between The Training and Query Images: ", len(matches))
在上面的例子中,我们看到在两个图像中检测到的关键点的数量再次非常相似,即使查询图像更亮,我们的Brute-Force匹配器仍然可以匹配找到的关键点的大约63%。
Noise Invariance
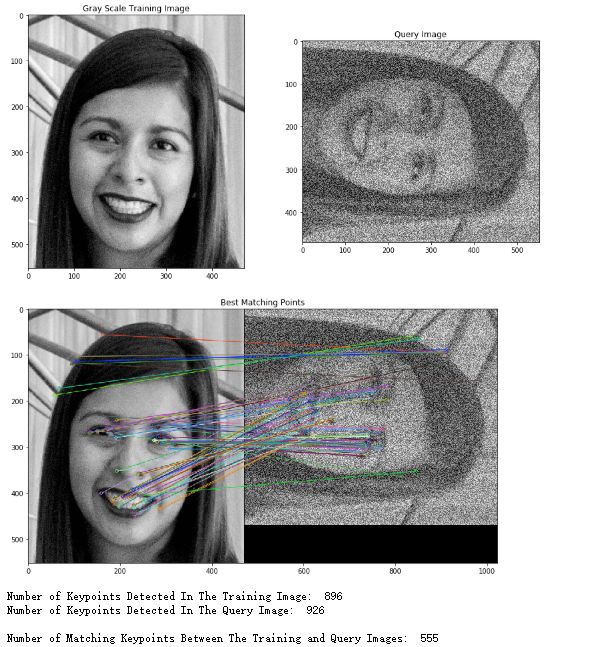
ORB算法也是噪声不变的。 这意味着它能够检测图像中的对象,即使图像具有一定程度的噪声。 为了看到这一点,我们现在将使用我们的Brute-Force匹配器来匹配训练图像和具有大量噪声的查询图像之间的点。
import cv2
import matplotlib.pyplot as plt

# Set the default figure size
plt.rcParams['figure.figsize'] = [14.0, 7.0]

# Load the training image
image1 = cv2.imread('./images/face.jpeg')

# Load the noisy, gray scale query image.
image2 = cv2.imread('./images/faceRN5.png')

# Convert the query image to gray scale
query_gray = cv2.cvtColor(image2, cv2.COLOR_BGR2GRAY)

# Convert the training image to gray scale
training_gray = cv2.cvtColor(image1, cv2.COLOR_BGR2GRAY)

# Display the images
plt.subplot(121)
plt.imshow(training_gray, cmap = 'gray')
plt.title('Gray Scale Training Image')
plt.subplot(122)
plt.imshow(query_gray, cmap = 'gray')
plt.title('Query Image')
plt.show()

# Set the parameters of the ORB algorithm by specifying the maximum number of keypoints to locate and
# the pyramid decimation ratio
orb = cv2.ORB_create(1000, 1.3)

# Find the keypoints in the gray scale training and query images and compute their ORB descriptor.
# The None parameter is needed to indicate that we are not using a mask in either case.
keypoints_train, descriptors_train = orb.detectAndCompute(training_gray, None)
keypoints_query, descriptors_query = orb.detectAndCompute(query_gray, None)

# Create a Brute Force Matcher object. We set crossCheck to True so that the BFMatcher will only return consistent
# pairs. Such technique usually produces best results with minimal number of outliers when there are enough matches.
bf = cv2.BFMatcher(cv2.NORM_HAMMING, crossCheck = True)

# Perform the matching between the ORB descriptors of the training image and the query image
matches = bf.match(descriptors_train, descriptors_query)

# The matches with shorter distance are the ones we want. So, we sort the matches according to distance
matches = sorted(matches, key = lambda x : x.distance)

# Connect the keypoints in the training image with their best matching keypoints in the query image.
# The best matches correspond to the first elements in the sorted matches list, since they are the ones
# with the shorter distance. We draw the first 100 mathces and use flags = 2 to plot the matching keypoints
# without size or orientation.
result = cv2.drawMatches(training_gray, keypoints_train, query_gray, keypoints_query, matches[:100], query_gray, flags = 2)

# we display the image
plt.title('Best Matching Points')
plt.imshow(result)
plt.show()

# Print the number of keypoints detected in the training image
print("Number of Keypoints Detected In The Training Image: ", len(keypoints_train))

# Print the number of keypoints detected in the query image
print("Number of Keypoints Detected In The Query Image: ", len(keypoints_query))

# Print total number of matching points between the training and query images
print("\nNumber of Matching Keypoints Between The Training and Query Images: ", len(matches))
在上面的例子中,我们再次看到两个图像中检测到的关键点的数量非常相似,即使查询图像有很多噪声,我们的Brute-Force匹配器仍然可以找到大约63%的关键点。 此外,请注意大多数匹配关键点都接近特定的面部特征,例如眼睛,鼻子和嘴巴。 此外,我们可以看到有一些功能不太匹配,但可能因为图像区域中的强度模式相似而被选中。 我们还要指出,在这种情况下,我们使用的金字塔抽取率为1.3,而不是前面示例中使用的值2.0,因为在这种特殊情况下,它会产生更好的结果。
目标检测
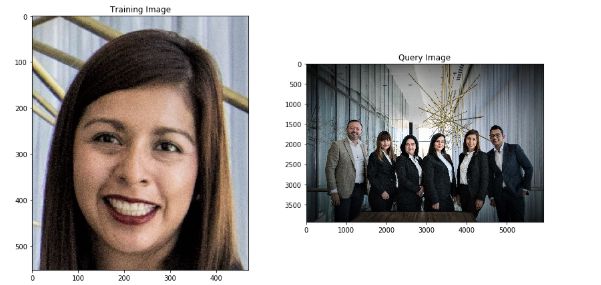
实现ORB算法以在另一图像中检测训练图像中的面部。 像往常一样,我们将首先加载我们的培训和查询图像。
import cv2
import matplotlib.pyplot as plt

# Set the default figure size
plt.rcParams['figure.figsize'] = [14.0, 7.0]

# Load the training image
image1 = cv2.imread('./images/face.jpeg')

# Load the query image
image2 = cv2.imread('./images/Team.jpeg')

# Convert the training image to RGB
training_image = cv2.cvtColor(image1, cv2.COLOR_BGR2RGB)

# Convert the query image to RGB
query_image = cv2.cvtColor(image2, cv2.COLOR_BGR2RGB)

# Display the images
plt.subplot(121)
plt.imshow(training_image)
plt.title('Training Image')
plt.subplot(122)
plt.imshow(query_image)
plt.title('Query Image')
plt.show()
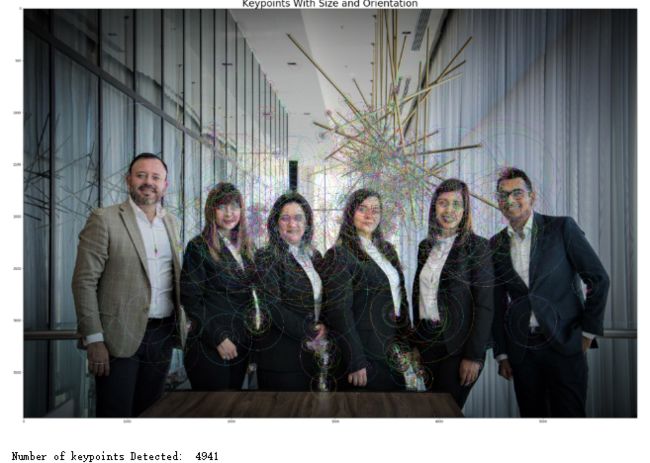
在这种特定情况下,训练图像包含面部,因此,如我们所见,检测到的大多数关键点接近面部特征,例如眼睛,鼻子和嘴巴。 另一方面,我们的查询图像是一组人的图片,其中一个是我们想要检测的女人。 现在让我们检测查询图像的关键点。
# Set the default figure size
plt.rcParams['figure.figsize'] = [34.0, 34.0]

# Convert the training image to gray scale
training_gray = cv2.cvtColor(training_image, cv2.COLOR_BGR2GRAY)

# Convert the query image to gray scale
query_gray = cv2.cvtColor(query_image, cv2.COLOR_BGR2GRAY)

# Set the parameters of the ORB algorithm by specifying the maximum number of keypoints to locate and
# the pyramid decimation ratio
orb = cv2.ORB_create(5000, 2.0)

# Find the keypoints in the gray scale training and query images and compute their ORB descriptor.
# The None parameter is needed to indicate that we are not using a mask in either case.
keypoints_train, descriptors_train = orb.detectAndCompute(training_gray, None)
keypoints_query, descriptors_query = orb.detectAndCompute(query_gray, None)

# Create copies of the query images to draw our keypoints on
query_img_keyp = copy.copy(query_image)

# Draw the keypoints with size and orientation on the copy of the query image
cv2.drawKeypoints(query_image, keypoints_query, query_img_keyp, flags = cv2.DRAW_MATCHES_FLAGS_DRAW_RICH_KEYPOINTS)

# Display the query image with the keypoints with size and orientation
plt.title('Keypoints With Size and Orientation', fontsize = 30)
plt.imshow(query_img_keyp)
plt.show()

# Print the number of keypoints detected
print("\nNumber of keypoints Detected: ", len(keypoints_query))
我们可以看到查询图像在图像的许多部分都有关键点。 现在我们已经获得了训练图像和查询图像的关键点和ORB描述符,我们可以使用Brute-Force匹配器来尝试在查询图像中找到女性的脸部。
# Set the default figure size
plt.rcParams['figure.figsize'] = [34.0, 34.0]

# Create a Brute Force Matcher object. We set crossCheck to True so that the BFMatcher will only return consistent
# pairs. Such technique usually produces best results with minimal number of outliers when there are enough matches.
bf = cv2.BFMatcher(cv2.NORM_HAMMING, crossCheck = True)

# Perform the matching between the ORB descriptors of the training image and the query image
matches = bf.match(descriptors_train, descriptors_query)

# The matches with shorter distance are the ones we want. So, we sort the matches according to distance
matches = sorted(matches, key = lambda x : x.distance)

# Connect the keypoints in the training image with their best matching keypoints in the query image.
# The best matches correspond to the first elements in the sorted matches list, since they are the ones
# with the shorter distance. We draw the first 85 mathces and use flags = 2 to plot the matching keypoints
# without size or orientation.
result = cv2.drawMatches(training_gray, keypoints_train, query_gray, keypoints_query, matches[:85], query_gray, flags = 2)

# we display the image
plt.title('Best Matching Points', fontsize = 30)
plt.imshow(result)
plt.show()

# Print the number of keypoints detected in the training image
print("Number of Keypoints Detected In The Training Image: ", len(keypoints_train))

# Print the number of keypoints detected in the query image
print("Number of Keypoints Detected In The Query Image: ", len(keypoints_query))

# Print total number of matching Keypoints between the training and query images
print("\nNumber of Matching Keypoints Between The Training and Query Images: ", len(matches))
我们可以清楚地看到,即使查询图像中有许多面部和对象,我们的Brute-Force匹配器也能够在查询图像中正确定位女性的面部。
Histogram of Oriented Gradients (HOG)方向梯度直方图
直方图(Histogram)
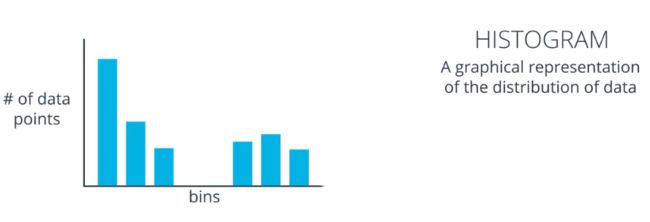
直方图就是数据分布的一种图形表现
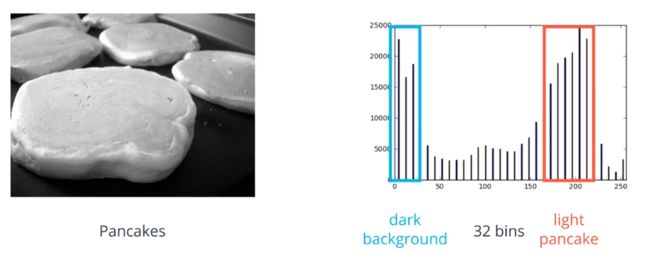
以灰度图像为例:
假设你想绘制出这张薄饼图的强度数据直方图,像素值的范围在 0 到 255 之间,所以我们可以把这些值分成若干组,创建 32 个组 每组包含 8 个像素值 所以第一组范围是 0 到 7、然后 8 到 15 以此类推一直到 248 到 255
方向梯度
方向很简单 指的就是图像梯度的方向或朝向,用 Sobel 算子来计算梯度的幅值和方向
把三个术语结合在一起,HOG 就是指一张有关图像梯度方向的直方图
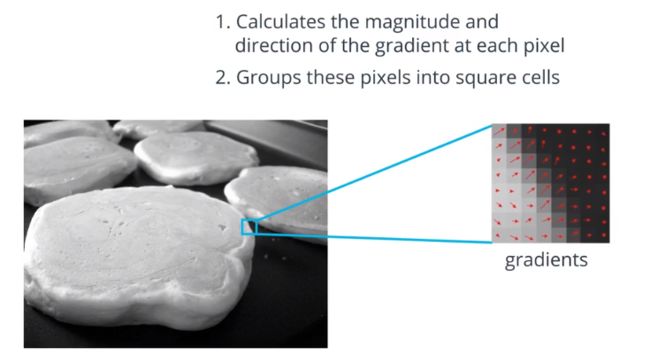
- 首先 HOG 会接受一张图像,然后计算每个像素的梯度幅值和方向
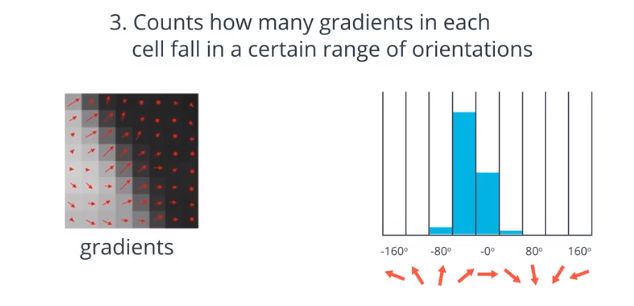
- HOG 实际上会把这些像素分成若干个较大的正方形单元 单元大小通常是 8 乘 8 如果图片小一些 单元也就小一些,如果是 8 乘 8 的单元,那就有 64 个梯度值,HOG 会计算每个单元相同的梯度方向有多少,将这些梯度的幅值相加,得到梯度强度
-
接着 HOG 会把所有方向数据放到直方图里,这个直方图有九组 也就是九个值范围,不过你可以建立更多组来进一步分类数据
